
Faydalı DIY oyuncaqlar. Tullantı materialdan hazırlanmış DIY təhsil oyuncaqları
Corabdan və qalan parçadan orijinal oyuncaqlar yaratmaq asandır. Yastıq oyuncağını necə tikəcəyinizə baxın, pişiyi basıqlayın və inkişaf lövhəsi düzəldin.
Corablardan hazırlanmış orijinal DIY oyuncaqlar

Uşaqlarınıza bu kuklaları hazırlayaraq onları sevindirin. Bunu etmək üçün bir az ehtiyacınız olacaq, yəni:
- corablar;
- iynə ilə iplər;
- yüngül düz iplik qırıntıları;
- doldurucu;
- dar örgü;
- tünd rəngli boncuklar;
- qayçı.
Hətta tikiş maşını istifadə etməyi bilməyənlər belə orijinal oyuncaqlar hazırlaya bilərlər. Yalnız bir iynəyə sahib olmaq faydalı olacaq.
- Çorabın yarısını kəsin. Bir hissəsi ayaqdır. İkincisi, elastik bir band ilə dabandır. Sizə yalnız birinci lazımdır. Doldurucu ilə doldurun, lakin çox sıx deyil. Yanları qeyd etmək üçün sağda və solda bir iynə ilə tikin. Ortada aşağıdan tikiş edərək ayaqları da etmək lazımdır. Körpə kuklasının gövdəsinin doldurulduğu üst çuxuru tikin.
- Yüngül parçadan kiçik bir dairə kəsin, bir ipə yığın, bir az sıxın və doldurucu ilə doldurun. Sonra ipi bərkitmək və düzəltmək lazımdır. Hələ kəsməyin, ancaq ortaya çıxan başı eyni ipdən istifadə edərək bədənə tikin.
- Gözlər yerinə boncuklar tikin. Yanaqlarınızı daha parlaq etmək üçün onlara ənlik çəkə bilərsiniz. Başın bədənlə birləşməsini örgü ilə bağlayın.
- Çorabın ikinci hissəsini götürün, dabanını kəsin, lazım olmayacaq. Yalnız üst hissəyə ehtiyacınız var - elastik bir bantla. Kəsikdən içəri qatlayın və qolların kənarı boyunca tikin. Qapağı kuklanın başına qoyun, sonunda "quyruq" əldə etmək üçün yuxarıdan tikin.

Belə bir sevimli pişik etmək üçün sizə lazım olacaq:
- 2 corab;
- iplər;
- iynə;
- qayçı;
- doldurucu polyester;
- Marker suda daha yaxşı həll olunur.
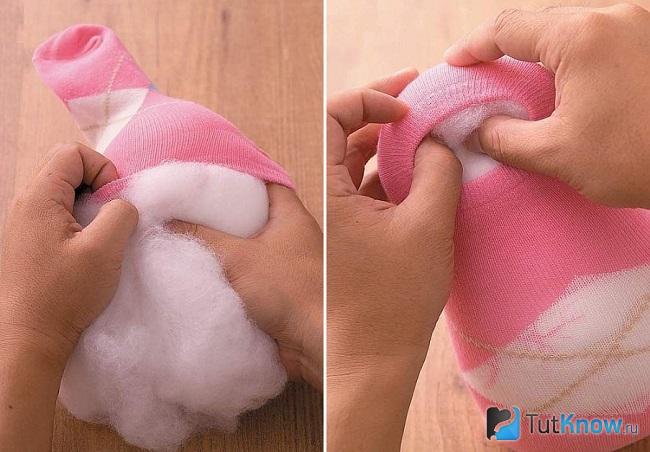
İki qulaq yaratmaq üçün çuxuru düz bir xətt ilə tikin.

Bir markerdən istifadə edərək, orijinal oyuncağın üz xüsusiyyətlərini çəkin.
Marker çox parlaqdırsa və ya suda həll olunmursa, sadə bir qələm istifadə etmək daha yaxşıdır.
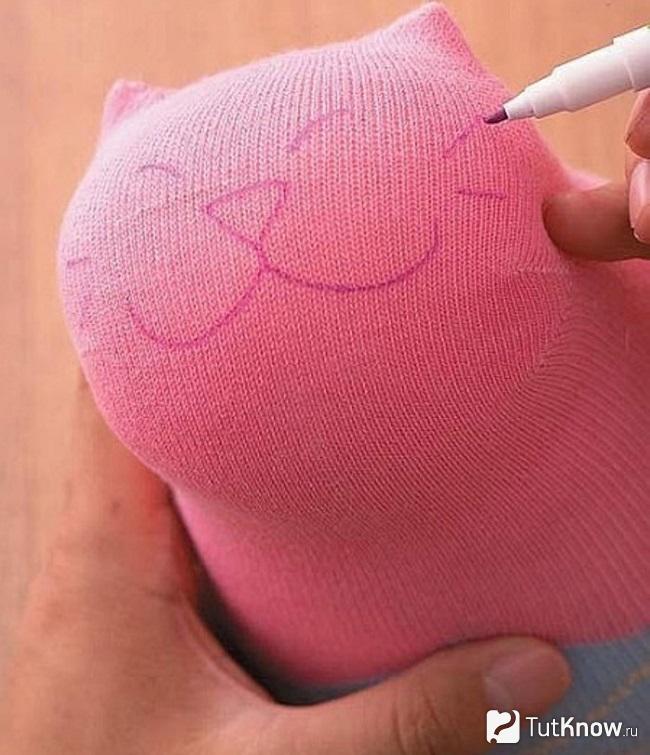
İndi uyğun rəngli bir ip götürərək bu işarələrə görə tikmək lazımdır.

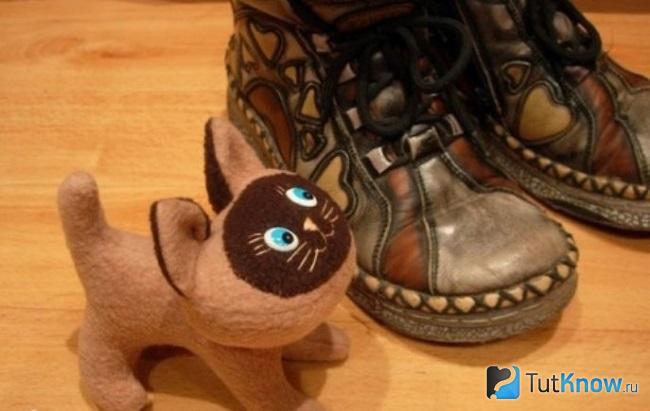
Belə orijinal pişik oyuncaqlarının ön pəncələri əldə etməsi üçün onları ikinci bir corabdan düzəltməlisiniz. Bunu etmək üçün əvvəlcə çarpaz şəkildə yarısını kəsin, sonra fotoşəkildə olduğu kimi.

İndi bu pəncələri tikmək, doldurma polyesteri ilə doldurmaq və oyuncağın gövdəsinə tikmək lazımdır.

Bu çox gözəl heyvandır. Əgər onu sevirsinizsə, onu dost edin.
DIY yumşaq oyuncaq pişik

Bu personaj cizgi filmi personajına çox bənzəyir. Naxış belə yumşaq bir pişik oyuncağının necə edildiyini açıq şəkildə göstərir. Bu tələb edəcək:
- bej və tünd qəhvəyi rəngli yumşaq sıx parça;
- doldurucu;
- iplər;
- oyuncaqlar üçün gözlər.
- Qarının iki hissəsini kəsin və onları mərkəzə tikin. Arxa tərəfə iki yan parça tikmək lazımdır. 2 hissəniz var. Onları pəncələr, quyruq və yanlar sahəsində bir-birinə tikin.
- Müvafiq hissələrdən istifadə edərək, pişik başını yaradın. Tünd parçadan ağzını kəsin və personajın üzünə tikin. Başınızı dibindən doldurucu ilə doldurun. Pişik balasının boynuna qoyun və qollarında gizli tikişlə tikin.
- Hər bir qulaq iki hissədən ibarətdir - qəhvəyi və bej parça. Bu üçbucaqlar cüt-cüt tikilir və hələ tikilməmiş dibindən içəriyə çevrilir. Sonra qulaqları başlarına tikmək lazımdır, onlara bir qat düzəldirlər.
- Yalnız gözlərə tikmək, bığları, kirpikləri, ağız və burnu yüngül saplarla tikmək qalır və öz əllərinizlə yaratmaq çox maraqlı olan yumşaq oyuncaq hazırdır.
Orijinal yastıq oyuncağını necə tikmək olar?
Uşaqlar bu əşyaları çox sevirlər. Əvvəlcə bu yumşaq oyuncaqlarla oynayırlar, sonra yorulanda onları rahat yastıq kimi istifadə edirlər.

Yastıq oyuncağı tikməzdən əvvəl hazırlayın:
- toxunuşa xoş olan parça;
- doldurucu;
- qayçı;
- bəzək üçün çəhrayı parça.
- 2 ədəd. baş üçün;
- 4 - qulaq üçün;
- 2 - bədən üçün;
- 2 - 2 quyruq üçün;
- 2 - qulaq yastığı üçün.
Bədəni və quyruğunu içliklə doldurun. Kuyruğunu işarələrin olduğu bədənə tikin. Başını az miqdarda doldurucu ilə doldurduqdan sonra tikin. Yastığı qulağa sancaqlar ilə yapışdırın, tikin, kənarlarını bükün. İkinci qulağı eyni şəkildə dizayn edin.
Çəhrayı parçadan bir burun, ürək və quyruq üçün bəzəkləri kəsin. Onları da tikin. Çox gözəl məhsul olduğu ortaya çıxdı. Gülməli oyuncaq ayıya bənzəməsi üçün yastıq oyuncağını necə tikəcəyinizi bilmək istəyirsinizsə, başqa bir master-klassa baxın.

Bunun üçün sizə lazım olacaq:
- bej və ağ parça;
- qara dəri parçası;
- doldurucu;
- iplər;
- iynə;
- qayçı.

Gördüyünüz kimi, onlar oval, düz dibdədirlər. Parçaları cüt-cüt tikin. Ayının ön hissəsinə yüngül bir üz və qara burun tikin. Bunu etmək üçün dəridən kiçik bir dairə kəsin, bir ipə yığın və doldurucu ilə doldurun. Üzünüzə oyuncaqlar tikin.

İndi ön və arxa sağ tərəfləri bir-birinə qatlayın, onların arasına tikilmiş nişanları qoyun. Boşluq buraxaraq kənarı boyunca tikin. İş parçasını onun içindən kənara çevirin. Doldurucu ilə doldurun və çuxur tikin.
Qalan parçadan belə orijinal oyuncaqlar hazırlaya bilərsiniz. Bərk rəng varsa, itin və pişiyin ağzını, rənglisi varsa, bədənlərini alacaqsınız.

Aşağıdakı nümunə bayquş şəklində oyuncaq yastığı tikməyə kömək edəcəkdir. Əsas parçadan, rəngli parçadan isə gözəl quş yubkasından yaradılmışdır.

Uşağınızın oyuncağı daha çox bəyənməsini istəyirsinizsə, o zaman kiçik bayquşlar da tikin. Bayquşun qarnına geniş bir parça zolağı tikin və ciblər yaratmaq üçün onu şaquli şəkildə tikin. Onların içinə bayquş qoyun. Onları yaxşı saxlamaq üçün ana quşun qanadları ilə örtün. Onları yuxarı basın.

Pompom oyuncaqlar
Onlar isti və rahat olurlar.
Onları etmək üçün sizə lazım olacaq:
- karton;
- qələm;
- diametri 2,5-7 sm olan dəyirmi şablonlar;
- çox rəngli iplik;
- kəskin qayçı;
- hiss;
- yapışqan tabancası

Qapaqlardan istifadə edərək dairələr çəkin. Daha kiçik diametrli sikkələri mərkəzə qoyun və konturlarını çəkin. Yaranan karton üzükləri kəsin. Hər birinin tərəfində bir kəsik düzəldin.

Eyni ölçülü iki karton parçasını birləşdirin. İpləri ətrafına möhkəm sarın. Kartonu ayırın. Ortada ipi kəsin, ortasına ipi daxil edin, sıxın və bağlayın.

Hər bir heyvan üçün müxtəlif ölçülü iki pompon hazırlamalısınız. Nə qədər kiçik olan baş, böyük olan isə bədənə çevriləcək.

Bu elementləri iplərlə bağlayaraq birləşdirin. Cazibədar bir heyvan üçün qulaqları, gözləri, burnu kəsin, yapışqan tabancası ilə yapışdırın.

Qoyun ağ saplardan, gözləri qara parçadan, burun çəhrayıdan, qulaqlar ağdan kəsilir.

Sarı pomponlardan istifadə edərək bir toyuq yaradın.

Bunlar öz əllərinizlə edə biləcəyiniz orijinal oyuncaqlardır.

Evdə uşaqlarınız varsa, qalan materiallardan onlar üçün faydalı şeylər hazırlayın.
Orijinal DIY təhsil oyuncaqları

Yumşaq kitablar körpə üçün əvəzolunmaz bir şeydir. Bu cür inkişaf vasitələrini öz əllərinizlə etmək maraqlıdır və bununla da çox pula qənaət edirsiniz. Belə təhsil oyuncaqları etmək üçün sizə lazım olacaq:
- tekstil;
- iplər;
- qayçı;
- vərəq doldurucu;
- bitirmə elementləri.
Əgər tikiş maşınınız yoxdursa, uzun tikişlərdən istifadə edərək hər bir vərəqi əl ilə tikin.
Qalan səhifələr üçün də eyni şeyi edin. Hər kəs öz övladına nəsə öyrətməlidir. Bir idman ayaqqabısı tikə və ona krujeva bağlaya bilərsiniz ki, uşaq onu bağlamağa məşq edə bilsin.
Qoy qız saçını necə hörməyi öyrənsin. Bunu etmək üçün səhifənin yuxarı hissəsinə üç lent tikin.
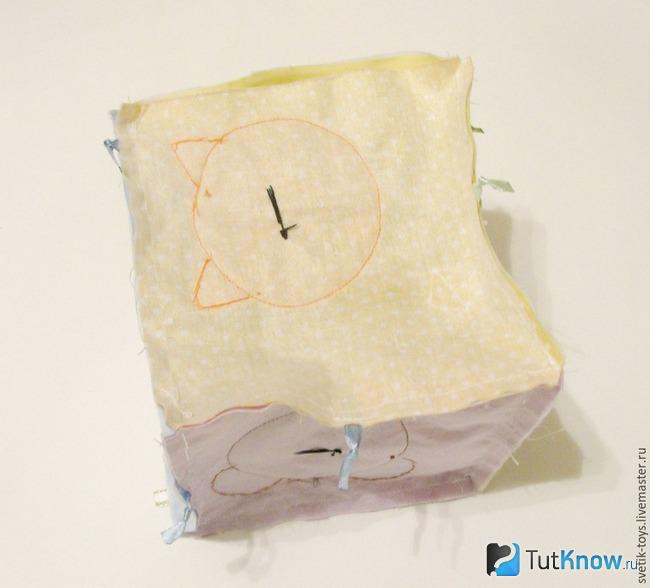
Uşağın saatlarla tanış olması faydalıdır. Yüngül qalın parçadan bir dairə kəsin və ona nömrələr tikin. Qaranlıq kətandan saat əqrəblərini kəsin. Onları siferblatın ortasına bərkidin.
Uşağınızın kiçik yaşlarından həndəsə öyrənməsinə kömək etmək üçün qırıntılardan müxtəlif formalar kəsin və onları kitaba tikin. Eyni cütləri parçadan yaratmaq və onlara yapışdırılmış Velcro lazımdır. Körpə qoşalaşmış rəqəmləri axtaracaq və onları müqayisə edəcək.
Kitabı tikmək lazım deyil, ancaq qalın bir pərdəyə yapışdırın həndəsi fiqurlar, qoy uşaq onlar üçün cüt tapsın.

Karton qutularınız varsa, onlardan oğlan üçün bütöv bir avtomobil kompleksi hazırlamaq üçün istifadə edin, bunlara daxildir:
- yuma;
- yanacaqdoldurma məntəqəsi;
- qaraj;
- qaldırıcı.

Avtomobillər eyni materialdan hazırlana bilər. Onları ağacdan və kontrplakdan düzəldəcəksiniz.

DIY təhsil lövhəsi

Bu oyuncaqla cansıxıcı olmayacaqsınız! Axı, burada o qədər maraqlı şeylər var ki, siz telefonun siferblatını gəzə, kilidləməni və əsl kilidi açmağı öyrənə bilərsiniz. İndi qapı zəncirini və ya mandalı vurmağa ehtiyac yoxdur, çünki hamısı lövhədə olacaq. Abakus övladınıza saymağı öyrənməyə, tərəzi isə cisimləri çəkməyi öyrənməyə kömək edəcək.
Öz əlinizlə belə "ağıllı" orijinal oyuncaqlar etmək üçün sizə lazım olacaq:
- qapı kilidi, kilid, zəncir, tutacaq;
- abak;
- tərəzi;
- keçid;
- düymələr;
- tekstil;
- elastik bantlar;
- keçid;
- yapışqan tabancası;
- rəngli karton;
- özünü vurma vintləri;
- MDF təbəqəsi;
- idman ayaqqabısı və s.
- Hazırlanmış lövhəyə əşyaları düzün. Kilidin yaxşı bağlanması üçün necə yerləşdirilməsinə baxın. Eyni şey kilid və qapı zəncirinə də aiddir.
- Kilidin bir yarısını özünü vurma vintləri ilə bir taxtaya, digərini və qapı sapını ikinciyə vidalayın. Eyni şəkildə, bu lövhələri MDF-yə yapışdırın.
- Abakusu işlək vəziyyətdə saxlamaq üçün onu "oyuncaqlar" ilə çırpmaq olar;
- İsti silah silikon çubuqlarından istifadə edərək tərəzi, açar sahibi və digər əşyaları yapışdırın. Telefonun əsasını kartondan kəsin, lövhəyə yapışdırın və siferblatanı mərkəzə bərkidin.
- Parçadan kiçik bir paltar kəsin, düymələri tikin və içərisinə döngələr şəklində elastik edin. Uşağınıza paltarın düymələrini açmağı və düymələrini açmağı öyrənin.
İnkişaf lövhəsini bəzəmək üçün evdə olan müxtəlif əşyalardan istifadə edə bilərsiniz.
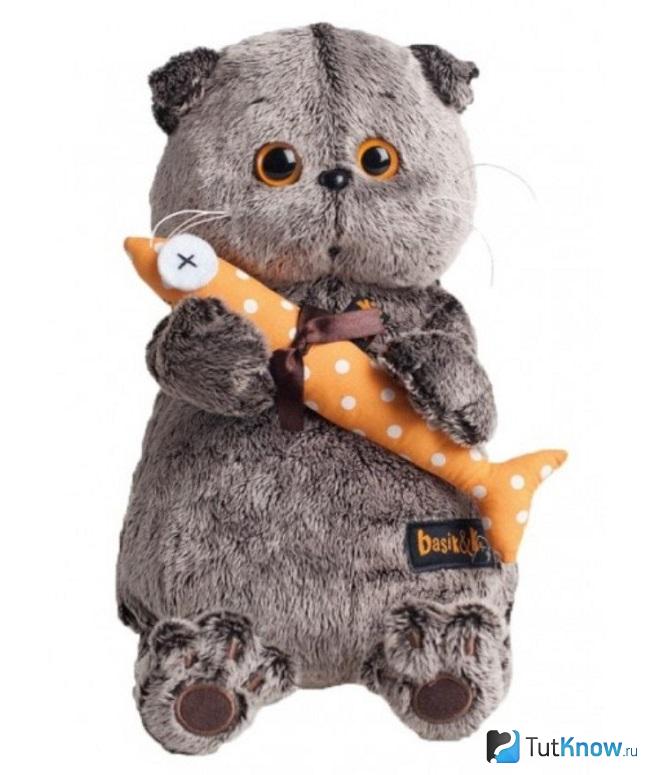
Orijinal oyuncaq - pişik Basik
Bu oyuncaq həm uşaqlar, həm də böyüklər tərəfindən sevilir. Sevimli pişik toxunuşa xoş gələn materialdan hazırlanmışdır.

Tez bir zamanda belə bir orijinal oyuncaq yaratmaq istəyirsinizsə, sadə bir naxışdan istifadə edin.

Arxa və qarın altındakı bir kəsik etmək lazımdır, sonra bu hissələr daha həcmli olacaqdır.
Basik naxışında kəsilmiş yerlər üçbucaqlarla göstərilir. Yalnız hər bir formanın əks tərəflərini uyğunlaşdırmaq və yanlış tərəfə tikmək lazımdır.
- Ağız güzgü şəklində kəsilmiş iki eyni hissədən ibarətdir. Onları mərkəzdə tikişlə bağlamaq lazımdır.
- Hər pəncə üçün 2 ədəd kəsmək lazımdır. Ümumilikdə, arxa ayaqlar üçün 4 hissə və ön ayaqlar üçün eyni sayda lazımdır.
- Cütlənmiş parçaları yanlış tərəfə tikin, üst hissəsini dikilməmiş buraxın. Pəncələri içəriyə çevirin və doldurucu ilə doldurun. Ağzını qarın nahiyəsinə tikin.
- Basik-i daha da necə tikmək olar. Bu orijinal oyuncağı yığmaq üçün ön hissəni arxa hissəyə qoyun, ön və arxa ayaqları onların arasına qoyun, onları yerinə qoyun. Oyuncağı dibində qalan çuxurdan içəriyə çevirin.
- Heyvanı az miqdarda içlik ilə doldurun və qollardakı deşiyi tikin.

Budur pəncələr və ayaq barmaqları. Oyuncağa quyruq tikməyi unutmayın. Nümunə üzərində verilir.

Rəngli parçadan bir balıq tikin və Basik pəncələrinə qoyun.
Siz öz istəyinizlə pişiyi bəzəmək olar; Basik üçün paltar tikmək də çətin deyil.

Bu qış seçimidirsə, qulaqcıqlı və şərfli şapka uyğun gəlir. Birincisini xəz qalıqlarından tikəcəksiniz və iplikdən bir eşarp toxuyacaqsınız.
Burada öz əllərinizlə yarada biləcəyiniz bəzi orijinal oyuncaqlar var. Bəyəndiyinizi seçin və sənətkarlıq etməyə başlayın. Yeni şeylər yaratmaq prosesini sadələşdirmək və ilham üçün fikirlər əldə etmək üçün seçilmiş videolara baxın.
Uşaq üçün ən yaxşı oyuncaq ruhun qoyulduğu oyuncaqdır. Hətta bir mağazada körpənin ürəyini uzun müddət qazanacaq qeyri-adi bir şey tapa bilərsiniz, ancaq öz əlinizlə hazırlanmış bir oyuncaq əsl xəzinədir. Bu unikaldır, başqa heç kimdə olmayacaq.
Bunu özünüz edə bilərsiniz oyuncaq düzəldin-dan təbii materiallar, üçün zərərsizdir uşaqların sağlamlığı. Ən əsası, evdə hazırlanmış oyuncaq uşaqların təxəyyülünü çox inkişaf etdirir!
Bu fikirlər üçündür uşaq əl işləri həssaslığa səbəb olur. Baxın, bəlkə siz də uşağınızı belə gözəlliklə sevindirmək istərdiniz!
Uşaqlar üçün oyuncaqlar necə hazırlanır
- Kiçik bir evdar qadının arzusu
Köhnə çarpayı masasından oyuncaq mətbəx üçün bu qurğu çıxacaq. Nə gözəl rəngdir... - Rahat rəflər
Ədviyyatlı qablar üçün rəflər qalın kartondan hazırlanmış kiçik uşaq kitabları üçün stend kimi istifadə edilə bilər. Onlar artıq mətbəxdə yalan danışmayacaqlar! - Orijinal paltar
Atanın köhnə köynəyindən qızınız üçün şirin bir paltar tikə bilərsiniz. Və ya onun kuklası üçün. - Qələm fincanları
Köhnə telefon kitabçası müxtəlif sənət ləvazimatlarını saxlamaq üçün yaxşı yerdir. - Daxili dekorasiya
Uşaqların rəsmlərini itirməmək və göz qabağında olmaq üçün saxlamaq üçün maraqlı bir yol. - Tic Tac Toe
Hətta böyüklər belə bir oyuncaqdan imtina etməyəcək, dizayn möhtəşəmdir! - Mətbəx
Kiçik bir mətbəx üçün başqa bir seçim - qız sevinəcək. - Çamadan evi
Köhnə bir çamadanda təşkil edə bilərsiniz kukla evi. Əla fikir! - Oyuncaq anbarı
Oyuncaqları uşaq skamyasının altında saxlamaq klassikdir! Plastik qablar çox rahatdır. - Gülməli bib
Köynəkdən hazırlanmış önlük dahidir! - Bir sirri olan qutu
Yataq paltarları üçün çekmeceden bütün oyun dünyası qura bilərsiniz! Hansı ki, çarpayının altına çox rahat oturur. - Mayka bədən kostyumu
Köhnə köynəklər körpə bədən kostyumlarına dəyişdirmək üçün əladır. - Oyuncaqlar üçün səbətlər
Divarlarda belə zənbillər evi dağınıqlıqdan qoruyacaq və uşağı maraqlandıracaq. - hədiyyə corab
Cins şalvardan hazırlanan bu corab, şübhəsiz ki, gözəl hədiyyələr verəcək! - Bir şüşədən donuz
Donuz bankından plastik şüşə heyrətamiz. - Gələcəyin avtomobilləri
Bunlar adi plastik qutulardan hazırlaya biləcəyiniz avtomobillərdir! Əla fikir. - Əyləncəli labirint
Karton qutulardan ibarət labirint qəzəbli əyləncələr üçün bir yerdir. - Alpinist yetişdirmək
Köhnə təkərlərdən hazırlanmış belə bir şən slayd uşaqların xoşbəxtliyi adasına çevriləcəkdir.


Yumşaq kitablar üçün ideyalar axtararkən öz əllərinizlə edə biləcəyiniz bir çox başqa öyrədici oyuncaqlar kəşf etdim. Balacaları üçün oyuncaqlar üçün çox səy, vaxt və sevgi sərf edən valideynlərdən həmişə heyrətlənirəm və ilham alıram, ona görə də həqiqətən bu heyrətamiz şeylərdən seçim etmək istədim. Onların bəziləri incə işlənmiş işləri ilə, bəziləri dahiyanə sadəliyi ilə, bəziləri zəkaları ilə heyran qalır, lakin onların hamısı, şübhəsiz ki, diqqətə layiqdirlər və ümid edirəm ki, siz, əziz oxucularımız üçün faydalı və maraqlı olacaqlar.
1. Trikotaj kublar.
şəkil
2. Kublar - təsvirlərin yaradılması
Bu darıxdırıcı taxta və ya plastik kublardan istifadə etmək üçün əla fikirdir.
şəkil
Budur, oxşar bir fikir, ancaq parça kublar üzərində: 
şəkil
4. Sensor çantalar.
Belə çantalar doldurulur müxtəlif dənli bitkilər, nişasta, un, makaron, dərman qapaqları və ya tikinti hissələri. Bundan əlavə, müxtəlif toxumaların parçalarından istifadə edə bilərsiniz. 
5. Evdəki bütün maraqlı şeylər bir paneldə.
Fikir çox xoşuma gəldi! Mənə elə gəlir ki, belə bir oyuncaq uzun müddət hətta bir yaşlı fidgetləri də ovsunlayacaq. 
şəkil
6. Zaykina Polyana
Belə bir klirinqdə bir bütöv təşkil edə bilərsiniz hekayə oyunu. Dovşanın bağı var, orada yerkökü, meyvə ağacları və çiçəklər becər. Alma və yerkökü yetişən kimi yığılıb çuxura aparılmalı, çiçəklər bolca çiçəklənsin deyə suvarılmalıdır. Bağda balıq olan bir gölməçə də var, onları vaxtında qidalandırmaq lazımdır; 
7. Sehrli pod.
Rəngli noxud ilə fermuar pod - rəngləri öyrənmək. 
şəkil
Budur, toxunma ilə başqa bir versiya. Noxudlar düymələrlə bağlanır. 
8. Şirin paltolar rəngləri öyrənmək və inkişaf etdirmək üçün gözəl motor bacarıqları.
şəkil
9. Ahtapot qapaqları.
şəkil
10. Tərəvəz güveç.
Balacalarla belə gözəl evdə hazırlanmış oyuncaqlar Tərəvəzlərin adlarını öyrənə bilərsiniz. Və sonra onlar uyğun olacaqlar müxtəlif oyunlar məsələn, mağazaya. 
0 yaş və yuxarı uşaqlar üçün öyrədici oyuncaqlar ona dünyanı öyrənməyə və ilk bacarıqlarını əldə etməyə kömək edəcək. Sizin üçün - saplardan, parçadan, kartondan, uşaq sapanlarından oyuncaqların hazırlanması üzrə ustad dərsləri.
0-dan uşaqlar üçün inkişaf kubunu necə tikmək olar?
Körpə dünyaya gələn kimi bu dünyanı kəşf etməyə başlayır. Üç aya qədər baxışları cəmləşir, gördüyü hər şeyi intensiv şəkildə udur. Bu yaşa qədər, onun üçün bir inkişaf kubu tikə bilərsiniz, onunla körpə artıq oturmağı öyrəndikdə daha aktiv oynayacaqdır.
Amma həm də çox gənc yaşda Bu şey körpə üçün çox faydalı olacaq, xüsusən də kubda təsvir olunan obyektlərin adını çəksəniz. Uşaq onları öyrənəcək, hər bir obyektin və heyvanın necə göründüyünü başa düşəcək.
Bu kub yumşaq və toxunuşa xoşdur, buna görə körpə ona zərər verməyəcək.
Ekoloji cəhətdən təmiz materialları götürmək və uşağın onları qoparmaması üçün kubun elementlərini sıx şəkildə tikmək vacibdir.

Belə bir öyrədici oyuncaq etmək üçün sizə lazımdır:
- pambıq parça (siz qırıntılardan istifadə edə bilərsiniz);
- hiss;
- astar;
- yumşaq doldurucu;
- Velcro;
- yoxa çıxan marker;
- sancaqlar;
- gözlər üçün düymələr və ya boncuklar;
- qayçı;
- atlaz lentlər;
- yaşıl yun parçaları;
- diş ipi;
- çınqıl elementləri.
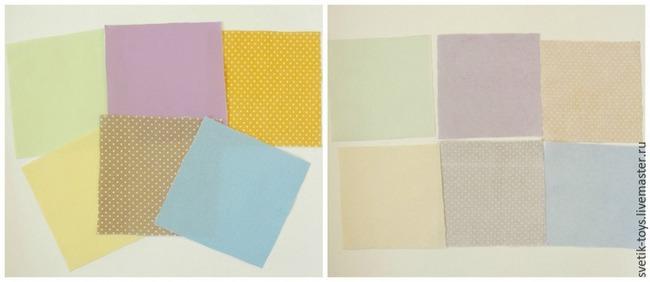
Təqdim olunan naxışlardan istifadə edərək, onları çap edin, sonra keçəyə köçürün və kəsin.

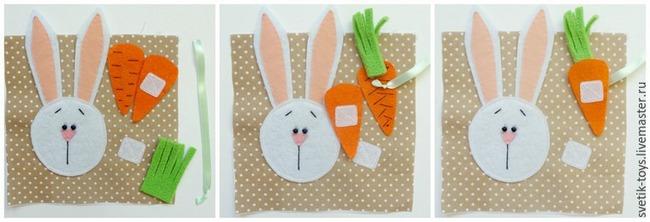
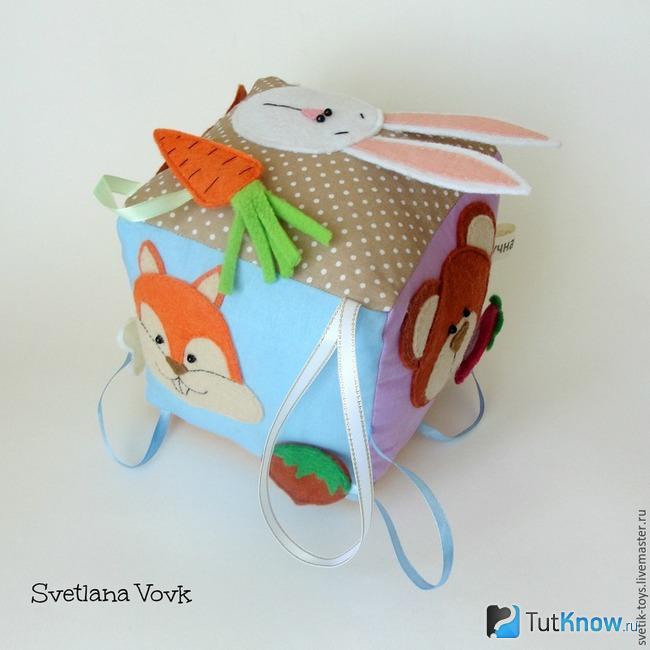
Dovşanın yuvarlaq başı var, şablon onun üzünün işarələrini göstərir. Hər bir qulaq iki hissədən ibarətdir - ağ və daxili çəhrayı. Yerkökü portağal edin və onun zirvələri yaşıl yundan kəsilməlidir. Bunu etmək üçün onu 5,5 ilə 3 sm ölçüdə düzbucaqlıdan kəsmək lazımdır.
Siçanı boz materialdan düzəldin və qulaqların içərisinə ağ yarımdairələr tikin. Pendir sarı keçədən hazırlanır.
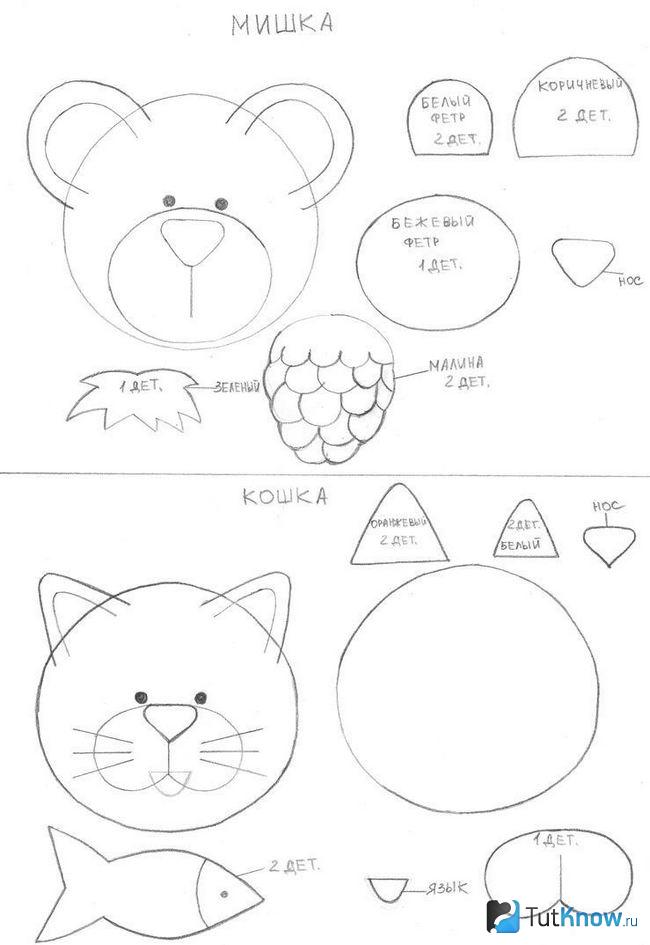
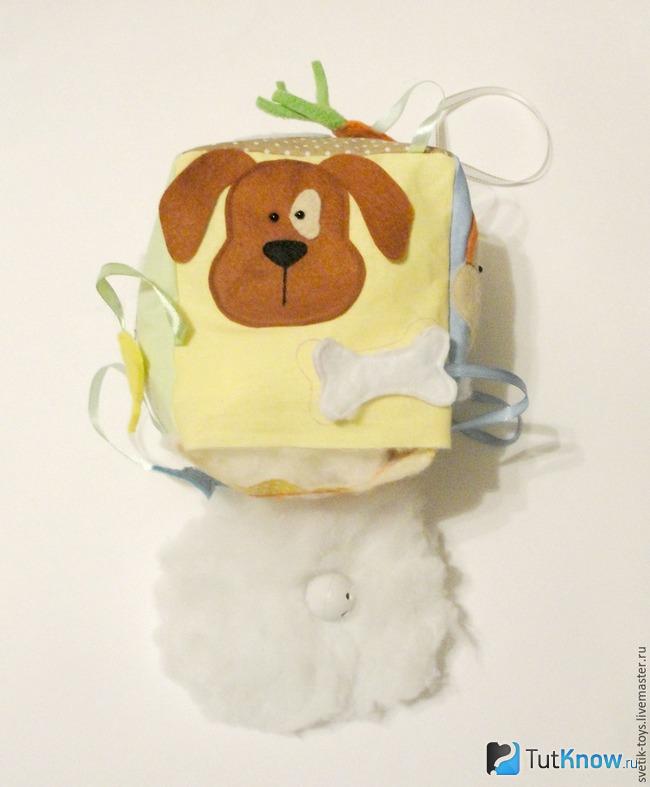
İndi növbəti cütü - ayı və pişiyi kəsməyə başlayın. Naxışlar istifadə edilməli olan rənglərin adlarını verir. Sonrakı it və dələdir.

İtin əlində sümük, sincanın isə fındıq olacaq. Bütün hissələr uyğun rəngli keçədən kəsildikdə, onları tikməyə davam edə bilərsiniz.

Su ilə yuyula bilən markerlə üzün xüsusiyyətlərini çəkin. İndi onları dovşanın üzünə tikdirin. Bu hissələri daha sıx etmək üçün arxa tərəfə yapışqanlı astar qoyun, ütüləyin, yapışmasına icazə verin. Dovşanın burnuna üçbucaq qara keçə qoyun və onu tikin.
İtirilmiş bir markerdən istifadə edərək, kubun bir tərəfinə bir ayının ağzını və qulaqlarını çəkin, əvvəlcə ikiqat qulaqları, sonra isə burun və gözlərin bağlandığı ağzı tikin.
Moruqlar belə yarımdairəvidir. Üzərinə qara sapla tərəzi tikin və üstünə yaşıl quyruq tikin. Moruq ikiqat olacaq, əvvəlcə Velcro-nu arxa tərəfə tikin, sonra Velcro-nu kubun özünə tikin.
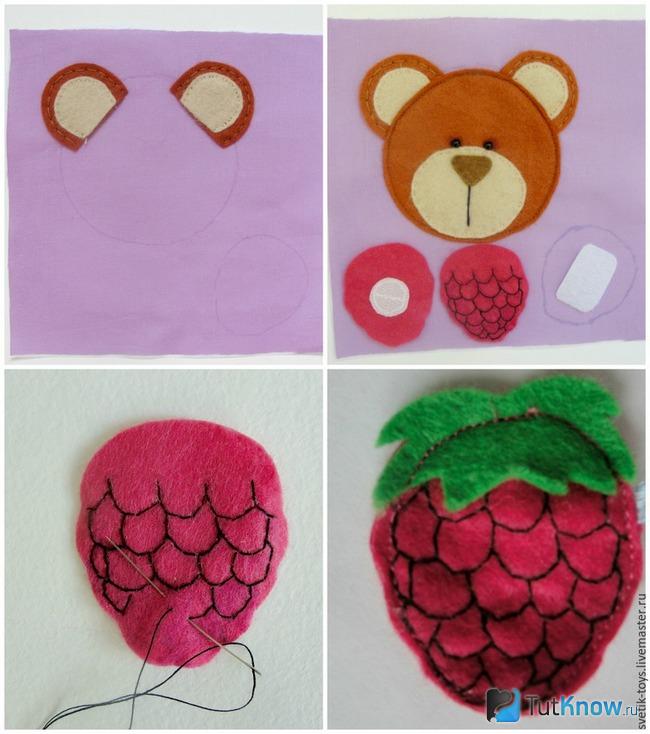
Uşaq moruqları öz yerinə yapışdıra biləcək. Eyni şəkildə o, dovşan üçün yerkökü əlavə edəcək. Ancaq əvvəlcə kökün iki yarısının arasına keçə göyərti və lent qoymaq lazımdır.
Yaşılları etmək üçün yun düzbucaqlının bir tərəfini saçaqlara kəsin.
Bütün personajlar və onlar üçün yemək eyni şəkildə yaradılmışdır. Bu yeməyin nəzərdə tutulduğu heyvanın yanında pendir, yerkökü, moruq, balıq, qoz-fındıq, sümüklər yapışdırılmalıdır. Uşaq heyvanların adlarını öyrənəcək və hər heyvanın nə yediyini biləcək.

İndi bu körpə oyuncağı aşağıdakı kimi yığılmalıdır. Kubun tərəflərini bir-birinə tikin, əvvəlcə dörd tərəfi birləşdirin. Sonra alt və üst hissəni onlara tikin.

Sonradan uşaq üçün daha da maraqlı olması üçün hər bir heyvan üçün yeməkləri yalnız bu xarakterin yanında deyil, həm də başqa bir heyvanın yanında yerləşdirin.

Uşaq bu elmi tez mənimsəyəcək və yeməyi tam olaraq nəzərdə tutulan heyvana "yedirə" biləcək.

İnkişaf kubunun necə yığılacağına baxın.

Bu fotoşəkil dörd tərəfin bir-birinə necə bağlanması lazım olduğunu göstərir, üst və alt isə hələlik boşdur. Bu elementləri bu şəkildə tikirsiniz.
0-dan uşaqlar üçün belə öyrədici oyuncaqlar onlara kubun üzərindəki heyvanların adlarını öyrənməyə və onlar haqqında ilkin biliklər əldə etməyə imkan verəcək. İndi kubu hələ də qalan çuxurdan sintetik tük və ya digər yumşaq doldurucu ilə doldurun. Körpə üçün daha maraqlı etmək üçün burada gülməli səs-küy yaradacaq çınqıl elementləri qoyun.
Bu sərbəst kənarı bərkidin və kor tikişlə yanları bir-birinə tikin.

Budur, 0-dan uşaqlar üçün öz əllərinizlə tikə biləcəyiniz bəzi öyrədici oyuncaqlar.
Bir körpəni ziyarət etməyə dəvət olunarsanız, uşağın valideynlərinə vermək üçün belə bir inkişaf kubunu asanlıqla tikə bilərsiniz.
Hətta bəzi tikiş bacarıqlarınız varsa, o zaman körpəniz üçün başqa əyləncəli və öyrədici şeylər yarada bilərsiniz.
0-dan uşaqlar üçün öyrədici oyuncaqlar - öz əllərinizlə yumşaq çələnglər
Uşağınızın ətrafındakı dünyanı tanımasına kömək edin. Onun üçün belə yumşaq bir çələng yaradın.

Bunu etmək üçün sizə lazım olacaq:
- parça parçaları;
- atlaz lentlər;
- güclü ip;
- böyük düymələr;
- muncuq.
0-dan uşaqlar üçün bu oyuncaqları tikmək üçün sizə lazım deyil tikiş maşını. Cütlənmiş hissələri birləşdirin və kənarından bir tikişlə tikin.
Kırılmayan kifayət qədər sıx və yumşaq bir parça götürün, məsələn, keçə və ya yun.
Hər bir elementin altında kiçik bir boşluq buraxın ki, oyuncaqları bu deliklərdən içliklə doldura və sonra onları burada tikə bilərsiniz. Və buludun altındakı üç çuxur buraxın, hər birində yarıya qatlanmış bir lent qoyursunuz və hər birinin ortasında bir düymə olacaq.
Sonra uşağa yağış yağdığını və düymələrin böyük damcı olduğunu söyləmək lazımdır. Ay lentlə, iki gözü və quyruğu olan fil, şüaları üzərində qotazlı ulduz bəzədilib.
Hər bir elementin üstünə bir döngə tikin, onları çarpayının üstündə və ya körpə arabasının üstündə yerləşdirilməli olan bir ipə bağlayın.
Bir uşaq üçün yalnız inkişaf edən bir kub deyil, həm də bir top edə bilərsiniz. Yaşına görə körpəyə təqdim edilə bilən heyvanlar, günəş və digər əşyalar da burada tikiləcək. Müxtəlif rəngli ləçəkləri olan bir çiçək toxuya bilərsiniz. Uşağınızı tədricən hər rəngin adı ilə tanış edin. Həmçinin təhsil xalçası da olacaq əla hədiyyə və gənc valideynlərə yardım.

Bu cür təhsil oyuncaqlarını öz əllərinizlə yaratmaq və onların alınmasına çox pul xərcləməmək olduqca mümkündür.
Uşağınızın gözəl motor bacarıqlarını inkişaf etdirməsi üçün mövcud materiallardan istifadə edərək onun üçün əyləncə təşkil edəcəksiniz. Aşağıdakılar üçün sizə lazım olacaq:
- rəngli karton;
- qələm;
- krujeva;
- qayçı;
- awl.
Kiçik delikləriniz varsa, bir deşik istifadə edərək onları böyüdün.
İndi uşaq kirpinin göbələkləri və tikanları üzərindəki deşikləri uyğunlaşdıracaq və bir kordondan istifadə edərək heyvanın kuboklarını kürəyinə yapışdıracaq.

Körpənin bir yaşına qədər dişləri çıxır, ona görə də bu dövrdə uşaqlar diş ətlərini müxtəlif əşyalara qaşımağa üstünlük verirlər. Babywearing boncuklar gənc valideynlərə kömək etmək üçün satılır, ancaq onları özünüz və hurda materiallardan edə bilərsiniz.
0-dan uşaqlar üçün öz əllərinizlə körpə sapan boncuklarını necə etmək olar?
Onları etmək üçün götürün:
- pambıq sapları;
- uyğun ölçülü çəngəl;
- muncuq;
- plastik top - kiçik bir oyuncaq üçün konteyner.

Sonra, eyni şəkildə, boncuk və kiçik bir iplik ipini gizlətməlisiniz.

İndi müxtəlif ölçülü bu muncuqları çox yerə taxmalısınız güclü ip və ya ip. Bunu etmək üçün, bir büzməli plastik qabda iki əks deşik etmək lazımdır. Çərçivəni toxuyarkən, 8 döngə ilə başlayın ki, boşluqlar qalsın. Mərkəzdə böyük muncuqları qoyun və daha kiçikləri olduğu kimi qala bilər - taxta.

Toxumağı bilmirsinizsə və ya toxunmaq istəmirsinizsə, o zaman ağacdan fərdi muncuqlar ala və onlardan nibbler muncuqları düzəldə bilərsiniz. 0-dan uşaqlar üçün belə oyuncaqlar, xüsusilə diş çıxararkən onlar üçün çox faydalı olacaq. Ancaq bir sıra təhlükəsizlik tədbirlərinə əməl edin:
- Muncuqlar boya və ya lak ilə örtülməməlidir, çünki uşaq onları ağzına qoyacaq və bu təhlükəli maddələr onun bədəninə daxil ola bilər.
- Çox sıx və möhkəm ipdən istifadə edin ki, qırılmasın.
- Böyük muncuqları götürün ki, uşaq onları udmasın.
Körpələr üçün öyrədici toxunma oyuncaqları

Bir corab itərsə və ya uşaq üçün çox kiçik olarsa, belə gözəl bir tırtıl düzəldin. Alın:
- corab;
- doldurucu;
- gözlər üçün düymələr;
- ip və iynə;
- ip və ya lent.
Doldurucu kimi noxud, qarabaşaq yarması, düyü, lobya, palamut və ya digər oxşar materiallardan istifadə edə bilərsiniz.
Tırtıl bir neçə seqmentdən ibarətdir. Birincisini etmək üçün seçilmiş doldurucunu ayaq barmağına tökün və bu hissəni ip və ya lentlə bağlayın. Eyni şəkildə, həşəratın bütün digər seqmentlərini yaratmalısınız. Heyvanlar üçün düymələr və ya hazır gözlər tikin.

Həm də göz düzəldərək, uşağınızı corabın üzərinə yapışdıraraq əyləndirə bilərsiniz. Birbaşa əlinizə qoyacağınız belə bir kukla istehsalının süjetini və qəhrəmanını izləmək uşağınız üçün maraqlı olacaq.
Digər toxunma oyuncaqları da toxunma üçün xoşdur və körpənin inkişafına kömək edəcəkdir. Bu, bir parça parçadan yaradacağınız ilandır. Bu xarakterin gözləri və bəzəyi olacaq saç və düymələr kimi ona iplər əlavə edin.

Bir uşaq diş çıxararkən, o, yalnız körpə sapand muncuqlarına deyil, həm də yumşaq üzüklərə ehtiyac duyacaq. Onları metal və ya plastik üzükləri iplə bükərək edə bilərsiniz. İplik götürmək daha yaxşıdır ağ, rənglənməmiş. Boşluğa bir yun üzük tikə və kənarlarını zolaqlara kəsə bilərsiniz ki, uşağın başqa bir oyuncağı olsun.

Bu yaşda olan uşaq müxtəlif əşyalar atmaq və onların necə düşdüyünü və bu zaman onlara nə baş verdiyini izləməkdə maraqlıdır. Əlbəttə ki, ona kövrək və ya ağır bir şey verə bilməzsiniz, buna görə də bu yastıqları tikin.

Hər biri üçün parçanı yarıya qatmaq, demək olar ki, bütün kənarları tikmək və içəriyə doldurmaq lazımdır. Sonra qalan tərəfləri bağlamaq lazımdır. Çocuğunuzun tədricən saymağı öyrənməsi üçün yastıqların üzərinə cizgi filmi personajlarını və ya rəqəmlərini tikə bilərsiniz.
Bu cür toxunma oyuncaqlarına yalnız əllərinizlə deyil, həm də uşaq çarpayısının kənarlarını tutaraq dayanmağı öyrənəndə ayaqlarınızla da toxuna bilərsiniz.
Balonlardan hazırlanmış duyğu çantaları da körpələr üçün çox əyləncəlidir. Onları duz və ya unla doldurmaq lazımdır ki, uşaq belə əşyalara toxunmaqdan həzz alsın.
Ancaq burada riayət edilməli olan təhlükəsizlik tədbirləri və diqqət etməli olduğunuz şeylər bunlardır:
- Topları makaron və ya kəskin kənarları olmayan digər oxşar əşyalarla doldurun.
- Alın şarlar uşaq onları dişləməməsi və daha uzun sürməsi üçün yalnız qalın rezinlə.
- Burada yalnız kiçik taxıl deyil, həm də bir neçə lobya əlavə edə bilərsiniz. Uşaq onlara toxunmaqdan həzz alacaq.
- Qırıntılardan hazırlanmış bir top körpənizin iməkləmə ustasına kömək edəcəkdir. Bunu necə edəcəyinizi göstərən təlimata baxın.
0-dan uşaqlar üçün topu necə tikmək olar?
Bu necə gözəl çıxacaq.

Bu tip top Amish adlanır. Bu ad qeyri-adi kəndlər yaradan və atalarının yaşadığı kimi burada yaşamağa qərar verən bəzi xristianların adı ilə verilir. Amish qadınları əla kanalizasiyadırlar; yamaqlı yorğanlar. Qalan parçalardan müxtəlif oyuncaqlar, o cümlədən uşaqlar üçün toplar tikirlər.
0-dan uşaqlar üçün bu cür təhsil oyuncaqları bir çox fayda gətirir, xüsusən də aşağıdakı şeylər:
- Körpənin incə motor bacarıqlarını inkişaf etdirmək; Körpəyə parlaq bir obyektə çatmağa çalışarkən, sürünməyi öyrədirlər.
- Onun diqqətini inkişaf etdirməyə kömək edirlər. Axı, topu yaxınlıqda gizlədə bilərsiniz ki, uşaq onu gözləri ilə axtararaq görmə qabiliyyətini məşq edə bilsin.
- Onlar topun elementləri kimi eşitmə və diqqəti inkişaf etdirirlər və uşaq bu səsləri izləyəcək.

Gördüyünüz kimi, kiçikdən böyüyə qədər üç növ elementi kəsməlisiniz. Bu nümunədə olduğu kimi onları bir neçə və ya iki rəngli qırıntılardan kəsin. İçəridə yerləşəcək 24 ləçək var, eyni rəngdədir. Daha 12 nəfər isə kənardadır.
İki ləçək götürün, 1 və 2-ni yarıya qatlayın və onların qatlarını uyğunlaşdırın. Bu iki parçanı üçüncünün üstünə qoyun.

Bu elementləri bir-birinə yapışdırın, ancaq kiçik bir boşluq buraxın ki, bu yeməyi yumşaq doldurma ilə doldurasınız.

Bu parçalardan 12 ədəd tikin, içliklə doldurun və hər yastığın içinə kiçik bir zəng qoyun. Sonra delikləri tikmək lazımdır.

Sonra, 0-dan uşaqlar üçün belə bir oyuncaq üçün bu elementləri yığmağa başlamalısınız. Bu halda, blankların ön tərəfi kənarda olmalıdır. Əvvəlcə üç parça götürün və bir-birinə tikin.

İndi bu simitləri top halına salın. Üç belə boşluq götürün və üstlərini birləşdirərək bir-birinə tikin. İndi yalnız dördüncü parça üzərində tikmək qalır. Bu işin texnologiyası aşağıdakı fotoşəkildə göstərilmişdir.

Budur, körpənizə bir inkişaf topu verə bilərsiniz ki, onunla ürəyindən doysun.
Qalan parça və sapdan körpələr üçün çox gözəl oyuncaqlar yaratmaq üçün də istifadə edilə bilər. Növbəti master-klass və addım-addım fotoşəkillər bunu öyrədəcək.
0-dan uşaqlar üçün ipdən və parçadan öyrədici oyuncaqlar

Bu ahtapotu etmək üçün bir parça yun götürün və künclərini kəsin ki, belə bir xaç əldə edin.

Bu iş parçasının kənarlarını saçaqla kəsin, indi bütün kvadratı doldurucu ilə doldurun və kənarları birləşdirin. Onları sadəcə iplə möhkəm bağlamaq lazımdır. İndi doğranmış elementlərdən örgülər toxuyun və onları iplə bağlayın. O, ahtapotlar üçün gülümsəyən ağızları tikmək və gözə çevriləcək düymələri möhkəm tikməkdir.
Müxtəlif motanka kuklaları da 0-dan uşaqlar üçün əla öyrədici oyuncaqlar olacaq. Və burada artıq ipdən necə istifadə edə bilərsiniz.

Bu növ at düzəltmək üçün sizə lazım olacaq:
- sıx iplər;
- parlaq iplər;
- düzbucaqlı karton vərəq;
- qayçı.

Onları sağa və sola kəsin və eyni iplə yuxarıdan bağlayın.

Üst hissəsini aşağı çəkin və kiçik bir hissəni bağlayın ki, yuxarıda bu dəyirmi parça olsun.

Atın qulaqlarını düzəltmək üçün orta və üzük barmaqlarınıza ipləri sarın və onları mərkəzə bağlayın.

İpləri yarıya bölün, bir tərəfi qaldırın və qulaqları orada qoyun.

Atın yalını düzəltmək üçün ipləri kartona sarın.

Onları bir tərəfdən və digər tərəfdən kəsin, sonra bu parçanı atın boynuna sarın və parlaq bir iplə bağlayın.

İndi at üçün ayaqları düzəltməlisiniz. Bunu etmək üçün əsas iş parçasının iplərini yarıya bölün və demək olar ki, dibinə qədər iplərlə sarın. Sonra təhlükəsiz.

İpləri yenidən karton vərəqinə sarın, ancaq yalnız bir tərəfdən kəsin. Bunlar ön ayaqları olacaq. Buna görə artıqlığı kəsin və iplə geri sarın. Onları bu şəkildə almalısınız.

Atın özündə qalan ipi yarıya bölün və ayaqları buraya daxil edin. Və ipin özündən bir quyruq meydana gətirin.
Ayaqların altını qırmızı iplə sarın, onu təmin etmək üçün quyruğa bir düyün bağlayın.

Bu çox gözəl atdır. Əgər siz 0-dan uşaqlar üçün başqa hansı öyrədici oyuncaqlar yarada biləcəyinizi görmək istəyirsinizsə, o zaman bunu indi edə bilərsiniz.
Normalda zibil qutusuna atılacaq lazımsız materiallardan belə istifadə edə biləcəyinizi görəcəksiniz.
Bir video blogger sizinlə bir yaşa qədər uşağı necə məşğul etməli və nəyin sirlərini paylaşacaq.
Müasir valideynlər uşağının inkişafı ilə sanki həyatının ilk günlərindən məşğul olmağa başlayırlar. Pediatrlar və psixoloqlar incə motor bacarıqlarına xüsusi diqqət yetirməyi məsləhət görürlər, çünki onlar nitqin formalaşması ilə birbaşa bağlıdır. Oyuncaq istehsalçıları bu ideyanı çoxdan mənimsəmiş və çoxsaylı öyrədici oyuncaqlar istehsal edərək onu həyata keçirmişlər. Ancaq onların çoxu öz əllərinizlə edilə bilər.
Niyə gözəl motor bacarıqlarını inkişaf etdirməlisiniz
Bir çox insanlar uşaqlarda incə motor bacarıqlarının inkişaf etdirilməsinin vacibliyini bilirlər erkən yaş. Ancaq hər kəs bunun nə üçün lazım olduğunu və bu cür fəaliyyətlərin nə olduğunu başa düşmür.
İncə motor bacarıqları əllər və barmaqlarla dəqiq hərəkətlər etmək bacarığıdır. Sinir, əzələ, skelet və görmə sistemlərinin işi ilə əlaqələndirilir. Onun inkişafı uşağın həyatının ilk aylarında öz barmaqlarına və əllərinə baxmaqdan başlayır. Sonra körpə tədricən oyuncaqları götürərək onları mənimsəməyi öyrənir. Motor bacarıqları əl çevikliyinə, şagirdin gələcək əl yazısının formalaşmasına və reaksiya sürətinə müsbət təsir göstərir.
Müəyyən edilmişdir ki, uşağın nitqinin inkişaf səviyyəsi birbaşa barmaq hərəkətlərinin formalaşma dərəcəsindən asılıdır. İnsan beynində nitq və motor bacarıqlarına cavabdeh olan mərkəzlər yaxınlıqda yerləşir. Beləliklə, bir sahə stimullaşdırıldıqda, digəri də aktivləşir.
Uşaqlarda incə motor bacarıqlarını inkişaf etdirmək üçün DIY oyuncaqlar
Uşaq mağazalarının rəflərində maarifləndirici vəsaitlərin geniş çeşidi təklif olunur. Heç kimə sirr deyil ki, onların dəyəri olduqca yüksəkdir. Maraqlanan analar üçün öz incə motorlu oyuncaqlarınızı düzəltmək heç də asan deyil. Əsas odur ki, unikallıq qalacaq - axırda onlar böyük incəliklə hazırlanacaqlar.
Sensor çantalar
Öz əlinizlə sensor çanta tikmək heç də çətin deyil. Aşağıdakı kimi istifadə edilə bilən müxtəlif rəngli və toxumalı qalın parça və doldurucuya ehtiyacınız olacaq:
- makaron (spirallar, qabıqlar, yaylar, borular);
- dənli bitkilər (darı, qarabaşaq yarması, inci arpa, düyü, yulaf);
- un və nişasta;
- paxlalılar (lobya, noxud, soya, lobya, qarğıdalı);
- şirniyyatlar;
- qoz-fındıq;
- təbii materiallar (acorns, şabalıd, qabıqlar, çınqıllar);
- müxtəlif formalı silgilər;
- pambıq yun və ya padding polyester;
- düymələr və boncuklar.
Təhlükəsizlik qaydaları
Təbii materiallardan istifadə etməzdən əvvəl yaxşıca yuyulmalı və qurudulmalıdır, oyuncaqlar qida məhsulları Quru yerdə saxlamağınızdan əmin olun - makaron və dənli bitkilər nəmdən qorxur. Çantalar elə tikilməli və ya bağlanmalıdır ki, körpə heç bir halda içindəkiləri ala bilməsin.
Video: öz əlinizlə sensor yastıqları necə etmək olar
Foto qalereya: evdə hazırlanmış sensor çantalar
Bu çantaları tikiş maşını olmadan belə özünüz etmək asandır.  Doldurma yalnız parçaya yerləşdirilə bilməz: sıx şarlar Toxunma qavrayışını təkcə doldurucunun köməyi ilə deyil, həm də müxtəlif teksturalı parçalardan istifadə etməklə inkişaf etdirmək olar.
  Çantalar müxtəlif rənglərdə və ölçülərdə ola bilər
Küpə toxunun
Bu oyuncaq bir kubdur, onun tərəflərində müxtəlif formalı və çalarlı üçölçülü obyektlər və ya müxtəlif materiallardan hazırlanmış tətbiqlər var.
İncə motor bacarıqlarını inkişaf etdirmək üçün bir kub necə etmək olar
Öz əlinizlə bir sensor kub etmək üçün sizə lazım olacaq:
- müxtəlif toxumaların və rənglərin kiçik parçaları;
- doldurucu kimi sintetik qışlayıcı və ya köpük kauçuk;
- astar;
- dekorativ elementlər (düymələr, lentlər, iplər, üzüklər, parça qalıqları, ütülü stikerlər);
- iplər;
- dəmir;
- tikiş maşını.
Parça qırıntılarından (pambıq, ipək, məxmər və başqaları ola bilər) eyni ölçülü kənarları olan 6 kvadrat kəsmək lazımdır.
Parçadan 1-1,5 sm kiçik bir tərəfi olan toxunmamış parçadan kvadratlar kəsməlisiniz. Toxunmamış blanklar parça olanlara qoyulur və ütülənir - hər iki hissə bir-birinə yapışacaq, sərt bir quruluş alacaq və formasını yaxşı saxlayacaqdır.
Hər bir kvadrat bir ideyaya uyğun olaraq hazırlanmışdır: bunlar heyvanların və quşların heykəlcikləri, xəzdən və ya keçədən hazırlanmış həndəsi formalar, termal stikerlər, düymələr, sıxaclar və daha çox ola bilər.
Dizayn başa çatdıqda, bir zolaqda 4 kvadrat tikmək lazımdır.
Qalan iki boşluq yuxarı və aşağı kvadratlardan birinə tikilir.
Dikişlər toxunmamış kənarların konturu boyunca hazırlanır və sonra sabitlənir. Sonra, inkişaf bir kub yaratmaq üçün birlikdə tikilir.
Küncdəki son kənarda kiçik bir çuxur buraxmalı və kubu diqqətlə çevirməlisiniz. Oyuncaq köpük kauçuk və ya padding polyester ilə doldurulur və gizli tikişlə tikilir. Doldurucu ilə birlikdə kubun içinə xışıltılı kağız və ya zəng də yerləşdirə bilərsiniz.
Video: öz əlinizlə inkişaf edən bir kub necə etmək olar
Toxunma yastıq
Sensor (toxunma) yastıqlar 2-3 aydan 3 yaşa qədər olan körpələr üçün uyğundur. Hamısı onun üzərində yerləşdirilən elementlər dəstindən asılıdır. Kiçik bir miqdar kiçik olanlar üçün uyğundur sadə materiallar. Uşağa belə bir oyuncaq verməzdən əvvəl, bütün elementlərin möhkəm bağlandığından əmin olmalısınız: əgər körpə onlardan birini ağzına çəkirsə, o, çıxmamalıdır.
1 yaşından uşaqlar üçün daha müxtəlif və mürəkkəb tədris əşyalarını seçib tikə bilərsiniz: fermuarlar, düymələr, bağlayıcılar, Velcro, yaylar və bağlana və çəkilə bilən iplər. Hazır yastıqdan istifadə edərək və onun üçün dekorativ elementləri olan yastıq örtüyü tikərək belə bir oyuncaq edə bilərsiniz.
Fotoqalereya: müxtəlif formalı sensor yastıqlar
 Bu yastıq 2-3 aylıq körpələr üçün uyğundur. Kvadratların hər birindəki şəkil üçün müxtəlif teksturalı bir parça istifadə edə bilərsiniz
  Bu yastıq 1 yaşdan uşaqlar üçün uyğundur. Daha mürəkkəb elementləri təqdim edir: düymələr, lentlər, yaylar, Velcro, qapaq
  Bu tısbağanın bir neçə tərəfi var, onların hər birində müxtəlif inkişaf elementləri var: karabiner, bağlama, düymələr. İki yaşından uşaqlar üçün uyğundur
İncə motor bacarıqlarını inkişaf etdirmək üçün DIY yastıq
Evdə belə bir yastıq tikə bilərsiniz.
Bunu etmək üçün sizə lazım olacaq:
- parça - yaşıl (53x30 sm) və mavi (83x20 sm);
- toxunmamış parça (53×50 sm);
- arxa tərəf üçün parça (50×55 sm);
- müxtəlif rəngli hisslər və uyğun iplər;
- fermuar uzunluğu 50 sm;
- Velcro, düymələr, örgü, lentlər, elastik şapka;
- Whatman kağızı, qələm;
- qayçı;
- tikiş üçün iplər, iynələr və sancaqlar;
- yastıq 45x50 sm.
Dikişə başlamazdan əvvəl gələcək yastığın eskizini çəkməlisiniz həyat ölçüsü. Bunun üçün trafaretlərdən istifadə edə bilərsiniz.
Tekstil mavi rəng iki zolağa kəsin (birincisi - cib üçün 30x20 sm, ikincisi - baza üçün 53x20 sm). Baza üçün hazırlanmış yaşıl parça və mavi qapaq toxunmamış parça ilə ölçüdə təkrarlanır. Cib üçün kəsik yarıya qatlanmışdır.
Günəş sarı keçə və lentlərdən hazırlanır: diametri 10 sm olan dairə və hər biri 10 sm uzunluğunda 7-8 zolaq.
Cib üçün hazırlanmış mavi parçaya yarıya qatlanmış lent şüaları olan keçə günəş sancılır.
Parçalar birlikdə tikilir tikiş maşını və ya kiçik, səliqəli tikişlərlə əl ilə.
Əsas hissənin elementləri (mavi və yaşıl) və cib bir-birinə bağlıdır.
Yaşıl parçanın əsası aşağıda, göy rəngli parçanın əsası isə yuxarıda yerləşir. Yuxarı sol küncdə günəşli cib yerləşdirilib
Sonra əsas və toxunmamış altlıq bir-birinə bərkidilir və sonra bir-birinə tikilir.
Çəkilmiş eskizdən elementlər keçədən kəsilir.
“Keçə dalğaları” bir-biri ilə əlaqə saxlayır. Hər bir balıq üçün iki hissəyə ehtiyacınız var (bacarsınız müxtəlif rənglər) və 10-15 sm uzunluğunda bir elastik bant
Uçlarında düyünlər bağlanmış elastik bantlar balıq elementləri arasında yerləşdirilir və bir-birinə tikilir. Dalğalar bazaya qoyulur (dikişlər üçün kənarlardan 1-1,5 sm məsafədə).
Çox rəngli balıqlar dalğalar arasında yerləşdirilir və sabitlənir. Çay elementləri əvvəlcə aşağıya, sonra bütün perimetr boyunca tikilir.
Növbəti element ağacdır. Onların hər biri üçün iki tac blankı, bir gövdə və bir neçə alma və ya armud lazımdır. Parçalar bir-birinə tikilir, meyvə iki tac arasında yerləşir və gövdə yuxarıda qalır.
Dəmir yolu üçün blank boz keçədən hazırlanır. Onun ölçüsü 53x5 sm-dir.
Dəmir yolu artıq çayı və ağacları olan yaşıllıqda yerləşir.
Buxar lokomotivi və qoşqu hazırlamaq üçün hər birinə iki element də lazımdır. Ön hissələr müxtəlif rəngli keçədən (təkərlər, pəncərələr, borular) bəzədilmişdir. Parçalar yuxarıdan tikilir. Qatarın arxa kənarına kiçik bir düymə, qoşquya isə kiçik bir lent ilgəsi yapışdırılır. Dikilməmiş kənardan 50 sm uzunluğunda lent keçir, uclarında düyünlər bağlanır. Quruluş dəmir yolu üzərində yerləşir və sabitdir.
Buludlar mavi keçədən hazırlanır - həmçinin hər biri iki elementdən ibarətdir. Onların vasitəsilə, bir qatar vasitəsilə olduğu kimi, ucları bazanın mavi hissəsinə tikilən bir örgü keçir.
Müxtəlif rəngli keçədən çiçəklər kəsilir, ortası üçün Velcro istifadə olunur və çayın yanında yaşıl boşluğa qoyulur. Dikiş Velcro-nun kənarı boyunca hazırlanır və ləçəklər sərbəst qalır.
Balıq nümunəsi ilə kəpənək və arı hazırlanır. Həşəratların çiçəklərə enə bilməsi üçün hər bir fiqurun arxasına Velcro tikilir.
Yastıq örtüyünün arxası üçün seçilmiş parça parçasının ortasına bir qıfıl tikilir.
Yastıq qabığının ön və arxa hissələri sağ tərəfləri içəriyə doğru bükülür və perimetri ətrafında tikilir, tikiş yerləri qalır (hər tərəfdən 1-1,5 sm).
İstəyirsinizsə, qatara minəcək heyvanların heykəlciklərini düzəldə bilərsiniz. Onlara markerlə üzlər çəkə bilərsiniz.
Yastıq üzü hazırdır. Körpə onunla oynaya, heyvanları vaqona yerləşdirə, relslər boyunca qatarı yuvarlaya, çiçəklərə həşərat əkə, ağaclarda meyvə axtara bilər.
Testoplastika
Barmaqların motor qabiliyyətinin inkişafına təsirli şəkildə kömək edir. Uşaqlıqdan bütün valideynlərin tanış olduğu plastilin verilməlidir bir yaşlı körpə təhlükəli, çünki o, hər şeyin dadına baxır. Adi xəmir köməyə gəlir. Təhlükəsiz maddələrdən özünüz hazırlaya bilərsiniz.
Xəmir reseptini oynayın
Bunun üçün incə üyüdülmüş duz və su (hər biri bir hissə), un (2 hissə) lazımdır.
- Dərin bir qabda duz və unu birləşdirin, su əlavə edin.
- Yaxşı qarışdırın.
- Qarışığı yumşaq plastilinin tutarlılığına qədər yoğurun.
Əgər bişdikdən sonra xəmir əllərinizə yapışıbsa, ona duz və un əlavə edə bilərsiniz (proporsiyaya riayət etməklə). Qırıntılı bir toxuma əldə etsəniz, sadəcə suyun miqdarını artırın.
Körpəniz heykəltəraşlıq etməyi sevirsə, bir anda çoxlu xəmir hazırlaya bilərsiniz. Onu soyuducuda saxlamaq lazımdır, lazım olduqda "işləyən" parçaları kəsmək lazımdır. Ancaq belə material uzun müddət saxlanmamalıdır - zaman keçdikcə xəmir elastikliyini itirir. Yaşlı uşaqlar üçün yemək prosesi zamanı qida boyası əlavə edə bilərsiniz. Quruduqdan sonra xəmir fiqurları sərt və davamlı olur. Onlar rənglənə və oyunlar üçün istifadə edilə bilər.
Foto qalereya: özünüz hazırladığınız xəmir heykəlcikləri
 Körpənizlə birlikdə belə bir səbət edə bilərsiniz - bu əyləncəli, yaradıcı və faydalı bir fəaliyyətdir.
  Xəmirdən uşağınızın sevimli heyvanlarının fiqurlarını hazırlaya bilərsiniz.
  Qurudulmuş sənətkarlıqlar rənglənə bilər akril boyalar
  Rəqəmlərdən bütöv şəkillər yarada və onlardan uşaq otağını bəzəmək üçün istifadə edə bilərsiniz.
Yığıla bilən elementlər
Kiçik detallarla oynamaq motor bacarıqlarını çox yaxşı inkişaf etdirir.
Keçe paltolar
Belə nümunələrdəki bütün böyük hissələr (ciblər, qollar və hətta yaxası) çıxarıla bilər. Uşaq yaratmağı bacaracaq maraqlı modellər, rənglərin birləşməsi. Belə oyuncaqlar iki yaşından uşaqlar üçün uygundur.
Riyaziyyat sətirləri
Körpəniz rəqəmlərə maraq göstərməyə başlayanda ona riyaziyyat sətirlərini təklif edə bilərsiniz. Onlar yalnız gözəl motor bacarıqlarını inkişaf etdirmir, həm də saymağı öyrənməyə kömək edir.
Video: şurkalar ilə didaktik oyunlar
Bağlama
Bu cür cihazlar təkmilləşdirmək üçün əladır motor fəaliyyəti barmaqlar və qollar. Axı, sadəcə çox rəngli bir ip götürmək lazım deyil - o, kiçik bir çuxura düşməlidir.
Sadə bağlama hər hansı bir təhlükəsiz səthdən hazırlana bilər: taxta taxta, plastik qapaq və ya adi qalın karton. Onların üzərində, bir şamda və ya bir çubuqda qızdırılan bir tornavida istifadə edərək, təsadüfi qaydada 5 mm diametrli deliklər etmək lazımdır.
Uşağınızı bağçılıqla məşğul etməyin daha asan yolu süzgəcdən istifadə etməkdir.
Daha mürəkkəb bağlayıcı istənilən formada edilə bilər. Bu, bir az daha çox vaxt, təxəyyül və material tələb edəcəkdir.
Çeşidçilər
Çeşidçilər, gözəl motor bacarıqlarına əlavə olaraq, körpənizdə əzmkarlıq, diqqətlilik və zəka inkişaf etdirməyə imkan verir. Onları özünüz etmək də mümkündür, baxmayaraq ki, bağlama və ya riyazi krujevalardan bir az daha çətindir.
Sıralayıcı üçün sizə lazım olacaq karton və bir neçə kiçik oyuncaq müxtəlif formalar. Qutunun bir tərəfində seçilmiş əşyaların formalarına uyğun olan delikləri kəsmək lazımdır, yalnız ölçüsü bir az daha böyükdür.
Foto qalereya: DIY çeşidləyiciləri
 Dəyirmi deşiklər plastik qapaqlardan bir qədər böyük kəsilir
  Bu orijinal böyük çeşidləyici artıq yeriyə bilən körpələr üçün uyğundur.
  Ən çox sadə variant evdə hazırlanmış çeşidləyici üçün bir qutu və karton blanklara ehtiyacınız olacaq
Təhsil stendləri - universal didaktik qurğular
Təhsil stendi bütün təsvir olunan əşyaların və oyunların elementlərini birləşdirə bilər.
Belə bir lövhə hazırlamaq üçün evdə tapdığınız hər hansı bir əşyanı bir fiberboard və ya lazımsız bir masanın üstünə əlavə edə bilərsiniz:
- boltlar,
- qıfıllar,
- fişləri olan rozetkalar,
- açarları müxtəlif ölçülərdə və formalar,
- qapı qarmaqları,
- boltlar,
- palto qarmaqları,
- köhnə fırlanan telefon
- simli zəng,
- glockenspiel.
Vaxt keçdikcə, mövcud əşyalar yeniləri ilə əvəz edilə bilər, uşağın oyuna marağını qoruyur.
Maarifləndirici kitablar
Maarifləndirici kitablar uşağın müstəqil otura bildiyi andan başlayaraq hər yaşda olan uşaqlar üçün böyük zövqdür.
Uşağınızın sevimli nağılı əsasında kitab hazırlaya bilərsiniz
Video: əl işi təhsil kitabları
Ayaq masajı döşəyi
İncə motor bacarıqları təkcə əllərin deyil, həm də ayaq barmaqlarının inkişafıdır. Ortopedlər uşağın müxtəlif səthlərdə ayaqyalın gəzməsinin müsbət təsirindən danışırlar. Yaz aylarında bunu etmək daha asandır - qum, ot, çınqıl üzərində gəzə bilərsiniz. Və digər mövsümlərdə möcüzəli xalçalar faydalı olacaq: üçün qalın parça kiçik düz çınqıllar tikilir və ya yapışdırılır, plastik qapaqlarşüşələrdən, düymələrdən və daha çox şeydən.
Fotoqalereya: evdə hazırlanmış masaj ayaqaltıları
 Bu xalça uşaqların ayaqlarına müxtəlif hisslər bəxş edən materialları birləşdirir.
  Çınqıllar bir xalça bazasına yapışdırılır
  Et masaj döşəyi plastik qapaqlar da daxil olmaqla bir çox materiallardan hazırlana bilər
Uşaqda incə motor bacarıqlarının inkişafı mağazada satın alınan bahalı oyuncaqlar olmadan mümkündür. Evdə həmişə uşaqlar üçün maraqlı olan çoxlu obyektlər var. Ailənin birgə yaradıcılığı heyrətamiz yaxınlıq hissi verir və uşağın sevinci və uğuru daha da sevindirir.