
Fruit applications. Application "fruit on a plate" for children made from real and paper fruits
Svetlana Tyurina
Hello, colleagues!
Application- wonderful view children's creativity! There are many ways of applique: from ready-made forms, broken, symmetrical, volumetric, etc. Of course, we all try to use them when working with children. Many ideas coincide with other colleagues in the workshop, but this is not scary. After all, children's works still remain original and unique in their execution, since each child and his work are individual.
I bring to your attention a master class on making volumetric applique"Ripe fruits", namely apples and pears.
You will need: colored paper, scissors, glue, pencil and desire.

We fold a sheet of colored paper several times (we will need three blanks), draw the outline of the fruit and cut it out.


In the same way, cut out three small white circles, decorate them with black seeds, cut out a leaf and a stalk from green paper.


Glue the white center circles to the parts of the fruit, glue a leaf and a stick to one part.
Fold the parts in half and fold them over.

We collect the fruit by gluing the edges of the workpiece together.

Making a worm: two small strips of double-sided colored paper and a circle with a picture of a face.


We fasten the edge with glue and glue the muzzle.

Glue the worm onto the fruit: ripe and tasty.


These are the wonderful apples and pears my middle group kids got.

The guys and I also made another voluminous work using colored paper rings.
Lesson notes
"Fruits and berries." Volume applique.
Teacher additional education Mamontova Tatyana Vladimirovna.
The age of the students is 6-7 years.
Target: teach students to cut out several symmetrical parts at the same time.
Tasks:
Educational
develop the ability to use scissors;
introduce students to symmetry.
Developmental
develop accuracy, attention, fine motor skills hands, perseverance;
develop imaginative thinking when solving riddles;
expand children's understanding of fruits and berries.
Educational
developing interest in the surrounding nature;
cultivate responsiveness and kindness;
develop a desire to engage in artistic creativity.
Tools and materials:
scissors, glue;
colored paper;
sheet of paper (background);
simple pencil.
Progress of the lesson.
Ask students riddles about fruits and berries:
Round, rosy,
I grow on a branch:
Adults love me
And little children.
(Apple)
In satin blue dresses
They will roll into the grass under the crown.
They will go for jam and compote
Or - wash it and put it straight into your mouth.
(Plums)
You look like a light bulb
And to Vanka-Vstanka too.
Your side is ruddy
And if you take a bite, the juice will splash out.
(Pear)
The long-legged one boasts -
Am I not beautiful?
And just a bone
Yes, a red blouse!
(Cherry)
Show models or illustrations of fruits and berries.
Cut an oval plate from colored paper by folding the sheet into four and rounding the corners. Carefully glue onto the background.
Fold three square sheets of colored paper (6x6 cm) in half at the same time. Trace the stencil of the apple halves with a pencil. Cut along the contour of the part. Halvespartiallyglueamong themselves. Draw the apple core and seeds with a felt-tip pen. Do the same for pears, plums and cherries. Place all the blanks on a plate that has already been glued and glue them (Fig. 1).
ill.1
Cut a strip of colored paper (1x4 cm), fold it like an accordion and draw the face of a caterpillar (ill. 2). Glue it on an apple or pear.

 ill.2
ill.2

Ripe fruits and vegetables are a reminder of the hot summer, which is why all children love them so much. Fruit crafts always turn out very beautiful, juicy and bright. But there is one problem - such crafts quickly deteriorate and cease to bring joy. There is a way out of this situation: paper fruit applique! The “Fruit on a Plate” applique can be made using any technique, some of which are presented in this master class.
Children of any age - in younger group, middle, high or high preparatory group- can easily cope with such applications. In addition, the technique of such applications for children in middle group and in senior group will allow them to develop fine motor skills, as well as quickly remember the names, types and colors of their favorite fruits.
Let's start simple
To make the “Fruit on a Plate” applique we will need:
- Glue;
- Paper plate;
- Colored paper;
- Scissors.
First you need to draw the fruit patterns. In this master class we suggest using fruits such as grapes, plums, apples and pears.
We cut out templates for each figure. Fold it in half and then in half again. We attach the pear template and trace it. All that remains is to cut it along the contour. For one fruit you will need four parts.


When the parts are cut out, they need to be folded in half, thus obtaining 4 halves of each fruit. Then we glue the halves together so that the other halves remain empty, as shown in the photo.

This is how we get voluminous fruits, which we “put” on our plate. All that remains is to cut out the green leaves and glue them to the fruit.


Vase with a surprise

To make the “Fruit Vase” applique, we will need the same elements as for the previous “Fruit on a Plate” applique, namely: cardboard, glue, colored paper, scissors.
We also cut out fruits from paper folded four times and glue the halves together to get three-dimensional fruit figures.

You will also need to cut out the vase. We make it in the shape of a half oval. First glue the vase figurine to the base cardboard.

Then we glue our fruits on top of the vase to create the impression that they are lying inside.

Then we complement the applique with hand-drawn branches of fruit, and decorate the vase the way we like. In this master class we used flowers made using a figured hole punch. You can use various ornaments obtained using a hole punch, or cut out with your own hands. You can also decorate the vase with glitter or hand-painted elements.
So, the fruit in a vase made of paper is ready!
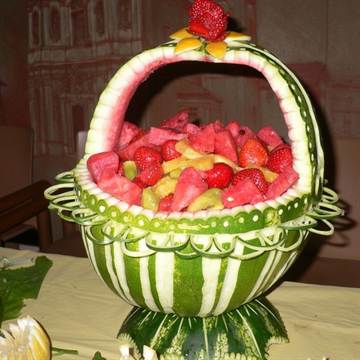
Food basket
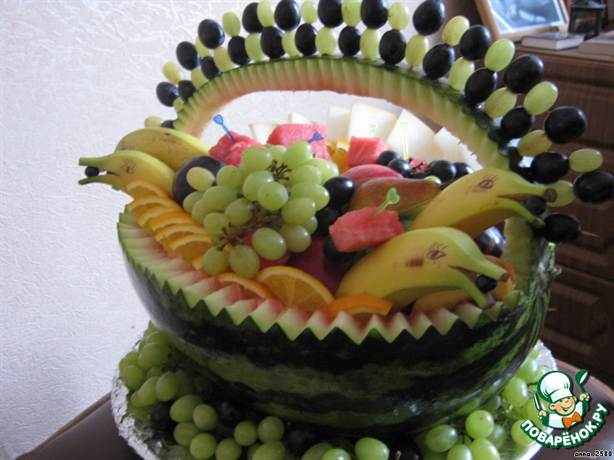
A fruit basket can become not only interesting craft, but also a decoration for the summer table. To make it we will need:
- Large watermelon;
- Sharp knife;
- Fruit for filling.

Let's get to work!
The base of our basket will be a watermelon, so the first thing you need to do is carefully inspect it for damage. Then you need to rinse it well and wipe dry with a towel. Now we take the prepared template for the handle of the future basket so that we know how to cut it out correctly. And carefully cut it out according to the template.

Please pay special attention that this must be done very carefully and carefully, trying not to damage the base.
After the watermelon is cleared of pulp, it must be thoroughly dried from the inside. To do this, first wipe everything with paper towels, and then put newspaper or paper inside to absorb moisture. It is best to change the paper several times until the watermelon is completely dry from the inside.
While the watermelon is drying, you can start decorating its exterior. You can cut out various elements directly on the peel, or you can use paints and paint the watermelon in any color.

And finally, we move on to the last step. Fill the basket with fruits and berries.


Let's start conservation

Before in winter adults usually do canning vegetables and fruits, and children watch them with genuine interest. Therefore, why not let your child take part in the process of canning fruit in the form of an applique?
In order to make the “Canning Fruit” applique, we will need cardboard, colored paper, scissors and glue.
We cut out a figurine in the form of a jar from cardboard, and fruit from colored paper. The fruit can be whatever you want. You can also not cut out the jar, but draw it on cardboard, as is done in the picture.

Then you need to “try on” the location of the cut out fruits “inside” the jar: arrange the figures so that they look interesting and do not overlap each other too much. The size of your cut fruit will depend on the size of the jar and how much fruit you want to "can".
When the fruits have found their places, it's time to start gluing them to the jar. To do this, each fruit in turn must be thoroughly coated with glue and attached to the jar. Excess glue can be removed with a napkin.
This fruit set will be a wonderful educational toy for your baby. But if you are already an “adult” and have long known all the fruits by heart, a bright paper still life will fill your room with summer freshness, adding a piquant sourness to the interior.
Ripe bananas, fragrant citrus fruits, juicy strawberry and honey watermelon are not all the fruits and berries that you and I will learn to design today. Pustunchik has prepared many paper fruit templates for you, but making them is equally simple and quick.
All you need: white sheets, scissors and glue.
Print out color diagrams of fruits, cut them out and make curves along the dotted lines. Glue in the right places. Ready!


Let's take a closer look at the process of creating berries and bananas.

Look how delicious the berries, watermelon, lemon halves and kiwi look!

Strict geometric shapes pears and apples.

... And finally - a “family” photo =)

Have fun and be inspired to create!
The creative process together with the baby can not only unite, but also enrich the child’s ideas about the world around him. Children willingly bring interesting ideas to life, realizing their creative potential and motor skills. The adult’s task is to competently present the material, touching the subtle strings of children’s curiosity and imagination. Bulk fruits made by a child’s hands fit well into the interior of the room and can be used as handouts during classes.
For making voluminous pear you will need:
Double-sided colored paper 2 colors
Toothpick
Glue
Scissors
pencil

Prepare the small parts first and give them time to dry. The rigid rod will be a toothpick, pre-wrapped with a thin strip of paper soaked in glue. The main structure is well attached to such a base.


Take 4 strips of 8 x 14 colored paper, fold them in half lengthwise, then crosswise.


On the bend line, draw half of the intended fruit using a template or simply with a pencil. We carefully cut it out, resulting in eight pieces folded in half.


We arm ourselves with glue, coating the parts along the bent line. The amount of glue should be minimal, and the treatment area should be limited only to the bend line.


We put four pieces on each other, resulting in two halves of the future pear.

The rod, treated in advance with a strip of paper, is placed in the middle coated with glue. We place the parts on top of each other, fixing them by pressing along the bend line. Let the glue dry thoroughly, then straighten the parts evenly.