
Paper applique of fruits in a vase. Volumetric paper pear step by step
Summary of GCD
Open lesson on application
"Vase with fruits and vegetables"
Completed by the teacher:
Datsenko Nina Nikolaevna
Abstract open class by application"Vase with fruits and vegetables"
Target : development of creative, cognitive interests of middle preschool age.
Educational tasks: to cultivate independence in completing a task, the ability to experience positive emotions from cognitive, productive activities.
Developmental tasks: develop the ability to distinguish by appearance most commonfruits and vegetables, name them.
Educational objectives: to form children’s knowledge aboutfruits and vegetables,
recognize them by distinctive features, intensify speech.
Basic educational region: "Artistic and aesthetic development"
Integrated educational areas: "Cognitive Development",
"Speech development"
Methods and techniques:
Methods : gaming, practical, verbal.
Techniques : questions for children, reminders, instructions, encouragement.
Visual learning aids: fresh fruits and vegetables (cucumber, carrot, tomato, apple, pear, banana, tangerine, plum) color illustrationsfruits and vegetables, vase, vase template, glue, tassels, oilcloth, napkins, scissors, squares
green and orange yellow, red, green and yellow on individual trays, album sheets.
Vocabulary work: continue to expand children’s vocabulary, develop
Children's ability to understand general words ( fruits, vegetables)
Preliminary work: conversations, looking at illustrations of fruits and vegetables ,telling riddles.
Structure:
Surprise moment.
Questions about. Did. game, riddles.
Conversation about fruits and vegetables
The teacher demonstrates gluing techniques.
Application "Vase with fruits and vegetables".
Summary of the lesson.
Progress of direct educational activities.
Educator:
Guys, look, Little Red Riding Hood came to visit us, she would like to
Take something tasty to your grandmother; she has already treated her grandmother to pies. She wants to pamper her grandmother with vitamins. Like her grandmother
She’s already old and needs vitamins for her health. Please tell Little Red Riding Hood which foods contain vitamins?
Children's answers: In vegetables and fruits!
Educator: Well done guys! I have prepared a surprise for you, would you like to see it?
What's under the napkin? Look carefully what is on my table?
Children's answers:
Educator: That's right, I have a vase on my table, and in it:cucumber, carrots, red tomato, green apple, pear, banana, tangerine, plum.
How can you call all this, in one word?
Children's answers: - fruits, vegetables.
And now I invite you to remember our riddles about fruits and vegetables.
Look, guys, there are riddles hidden in the vase.
Guess them quickly. Well, who's going to start first!!
Orange's little brother Because it's small. mandarin | Children know this fruit Monkeys love to eat it. He comes from hot countries Grows in the tropics... banana | Round, rosy, I grow on a branch, Adults and little children love me.(apple) |
Blue uniform, white lining, It's sweet in the middle. plum | Matryoshka dolls, yellow ones hanging They look at everyone from a branch. Juicy honey Familiar to us since childhood And not toys at all And the sweet ones.. / Pears. |
|
I am long and green, I am delicious when salty, Delicious and raw. Who am I? cucumber | This vegetable is not easy. He was green at first And now he's blushing Suddenly it turned red and began to glow. That gentleman is very important and is called -/ Tomato. | Beautiful maiden Sitting in prison And the braid is on the street carrot |
Educator: Well done guys, you guessed all the riddles correctly!
Now let's look at the board, here are pictures of fruits
and vegetables, you need to choose only fruits.
Classification games"Gathering the Harvest"
Children choose pictures with fruits.
Physical exercise “Vegetables and fruits”
Vegetables and fruits (bend down, reach the floor with your hands (garden), straighten up, stretch your hands up (garden))
Delicious products. (pat the tummy with your right hand, then with your left hand)
About the vegetable garden (bend down, reach the floor with your hands (collect))
And in the garden (straighten up, stretch your arms up (harvesting in the garden))
I'll find them for food. (pat the tummy with your right hand, then with your left)
Educator:
And now guys, we will help Little Red Riding Hood make a delicious, healthy vitamin gift for her grandmother. Look carefully at how to properly glue the vase. In front of you lies a landscape sheet, and squares with
rectangles of different colors, vase template. You need to circle with a pencil
Place a leaf on a vase and cut it out. Stick on the vase. But when sticking the vase, you need to be careful so that there is no distance between the vase and the fruits and vegetables, as they
must be in a vase.
Then take squares or rectangles of colored paper, choose the vegetables and fruits you like best and cut them out.
You need to stick fruits and vegetables into the vase
Attention task! What color paper should I use? It is very important to choose the right color of paper for cutting out vegetables, fruits, and berries to highlight their main parts and details. What needs to be done to make vegetables and fruits from squares and rectangles of these colors?
Children's answers.
That's right, they need to be cut out. (The teacher explains cutting techniques
a round-shaped object made from a square, encourages and praises children.)
Apply the glue carefully, glue the vase first, and then the vegetables and fruits, remove the excess glue with napkins.
After gluing is completed, the teacher suggests leaving the work on the tables, walking around and seeing how beautiful the children’s vases with fruits and vegetables turned out.
Now you and I will give our works to Little Red Riding Hood so that she can treat
your grandmother with vegetables and fruits.
Children, do you like your work? What's your mood now? Who are you
Can you tell us and show us about your vases of fruits and vegetables?
Children's answers
Well done today! Thank you very much for these beautiful work. And now I will treat you to fresh vegetables and fruits!
Applique is one of the types of fine art. They begin to get acquainted with this type of activity as early as nursery group kindergarten. The application develops all senses. The child learns to distinguish the colors and qualities of paper and other materials. While doing the work, children begin to think about how to complete the task correctly, how to place the parts, and how to use glue. Tactile fingers feel the thickness of the paper, its structure. Fine motor skills of the hands and fingers develop during the actions performed, as well as finger strength when using scissors.
The sense of beauty, aesthetic perception of reality develops, creativity and the ability to create a composition from individual parts. in autumn kindergarten exploring the gifts of nature is often planned. Children learn what fruits adults collect in fields, vegetable gardens, and orchards. During this period, classes on the application “Vegetables and Fruits” are also conducted.
Nursery group
Children early age First, they study the properties of paper and tactilely master it. Then, acting like a teacher, in game form learn to lay out finished parts on a sheet of paper. Don't use glue yet. Later, individual small pieces begin to be glued on. For example, when making an application “Vegetables”, a teacher can plan the topic “Canned food”. Children are given a sheet of paper cut out in the shape of a bottle and ready-made parts - vegetables. The kids put them in a jar and “preserve” them.
When teaching gluing is carried out with children, you can take the following options for topics. For example, plan the application “Vegetables on a plate”. To do this, the teacher prepares round sheets of paper, and the kids lay out the prepared vegetables so that they do not overlap each other. Give no more than two details. For example, a red circle is a tomato, and a green oval is a cucumber.
Junior group
For three-year-old children, program tasks deepen and expand. Children begin to experiment with ways to influence paper. For example, when making a “Vegetables” applique, they can use the technique of tearing paper or use crumpled paper to make the image three-dimensional.

The number of parts is gradually increasing. Since the beginning of the year, the teacher has completely prepared the forms for appliqué, cutting them out of paper himself. Then he begins to introduce children to scissors, how to use them, and safety precautions when working with the tool. But for now this is taking place in the form of individual tests. Self-cutting is not yet used for this lesson.

Children learn to correctly place parts on a sheet of paper, following the example of the teacher. Fix colors and their shades. They learn to navigate in space. Repeat geometric shapes learned in math classes.
Scheduled once a month collaborations on large sheet Whatman paper For example, to make a collective “Vegetables” appliqué, children can distribute them among the beds. Tomatoes and cucumbers on the bush, pumpkin in the garden, potatoes below ground level, beets and carrots in the middle. The roots are under the line, and the tops are on top. Children repeat where things grow, reinforcing their knowledge about nature.
Application "Vegetables" in the middle group
Children at the age of 4 already begin to learn how to use scissors. First is the correctness of holding the tool in your hand and cutting the fringe. Children at this age learn to create compositions using plot appliqué. Work with design elements from geometric shapes, add elements made by drawing individual parts, with the addition of seeds or cereals.

For example, let's take the "Vegetables" applique on the "Carrot" theme. The teacher prepares the following details for children:
- triangle orange color;
- stripes to match the color of the vegetable;
- green trapezoid.
The guys first do the work with scissors, cutting the fringe of the green tops, making cuts on the trapezoid not completely. Then the green part is glued on first with the cut parts facing up. Next, the main triangle of carrots is glued so that it is located on top of the tops. Only the fringe should be visible. The last part of the work will be to add volume to the vegetable. To do this, take orange strips and crush them in your hand. Next, without completely smoothing the parts, glue the strips across the carrots. The work is done from top to bottom.
Theme "Fruits on a plate"
In the middle group, when working with paper, they use different options. These include thin napkins, cardboard, smooth glossy paper, and structured thick paper.

In the fall, it is also interesting to propose a “Fruit on a plate” theme. Using paper different quality and thickness, you can achieve the effect of a three-dimensional picture. This paper can be purchased at a grocery store. children's creativity. Before starting work, children should hold the parts in their hands and learn to distinguish between grooved and compressed paper. The children also learn to arrange the composition so as to create a beautiful still life: some details first, the rest on top of them, and only then the plate itself. Children understand the spatial arrangement of parts.
Work in the senior group
In making the "Vegetables" applique in senior group apply new ways of working with various materials: natural and waste, quilling strips and fabric. The methods of work are also new. Children cut out the parts themselves using scissors from prepared geometric shapes. For example, in order to cut a tomato, the teacher gives the child a square, for a cucumber - a rectangle. A five year old should be able to cut corners.
Children also fold a sheet of colored paper using the origami method. The results are voluminous figures. To make "Vegetables" appliques for children, you can also use symmetrical cutting of paper by folding it in half. Then the part turns out to be the same on both sides.
Quilling
Nowadays, the technique of creating pictures using the quilling technique is gaining popularity. It is very interesting for children to make the “Vegetables and Fruits” applique from strips of paper by twisting them. Lots of sets for sale different colors and thickness.

You will need PVA glue, a thin stick and quilling kits. Children quickly understand how to use this technique.
Parents, after reading the article, can try to make an autumn gift for their grandmother or teacher over the weekend, taking into account the age requirements of the kindergarten curriculum.
Lesson notes
"Fruits and berries." Volume applique.
Teacher additional education Mamontova Tatyana Vladimirovna.
The age of the students is 6-7 years.
Target: teach students to cut out several symmetrical parts at the same time.
Tasks:
Educational
develop the ability to use scissors;
introduce students to symmetry.
Developmental
develop accuracy, attention, fine motor skills hands, perseverance;
develop imaginative thinking when solving riddles;
expand children's understanding of fruits and berries.
Educational
developing interest in the surrounding nature;
cultivate responsiveness and kindness;
develop a desire to engage in artistic creativity.
Tools and materials:
scissors, glue;
sheet of paper (background);
simple pencil.
Progress of the lesson.
Ask students riddles about fruits and berries:
Round, rosy,
I grow on a branch:
Adults love me
And little children.
(Apple)
In satin blue dresses
They will roll into the grass under the crown.
They will go for jam and compote
Or - wash it and put it straight into your mouth.
(Plums)
You look like a light bulb
And to Vanka-Vstanka too.
Your side is ruddy
And if you take a bite, the juice will splash out.
(Pear)
The long-legged one boasts -
Am I not beautiful?
And just a bone
Yes, a red blouse!
(Cherry)
Show dummies or illustrations of fruits and berries.
Cut an oval plate from colored paper by folding the sheet into four and rounding the corners. Carefully glue onto the background.
Fold three square sheets of colored paper (6x6 cm) in half at the same time. Trace the stencil of the apple halves with a pencil. Cut along the contour of the part. Halvespartiallyglueamong themselves. Draw the apple core and seeds with a felt-tip pen. Do the same for pears, plums and cherries. Place all the blanks on a plate that has already been glued and glue them (Fig. 1).
ill.1
Cut a strip of colored paper (1x4 cm), fold it like an accordion and draw the face of a caterpillar (ill. 2). Glue it on an apple or pear.

 ill.2
ill.2

From very early childhood, your child has the opportunity to see a wide variety of fruits and berries, which means that even then he begins to get acquainted with them. The child gradually remembers what this or that fruit looks like and the name of, then begins to determine the properties and qualities of fruits and berries.
In this article, the News Portal “site” has prepared for you several options for voluminous paper applications on the theme of Fruits and Berries.
By doing arts and crafts with your child, you will not only be able to instill in him creative abilities, but also introduce him even closer to fruits and berries. In the process of creating an application, you can tell your child about the benefits of a particular fruit, adding thematic songs, riddles, proverbs and sayings, rhymes and jokes.
Well, now, let’s move on directly to the master classes on making Fruits and Berries paper appliques.
Applique Apple
Applique Apple made of paper

Such a juicy and tasty fruit as an apple is loved by all children and adults. Dedicate one of your evenings to creating such a voluminous, bright Apple applique.
To make an applique you will need a sheet of cardboard, a set of colored paper, scissors, a glue stick and a regular pencil.

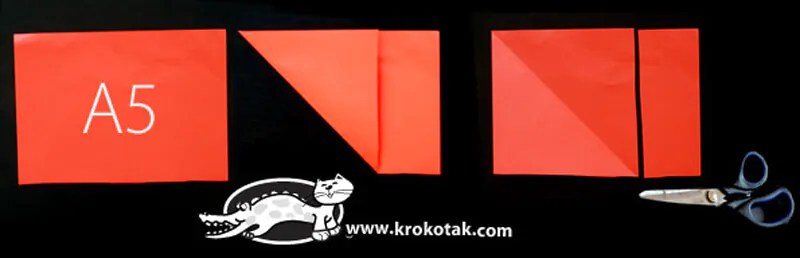
Cut a sheet of colored paper (in our case, bright red colored paper) in half. Fold the halves together and then in half. Draw the silhouette of half an apple with a pencil. Cut with scissors (see photo).

Now glue the resulting rounded halves to a sheet of cardboard, which will be the basis of our fruit appliqué.
From colored paper brown cut out the spine and a leaf from green colored paper. Glue the parts.
From a sheet of white paper, cut out the core for the future apple and glue it. Draw the bones with a black marker.
Strawberry applique
Strawberry applique
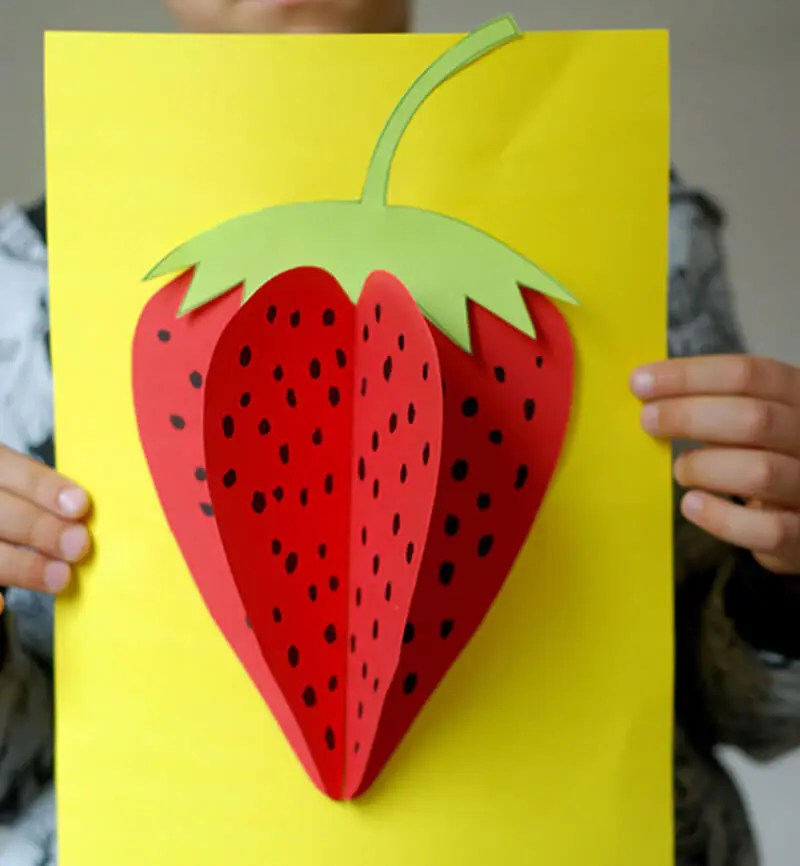
The principle of making this application is similar to the previous one. The only difference is to cut correct form. This time the shape will resemble an oblong heart (see photo).


Decorate the finished applique with leaves (template included) and seeds drawn with a black marker.
Cherry applique
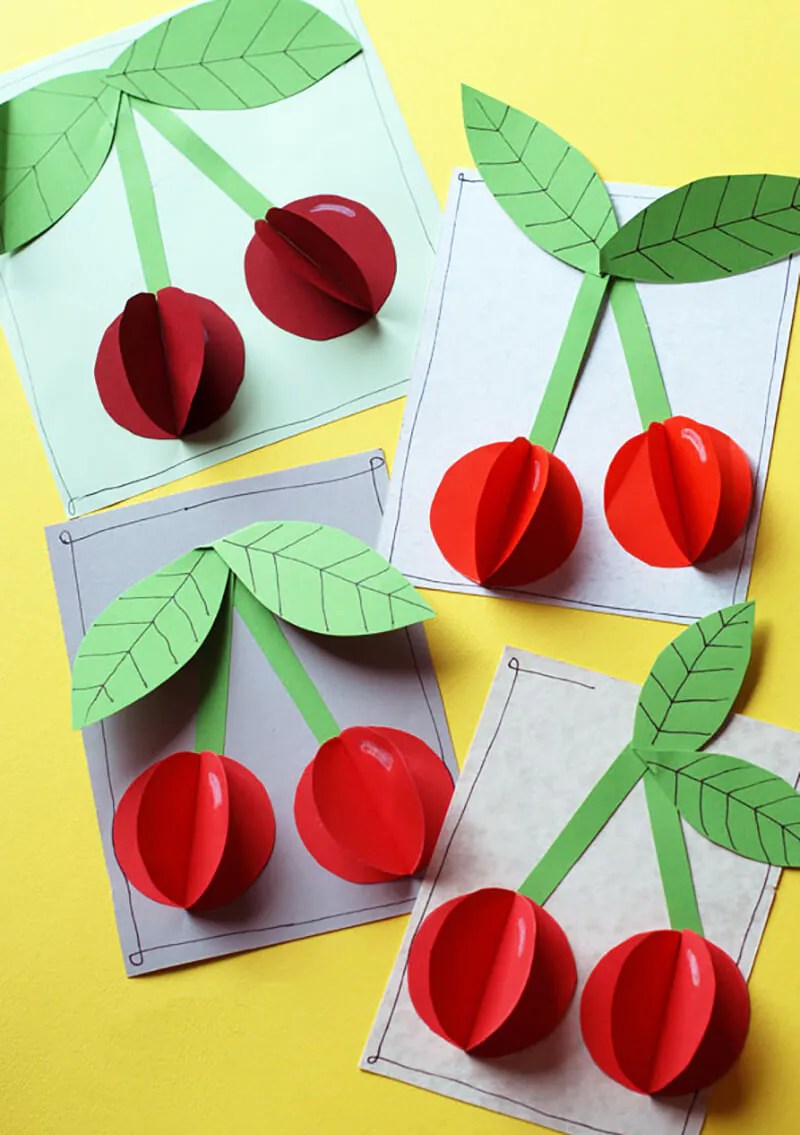
And another applique with the image of delicious cherries.


Having mastered this simple technique, you can make applique with your child of absolutely any fruit, berries and even vegetables. The main thing is to choose the right color and cut out the desired shape.
Doing appliques with children helps to develop them creative thinking and creativity. The applique of fruits and vegetables, beautifully placed on a plate, provides wide scope for creativity and, depending on the chosen materials and complexity, can be done in both the junior and senior groups. In this article we will talk about which applications are suitable for which age groups and about what unusual techniques can be used to make such work from paper.
We are considering options for applications with fruit in a vase and on a plate

An applique bowl of fruit is an excellent craft for children in the middle group. Such work can be done collectively, or individually. Depending on the assigned tasks. Collective pleasant pastime, creativity, will help children learn to work in a team and make compromises, and independent work will express the individuality of each child. Before making the applique, it will be useful to talk to the children about the names of fruits, how fruits and vegetables differ, and what shape each individual fruit resembles (this will be useful in the applique). To complete the application we will need:
- Colored paper of different colors
- Scissors
- White or neutral cardboard for the base
- Gouache
- Tassels
- pencil
Work progress:
1) Draw the outline of the vase on white cardboard. Paint the vase with gouache
2) Cut out fruits from colored paper
3) Glue the fruits into the vase
In the case of a collective application, the teacher should draw the outline of a large vase and invite the children to color it. You need to show how to cut fruits out of paper (at the level middle group You can use the technique of cutting along a sheet folded in half so that the halves of the fruit are symmetrical). You can ask children to draw the outlines of fruits themselves (connect fruits with geometric figures - apple looks like a circle, only with a tail, a plum looks like an oval, and so on) or use ready-made templates.
We create an application with fruits for senior preschool age

For children in the older group, a more complicated version of the applique - a basket with fruits - is more suitable. We will need:
- colored paper of different colors
- scissors
- marker or felt-tip pen
- white or neutral cardboard for the base
- pencil
Work progress:
1) First, draw the outlines of the basket on brown colored paper and cut it out.
2) Glue the basket onto the cardboard. After this, you can draw a pattern on the basket with a marker.
3) Draw and cut out any fruits from colored paper. Cut out fruit cuttings from green paper. To make the applique more interesting, you can cut out exotic fruits with characteristic silhouettes - pineapples, bananas. On the pineapple, as well as on the basket, you need to draw an ornament.
4) Glue the fruits with cuttings into the basket. Several can be stuck next to it to complete the still life.

The most suitable occupation in younger group There will be a lesson on the topic of “canning” fruit. Before you start making the applique, you need to talk to the children about fruits, ask them to remember the names of their favorite fruits. You can ask why we preserve fruit, you can ask riddles or read poems. Then you need to give the children ready-made templates of “cans” made of cardboard for the base of the applique and paper fruits, invite them to choose the fruits that they want to add to the “compote” and put them in jars. Having assessed how the children arranged the fruits (so that the edges do not stick out and the fruits do not intersect), we proceed to gluing.

In the preparatory group, it is important to familiarize children with unusual techniques working with paper, for example, creating a three-dimensional picture or using the technique of cut-out, mosaic appliqué. We will talk about cut-off appliqué. To complete the fruit applique in a vase we will need:
- white or colored cardboard for the base
- pencil
- colored paper of different colors
1) Draw the outlines of the vase and fruit on a sheet for the base. The outlines should not be too small - it should be convenient to stick parts in them.
2) Choose required colors paper and tear it into small pieces. The pieces should be neatly shaped, they should not be too long or too large
3) Glue pieces of colored paper onto the base. We make sure not to go beyond the edges of the sketch.
A similar applique can be made using scissors. In this case, the parts should not be torn, but cut out and glued at a short distance from each other in order to preserve their outlines. The application will look like a mosaic of individual bright fragments.
Video on the topic of the article