
What can you do Monster High? Furniture Monster High
They are extremely popular among fans of the dolls of the same name. There are even craftswomen who create special groups on social networks in which they share their work and master classes. Since dolls are monsters and are directly connected with the other world, all crafts for them must certainly be decorated with shards, black roses, coffins, etc. Let's see what you can do with your own hands for Monster High dolls.
DIY Monster High crafts.
Chair for a doll.
Required materials:
- ice cream sticks
- a piece of wood (the size of the chair)
- thin wooden sticks (4 for legs and 2 for back)
- sandpaper
- glue
- drill
- pencil
- ruler
- white paint
- black rose sticker
Manufacturing process:
1. Sand a piece of wood using sandpaper.
2. Mark 4 holes, drill them (not all the way), and then insert the sticks for the legs.
3. On the other side, drill (not completely) 2 more holes, insert long wooden sticks, and glue ice cream sticks on them.
4. Paint the entire surface of the high chair white, stick the sticker.
Bed and bedding for Monster High.
Required materials:
- black and pink satin fabric
- black lace
- black beads
- stuffing material
- scissors
- threads
- needle
- cardboard box
- cardboard
Manufacturing process:
1. Cut out a blank for the back from cardboard, cover it with pink fabric, and trim the edge with black beads. Sew a few beads onto the front.
2. Make a pillowcase from pink fabric, stuff it with fabric, and sew it up.
3. Cover a cardboard box with pink fabric and make “lace borders” on top. The top can also be stuffed with fabric, and only then pull the fabric from below.
4. Sew a bedspread from pink fabric, decorate it with black lace on top, and stuff it inside with fabric. ready!

In addition to such a crib, you can make a rug.
Crafts Monster High dolls.
Chair for a doll.
Required materials:
- fleece in white, green and pink
- a piece of padding polyester
- scissors
- needle
- green wool thread
- cardboard
- glue
- white beads
- plastic ball

Manufacturing process:
1. Plastic ball cut into 2 parts.
2. Take one part and put a piece of padding polyester inside. Cover it with green fabric on the bottom and pink on top.
3. Take white fleece and use scissors to create a border. Sew white beads along the edge.
4. Cut a circle out of cardboard and decorate its edge wool thread and decorative fleece leaves.
5. Connect the upper and lower parts, decorate the joints.
DIY furniture for dolls - what could be better for joint creativity between parents and child? On the one hand, this great way save family budget, because buy miniature ones sofas and doll cabinets in specialized stores are not that cheap. Well, on the other hand, handicrafts help instill in your girl neatness, perseverance, and creative skills. So, let's figure out how to create doll furniture with your own hands and make it truly original, because you won't find exactly the same furniture set anywhere else!
Making furniture for dolls with your own hands: what available tools will be useful?
If you want to please your little one with a new addition to your doll's interior house, Don't rush to get rid of the following:
- matchboxes (it’s easy to build real drawers from them for dressing tables and cabinets);
- cardboard boxes for shoes, cosmetics and small household appliances;
- plastic bottles;
- bright sponges for washing dishes and viscose napkins for cleaning;
- plywood;
- scraps and scraps of fabric and leather;
- flexible wire and foil;
- plastic food containers, egg molds;
- threads for knitting and other little things that will be useful in creating doll furniture.
Advice! In addition, you may need polymer clay, beads, beads, rhinestones and other decor at your discretion: after all, the brighter and more elegant the interior of the doll’s home, the better.
Master classes on creating furniture for dolls: detailed instructions for your creativity
Any mother knows: her daughter’s best friend is a doll. This means that you will have to make every effort to create a worthy home for your princess’s favorite toy. And you can’t do without furniture filling. We offer you several master classes that will tell you how to make furniture for Barbie, Monster High dolls, Winx dolls, baby dolls and so on with your own hands, and all you have to do is choose the appropriate option.
DIY furniture for dolls from boxes
We offer you two simple options making miniature furniture from cardboard boxes. We will make a dressing table and a chest of drawers.
For making dressing table we will need:
- a small cardboard box (hair dye packaging is suitable);
- scissors or stationery knife;
- ruler and pencil;
- foil;
- glue;
- white or colored paper for gluing the finished product.
First, determine how high the future table will be so that the doll can comfortably sit in front of it. If you are making furniture for a standard height doll (Barbie, Monster High, Winx, etc.), this could be 6-8 cm. Cut the box at this height.
Cut a flat piece of cardboard from the rest of the box (a blank for a mirror), the width of which matches the width of the table and has a height of 15-16 cm. Lubricate it with glue and attach it to the base.
Decorate the upper edge of the future mirror with curly openwork patterns or just make it round.
Cover the table with the mirror with white or colored paper.
Decorate the blank with drawn doors and drawers (they will not open or pull out). You can also decorate the walls of the table and the place for the mirror with any patterns.
The final touch: you need to cut it out of foil " mirror"and handles for drawers and doors, and stick them on the designated places.
Advice! Complete the dressing table with cardboard crib, made in the same style (for example, you can decorate its headboard with patterns similar to the decor of the table and mirror). This will help to decorate the interior of the doll's bedroom in a single key.
Connect with each other matchboxes using glue so that their drawers slide out. When the furniture is ready, cover it with decorative paper.
As you can see, it is very easy to make furniture for dolls from cardboard with your own hands, and at the same time it looks just as beautiful as the purchased one.
DIY furniture for plywood dolls
We offer you a simple master class on making a round coffee table for a doll.
To make it you will need:
- plywood;
- a device for cutting plywood (for example, a jigsaw);
- glue;
- varnish or acrylic paint.
First you need to cut out two identical round elements (the surface of the table and the shelf), as well as the legs and stands for the shelf. Next, connect them together using glue, as shown in the diagrams we provided, and cover them with varnish or paint.
DIY furniture for dolls made of wood
We invite you to make a puppet sofa made of wood and fabric. To do this we need the following:
- flat wooden planks about 1 cm thick;
- wood cutting tool;
- glue;
- fabric for pasting.
Cut out five elements of the future sofa: the base (H6 cm * D16.4 cm), the same back and bottom (H6 cm * D14 cm) and two armrests that gradually widen towards the top (H4 cm * D6 cm below * D7 cm above).
Glue them together (except for the bottom).
Cut out fabric elements of similar sizes and glue them onto a wooden piece.
Separately cover the bottom of the sofa with fabric and place it on the base.
DIY furniture for paper dolls
To make a miniature paper doll table with a top made of mosaics, we need:
- very thick paper or cardboard for the base;
- ruler;
- awl;
- scissors/stationery knife;
- colored plain cardboard for mosaics;
- toothpicks or wooden skewers;
- thick threads;
- glue.
First of all, cut out the base for the tabletop from cardboard or thick paper. Its sizes can be any. Using an awl, make small holes on it in the corners for the legs, and on four sides for the stands that you will need to decorate the table with weaving.
Cut small squares of the same size from colored cardboard to decorate the table. Glue them onto the top of the tabletop in a mosaic pattern.
Insert toothpicks or skewers into the holes and secure them with a small amount of glue. Weave the table legs in a spiral with threads, the edges of which are secured with glue.
Glue the end of a thick thread to the underside of the tabletop near one of the racks. Start braiding the legs and uprights, passing the thread alternately under them and then over them. Make sure that the weaves of threads are located tightly, but do not tighten the racks too much, as this can lead to deformation of the finished product. Braid the table as much as you want, then decorate the lower and upper edges of the weaving with a decorative braid made from the same threads.
After purchasing a doll from its little owner, the question often arises: “How to make something for the dolls with your own hands, what to make accessories for it from, what kind of furniture to furnish it with.” dollhouse? To make furniture, cars, dishes and electrical appliances, cardboard and matchboxes, scraps of fabric, foam rubber, padding polyester and some decorative elements are useful.
Furniture for home
The living room begins with a comfortable sofa. For it you will need a box (the larger it is, the more impressive the piece of furniture will be), padding polyester, fabric, glue gun, cardboard, newspaper and tape.
Work progress:

Fireplace and TV
On cold winter evenings, your favorite doll will be warmed by an artificial fireplace. You will need thin foam plastic, cardboard, and paints.

Mobile stand and large cabinet
 A convenient mobile stand is made from long sticks and a small box. It can be made from thick cardboard and painted in desired color. Attach wooden sticks to the narrow sides of the box and glue a crossbar on top.
The simplest doll cabinet can be easily made from a rectangular box. To do this, cut the front wall in half, insert a stick-bar for things inside and cover the outer walls with paper.
Or make a multifunctional cabinet with drawers and shelves. You will need cardboard boxes for the cabinet itself, small boxes for the drawers, additional thick cardboard, a barbecue stick and paper clips.
Execution:

Following this principle, it is easy to make a wardrobe of any configuration and purpose: in the form of a coffin for Monster High dolls, a narrow wardrobe for shoes, a spacious kitchen and other options.
Clothes for dolls
Sewing clothes for a doll does not require any special expenses. Colored scraps of different fabrics, elastic bands, sewing supplies and decor will come in handy.
Simple ways to make things for dolls with your own hands:

Accessories for dolls
It’s easy to make everything you need for a doll’s house and its owner with your own hands.
 The doll has a lot of things, it's time to take care of their appearance. An iron will help her with this. To make such a useful electrical appliance you will need a plastic valve from juice or milk and a cap from ballpoint pen. Plastic cover trim around the edges, leaving only the rounded inner part. With its shape it already resembles the sole of an iron; all that remains is to add details. Separate the narrow plastic part from the handle cap and shorten it so that the iron handle does not end up being very long. Glue the parts together and add a small heating regulator bead. Paint the bottom of the iron with silver varnish.
Travel suitcase. For such a cute craft, you will need a small box, four beads, a piece of fabric, narrow braid, a beautiful sticker and scissors with glue. Fix two rectangular narrow boxes in pairs with tape on one side and cover them with a beautiful fabric. Attach black braid to the other sides. Cover the top of the lids beautiful paper and add stickers. Connect the suitcase with braid and attach bead wheels.
Barbie has a piano in her living room, it must be decorated with candles or a table lamp. It is easy to make such an interior element from the cell of an egg tray. Cut one segment from the container and fix a stick or cocktail tube inside. Secure the lower part into a piece salt dough. After hardening, paint and decorate with ribbons, braid or beads.
doll car
There are many options on how to make a car for dolls. Let's look at a simple way to make a car out of a box. Based on it, it is not difficult to simulate other machine options.

Various homemade little things can be made from salt dough, fimo plastic and even plasticine . IN different cases Drink lids will come in handy, empty pill wafers. As you can see, all kinds of garbage make cute things for dolls. Take a closer look at these “throwaway” things, maybe they will turn into a desk, chaise longue or other stunning thing for a dollhouse.
Attention, TODAY only!
Monster High dolls are very popular now, and our readers’ daughters probably have these funny beauties. It is very important for girls to provide their favorite dolls with conditions for beautiful life, including furniture. You can buy a bed for a Monster High doll in a store, or you can make it yourself exclusive item, avoiding unnecessary costs.
Step by step instructions
There are many ways to make toy furniture, including beds. We will tell you a few of them, simple and quick. The most important thing in our case is proper styling, and the foundation is done quite easily and even standardly.
It is very important that the exterior of the bed is designed to match the style of your doll.
Whatever type of bed you choose for your Monster High doll, you may need the following materials and tools:
- a cardboard box of suitable size (for example, a shoe box);
- paper – colored, velvet or corrugated;
- scissors and paper knife;
- stapler;
- ruler;
- pencil;
- colored markers;
- gouache or watercolor paints, brushes;
- PVA glue, tape.
Now let's proceed directly to making the bed. We will describe several methods in detail to you, and you choose the most suitable one.
Regular bed
For this crib, you need to take two small cardboard boxes and viscose napkins in two colors.
Please note: when choosing boxes for making a bed, rely on the fact that the doll should fit completely on the bed when lying down, and when sitting, it should be able to freely reach the floor with its feet.

Thick cardboard or a shoebox makes an excellent base for a crib.
We will proceed from the dimensions of the box with a length of 29.5 cm and a height of 6 cm.

Try to make a simple ottoman as in the picture.

Simple ottoman bed for a doll
To do this on cardboard box measure with a ruler and draw a line with a pencil, leaving 2 cm at the top and 1 cm at the sides. Cut out the bed as in the photo.

Cut a bed base from a box
Cover the blank with paper - colored or velvet. You can use magazine clippings and decorate with beads and rhinestones.

Cover the blank with paper and decorate
Cut out the back from thick paper or cardboard. Make it tall and shape it, color it to match the style of your monster doll. Glue the headboard to the bed and make the bed.

Cut out the back and paint it to match the style of your doll
Bunk bed
Making such a bed is not that difficult. It will come in handy if your daughter has a whole collection of Monster High dolls. You will need:
- shoe boxes;
- padding polyester;
- textile;
- glue;
- wooden skewers or sushi sticks.

Double decker crib option
Cover the boxes with colored paper. Inside, secure the padding polyester in several layers, which will serve as a mattress, cover with a suitable piece of fabric.
Glue sushi sticks to the ends of the bottom box. From the bottom they should protrude slightly, literally 1 cm, beyond the boundaries of the box - these will be the legs of the bed.
Attach the second box to the tops of the stand sticks. Your doll bed is ready!
Video: making a crib for Monster High
A couple of unusual and original ideas
If you have free time and a desire to use your imagination, you can use the ideas suggested below. Your doll will receive a very interesting and unusual piece of furniture.
Designer bed
It can be made collapsible without using glue. It is enough to fasten the parts with pieces of tape if you want the bed to be more stable.

Designer bednbsp;
Cut out a rectangle measuring 30x15 cm from cardboard. This will be the bed linen. Make four parts that will become legs and side borders at the same time 6x6 cm and 6x12 cm. And two more parts - backs 15x7 cm and 15x5 cm.

Diagram of construction bed parts
First, mark with a pencil the future places of cuts as shown in the photo, retreating 1.5 cm from the edge everywhere. Then cut the side backs by 1.5 cm. Cut the bed sheet by 3 cm and the borders by 3 cm and 1.5 cm .
Assemble the bed and secure the joints with tape. Now it can be decorated with any patterns, painted, covered with rhinestones and ribbons. Make the bed and put the tired doll to bed.
Coffin for Draculaura Monster High
Everyone knows that Monster High Draculaura loves to sleep in a coffin. Let's make her such an extreme bed.

Coffin bed for Draculaura
Take a shoe box, fold the edges and secure them with glue and tape. Cover the coffin with black and red colored paper.
Attach four chains to the corners with a stapler, cover the coffin and invite the doll to try the bed.
The coffin-bed can be made not hanging. Take another box, cut out the side, paint it and line it.
Do you know that you can make Monster High dolls with your own hands? You can also easily make furniture, shoes and clothes for them by reading the master classes.
Contents of the article:
Thanks to the cartoon "Monster School", Monster High dolls have become very popular. Therefore, the price of these toys is not small. If you don’t have enough money to buy a store-bought one, check out how to make a Monster High doll with your own hands. If your child has such a toy, then you can save on clothes for Monster High. Make your own furniture for dolls, accessories, a house to please your child.
How to make a Monster High doll - two ways
Two methods will be presented below. Using the second, you can remake a Barbie or similar doll into Monster High. The first option will teach you how to make Monster High from polymer clay. If you like this type of needlework, you can create the heroine of this cartoon not only for your children, but also as a gift for others. Once you get the hang of it, you can make Monster Highs if you want, and then sell them.

To implement the idea of the first option, take:
- white polymer clay and granite colors;
- doci;
- blade from a stationery knife;
- nail file;
- polymer clay remains;
- Tresa artificial hair;
- acrylic paints;
- acrylic varnish;
- A4 paper sheet;
- simple pencil;
- eraser;
- scissors;
- pins;
- pin;
- pliers;
- textile.
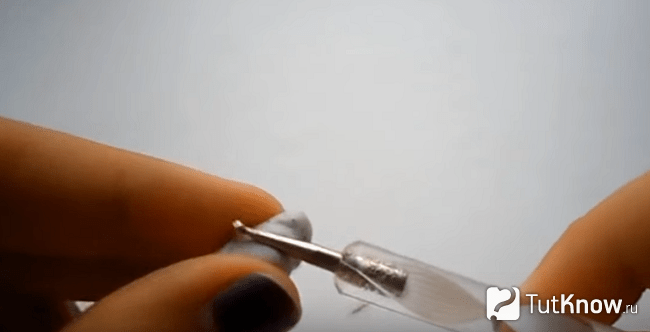
Doci are devices that allow you to paint on your nails. You can buy pins at a sewing store.
The next two photos show what these tools look like. If you don't have them, replace them with similar devices.

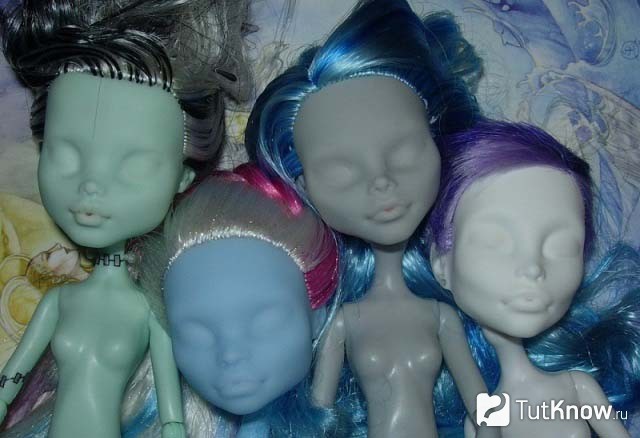
If you have not done plastic before, you do not have any leftover material, then take the one that you plan to use the least. This is usually green polymer clay.
The principles for creating this part are the same for these heroines. This master class will tell you how to make Rochelle Goyle, who is also one of the heroines of the cartoon “Monster School”.
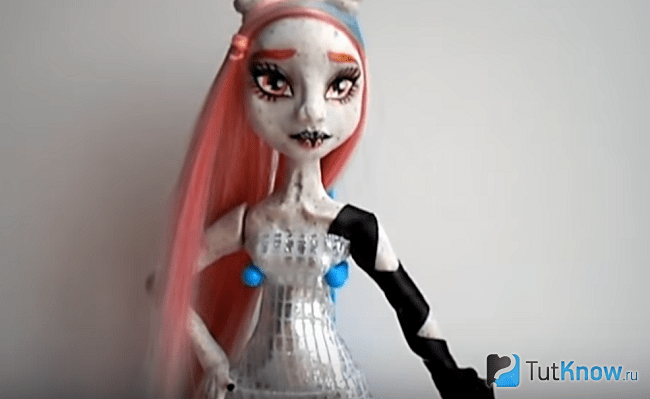
A little about her. This girl has an unusual skin color and original ears; she is a gargoyle. Her skin is a mixture of gray, white and black, which makes the coating look like granite. Use this property when you create Rochelle Goyle. The girl's hair is pink, interspersed with blue strands.
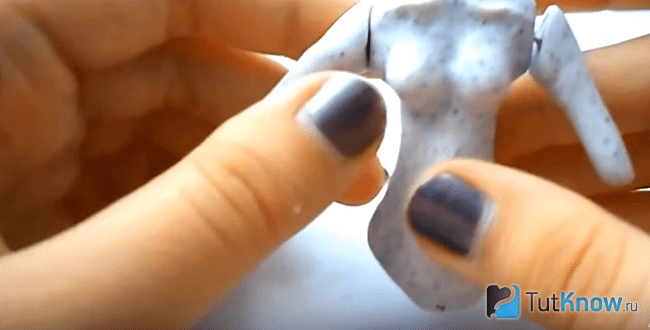
Having formed the head from unnecessary pieces of plastic, insert a pin from a pin into the neck area, bake the head in the oven at 130 degrees for 15 minutes. If you took another type of plastic, look in the instructions at what temperature it hardens.

Mix white plastic with granite colored polymer clay. If you take only the last one, without the light one, then the skin will turn out too dark. Cover Rochelle Goyle's head with the resulting mixture. From the same material, roll one, then a second sausage. Use these parts as the doll's lips and attach them in place using doci. Make her nose in the same way, send the face blank back to bake in the oven for 15 minutes, during this time make the other parts of the head.
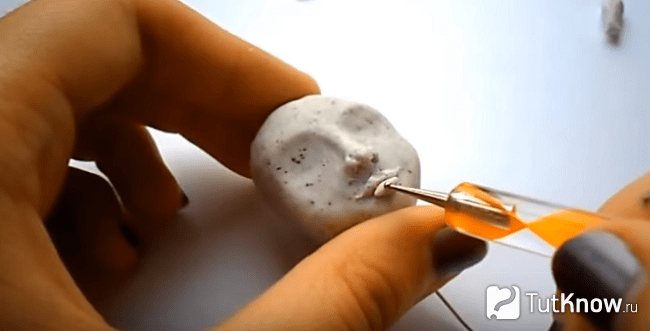
To make the ears, break off a piece of polymer clay and shape it into a triangle. Using a dozer, make two horizontal indentations on them.
Bend the tip of the ear back slightly, and shape the second one in the same way. Attach these parts to the head, which by now is baked. Now place this preparation in the oven for 15 minutes. Don’t waste time, and use unnecessary plastic to form the body of Monster High Rochelle Goyle. Insert the pin into one shoulder and pull it out through the other. Also place pins where the legs will be located.
During this time, the head is baked, try it on the neck. Secure with a pin. But this is not the final stage. You just made a depression in the body, now also send it to the oven to harden.
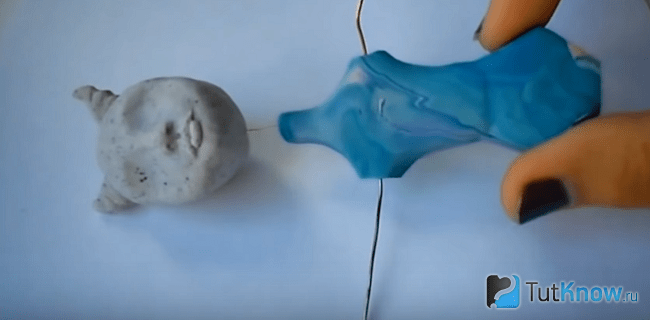
Cover the body with skin made of polymer clay created from white and granite.

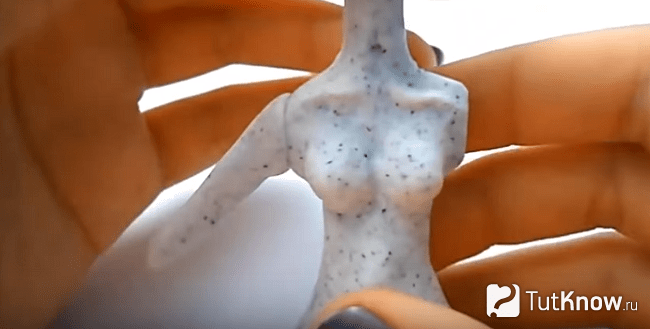
From the same mass, mold 2 breasts, form small protruding collarbones, which are created from two small “sausages” of plastic. Add a little polymer clay to the abdomen and make a navel here. Place the piece to bake.
Turn the doll over to the other side; use the same tool to form its spine. Roll a ball out of plastic and make buttocks for our heroine.
Place this part of the Monster High Rochelle Goyle doll's body back into the oven for 15 minutes. Now take the head and use a pin to connect it to the body.
If the metal rod is too long, shorten it using pliers. Do the same with the pins on which you will put your arms and legs.
To ensure that the limbs and head fit well to the body, use a utility knife blade to make cuts on them where you will attach them to the base.
From the same polymer clay, form a sausage in the shape of a doll’s hand, and make the second one in exactly the same way. Place them in the oven to harden.
At this time, break off a small piece of the same plastic and attach it to the doll’s forehead. Take a larger ball and glue it to the back of your head to make it stick out more.

Remove your hands from the oven. While they are still warm, insert a pin into each of them. When the workpieces are cold, this will be more difficult to do.
Take the metal rod out of your hand, coat its end with superglue, and stick it there again. Fasten the reverse side of the rod to the shoulder. Here you do not glue the pin so that the hand can move. Attach the second one in the same way.
Make the lower part of the arm in the shape of a sausage and attach it to the upper one. Blind two parts of the legs, up to the knee and below it. Attach the feet here and the palms to the hands, cutting out spaces to make 4 fingers. The fifth one you will make from the remains of polymer clay. Place the pieces in the oven to harden.
Take them out, cool, and go over the surface with fine sandpaper to sand them down.
To make a Monster High hairstyle, cut a small strand of pink synthetic hair, grease it with superglue, and attach it to your head. Glue all the hair of this color in the same way. Then attach the blue strands.

Help yourself with a toothpick. Gather all the hair with an elastic band and remove the head from the body. Now you will need the skills learned from the first article on this topic, as you will need to draw the eyes of the Monster High doll. Also draw eyelashes and pupils. Paint over the whites with white paint.
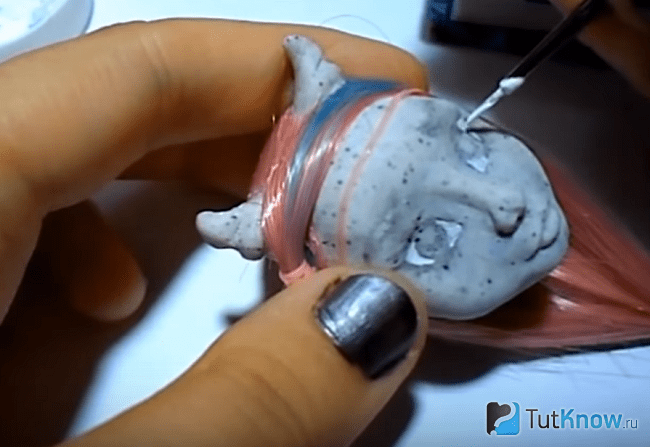
Use black to draw eyelashes, a lens, and outline the eyes. Draw eyebrows and pupils with light brown, paint highlights on them with white paint.

Carefully paint your upper lip with black paint and your lower lip with pink. When these surfaces are dry, upper lip paint the stripes pink and the bottom black.

Give Rochelle a manicure using black paint. Add shine to your eyes, lips, and nails by covering these parts with acrylic varnish.
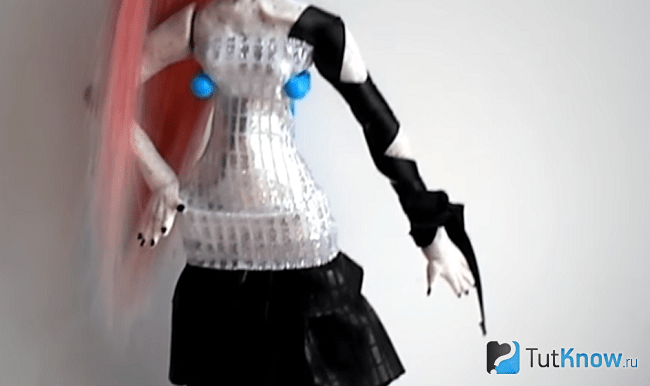
To make a Monster High doll dress, place the silver fabric with the front surface facing her body, wrapping it around it. Sew here with a basting stitch on your hands using black thread. Trim excess fabric, leaving seam allowance.
Mark the length of the dress, cut off excess material.
Now you need to make three shuttlecocks from black fabric, the length of each is 2 times the final length. Make the bottom shuttle the widest, the top the narrowest, and the central shuttle medium in width.
Gather each flounce at the top and sew the edges. Connect the top parts of these trim pieces and stitch them to the bottom hem of the dress. Cut two strips from the same black fabric and sew them vertically onto the back.
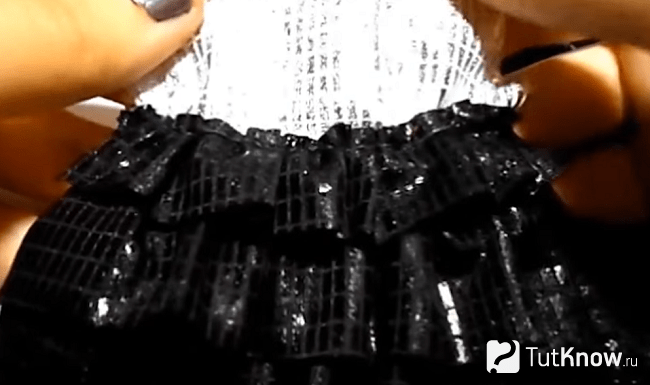
Sew Velcro onto these black stripes on the back. Cover the junction of the flounces with the bottom of the dress with a ribbon cut from silver fabric and tie it in a bow at the back. Sew black braid to the left shoulder.
Now you know how to make a Monster High Roshal doll with your own hands.
If this method seemed too time-consuming to you, then use the second one.
How to transform a doll into a Monster High character?
To create the look you like, take:
- clear varnish;
- acrylic paints;
- solvent;
- thin brushes;
- cotton pads and sticks;
- doll preparation.
The most big problem in this process, find the doll blank. You can use unwanted Barbie, Cindy, Ken.
For these dolls, you need to erase facial features with a solvent using cotton wool. To avoid damaging your hands and nails, do this with rubber gloves.
See which Monster High heroine you'd like to make. Their eyes are drawn the same way, but sometimes using different colors. To do this you need to first paint it white acrylic paint eyeball, then outline the eyes with black paint. Depending on what kind of heroine it is, apply eyeshadow of the appropriate color. In this case, they are green.

Light brown eyebrows. Using the same or another paint, create the pupils. Draw the lens with black and the highlights on the pupils with white. You also need to highlight your lips using paint. If the character has fangs, draw them.
Draw eyelashes. To make your facial features shine, top off the paint with clear nail polish. Looking at a photo of your favorite heroine, apply the scars and tattoos that she has to the doll.

The next master class will help you style the hair of heroines.
DIY hairstyles for Monster High
If you are making Monster High Barbie or Sindy dolls that don't have the hair color you want, then dye them. Now you can start styling your hair.
To make the first one, take:
- comb;
- an elastic band to match your hair;
- safety pin.

Connect these two elements at the back below the back of the head and tie with an elastic band.

Continue braiding the braid further, placing it at the back of the head to create the so-called “cuckoo” hairstyle. Secure this element with a safety pin.

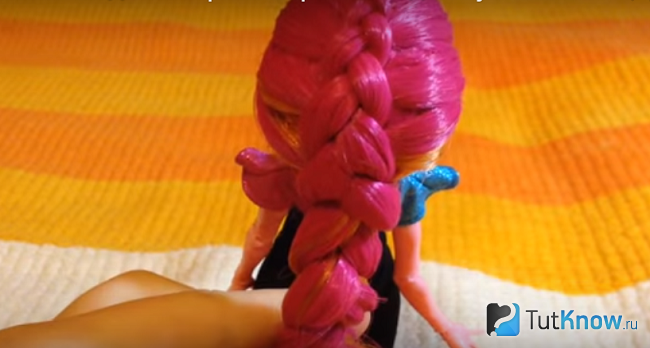
To create another hairstyle for Monster High, separate some hair from the bang area and divide it into three strands. You will braid the braid inside out, tucking the outer strands under the central one, and not going over it, as is usually done.

Make two such turns, then separate a small strand on the left, connect it with a strand of the braid that is on the same side.

Bring this fragment under the central strand. Do the same with right side. Proceed in the same way and continue braiding.

You will get such a wonderful braid.
If you want to do hairstyles for Monster High so that your hair is in curls, but you don’t have thin curlers, then do this.
Take:
- comb;
- a bowl of water;
- hairspray;
- several small rubber bands.
- Squeeze a little gaseous varnish into a bowl of water by pressing the spray can button 2-3 times. Braid the doll several small braids and secure the ends with an elastic band. Now dip your hair completely into a solution of water and hairspray and wet your hair.
- Then dry it well. To make this process go faster, first blot excess water with a towel, then dry your hair near a hot radiator or using a warm jet of a hairdryer.
- When they are completely dry, undo the braids, you will see what wonderful curls you get.

Shoes for Monster High
You can also make it yourself. First of all take:
- PVA glue;
- scissors;
- napkins;
- eraser;
- thin braid.
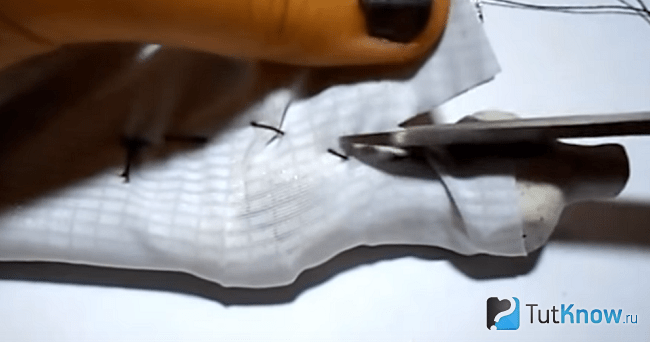
- Dampen pieces of napkins in water and cover the doll’s leg with them in 2 layers. Let it dry, then coat it with PVA glue and glue another 3-4 layers of napkins here.
- Wait until they dry. Then cut this paper blank at the heel. Remove it from the doll's leg.
- Since cartoon girls wear shoes on high heels, make these parts from an eraser, cutting out the sole along with the heel from it. Glue this paper blank on the heel and with the eraser blank, connecting the joint with braid, which also needs to be placed on glue.
- Decorate other parts of the shoes with this ribbon, after making cuts in them to get these elegant, beautiful open sandals.

You can make several pairs of shoes for Monster High, put them in beautiful boxes, create them yourself.
Furniture for Monster High dolls: master class
You don’t have to buy it either; you can make it yourself from simple materials. Let's make this wonderful chair in which the dolls can relax.

To create this piece of furniture you will need:
- pieces of fabric;
- padding polyester;
- lace;
- sheet of cardboard;
- glue gun;
- newspapers;
- milk carton.
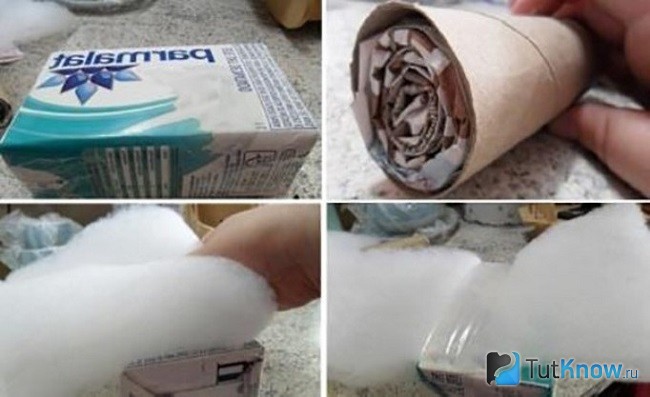
Wrap it around these rollers, sew the joint or seal it with tape. Also make a padding polyester pattern to cover a milk carton with. See how much fabric you need to sew a chair cover.

Cover the seat with fabric and secure the joints with a glue gun. Sew the side seams of each roller in a machine or by hand, gather the 1st and 2nd sides of the sidewalls with a thread, tighten them, tie them with a couple of knots.

At the bottom of the seat you will need to sew a frill; to do this, cut out a rectangular ribbon from the same fabric, its length should be 2-3 times greater than the perimeter of the seat. This value depends on how pompous you want this part to be. Tuck this ribbon at the top and bottom and stitch it on a machine. Place the folds, secure them with a pin or basting hand stitch. Stepping back 3–4 cm from the top of the ribbon, sew on the openwork braid.
Cover 4 flat buttons with fabric and sew each of these parts on one side of the bolster.

Make the back shaped by cutting it out of cardboard. Also cover with padding polyester, then with fabric. Glue this part to the seat, place bolsters and decorative pillows here, which you can sew from cardboard circles. A padding polyester is placed on them on both sides, and the whole thing is covered with fabric.

Monster High clothes can hang on hangers; you can make such a design yourself.

To do this, take:
- a small rectangular wooden box;
- two narrow planks
- wooden rod;
- black spray paint;
- glue;
- small screws.

To ensure that the structure is firmly connected, wrap it with electrical tape for a while and leave it like that until the next morning so that the glue dries.

Now you can put it on unnecessary sheets of paper and cover it with black spray paint.

Once it's dry, you can place the hangers. If you don’t have such dolls, then have an adult use a drill to make holes in the center of the wooden blocks, insert a wire here, bending it at the top in the form of a hook.
Can be used for cardboard base by gluing them or attaching 4 layers. In the center of such a workpiece you need to make a hole with a shell, also insert a wire, bend its top with a hook, and make a small loop at the bottom so that the wire does not jump out of the base.
If you want to make a wardrobe for Monster High, then take:
- colored paper;
- sheets of cardboard;
- scissors;
- pencil;
- ruler;
- glue.

Measure another 4 cm from the top, draw a horizontal line parallel to the first. On the segment you just made, measure 3 cm to the right and left of the second vertical line. Connect each of these points to the corresponding point on the upper horizontal segment, and draw a line down from one side and the other to the corresponding point.

Erase the auxiliary lines. Stepping back from the outermost 2 cm, draw lines for gluing the shelves and along the strip for gluing the sides of the cabinet.
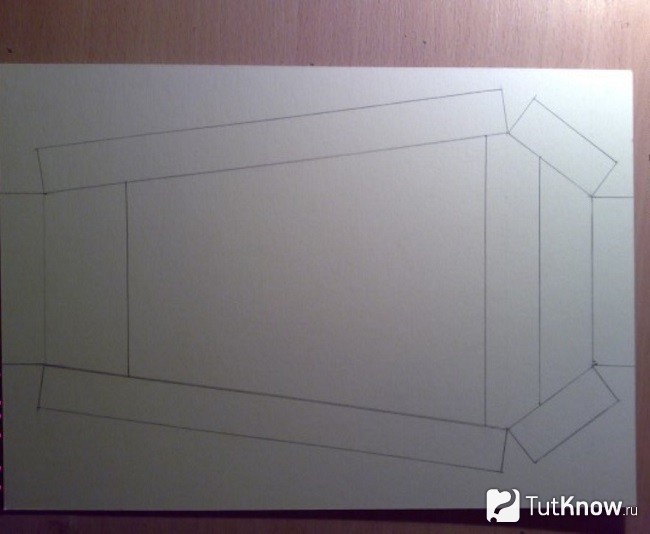
See how to make a Monster High wardrobe next. You need to draw the detail that is shown in the next photo. The side stripes on it are of equal width - 2 cm.
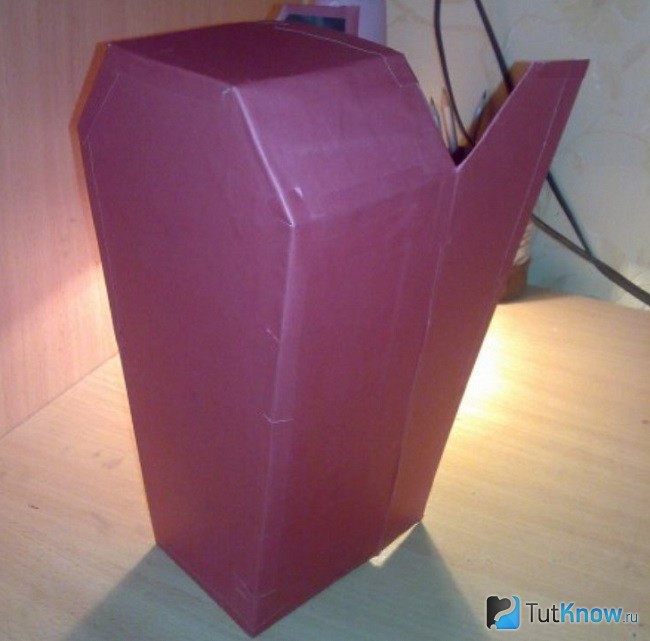
To make a dress rod, attach a handle rod under the top shelf. You can buy Monster High stickers or draw them yourself and cut them out of paper. Attach these elements inside and outside the cabinet to decorate it in this way.

Draw hangers for dresses on a sheet of cardboard, cut out these parts, you can paint them red or black or combine it.

To be able to fix the doors, glue ribbons on one side and the other; you will tie or untie them to get an outfit for your favorite doll.

You can make such wonderful Monster High furniture. If cardboard hangers seem too unreliable to you, then make them from paper clips. To make hangers for doll dresses, straighten the paperclip on the left side, and also slightly straighten the tip on the right. Secure it with a twist of the left half of the workpiece. This is such a wonderful thing you can do.

It is convenient to bend the tip of a paper clip using a pencil.

Here's how much you can do with your own hands together with your children to please them with new toys, clothes, furniture for Monster High dolls.
If you want to see a master class on making a sofa for such dolls, then check out this short video.
The following will teach you how to make a Draculaura wig to wear to a party or Halloween.