
Santa Claus cut out a template from paper. Stencils for windows for the New Year
You can create a New Year's atmosphere with products self made, cut out of paper. They are called vytynanki, which means “clippings.” Here you can find silhouettes of New Year's heroes: Father Frost and Snow Maiden, snowmen, gnomes, various Christmas trees, balls and bells, snowflakes, snow-covered houses, figurines of deer and cute animals.
Today we offer you stencils for New Year's decorations of various themes. Let's be inspired by the actions of the masters and the finished works for decorating windows, Christmas trees, postcards, and the New Year's scene. The given templates can be easily printed on a sheet of white paper, cut out and pasted on the window with soapy water, or fixed in other corners of the New Year's interior.
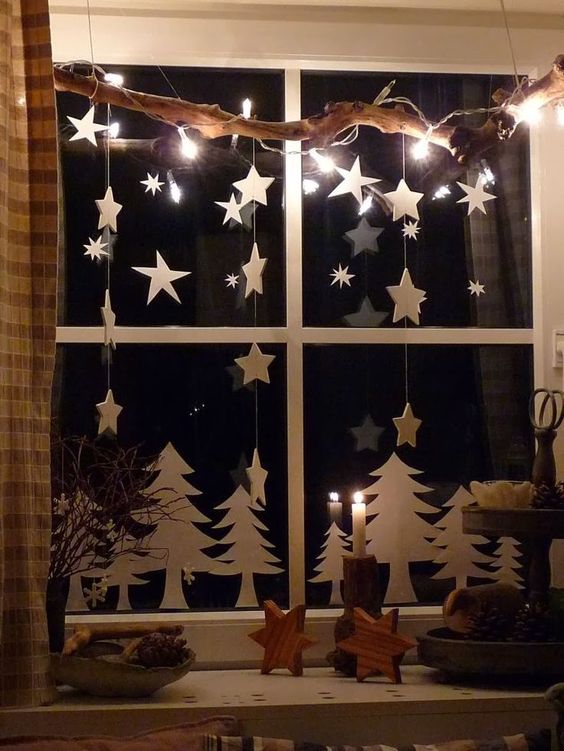
With small cutouts you can decorate a window or create a composition on a windowsill or table; larger cutouts can be used to decorate walls in a room or on a stage.
These are the images you might end up with:


Stencils for vytynanok silhouette cut Snow Maidens and Father Frost:


Choose your favorite stencil with the image of Grandfather Frost and his granddaughter. As a tool, you can use thin scissors, stationery knives, you will definitely need a backing board so as not to scratch the table.
Vytynanka Christmas tree
You can cut out the Christmas tree using a stencil as a silhouette, or you can make a symmetrical cutout by folding a sheet of paper in half. We make a standing Christmas tree in one of the following ways: glue two symmetrical Christmas trees onto an oval paper stand, or fold each Christmas tree in half and glue it together.


Snowflakes and ballerinas
Snowflakes are very different. Especially if the master uses all his imagination. So, you can cut out a symmetrical snowflake by folding the paper several times. Look what design was applied in the form of a stencil and what an unusual tip the snowflakes have.


Inside a snowflake there can be a completely independent composition. For example, a New Year's snowman or a snowy forest.


Snowflakes can take on the appearance of lungs snow ballerinas. To do this, cut out the silhouette of a ballerina separately, put an openwork snowflake on it and hang it by a thread. It turns out to be a very delicate airy decoration.

Christmas balls
Christmas tree decorations can be cut out either in a symmetrical pattern or using an individual stencil. These decorations can be used to complement a composition on a window, decorate a Christmas tree, or attach them with threads to a chandelier or curtain.


Bells
We make carved bells using a stencil. If you glue translucent paper, for example, tracing paper, to the inside of the cutout, then such a bell can be used with a backlight effect.


Reindeer, sleigh, cart
Another fabulous New Year's hero is the deer. The delivery of the wizard Father Frost and the Snow Maiden is associated with it. We offer stencils for cutting out deer, carts and sleighs.


Snowmen
Charming good-natured Snowmen should definitely decorate the New Year's house. You can simply cut out their figures symmetrically, or you can make “ family photo Snowmen" or a composition with a Christmas tree and children.


New Year numbers
You can cut out beautiful numbers for the coming New Year using these templates:


Beasts, signs and symbols
You can make a custom New Year's decoration. To do this, we cut out paper silhouettes of our favorite pets, fairy tale and cartoon characters, birds and animals in a fabulous winter forest.


Cut out the figures of the sun and moon using stencils and complete your composition.


Snowy houses
It will be very cozy if there is a snow-covered house on the window in the New Year's picture. It could be a small hut or a whole palace.


Children
Who is looking forward to the New Year and Santa Claus the most? Well, of course, children! Using silhouette paper cutting, we make figures of children near the Christmas tree, with gifts, singing and dancing, in a word, we bring the true atmosphere of the holiday!


Candle
We offer options for vytynanok - candles. They can be independent or combined with balls, bells, branches and bows.


Christmas
For Christmas, you can cut out thematic patterns dedicated to the events and circumstances of this event. These can be silhouettes of Jerusalem, images of angels, shepherds and wise men. And don't forget about the Star of Bethlehem!


You can separately cut out the silhouette of the Star of Bethlehem:


The central place among the Christmas decorations should, of course, be given to the Nativity scene - the cave in which the Savior was born. The manger of the Divine Child is comfortably surrounded by hay and domestic animals.


Composition with lighting
With openwork paper cutouts you can decorate not only the window, but also create a three-dimensional panorama on the windowsill. It will be especially impressive if you put a garland or small lights inside the box.


Get started with the design New Year's decorations- made of paper with children. This is not only useful for developing imagination, training fine motor skills hands, but it will also give you a lot of pleasure from joint creativity, and then from contemplating the resulting beauty!
New Year's vytynanki have become an indispensable attribute of this holiday along with garlands and. They are most often cut out and glued to windows, creating a fabulous atmosphere. But we won’t limit ourselves to just this idea: let’s see what vytynanka templates can be used for, and which ones are suitable for decoration festive table, and which ones to create. In fact, the scope for using protrusions is limitless!
In addition to the most fabulous ideas for decorating your home with vytynankas for the New Year 2018, “Cross” will tell you in detail:
What types of vytynankas are there?
Most often, protrusions are cut out on, so we will rely on this topic. So, what can be classified as silhouette and what can be classified as symmetrical protrusions.
Silhouette:
- numbers for numbering the coming year
- symbol of the coming year ()
- winter compositions
- and Snegurochka
- animal figurines
- fairy tale heroes
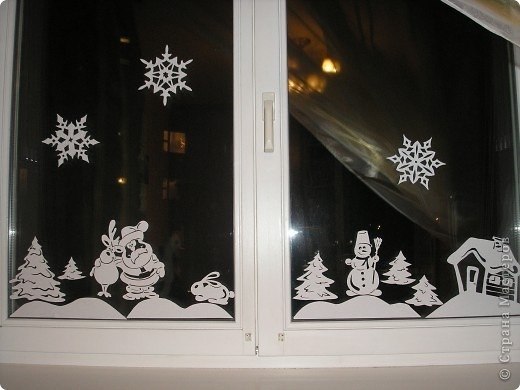
 Even such simple protrusions on the windows will look very elegant:


From simple pictures cut out using stencils, you can create complex compositions and full-fledged plots:

People with extensive experience cut out plots of incredible complexity:


What materials and tools will be useful in the work?
We are pleased to publish on the pages of the online magazine “Cross” a list of everything that may be needed and help in the cutting process, as well as for gluing.
- printer or copier
- white A4 paper, colored paper for the printer, not too thick Whatman paper, kraft cardboard
- stationery knife small size (the sharper the knife blade, the easier it is to cut, and the smoother the protrusion) or a knife for artistic work (paper cutter), for example, from Mr.Painter or Erich Krause.
- cutting base(a breadboard mat, a cutting board, a piece of plywood, or, as a last resort, a thick stack of newspapers or magazines that you don’t mind ruining)
- scissors(regular and manicure ones are useful, as well as those with a very sharp nose)
- pencil
- tweezers
- box or package for paper waste
- box (preferably with a lid) for storing finished vytynankas
- glue or double-sided tape, laundry or other soap
- sponge or tassel

Kraft cardboard vytynanki

Art knife

Cutting mat
YOU WILL NEED IT
The vytynanka painting will fit perfectly in a box from:
Even the simplest ones will become more elegant if they are decorated with cut-out scenes on a current topic:
Vytynankas cut from very thick paper or even cardboard:
- decorate a mobile phone
- chandelier or lamp
- suitable as
In order to do such christmas balls, cut out a New Year's eve from paper or cardboard, and then stick it on cardboard of a different color.
Can serve as table decorations:
And the illuminated city will literally bring any window sill to life! To make such a city on the window, place snowdrifts below, some that houses can easily fit into. , place on top. Provide a central place for the Snow Maiden if you decide to cut them out too.


There are only a few days left until the New Year! Many houses sparkled Christmas trees, decorated with multi-colored balls and tinsel, and snowflakes cut out of paper adorn the windows. But, if snowflakes are found in almost every window, then the vytynankas are made, perhaps, by the most creative and patient people.

Vytynanki - a word with such an unusual sound and auditory perception is called a type of decorative and applied art, with the help of which not just hand-made masterpieces are created, but truly magical jewelry. We recommend that each of you as soon as possible master the technique of cutting out protrusions in order to create original, unusual, unique things - silhouette compositions that will decorate your home for the New Year 2016.
The protrusions are made, or rather cut out, using a stationery knife. The end result is openwork figures. They can be hung on the Christmas tree, glued to windows or placed in a photo frame. And if you cut out symmetrical silhouettes, you can make three-dimensional compositions, for example, a reindeer sleigh with Santa Claus on the windowsill. Agree, it is impossible to remain indifferent when seeing such beauty on the windows!
This amazing type of creativity is especially attractive to children. Of course, cutting out protrusions will require perseverance, certain skills and safety, since you will have to work with sharp objects. Therefore, do not abandon your young needlewoman, but keep an eye on her and, of course, give her advice.
Vytynanka for the New Year: tools for making
So, several things will help you create a unique New Year's atmosphere:
Stencils with characters symbolizing the New Year;
Nail scissors or stationery knife;
A wooden board or piece of plywood (so as not to scratch the surface of the table).

Examples of templates for cutting out New Year's protrusions
As a rule, protruding stencils are printed on a printer. You can use regular paper for printing. office paper(it is suitable for gluing figures on the window), or you can take a thicker one - a business card, multiply symmetrical templates and make three-dimensional compositions.
Where can I get a drawing for the embroidery if I don’t have a printer at hand? It’s great if you have an artistic gift and can draw any template yourself. If drawing is not your thing, then take it white paper and, using the tracing paper principle, redraw from the monitor. Enlarge the template you like as much as possible, attach a sheet of paper to the monitor and trace the contours. We wish you success in mastering the new wonderful technique of vytynanki!
The symbol of 2016 will be the Fire Monkey. Let this funny paper monkey have fun on your window and bring good luck for the whole next year!


Always in anticipation of a magical holiday, the whole family starts making New Year's decorations for the green beauty and home. And the main symbol is rightfully considered the most favorite craft New Year's holiday- Father Frost.
We suggest you make Santa Claus out of paper. With this simple material You can create real masterpieces with your own hands. You just need to devote a little time to this activity and show all your limitless imagination.


Study our master classes on making Santa Claus with your own hands and you will be able to please your loved ones with unique New Year's gifts made with soul and attention.
Modular origami Santa Claus - master class


We will need: sheets of A4 paper: blue- 14 pieces for 211 modules, white- 13 pieces for 207 modules, pink color- 1 sheet for 17 modules.
We divide each sheet into 16 rectangles, from which we will make modules.

Step one. Fold the rectangular sheet in half lengthwise. Using another fold, we outline the middle line.

Step two. We bend the edges of the rectangle folded along the middle, as shown in the photo. Turn the piece over and fold the bottom edges up.

Step three. We fold the corners, bending them over the large triangle, and then bend these corners inward. We bend the resulting figure in half - so we have learned how to make a module. Now, in the same way, we make the required number of modules indicated above from the rest of the paper.

Step four. Let's start making crafts. We take 5 white modules and arrange them as in the photo (we place the top row module with the smaller side up). Next, we assemble a chain of 3 rows of white modules. Each row consists of 25 pieces.

Step five. We close the chain into a ring and turn it over. Next, we perform 3 rows with blue modules. From the seventh row we make a beard. To do this, insert 2 white modules with the smaller side facing out. We insert the remaining blue modules of row 7 as usual.

Step five. In the 8th row we fasten 3 white modules, as usual, with the long side, the remaining modules are blue. With everyone next row add one white module on each side of the beard.

Step six. In the 11th row we insert one red module into the middle of the beard - this is the mouth. Row 12 consists of white modules. We put them on blue modules with the smaller side facing out, and on white modules (beard) with the long side, as usual. In the 13th row, opposite the red module, we put on the white one with the long side outward, and 2 pink modules each with the smaller side (see photo).

Step seven. In the 14th row we put on 6 pink modules with the smaller side, and we put on white modules as usual. Row 15 - we put on 17 white modules and 8 pink ones. In the 16th and 17th rows we put on all the white modules with the smaller side outward - this is the hat.

Step eight. The last 18th row consists of blue modules with the smaller side facing out. We assemble hands from 3 white modules and 5 blue ones. Glue the finished eyes and insert the nose (part of a children's mosaic). Santa Claus made from paper using the technique modular origami ready. We hope that after studying the master class, the Snow Maiden, made in the same technique, will appear next to your Santa Claus.
Santa Claus made of paper using origami technique - master class

We will need colored paper and a little patience. We offer you several schemes according to which you can easily make Santa Claus with your own skillful hands. You can hang it on the Christmas tree and decorate it greeting card or give it to friends for New Year.


DIY Santa Claus from colored paper - master class

We will need: red paper, pink paper for the face, white paper for the beard, cotton wool, markers, scissors and glue.

Operating procedure:
- Using a compass or a small plate, draw a semicircle on red paper. We cut it out, fold it into a cone and glue it together.
- We cut out an oval from pink paper, draw eyes and a nose on it with a felt-tip pen and glue the face of Santa Claus to the cone.
- Next, glue on the beard and hat from white paper. To do this, cut out white strips, cut fringe on them and twist it with scissors. We glue strips with twisted fringe to the cone at the bottom of the face in several rows, giving the beard fullness. We make a hat from the same strip. A beard, hat and fur coat for Santa Claus can be made from cotton wool, which is glued to the cone along its lower edge, on the face and the upper part of the cone. An elegant Santa Claus made from paper, made by yourself, is ready. Using a cone, using your imagination, you can make a Snow Maiden.
Santa Claus made of colored paper strips - master class

We will need: thick colored paper, white corrugated cardboard, scissors and glue.

Operating procedure:
- Cut out 6 strips measuring 1 cm by 15 cm and 6 strips measuring 1 cm by 10 cm from red paper. Glue them into rings. We assemble a ball from 6 large rings, fastening it with glue at the top and bottom. Using small rings, we assemble a smaller ball using the same pattern. The result is the body and head of Santa Claus.
- Cut out a small circle for the face from pink or orange paper. Cut out a mustache, beard and hat of any size from corrugated cardboard and decorate the face with them. Cut out and glue the eyes and nose. Glue the face to small ball, which we then glue to the body. Cut out mittens and felt boots from cardboard and glue them to the craft. The New Year's symbol made from paper, created with your own hands, is ready.
A few more ideas for creating Santa Claus with your own hands
By using your imagination and using the patterns we have proposed, you can make Santa Claus even from a paper napkin.

A paper cone allows you to make many versions of Santa Claus with your own hands.


And this family of Santa Clauses is made from ordinary toilet paper rolls.

Father Frost and Snow Maiden using the popular modular origami technique.

We hope that our master classes helped you understand the technique of making Santa Claus from paper and encouraged you to be creative. Use a little imagination and create your own kind Grandfather or even several. They will decorate your holiday and create a magical mood!
DIY Santa Claus made from paper- This interesting option For children's creativity in winter. Execution similar crafts you can study in kindergarten, in primary school, in the company of children in extracurricular activities and with parents at home. Paper is a very simple material that will be interesting to work with both very young children and adults, and for each age category we have interesting technique, which we will talk about in more detail today.
Paper plate it is necessary to bend, but not in half, but to bend about a quarter of the plate, we will use the remaining part to create a face for our Santa. We will also need beige paints (you can mix white and yellow). We need to decorate the inner circle of our plate with these paints, leaving the wavy edges white.

It will have a fluffy nose, we will make it from threads following the example of a pompom for hats, using yellow or orange threads. A pompom for a cap can turn out just as fluffy, or it can be cut out from white paper. Near the nose we will have a mustache consisting of two elements that need to be cut out. The eyes can be made from two parts: cut out a white and black circle, the black one should be smaller in size and glue them together, placing one on top of the other, and then glue them to the plate. Our face is ready.
All that remains is to decorate the sharp edge of the triangle with a white pompom circle for the hat. And glue a paper rectangle over the plate - a strip that will mark the beginning of the cap. To make it look like this DIY paper Santa Claus, diagram you won’t need it at all, you can look at the photo example and repeat it using the materials available to you for children’s creativity.

DIY paper Santa Claus: diagram
You've probably already looked at a lot of master classes on the Internet on how to make one, but most of the descriptions presented are more suitable for adults; these ideas will be too complex for children's creativity. It will be interesting for kids to work with multi-colored paper sheets, sheets of cardboard, cut out various figures with scissors and glue them to the surface.
First, you can watch with your child on the computer how it’s done. DIY paper Santa Claus video, and then invite the baby to make the same figure on his own.

The main decoration of Grandfather Frost is, of course, his luxurious beard, and we definitely have to make it for our paper old man, besides, it’s so easy to implement using only white paper and scissors.
However, before making the ford, we need to complete the base; for this we will use colored cardboard - preferably choose red. The cardboard can also be one-sided, because we will roll it into a cone. We will also need a sheet of plain paper or corrugated paper; it will definitely make a voluminous and curly beard. As always, the main assistants in completing this children's craft will be ordinary stationery scissors and PVA glue.
On the cardboard you need to draw an outline: a circular sector (almost a semicircle). What figure should be drawn on cardboard, you can look at step-by-step master class. From this sector we will make the basis for our future craft. The most beautiful and bright base will be red, but you can also use blue cardboard. Such figures will become original decoration for the New Year tree, and even preschool children can do the task without the help of adults.

Do-it-yourself voluminous Santa Claus made of paper we will have it on a cone-shaped base, so the semicircle needs to be rolled up and the edges glued together. The joint can additionally be taped. The base can be in the form of a non-sharp cone, i.e. At the back you will staple only the edges of our circular sector.
We need to cut out a small circle from a white sheet of paper, this will be the face of our craft, and a long white strip, from which we will make a curly beard and bangs.
Now he will process the edge of the white strip: one side must be cut into strips, without cutting to the end, since in children's appliqués we make grass under a tree or flower. Since our beard should be curly, we can add volume to it by twisting the stripes onto a match or pen rod. Now you will see how luxurious the beard of the future main symbol of the New Year turned out.
DIY Santa Claus from colored paper can become a toy on the New Year tree, but for this you need to make a loop on top. From cardboard brown you should cut out two mittens; if you don’t have cardboard of the corresponding color, you can cut out the elements from white paper and then paint them with the chosen color or even make an interesting geometric pattern on the mittens. The mittens should be glued to the sides, slightly below the head.
In the middle of the base on the front side, we first glue a white circle, draw eyes and a mouth on it, make a carrot nose, glue a piece of “curly” paper on the sides, below and above the face. When the glue dries, our craft is ready to become an interior decoration.

DIY Santa Claus from colored paper
DIY paper Santa Claus toy in the origami technique, this is a task for a real master, at least that’s what it seems when you first see the diagram for its implementation. But if the kids enjoy making paper boats and airplanes, then you can focus their attention on other figures that can be made using this oriental technique.

If you make several of these figures, then by attaching them to a thread you will get an original New Year's garland, which can be used to decorate a child’s room, where it is too early to put up a Christmas tree or hang Christmas balls.
This craft will be a great pastime for the whole family; you can arrange a small family competition- who will make the most beautiful Santa Claus using the origami technique?

We will make origami from a colored sheet: on one side it should be red and on the other white. The sheet must be given square shape, cutting off the excess part. Origami is always performed according to the following scheme: a square sheet is folded in the correct sequence until the required shape is obtained flat figurine. The origami technique is famous for the fact that it allows you to get a bizarre, complex figure without using a drop of glue or scissors to create it.
Older children will be interested in the technique of modular origami, where it is necessary to create a three-dimensional figure from paper modules. The folded “triangles” are fixed together in a chain without glue, thus forming layers. Triangles can be used different colors- in this case, our choice fell on blue and white paper. Following the diagram, you can make your figurine with original pattern on the "fur coat".
DIY paper Santa Claus: template
When children perform DIY Santa Claus made from paper, template might come in handy. You print the template on a printer on white or colored paper, then cut out the elements along the contour with scissors. The children's task is to glue the elements to the base so that they form a picture, in our case it should be Santa with a curly beard.

Mothers always choose complex New Year's crafts: they create Santa Claus and Snow Maiden in full height, guided by the technique of creating dolls from nylon tights, and sew for them, sometimes they even embroider fur coats with beads, felt felt boots from wool, and make painted kokoshniks for the Snow Maiden.