
For the playground with your own. Children's playground: ideas, materials, diagrams, implementation, design
A children's playground is an integral attribute of any dacha or private home if children live in it. Buying a swing, sandbox and other attributes is a rather expensive process. It is much cheaper to build a playground with your own hands. Let's look at how to quickly and inexpensively build a playground with your own hands from available materials.
Do-it-yourself design and diagram of a playground
The first and main rule of constructing a playground is to design it in such a way that the playground is a reliable and, most importantly, safe place for children to relax. In addition, when choosing a place to set up a playground, focus on an area with good visibility for adults.
Also, the presence of electrical appliances, wires, and various sharp objects on the playground is unacceptable. The playground should not be located near ponds or swimming pools.

Try to have shade from the trees on the playground during the day, and in the evening it is well lit. The place for arranging the site should be level, it is advisable to arrange a sand cushion on it, which will reduce the risk of injury to children if they fall.
When choosing materials for building a site, we recommend choosing wood. This product is environmentally safe, harmless, lightweight and practical. In addition, wood is easy to process, so it can be used to construct almost any design part. Painting wooden crafts in different colors, you will be able to get an aesthetically attractive playground.
We recommend that you initially create drawings of playgrounds with your own hands on paper. The project must indicate all dimensions of each element located on the site. In addition, it is necessary to determine the safe angle of inclination of the slide and its height.

DIY playground: photos and ideas
The choice of design for a playground should be compared with the age of the children and individual characteristics the area in which it will be built. Most often, the main components of any playground are a sandbox, a slide and a swing. In addition, you can also add slides, a children's playhouse, and a carousel. In general, all components of the playground should be interesting for children to play.
The most important element of any playground is the sandbox. Its creation must be approached with special responsibility. When choosing the size of the sandbox, you should take into account the number of children who will play in it. If the area is not in the shade, then it is preferable to make a sandbox with protection from sunlight. And if you have pets, such as dogs, then it is better to build a lid on the sandbox that will close it at night and during the winter.
Any child will be delighted to have a slide on the playground. However, this element must be especially safe. The slide must have handrails installed to prevent the child from falling. The steps should be designed in such a way that the baby can easily climb them. The angle of the slide itself should not be too sharp, as the baby may fall off it. At the bottom of the slide, you should come up with protection that slows down the child a little during the descent.

If the slide is made of wood, then thoroughly sand the surface and treat it with special compounds that will rid this material of roughness. The main qualities of a good slide are stability, strength and safety.
Try to ensure that there are no sharp corners or loose nails on the structures. It is necessary to cover wooden structures only with environmentally friendly materials. It is preferable to use sand or lawn grass to cover the site. An excellent option is to cover the site with synthetic artificial turf. Under no circumstances should the playground be built on a concrete foundation.
Technology for constructing a playground in the garden with your own hands: making a sandbox
When choosing a place to install a sandbox, consider the following requirements:
- the place where it is installed must be open to parents;
- It is not recommended to install a sandbox under a tree, as leaves and various debris will fall into it;
- make sure you have protection from direct sunlight;
- Calculate the size of the sandbox so that children can fit in it freely.
When choosing the shape of a sandbox, it is best to give preference to a square. This structure is easily constructed from wood. When choosing wood, choose pine, as this material tolerates moisture, temperature changes and solar radiation. In addition, the resin found in wood has an antimicrobial effect.
The standard size of a sandbox, convenient for several children to play, is 200 by 200 cm. Initially, care should be taken to prepare the area for the sandbox. To mark, you will need a cord and pegs. After marking, it is necessary to remove the top layer of soil, approximately 20 cm.
Next, you should prepare the base for filling the sand. It is best to cover the bottom of the sandbox with dense material, since mixing sand with soil will lead to a loss of its attractiveness. A sand cushion about 5 cm thick is placed at the bottom of the sandbox. Next, geotextile material or plastic tiles should be laid on the bottom of the sandbox.
Please note that the use of polyethylene is unacceptable, since after rain moisture will accumulate inside the sandbox, which will not allow the sand to dry out. Geotextile materials, in turn, easily allow moisture to pass through, but do not allow insects and spiders to pass from the soil into the sand.
When using film or plywood, it is recommended to install drainage holes in them. At the corners of the structure, a frame made of beams, 5x5 cm thick, should be installed. To treat the parts, use an antiseptic, and it is recommended to treat those fragments of the sandbox that will come into contact with the soil with resin or bitumen.
To cover each side of the sandbox, make pine boards. At the same time, it is recommended to choose boards 25 mm thick and about thirty centimeters wide.
Please note that there should be no knots or burrs of any kind on the surface of the wood; it must be well sanded. For greater convenience for children while playing, we recommend building sides on the sandbox. They will serve not only as an additional seat, but also as a showcase for various types of sand structures.
As an additional convenience, you can build a lid on the sandbox that will protect it not only from rain, but also from debris and pets. To make the lid, you should build a shield from the same boards, which is fixed on additional bars and hinges. Please note that even a child should be able to open the doors, so do not make the lid massive.
DIY playground photo:
It is possible to equip the sandbox with an awning or a shelter in the form of a fungus, for example. These structures will also protect the sandbox from moisture. In order to build a fungal leg, you will need a beam with a cross-section of 10x10 cm. In order for the leg to be stable, it is buried in the ground at least 80 cm. To treat parts in contact with the soil, use hot bitumen or resin.
Next, you should purchase sand for playing in the sandbox. We recommend choosing the river version. This sand contains practically no foreign inclusions. However, any sand must be sifted before being placed in the sandbox.
There are special varieties of sand with a high clay content. It is easier to sculpt castles and other structures from them. However, the cost of such sand is more expensive.
DIY playground: building a slide
In order to make your own wooden slide, you will need:
- four wooden beams, dimensions 10x10x60 cm;
- one beam 50x50x80 cm;
- three standard floor boards, 6 m long;
- five boards measuring 4x13x60 cm;
- two slats with a round cross-section;
- two sheets of fiberboard and wood lining used in the finishing process;
- fasteners and screws.

In addition, it is necessary to prepare tools such as a hammer, screwdriver, grinder, electric drill, plane, saw, level, tape measure, wood cutting machines, etc.
Instructions for making a playground from wood with your own hands:
1. Initially, you need to create a plan for the slide. The project should indicate the specific dimensions of each part. You can use ready-made slide drawings.
2. In accordance with the drawing, the wood is sawn into individual parts. Logs must be sanded and planed. Bevel the wooden parts to avoid injury to children.
4. Make a 65 cm depression in the ground. Coat the wooden parts of the tree that are installed in the ground with waterproofing mastic or resin.
5. Use a router to make grooves in the posts. The depth of the grooves should be at least 2 cm. Use grooves to connect supports and boards. To tighten the boards, use bolts with self-tapping screws. The result is a frame structure.

6. Connect two wooden posts with grooves in them to the frame. In order to install the floor, you must use a floorboard.
7. Please note that a small gap must be left between the boards to compensate for the expansion of the wood as it gets wet. Use steel angles to connect the boards to the floor.
9. In order to build the frame, process the upper and lower parts of the slide using boards.
10. Sides are installed on the side, the height of which is about 30 cm. To finish the slope, a sheet of plastic, a sheet of galvanized steel or a linoleum coating is used.
12. In order to build a ladder for a slide, use wood 5 cm thick. Initially, build a stringer on which the steps will be fixed. Use self-tapping screws to secure the boards.
13. Install the ladder; use self-tapping screws and stands to secure it to the slide. Don't forget to strengthen the beams. Next, the baluster is installed on the stairs; its height is about half a meter. Install railings on it. Their installation is mandatory.

14. Install plywood or fiberboard walls at the bottom of the slide. They are fixed in groove joints. The presence of a parapet will protect the child from accidental falls. You should also install a roof on the slide; it will protect the kids from the sun in hot weather.
How to decorate a playground with your own hands
In the process of designing a playground, it is not necessary to use expensive purchased materials. A few cans of bright paint and available materials are enough. If you have old tires, plastic bottles, toys made of rubber and plastic, wheels lying around at home, then you can use all these elements to decorate the playground with your own hands.
Let's start with the sandbox. In order to give it an unusual and non-standard appearance, equip it with sides that have different heights. It is possible to use an old tire as a bead for a sandbox. At the same time, it needs to be decorated with different colors.
If the sandbox has a lid, decorate it with paints. At the same time, you can decorate the playground in a certain theme, for example, in the form of a ship, forest, flower bed or garden.
If there is a house on the playground, its walls are painted in different colors. The discs can be used as mirrors or paintings. Install a table and chairs in the house so that children can relax and have tea. If you have old curtains lying around in your closet, feel free to hang them in your home. Place artificial flowers on the windowsills. Girls will especially like this design.
The option of construction on the machine site is possible. To make its frame, use old boards, and the wheels will be old tires. A seat and a toy or real steering wheel should be installed inside. To make the car happy for the kids, decorate it in their favorite color.
To add palm trees to your playground, build them from plastic bottles. If you have old stumps, build paths from them. Using old tires, you can make garden figures for the playground in the form of swans, frogs, a wolf and a hare.
Try to ensure that each element of the playground performs a specific developmental and educational function. It’s enough to show a little imagination and a playground made by yourself will become bright, beautiful and sunny.
A children's playground is not a place for orderly and quiet games: children are expected to make noise, run, climb, jump from heights, get dirty and litter. This means that such a playground should be simple, safe and, most importantly, easily changeable, taking into account the changing interests of the child. Take these into service great ideas other parents!
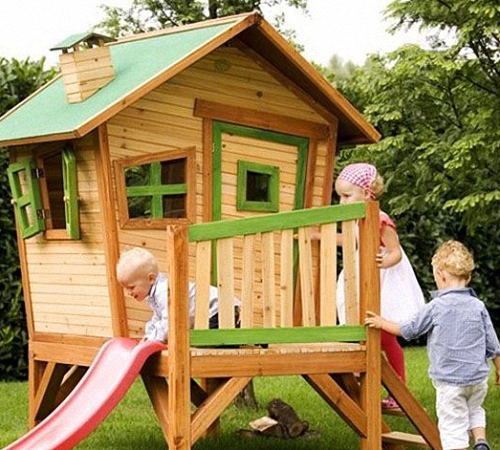
DIY playground for children: houses and huts

A house where you can hide from prying eyes is a necessary element of any summer cottage: puppet tea parties will take place here, there will be a secret base and a pirates’ lair, if necessary, this “home” will turn into a fortress, a tower, a princess’s castle and a magical portal. It is better to build a house without walls, and use thick fabric to protect it from the sun, rain and wind.

Where will we climb?

A simple climbing route can be made from boards or furniture boards and special holds or ordinary wooden blocks. For routes that run close to land, use noodles, flexible swimming accessories made from lightweight foam plastic. They can also be used to make temporary soccer goals or arches for ball games.

Do-it-yourself playground: tires in action

Old car tires are simply invaluable material for arranging a playground. From them you can make swings, ladders, elements for “rope” routes and many other useful things on the playground for children with your own hands.


Sandboxes

A sandbox with a high-stretched awning is both a safe place to play (the child does not risk getting sunstroke) and a ship with raised sails, a house or a hut. If you provide the sandbox with a light lid, then it won’t be afraid of rain either.
Water games

Set up a small area where you can play around with water on hot days. This part of the site can be covered with rubber flooring so that it is not slippery, and then you can simply run a hose here and build several “routes” for water and water mills.

"Board" games

Difficult childhood wooden toys: unusual elements for familiar ones board games easy to cut from wooden blocks. And painted flat stones make excellent tic-tac-toe chips.

Rope routes

Several textile slings stretched tightly between trees at different heights - and future acrobats are happy to conduct their training here.
Drawing with chalk

To prevent paths painted with chalk from spoiling the appearance of your well-groomed summer cottage, select a part of the wall or fence for painting. Paint a board or furniture panel with a special slate paint with the effect school board or make the coating yourself by mixing, for example, dark paint with grout for tile joints or latex paint and primer for it (in a ratio of 8 to 1).
Kitchens

Dolls and guests wandering into the light will not be left without a treat: the ideal country kitchen can easily be made from a couple of boards and blocks and an old sink. Organize a simple “plumbing” and “stove”, give the children unnecessary real dishes - and enjoy the peace.
Why children need a playground is probably worth explaining only to someone who was born six feet tall, wearing a business-like three-piece with a tie, crocodile shoes and a cigar in his mouth. The cigar is, of course, electronic. Even the smoke from it is not chemical, but depicted by holography and is clearly visible without harmful anamorphic glasses.
There are plenty of manuals on how to build a playground for posterity. And in them - really valuable and necessary instructions on safety, reliability of fastenings, quality of materials, etc. However, having reviewed many of these, something like what appears in Fig. below. Paradise, no doubt. Okay, palm trees, a huge stump (it looks like no less than a 100-year-old eucalyptus tree). Maybe they have palm trees like we have quinoa, and they give away high-value industrial wood to everyone for free, just to take it out of sight.

However, in both cases, a middle-income householder who decides to please the children by making a playground for them with his own hands immediately faces the question: where to get the space? No less than 2 acres of land went into such a monumental structure, but what if there are only 6 of them at the dacha? Or even less in your personal local area? A playground for children is built when the economy has already been established. Therefore, next we will consider, first of all, how to correctly arrange everything that children need for joy, trying to keep it to 1 hundred square meters or less. But, of course, the very components of the playground for children will not be ignored.
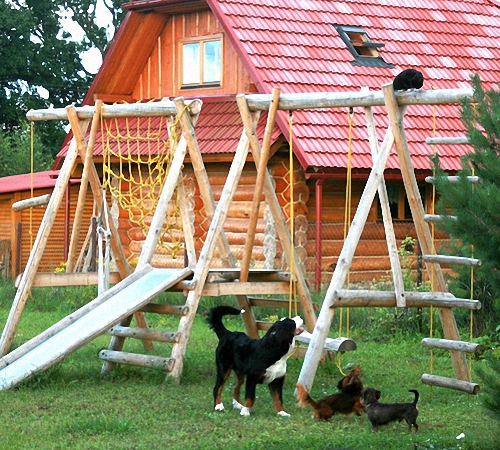
The most difficult case
The most difficult thing to arrange is a children's playground in the country. In addition to the acute lack of space, she remains unattended and unguarded throughout the cold season. That is, in addition to resistance to external conditions and environmental friendliness, the material of the structure should not provide much temptation to possible thieves. At least a temptation worth the trouble of dismantling. Hence, the entire country play complex must be compact and strong and upon completion is inconvenient to approach with a tool. What if they end up being stolen or succumb to bad weather, this shouldn’t bring big losses.
A good option for children play corner at the dacha made from scrap materials is shown in the photo:

The main material in this case is quite reliable, high-quality and affordable - construction pallets (pallets). Occupied area – only approx. 5 sq. m. Behind the climbing frame is a 2-story secret shelter. If one of the younger members of the family is a person of the fair sex, then the car is unceremoniously expelled to the green parking lot, and the garage is transformed into a boudoir, kiosk, doctor’s waiting room, etc. If there is sufficient area in front of the building, a ladder or slide can be attached to the captain's bridge.
About materials
The above case is not trivial. The materials at hand are used mainly for the design of the site; We will return to this issue later. But for its key structures (see below), high-quality construction materials are needed, because we are talking about the safety of the child.
 Tree– coniferous without signs of rot, mold, cracks, or falling knots. Load-bearing elements – timber from 130x130 mm or log from 120 mm. Boards – edged or tongue-and-groove from 20 mm. Before assembly, the parts are treated with an oil water repellent ( water repellent) or are impregnated twice with a water-polymer emulsion. The best finishing coat is water-based acrylic varnish on a well-sanded surface.
The second most important material is metal. In addition to fasteners, heavily loaded elements are made of steel, for example. in sports facilities. In this case, it is preferable to connect the parts by welding: any protrusion is dangerous. The urchins manage to get caught on the seemingly completely smooth head of the bolt with clothing that seems completely unsuitable for this. Metal parts must be painted with a primer and twice. The best paint coatings are acrylic.
Plastics They are easily electrified; in the open air, microcracks appear in them within 1-2 seasons and hygiene disappears. And since plastics are also low-tech at home, it is better to avoid them altogether in a homemade playground. Perhaps the only place where plastic is appropriate on a playground is a manhole pipe. A plastic barrel works well for it. It’s better to take a white, translucent one so that you don’t get scared, start panicking and get stuck. Glass and other breakable or brittle/delaminating materials (composites, for example) are absolutely unacceptable.
Stone The material is also unsuitable for a playground: if you fall down hard, you can seriously hurt yourself on it. If borders are required on the site, then they need to be laid either soft or homemade wooden, or planted phytoborders from soft hardy plants, for example. sedum (sedum).
Separately, it should be said about ropes. In terms of childhood injuries on playgrounds, the top three are consistently occupied by rope railings/fences, entanglement mazes and climbing nets. They overhang themselves over the first ones, not yet being able to correctly assess by eye the stability of the support, fall head over heels and are seriously injured, even breaking their necks. The nets do not leave parents inconsolable, but they cause a lot of fractures and dislocations. Prostitutes do not seriously injure physically, but due to fright and hysteria they can leave an indelible mark on the psyche. Therefore, ropes on the playground are applicable only as hangers for swings, stretchers of awnings and vines - a gymnastic rope with knots.
Note: fabric and non-woven textile products in children's playgrounds are used for awnings and soft fencing. In any case, the fabric should be stretched so that there are no rinsing sides.
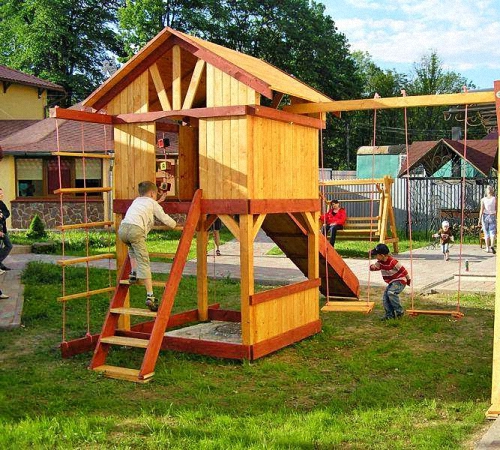
Basic and extended equipment
A traditional typical playground minimally consists of a slide and a fungus. The latter are now most often combined in the form of a 2-story playhouse with a balcony, an air passage, an observation deck, a climbing frame and a ladder. This allows you to create a greater variety of entertainment in the same area, see fig. However, it is impossible to create a sandbox on the first floor of the house: the stomping overhead will in no way benefit the development of very young, “sand-aged” children. The sandbox must be separate.

So, we get a basic set of a sandbox, a combi house and a swing. He is able to last from the first top to the time when it turns out that girls, in general, are not meant to be pulled by their braids. If possible, the following are added to the mini set:
- Free space for quiet games, children's picnics, in winter - for making a snowman, etc.
- Decorative elements for the development of aesthetic sense.
- Boom, that is. push runner.
- Inflatable pool, bathtub, trough or basin for bathing.
- A secret refuge corner.
- Sports complex.
- Playground for sports games.
- Mini flowerbed or mini flower garden.
- Hut or tent.
- Labyrinth.
- Children's carousel.
Many other additions are possible, provided there is free space and the imagination of the parents. But they no longer have a decisive significance for the all-round development of the child, so we will limit ourselves to the remark that most of them and some of the above can be quite placed in the gaps between the safety zones of the main structures, see below.
Selecting a location
Ideas regarding the artistic and decorative design of the playground can be anything; Some of the combinations of business and pleasure will be discussed below. There are no regulations/requirements regarding appearance There are no facilities on the site for children's games. However, when selecting a place for it, certain rules of safety and comfort that promote the proper development of children:
- The site must be within sight of the most habitable room. In private households this is usually the kitchen;
- All structures on the site, including their safety zones, must be within a 45 degree viewing angle. This roughly corresponds to the view of the housewife, who is busy at a stove located in accordance with fire safety rules;
- If the site borders a passage, incl. internal (your own, yard), between him and her there must be a permanent fence insurmountable for children, regardless of the presence of a fence of a different type;
- Reservoirs, wells, utility yards, etc. should also be demarcated. sources of possible danger. In this case, the fence may be light, but necessarily insurmountable for children;
- The site should be located in sectors from north to southeast. Otherwise, the youngest in the sandbox and children engaged in active play should be protected from harsh afternoon light;
- Regardless of the location of the playground, the sun should not blind the eyes of children engaged in active games or sports exercises;
- The sandbox is located first in order of distance from the exit to the site. If he is not there, go first from home;
- The sandbox should not be located under a tree(s);
- The swinging directions of the hanging swing and the rolling out of the slide should not cross the sandbox. Otherwise, the distance between them should be at least 3 m for swings and not less than the height of the slide;
- The same directions should not go to the roadway;
- Between the sports complex and the sandbox there must be a playhouse or swing, or other permanent (immovable) structure, or there must be at least a 3 m distance;
- Safety zones of capital structures should not overlap.
Note: The safety zone of a children's play structure is assumed to be 1 m by default. The slide-out zone is 1.5 x 1.5 m. The safety zone of a swing is equal in length to 1.5 times the height of its suspension, and in width is at least 1.5 m; carousel - its diameter. The safety zones of sports complexes are indicated in their projects.
Examples of layouts of the basic modules of the playground with different orientations according to the cardinal points are shown in Fig. The house is conventionally designated by a gray circle with a star of directions and half-points. The swing's safety zone is shown by a mustard-colored rectangle; house with a slide - thick green. What is a sandbox with an awning, see below.

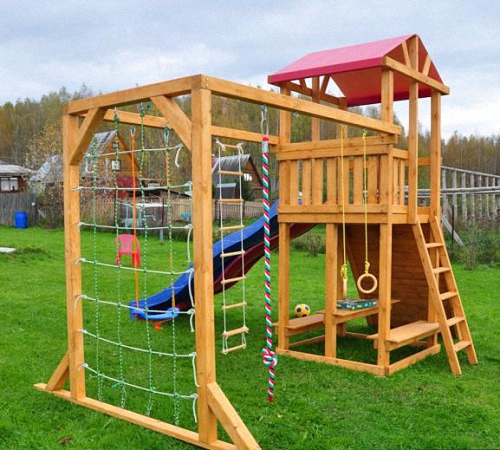
About sports complexes
In Fig. Below are projects of children's sports complexes with a house and a slide (on the left) and only a gymnastic complex of the most compact T-shaped design. From there you can see that less than 30 sq. area is not enough with a standard solution, and the full complex does not leave room for a sandbox. It would seem that home sports in a small area does not shine.

However, it was Russian specialists who developed projects for children's open-air sports complexes based on the conditions of the Russian Federation, namely, the high endowment of middle- and lower-income segments of the population with land plots left over from the USSR. In the West, only a very rich person can afford to have 6 acres outside the city for recreation.
Drawings of one of these children's sports complexes are shown in Fig. below. Material – steel pipe (27-30)x2. Its features are an extremely narrow, but completely justified safety zone, only 0.5 m along the contour. No matter how you play around with this design, its ergonomics are thought out perfectly: if you hurt yourself, it won’t be too bad, but you won’t hurt the little ones nearby. The second is the correct configuration. This makes it easier to place the complex on the site, as can be clearly seen in Fig. with layout diagrams: a site with opportunities for sports does not “climb out” anywhere for 1 hundred square meters.

About fences and dividers
In addition to a protective fence, in a playground for 2 or more children, it is highly desirable to delimit zones. If the space allows, the labyrinth will provide a lot of fun and useful skills; see below for more information on it. The traditional solution to the issue of dividing zones is a fence, and inside the site there are tires or logs, also see below. But the fence, albeit very cheerful, as in Fig. just below is a clear prohibition, which is generally not good for children. The strongest and most reliable discipline is a conscious one, understood with one’s own mind. And from the obvious prohibition during the “holiday of disobedience” you can even tear off a board. And climb where you shouldn’t at all, without even realizing what this is fraught with.

When you need to isolate yourself from the roadway, there is no choice, because... The safety of children in this case depends not only on them. But, for example, a pond or utility yard will not enter the site on its own. In this case, if the platform is made of wood, the ideal lightweight protective fence is wattle fence. First of all, it is not difficult to weave, and free material is found almost everywhere in nature. Secondly, a fairly high fence is very difficult to overcome even for an adult well-trained person. Don't believe me? Try to climb over. It is not for nothing that temporary fortifications - fascines - were once made from wattle fence. In the same way, a bull is not capable of breaking a properly made fence, much less a person. Thirdly, the wattle fence itself is an excellent decoration for a suburban area.
But the most important thing is that children do not perceive the fence as a prohibitive sign. Why? And you can peek through it. Just looking at the pond - well, the water lilies there are beautiful, well, a frog climbed onto a leaf and is croaking. And through a crack, stealthily, a fairy-tale world appears, populated in the imagination by amazing creatures. Okay, we don't have one yet. But then, if a gloomy pig or an angry gander turns to the fence from the other side, you can be scared to your heart's content, without really risking anything. Rest assured, children perfectly distinguish toy fear, on the basis of which reasonable caution is developed, from real fear.
About the soil
An almost ideal soil base for a playground is seeded or rolled: it dries quickly enough after rain, brakes well when it rolls and dampens when it flops, and does not overheat in hot weather. One “but”: it can turn clothes green because they don’t wash well. Therefore, the soil on the playground is often covered with fine gravel. It drains and brakes even better, but it gets hotter under the sun and can get scratched. The ideal backfill would be small, up to 1.5-2 cm in diameter, well-rounded pebbles. But, alas, this is a very expensive material, and its predatory self-procurement is punishable by law.
Modules and elements
Sandboxes
First, what is a sandbox with an awning, which is necessary when the site is located in sectors from the south to the northwest? See fig. There is no need to make the canvas very large and lower its edges too low: it is enough for the awning to shade the sandbox from the high midday sun. Closer to sunset, if the children are still playing at this time, about half of the box should be shaded so that the little ones themselves can settle down where it is more convenient for them.

The second thing that will be very useful if there are two or more children with a sufficient age difference is a sandbox-truck, or, depending on the inclinations of the older one, a sandbox-ship. In the latter case, the wheelhouse with the navigation bridge is located, like on any decent “transport vehicle,” in the stern. Then the younger ones will go about their sandy business without feeling intrusive guardianship, and the older “parent” will be able to fulfill his duties literally playfully, without getting bored. And if he ever takes the wheel or stands at the helm professionally, it has already been deposited at the level of reflexes: the main thing in a flight is passengers and cargo.

House with a slide
Here we will fill in something missing. The first is the slopes of the slides. They are most often bought ready-made, made of plastic. There are basically 3 designs to choose from: straight, spiral, see figure, and pipes.

It is better to ignore the latter: a children's slide is not a water park, water lubricant does not flow through the pipe. Children in tube ramps often get stuck with everything that follows. In terms of the degree of psychological trauma, tube rays are almost on par with prostitutes.
Of the others, if there is very little space for a platform, it is better to take more expensive spiral ones. Their use allows, in a standard design (see above), to abandon the roll-out zone, because it will be to the side, within the general safety zone. And rolling with a screw is more fun and “cooler” than just like that.

However, as stated above, it is best to avoid plastic in the playground. Therefore, for fairly skilled home craftsmen, we give in Fig. on the left is a profile of a children's slide made of sheet metal. The sliding line is highlighted in red, the sides of the trough-shaped chute are highlighted in brown, the straight protective side with a bend outward is highlighted in blue; green - elastic pad on it made of smooth rubber. The latter is necessary to brake with your hands. The width of the ramp gutter is 600-700 mm.
Note: It is unnecessary to remind, but for the sake of the seriousness of the moment, let us recall that the overlaps of the sheets that make up the gutter and sides should be directed down the slope. Otherwise, the overlaps will turn into knives.
Swing

The cradle (seat) of a hanging swing is often made from tires. Then, if the children are boys, it is better to hang the tire vertically, on the left in the figure, so you can “ride” to your heart’s content. For girls would be better suited a swing cradle made of tires, suspended flat: here it’s already convenient to sit in a circle and gossip like a woman.
The cradles of sports swings, on the right in the figure, are made hard, in the form of a flying trapezoid with rings, and soft. Making rings separately is recommended only for children who are already involved in athletics and have had some success in this: many beginning gymnasts were quite seriously injured trying to make a cross on the rings without sufficient physical training.
If there is enough space, little ones will really like and find the balance swing, inset in Fig. below. If there is not enough space, and the child shows the makings of a dexterous and strong little one, they can be replaced with a spring swing. The diagram of their device is shown in the same figure. The spring is from the shock absorber of a small car or motorcycle, depending on the age and weight of the rider.

About labyrinths
A labyrinth for children's games must satisfy the following conditions:
- To be one-dimensional, i.e. from partitions standing on the ground.
- The partitions should not be solid or high: older people should see over them and be able to climb over them, and younger ones should see below them and crawl up.
- Plant labyrinths are not allowed for children to play; they can get lost in the bushes out of fear and get hurt.
funny beauty
Tires
Functional, i.e. Suitable for games, decorative elements of children's playgrounds are most often made from truck tires. Let's leave aesthetics to the adults. Children are pragmatists, it is important to them that it is elastic, springs well, and does not break if you hit it. Try to use only solid tires: cut tyres, over time, often have traumatic cord ends sticking out. Or regularly check the tire structure and go over the protruding wires with a grinder and a grinding wheel.

A classic product of this kind is the boom runner. It can also be a zone delimiter or a barrier between the sports complex and the sandbox if there is not enough space. So, in all respects it is better to dig tires for it not lengthwise, as is customary, but across, as in pos. 1 pic. at intervals of approx. 30 cm:
- We clearly see the gap where there is no need to step.
- If your foot slips, it will slip sideways. Anyone who knows about sports physics knows that then the first thing to come into contact with the underlying surface, without any grouping skills, will be not the face, but the fifth point.
- It’s convenient and safe to push: the legs themselves rise to the position of the strongest support, and if the leg slips, then everything is as before. case.
- Anyone who is pushed does not fall backwards, risking injuring his back or hitting his head, but to the side, which is safe for children.
For small ones, if there are several different tires, you can simply pile them up, pos. 2. For those who are older and more skilled - an “advanced” climbing frame in addition to the usual one, pos. 3. Pos. 4 is actually a godsend: an old, but real steering wheel, and if you sway, it’s like driving a tractor over potholes.
Pos. 5 – the well-known sun made of tires and bottles is actually not just a decoration. PET bottles are an excellent, stable target for darts, arrows and generally anything thrown. And don't be afraid that children will grow up aggressive. On the contrary, it is precisely those who in childhood did not have the opportunity to express natural male inclinations, conditioned by the eras of biological evolution, in a harmless way, when they grow up, have a much greater chance of failing to express them in an adult way, up to the highest measure of responsibility under the legislation of the place where the act was committed.

For girls, and perhaps not only for them, a mini-flower bed made of tires, on the left side of the trail, will suit well and decorate the entire area. Fig., or a flowerpot made from a worthless wheel. In the latter case, in view of the above-mentioned risk of injury from the cord, it is better to turn the flowerpot with scallops down, as on the right there. What it lacks in aesthetics here and there it makes up for in coloring.
They make a lot of other things out of old tires. For children, without any obvious functionality - different figures. For example, what kind of crafts there are for the playground made from tires in the form of different animals, see.
Video: crafts made from tires for decorating a playground
Pieces of wood
We won’t dwell on driftwood or roots painted to resemble animals: everything here depends on the source material, the appearance of which is impossible to predict, and already known creations cannot be repeated either - no two driftwood are identical. Let's deal with what is more or less stable in its original form: logs. Not necessarily business measures; any dead wood or waste from tree pruning will work for crafts for children made from logs. Simply by sawing logs out of them, and not very carefully, you can already build a good zone delimiter, on the left in the figure, a sandbox, in the center, or a furniture set for a doll picnic, on the right.

And with a little more effort and skill, make figures for a composition that has independent meaning or, say, for a children's carousel. Drawings of some of these are shown as an example in Fig. below.

Another idea
The arrangement of the playground is still the same, without going beyond 100 square meters. m and without interfering with anything else there, another thing can be completed. Let’s say you still have a baby bath, but you don’t intend to have any more offspring. The old adult bathtub is too deep, it is better to let it sit. Or there’s a leaky trough lying around in the barn. Or, let’s say, you came across an ad: “Used culinary equipment for sale,” and in it – “Donut pan 1100x650x100.” In general, you need any tub with a length of 80-90 cm, a width of about half as much and a depth of up to 15 cm.

Why do children need this? Let the ships go. For adults, applying patches to construction or aquarium silicone and painting, if rusty, is not a difficult task. It won’t take much water, so you can simply change it more often without excessively using disinfectants that are not always safe. If you keep the baby mini-sea in the sun, and throw a couple of grains of potassium permanganate or methylene blue (pharmacy blue) into the water until it turns barely pink or blue, and cover the pond with film at night, a week of uninterrupted navigation in it is guaranteed. Children get a lot of delight and fun from it. There will also be a lot of splashes and wet clothes, but there’s no need to get angry here, or were you not like that yourself?
(No ratings yet)
We will send the material to you by e-mail
D For the normal development of children, they need to actively spend their free time - running, playing, having fun. When creating playgrounds, the main attention is paid to their safety and functionality. To build playgrounds with your own hands on a country plot or dacha, photos of which you will find in this article, you will need some tools, carpentry, construction and plumbing skills.
Homemade playground
Decorating children's playgrounds with your own hands, photos of which are posted on the Internet, requires the presence of certain equipment. If you don’t have something, don’t be upset, here are some ideas that will help you equip your playground.


Making a slide house
A do-it-yourself children's playground at the dacha, a photo of which you can find on the Internet, always includes a slide or a house slide. The base of the slide is a frame of 4 vertical posts. You can use only 2 racks, but then the possibility of creativity is reduced and the slide will be limited to one slope and one rise. On a frame of 4 racks you can make a slide with one slope and several rises. Make one climb in the form of a ladder, another with normal steps, and the third with a rope.

This design seriously diversifies children's leisure. For a slide with a straight slope, it is undesirable to make the angle of the slope more than 30 degrees relative to the ground in order to avoid excessive acceleration and injuries.

Useful advice! If possible, use a plastic ramp, which is sold in stores. With its help, children will receive More fun than from a straight wooden slope.

What to make a slide house from
For this you will need:
Preparing the base
Find a place for the slide and prepare a hole for the foundation of the frame. We recommend making a square frame with a distance between posts of 1 meter. The side size of the pit should be 1.5 meters, the depth should be at least 20 cm. Compact the bottom of the pit and pour a 10 cm thick layer of crushed stone (fraction 15–25 mm) there. Compact it. You can also make do with small holes under each block. In this case, the depth of the pit should be at least 50 cm. Soak the lower edge of the beam with diesel fuel and molten bitumen, the treated part should rise above the ground by 1.5–2 cm. Place a crushed stone cushion on the bottom of the pit - fraction 15–25 mm, thickness 5 –10 mm. Insert the pillars into the hole, level them and ensure their correct orientation - their edges should be parallel to each other (this is not required with logs or round bars). Then pour concrete.

Useful advice! The less water in concrete, the stronger it will be. To make thick concrete more flexible, add plasticizers to it, which can be bought at a hardware store.
Bottom harness and ramp
Tie the bars with a 50 mm thick board at the floor level of the house, and also install one longitudinal jumper. Attach the boards to the bars using self-tapping screws no less than 100 mm long. Make a tray for the ramp from a 25 mm thick board. To do this, cut 2 boards, the length of which is slightly longer than the length of the slope. Mark the angles of contact with the framing frame and the ground, then cut the board using a circular saw or jigsaw. Place the boards against the trim to make sure you have done everything correctly. Then cut the lintels from the same board. The length of the jumpers is equal to the width of the slope. Lay the long boards on the ground and use self-tapping screws to attach the lintel to them from the bottom.


The distance between the jumpers is no more than 30 cm, and install the first and last jumpers 5 cm from the edge. Make a cutout in the upper edge of the board so that the slope rests on the frame as if on a shelf, and the jumpers are flush with the frame. Attach the ramp to the harness using the corners of the bolts with nuts and self-tapping screws. Install the corners so that children do not get scratched. Attach the corners to the slope using bolts and nuts so that there is nothing protruding or sharp on the side of the slope. Sew up the slope with plywood using self-tapping screws. They must be recessed by 0.5–1 mm, then puttyed and sanded. Secure the bottom edge of the ramp using pegs or anchor bolts driven into the ground.

Ladder
Cut two pieces of 50 mm thick board, the length of which will be slightly longer than the length. Mark and trim the angles of contact with the harness and the ground. Cut 24.5mm wide grooves into these boards to accommodate the steps, then cut the steps to the required width and assemble the stairs. Attach the steps to the side boards using self-tapping screws. Attach the ladder to the harness and the ground on the side opposite the slope. Attach supports and railings to both sides of the stairs. They can be made from 25 mm thick boards. Posts and railings should be smoothed using a hand or electric plane to remove any sharp edges and then sanded thoroughly. The top edge of the railing must be attached to the posts.

Additional entrances, roof trim and roof
On one of the sides, make a ladder from the same block that was used for the racks. Process the cut bars using an electric planer to slightly round the edges. Attach these bars to the posts at a distance of 20–30 cm from each other. Screw the first block at a distance of 20-30 cm from the ground. Prepare for an extreme climb to the lodge. To do this, make the same tray as for the ramp, but installed at an angle of no more than 20 degrees relative to the posts. Tie the posts at the ceiling level of the house using a 50 mm thick board. On the side of the extreme entrance, strengthen the strapping using steel corners. Cut and lay plywood on the floor, then line the ceiling with plywood. Cover the outside of the house with plywood, making round or oval entrances. Determine the size of the entrances/exits yourself so that the child is comfortable. To make the roof, cut 4 rafters from 25mm thick boards. Determine the angles of the rafters based on the height of the roof. Attach the rafters to the corners of the frame and connect them together from above using metal corners. Cut the plywood into pieces of the required size and sew up the roof.

Cutting plywood with a jigsaw
Final works
After finishing the work, be sure to sand all the places where a child could get a splinter. Then treat the slope, steps and extreme rise with parquet varnish. Attach a 10–15 mm thick rope to the top harness on the extreme climb side and tie knots on it every 20 cm. Paint the house so that it looks beautiful.

Summer is coming, vacation. How to organize leisure time for children in nature, in the countryside, in the countryside? We make a playground for children ourselves!
In the summer, most parents try to take their children out of dusty, polluted cities into nature. If you spend the summer months at the dacha with your children, then you need to make sure that summer holiday was not only to their benefit, but also to their joy. To prevent your child from getting bored at the dacha, make a playground for him with your own hands. This will require very small financial investments plus your time and imagination. Be sure to involve the children themselves in creating the playground. Firstly, joint work helps to unite the family and strengthen the relationship between parents and children, and, secondly, designing a playground is a creative activity that will be useful for general development child.
Any child will prefer to play natural materials(for example, wood) artificial plastic. Therefore, we will focus on creating crafts for the playground from natural materials.
The required components of any children's playground are as follows:
- sandbox
- water
- green spaces
- children's playhouse (tent, awning)
- swing
- natural materials for play (gravel, stones, tree cuts, cones, twigs, plants, etc.)  1. DIY playground. DIY sandbox
All children get a lot of joy and pleasure when playing with sand. Playing with sand provides unlimited opportunities for a child's development. You can make Easter cakes from sand, build castles and tunnels, cook “soup” for dolls, and it can be transported in cars. Another fun thing to do is bury various objects in the sand and then dig them up. You can sprinkle dry sand on the beetle, and then watch how it gets out of it. It is interesting to draw pictures and write letters on damp sand.
Making a children's sandbox with your own hands is not at all difficult. First of all, you need to choose a suitable place for it. The sandbox should not be in the sun, but at the same time, a too dark, damp place is not suitable for it. If the child is still small, the sandbox should be near the house so that the baby is always in your sight.
You can fence off the sandbox using logs, stumps, and boards. If the sandbox is large enough, you can divide it into several play areas (see photo below). 
To protect from the sun, you can make a canopy.

2. Children's playgrounds for the dacha. Swimming pools
Just like with sand, children only like to play with water. Most best option- combine games with water and sand. Make sure that your child always has a source of water near the sandbox. Even a small bowl of water will be enough.

Of course, any child will be delighted to have a pool at their dacha. 
Another good fun is to spray each other with water from a hose on a hot summer day. Or you can ask your dad or grandfather to make an outdoor shower from PVC pipes. 


3. Children's playgrounds. Children's playgrounds photo
When creating a playground with your own hands, you cannot do without all kinds of logs, stumps, tree cuts, and boards. You can make tables and chairs from stumps and surround the sandbox with them. Stumps and logs can be used as sports equipment: it is useful for children to learn to walk on them while maintaining balance. The tree cuts will make a nice path.
A child's imagination can turn a simple log into a bridge spanning an abyss, into an airplane, a car, a horse, etc. Such games with object replacement are very useful for development. creative thinking children. 


4. Decoration of the playground. DIY playground photo
A prerequisite for a good playground is the presence of greenery: trees, shrubs, grass, flowers.
Large trees provide protection from the sun on a hot summer day. They are fun to climb. 
Sometimes trees have to be removed for various reasons. However, you should not cut down the tree at the very root - turn it into an interesting decorative element - a fairy-tale “house”. 
The base of large trees is the best place to create fairy houses. Making such a fairy-tale house from any available material will be interesting for every little girl. 


Be sure to help your child make his own flowerbed, which he will take care of on his own. 

Even if you yourself prefer not to plant anything in your dacha, make sure that your child has his own small garden. Just a couple of beds where he can grow unpretentious and tasty plants, for example, green peas. 
5. Crafts for the playground. Decorating a playground with your own hands
Decorating children's playgrounds is an interesting and creative activity. Handmade crafts made from wood, tires and plastic bottles are suitable for decorating a children's playground. Here are some ideas for decorating a playground with your own hands. Be sure to involve children in the process of creating crafts for the playground. 


6. How to make a playground. Playground ideas
When creating a playground with your own hands, be sure to give your child a secluded corner where he can be alone or in the company of his friends, dream, play, read, and finally take a break from you, the adults. This could be a purchased children's playhouse or tent. Or you can make a children's house (tent, pavilion) with your own hands. Here are some interesting ideas.
DIY children's house made of wood 
Children's houses for dachas. Children's houses tents.
The easiest way to make a children's house with your own hands is to stretch a rope between two trees, pillars, between a tree and a fence (see photo below) and throw a thin blanket over it. The ends of the blanket must be tied with ropes to pegs driven into the ground, or pressed with stones. 

DIY children's house.
The most interesting way to make a children's house for a summer cottage is to “grow” it on your own plot. Any climbing plants with lush foliage, such as beans, are suitable for this. 
Using the same principle, you can “grow” a children’s house from sunflowers. Sunflowers are a good plant to grow with children. They have large seeds, grow quickly and are very unpretentious. Plant sunflowers around the perimeter of the circle at a distance of 10 cm from each other. When they grow to 1.5 meters, collect their tops and tie them together - your sunflower house is ready! Yes, don’t forget to leave room for entry when planting! 
7. DIY playground. Children's playground made of wood
As we already mentioned at the beginning of the article, be sure to make sure that the child has natural materials available for play: sand, water, large stones, small stones, twigs, pine cones, plants. Games with natural material are of great importance for the development of sensory perception, motor skills, creative thinking of the child, and have a beneficial effect on the physical and mental health of children. 

8. DIY playground ideas.
Concluding our review article “Do-It-Yourself Playground,” we will share with you a few more useful ideas for decorating playgrounds.
Plexiglas easel.
Many mothers know how useful games with paints are for young children. But most do not very often allow children to draw at home, because... After such activities, you have to wash both the child and the apartment.
Games at the dacha in warm weather have one great advantage - a child dressed in only panties, no matter how dirty he gets, can be very easily washed right on the street, by watering, for example, with warm water from a hose. And at the same time, you don’t have to worry about the cleanliness of the carpet, furniture, or floor. Let the children at the dacha have plenty of fun with dirty materials, with the same paints, for example. A homemade plexiglass easel, which can be washed using the same hose, will provide you with invaluable help. 

It's a good idea to hang a chalk board on the fence. Don't forget to give your child crayons, a bucket of water, and a rag. 
Taking care of physical development children, you can make a rope bridge and bungee for them. And from an old chair you can make a comfortable swing. 

Good luck in fulfilling your plans!