
How to do simple gymnastic exercises for beginners? Gymnastic exercises Gymnastic exercises
(Told by master of sports in rhythmic gymnastics Yulia Sitnikova)
You've probably had the opportunity to watch gymnasts perform on TV more than once, how they masterfully perform the most complex technical elements. All this is many years of training. And where did it all begin? Mothers bring little creatures to rhythmic gymnastics at the age of 4-5 years. The first year is one of the decisive stages: girls learn the basics of gymnastics - the basic basic elements, they are stretched, they do a lot of flexibility exercises, they pump up the muscles of their legs, abs, back, arms, and learn to pull their toes and knees. And most importantly, girls begin to feel (control) their bodies. In this article we will look at the main (basic) elements with which rhythmic gymnastics begins.
I. Twine.
There are several types of twines: right, left, transverse and vertical. The vertical one is a more complex element and here, in addition to stretching, you also need to be able to maintain balance on one leg. Stretching is very important for a future gymnast. Therefore, the element needs to be given a lot of attention, especially to the correct execution. Before doing stretching or flexibility elements, you must first “warm up” the child. Jump a little, run with him, do squats, squat (like ducks) so that the child’s muscles are elastic and easier to stretch. Remember - never pull on an unheated (“cold”) child; in addition to pain, you can also damage the baby’s ligaments. Do not do anything abruptly, only with smooth movements and springing several times.
There are several ways to stretch for splits:

Correctly executed twine:
- right or left split: the child sits on the split, shoulders and hips are on the same line, the back is flat, the knees and toes are tense; - transverse split: stand on the side and look, if the legs are on the same line, the knees and toes are tense, then the child is sitting Right. If there is no line (i.e. a corner instead of a line), then it is not a split, but legs apart).
If you want to achieve results in stretching, then it is advisable to do the exercises daily, then the muscles will become more elastic. And of course, the sooner you start doing it, the better. Another important element for twine is the fold.
II. Fold.
A fold is when a child sits on his butt, his legs are together in front of him, and his tummy lies completely on his legs, his hands clasped his heels, his knees are stretched like “strings.” 
Exercises to help prepare for the fold:
- The child sits on his butt - his legs lie together in front of him on a small chair and we bend forward (put the tummy on the legs) trying to grab the heels.
- The child sits on his butt, legs in front of him - we do exercises with both feet together: towards ourselves - pull towards the floor (20-30 times), knees stretched. Then we fixed our feet towards ourselves and leaned towards the legs, trying to reach the feet and grab them.
- Standing position: legs together, knees extended, bend forward - you need to put your palms completely on the floor, then try to hug your legs. This exercise can also be performed in motion: we take small steps with our legs together with a forward bend and reach the floor with our hands (or place our palms on the floor), the tummy should lie on the walking leg.
- We stand facing the wall bars - we throw one leg onto the wall bars at the level of the hips (hips and shoulders on the same line) - and bend towards the leg (to the right and to the left).
Your baby will be better able to do these exercises - if you are an example for him! Do these exercises opposite each other and point out your baby’s mistakes. Be a positive example for him! What the fold exercise does is stretch the hamstrings, which play a big role when stretching into splits.
III. Bridge.
Your little one has probably tried to stand on the bridge on his own more than once. Even when they are very small, they often bend over backwards, making their first funny parodies of the bridge. How to make bridges correctly? The correct bridge is when the fingers are as close as possible to the heels of the feet (touching is desirable), the feet are shoulder-width apart (a little wider is possible). The bridge turns out to be beautiful and high. 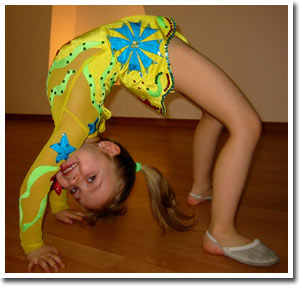
Exercises to develop flexibility and pump up the back muscles of a child:

When the child’s back is already a little prepared, it’s time to start teaching him how to make a bridge “from above”, i.e. bridge from a high position. First, it is better to lay something soft on the floor (so as not to hit your head), since the child’s arms are still weak and will creep to the sides, and of course, do this exercise at first only with mom (dad) nearby. Then you should take the correct stance: feet shoulder-width apart, hands at the top near the ears, eyes raised up and looking at the tips of the fingers. Then hold the child under the back (it’s better for you to take a position on the side of the child and he will, as it were, lie on your hand), the baby little by little (slowly) begins to tilt back. When the deflection is so good (the eyes see the floor), then you can lower your hands to the floor. You can also hold the child by the swimsuit (T-shirt, blouse) while standing in front of him. Each time, reduce the degree of your participation in the process of standing on the bridge. When you are sure that the child will not fall on his head, try to have the child make the bridge on his own. And one more thing very useful exercise which will help your baby learn to make a “bridge from above” - the child stands with his back to the wall (preferably a Swedish one) at a short distance from it, bends and begins to gradually move his arms to the very bottom of the wall and then, moving his hands to the floor itself (if This is a Swedish wall - he intercepts the sticks alternately with his right and left hands).
The back has been stretched, the legs have been stretched, it’s time to pump up the abs. There is a good exercise corner for this.
IV. Corner
Corner - sitting position on your butt, legs together, lift your legs and arms off the floor and hold the corner. Hands to the side (will help maintain balance), legs point up towards the ceiling. It is advisable to hold the corner for 5 seconds to begin with. Then, each time you repeat this exercise, increase the time it takes to perform it. Your child will have more fun doing this exercise if you keep him company.
Several exercises to strengthen your abs:

There are still very good exercise to strengthen the lateral back muscles: - you lie on your side with the baby opposite each other, one hand under your head, the other lies in front of you. The legs are extended and one of them is raised 45 degrees. We make movements - we pull one leg up to the position of the other (as if we are kicking up the raised leg), the lateral back muscles are included in the work. - you are in the same position, but now you raise your body, leaning on the hand that is in front of you. Second hand behind the head.
V. Birch
Birch - lying on your back, legs up at the ceiling, holding your butt with your hands (arms bent at the elbows, legs together). You’ve probably done this exercise yourself more than once; now teach your child how to make a birch tree. At first it will be very difficult for the baby to hold his butt in his hands)), but with your help (hold his legs up) he will do it much better. 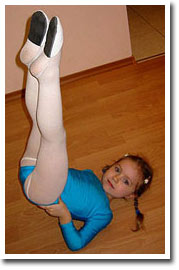
VI. Martin
Swallow - standing position, back straight, arms to the side, legs together. We raise one leg back, preferably so that the body remains vertical and the leg is raised as high as possible (horizontal to the floor and both legs extended). For a baby, this is a rather difficult exercise, since you need to learn to transfer the center of gravity of your body to one leg and be able to maintain balance. To begin with, start practicing the “heron” exercise with him: standing on one leg, the other leg bent at the knee and the toe pressed to the supporting leg, arms to the side (help to maintain balance). Alternate your supporting leg. As soon as the “heron” begins to turn out, move on to the “swallow”. In addition, a very useful exercise is to walk in one line: lay out a ribbon or jump rope and let the baby walk along it. 
VII. Somersault
Somersault is an element that young gymnasts learn in the first year of training and then use throughout their entire sports life. Standing position, one leg extended slightly forward, arms also directed forward. We take a step with our legs, touch the floor with our hands, bend our heads towards our tummy, sort of group ourselves, roll onto our back, bend our crossed legs under ourselves and rise on the same leg with which we took the step. What mistakes can be made when performing this element: - make sure that the child does not stand on his head when performing a somersault (dangerous, it can damage the neck), - the somersault must be done in a group, then it will be neat and fast, and this is especially useful when the somersault is performed in a bunch of gymnastic exercises.
After you have worked out, it will be good to “unload” the spine. To do this, if you have a wall bars, then you can hang on the wall bars, if not, then take the child by the arms (or legs) and lift him off the floor.
 |
 |
Article added with permission from Yulia Sitnikova
Gymnastic exercises have an effect not only on various systems of the body as a whole, but also on individual muscle groups and joints, allowing you to restore and develop some motor qualities - strength, speed, coordination, etc. In this regard, they are divided into general developmental (general strengthening) and special. General strengthening exercises are aimed at healing and strengthening the entire body. The purpose of special exercises is a selective effect on one or another part of the musculoskeletal system, for example, on the foot with flat feet or traumatic damage; on the spine when it is deformed; on one or another joint with limited movement. Exercises for the torso, in their physiological effect on the body, are general strengthening for healthy person. For a patient, for example, with a disease of the spine (scoliosis, osteochondrosis, etc.), they are included in the group of special exercises, as they contribute to solving the immediate therapeutic problem - correction of the spine, increasing the mobility of the spine, strengthening the muscles surrounding it, etc.
Various movements for the legs are among the general strengthening ones when exercising with healthy individuals. The same exercises, used according to a certain method for patients after surgery on the lower extremities, are special, since with their help the functional restoration of the limb occurs.
Thus, the same exercises for one person can be general developmental, for another- special. In addition, the same exercises, depending on their methodology,
applications can help solve various problems. For example, extension or flexion in the knee or elbow joint in one patient can be used to develop mobility in the joint, in another - to strengthen the muscles surrounding the joint (exercises with weights, resistance), in a third - to develop muscle-joint sense (precision reproduction of a given amplitude of movement without vision control). Typically, special exercises are used together with general developmental exercises.
The basis of the classification physical exercise there are several signs.
Anatomical sign. There are exercises for small (hand, foot, face), medium (neck, forearm, lower leg, shoulder, thigh), large (limbs, torso) muscle groups.
The nature of muscle contraction. Based on the nature of muscle contraction, physical exercises are divided into dynamic (isotonic) and static (isometric).
Dynamic exercises. The most common are dynamic movements in which the muscle works in an isotonic mode. In this case, periods of contraction alternate with periods of relaxation, i.e. the joints of the limbs or torso are set in motion. Examples of dynamic exercises include flexion and extension of the arm at the elbow joint, abduction of the arm at the shoulder joint, and bending the torso forward to the side. The degree of muscle tension when performing dynamic exercises is dosed due to the lever, the speed of movement of the moved body segment and the degree of muscle tension.
According to the degree of activity, dynamic exercises are active and passive, depending on the task, the patient’s condition and the nature of the disease or injury, as well as the creation of a strictly adequate load.
Active exercises are performed by the patient independently under normal or easier conditions (with the elimination of gravity and friction). To facilitate movements, special sliding planes have been proposed - horizontal and inclined, roller carts, various suspensions that eliminate the friction force at the time of active movement. To make muscle contraction more difficult, movements with shock absorbers or resistance provided by the instructor are used. Measured resistance can be applied at different stages of the movement - at the beginning, in the middle and at the end.
Passive exercises performed with the help of an instructor without willpower patient, while active contraction
no muscles. Passive exercises are prescribed to improve lymph and blood circulation, prevent stiffness in joints in cases where active movements cannot be performed by the patient himself, as well as to recreate the correct pattern of motor activity (for example, with paresis and paralysis of the limbs). Passive movements stimulate the manifestation of active movements due to the reflex influence of efferent impulses that arise in the proprioceptors during passive movement. In addition, they are less stressful on the body and therefore can be performed in the earliest stages of traumatic injury or disease of the musculoskeletal system. Static exercises. Muscle contractions in which they develop tension but do not change their length are called static (isometric). For example, if a patient, from the initial position lying on his back, lifts his straight leg up and holds it for some time, then he thus performs first dynamic work (lifting), and then static work; in other words, the hip flexors perform an isometric contraction. Muscle tension under a plaster cast is quite widely used to prevent a decrease in muscle strength and endurance in traumatology and orthopedic clinics.
Isometric muscle tension is used in the form of facial (performing movements at a rhythm of 30-50 per minute) and long-term (muscle tension for 3 seconds or more) tension. Rhythmic muscle contractions are prescribed from the 2-3rd day after injury or illness. At first, the patient performs the exercises as an independent methodological technique; in the future, they are recommended to be included in LG classes. 10-12 tensions during one session should be considered optimal. Long-term isometric muscle tension is prescribed from the 3-5th day after injury or illness with an exposure of 3-5 s, subsequently increasing the latter to -7 s. Longer exposure (more than 7 s) does not give a greater clinical effect, but, on the contrary, causes sharp vegetative changes, expressed during periods of muscle tension by holding the breath, and in the “after work hours” by increased heart rate and breathing.
Nature of exercises. By the nature of the exercises, the latter can be grouped as follows: a) breathing; b) corrective; c) to relax muscles; d) to stretch muscles; e) balance exercises; e) reflex; g) to coordinate movements; h) rhythmoplastic; i) using gymnastic apparatus and equipment.
Breathing exercises are used to improve and activate the function of external respiration, strengthen the respiratory muscles, prevent pulmonary complications (pneumonia, atelectasis, pleural adhesions, pleurocardial adhesions, etc.), as well as to reduce physical activity during and after physical exercise.
Dynamic, static and drainage breathing exercises are widely used in rehabilitation treatment.
Dynamic breathing exercises These are exercises during which breathing is carried out with the participation of auxiliary respiratory muscles, with the movement of the limbs and torso.
Static breathing exercises are called deep, rhythmic breathing exercises performed without moving the arms, legs or torso. This group of exercises includes:
1) exercises that change the type of breathing: a) full type
breathing; b) chest type of breathing and c) diaphragmatic breathing.
The most physiological is full breathing when
inhalation time rib cage expands successively into
vertical direction due to lowering of the diaphragm and
in the anteroposterior and lateral directions as a result of simultaneous
constant movement of the ribs upward, forward and to the sides;
2) exercises with dosed resistance: a) dia
phragmatic breathing with resistance from the instructor's hands
areas of the edge of the costal arch, closer to the middle of the chest;
b) diaphragmatic breathing with laying on the upper area
quadrant of the abdomen of a bag of sand of various weights (0.5-1 kg);
c) upper thoracic bilateral breathing with overcoming
resistance when pressed by the instructor's hands under
clavicular region; d) lower thoracic breathing with the participation
diaphragms with resistance under pressure by the hands of the instructor
in the area of the lower ribs; e) upper thoracic breathing on the right with
resistance when pressing with the instructor's hands at the top
parts of the chest; f) use of inflatable toys,
balls.
Drainage breathing exercises are called exercises that promote the outflow of secretions from the bronchi into the trachea, from where sputum is evacuated during coughing.
When performing special physical exercises, it is necessary that the affected area is located above the bifurcation of the trachea, which creates optimal conditions for the outflow of secretions from the affected bronchi and cavities (Fig. 2.2).
Rice. 2.2. Drainage positions for all lung segments. In numbers
COMPLEXES OF GYMNASTIC EXERCISES
The proposed sets of gymnastic exercises are compiled for various mass sports and gymnastic performances and sports holidays schoolchildren. All of them were tested during rehearsals and performances. They are necessary to provide methodological assistance to everyone involved in the preparation and conduct of mass sports and gymnastic performances of schoolchildren under the “Starts of Hope” program and other physical education and sports events in schools and camps summer holiday children.
There is no doubt that with sincere interest and creative imagination many leaders of mass sports festivals can come up with their own, more spectacular and original sets of gymnastic exercises.
You can use melodies that are constantly updated and heard on radio and television.
Complex 1.
Exercises with balls for younger children school age
Children run out onto the field and line up at their points in columns of 12 participants each. The calculation of the columns is from left to right (girls are in odd numbers, boys are in even numbers). All the children have medium-sized rubber balls in their hands: boys have red ones, girls have blue ones.
Starting position - main stance, ball below.
I. 1. Hands forward.
2. Hands up.
3. Same as count 1.
4. Hands down.
5. Hands in front of the chest.
6. Same as on count 2.
7. Lean forward and touch the ball to the ground.
8. Straighten up, ball on chest.
II. 1. Squat, ball forward.
2. Straighten up, ball down.
3. Squat, ball on chest.
4. Same as count 2.
5. Girls: squat, ball down; boys: basic stance, ball up.
6. Girls: straighten up, ball up; boys: squat, ball down.
7. Girls: squat, ball down; boys: straighten up, ball up.
8. Everyone: jump, legs apart, ball up.
III. 1. Tilt to the left.
2. Basic stance, ball up.
3. Tilt to the right.
4. Same as count 2.
5-7. Same as counting 1-3.
8. Ball down.
IV. 1. Lean forward, put the ball.
3. Bend forward.
4. Same as count 2.
5. Same as count 3.
6. Straighten up, hands on your belt.
7. Same as count 3, but take the ball.
8. Jump straight up, ball on chest.
V. 1. Turn (girls - left, boys - right), ball on chest.
2-7. Jump and change places with your partner and return to the starting position.
8. Basic stance, ball up.
VI. 1. Lean forward, touch the ball to the ground.
2. Squat emphasis.
3. Straighten your legs.
4. Same as count 2.
5. Boys: straighten up, ball up; girls: crouching emphasis, ball down.
6. Change position.
7. Same as counting 5.
8. Everyone: stand up straight, ball down.
VII. 1. Boys: get down on your right knee; girls: ball on chest.
2. Boys: place the ball on your left knee.
3-6. Girls: run around the boys
(clockwise).
7-8. Boys: straighten up, put your right foot down, ball up; girls: turn around,
ball in front of your chest.
VIII. 1-6. Jump and change places with your partner, return to the starting position and
make a turn (girls - right, boys - left).
7. Lean forward, put the ball.
8. Straighten up, arms up.
IX. 1-6. Swing with bent arms above your head.
7-8. Lean forward and grab the ball.
Complex 2.
Dance exercises for children of primary school age
After completing complex 1, the children line up in circles (in each circle there are 12 girls and 12 boys, who stand in pairs facing counterclockwise. Boys stand inside, girls outside the circle).
Starting position - boys and girls join hands, hold the ball from the side to the outside.
I- II. 1 -15. Polka steps forward*.
16. Place your foot, turn your face inside the circle, ball on your chest.
Ill- IV. 1 -15. Polka steps in a circle, switch places 2 times.
16. Stand facing the main direction of movement, hold hands again, ball from the side to the outside.
V- VI. 1-7. Polka steps forward.
8. Putting your foot down, turn your face inside the circle, the ball in front in bent arms.
VII-- VIII. 1-4. Girls: perform 4 jumps in place, hitting the balls from above
boys' balls; boys: stand still, holding the ball.
5-7. Same as counting 1-4, but do it in reverse.
8. Everyone: turn right.
IX- X. 1 -14. Polka steps forward (towards the partner).
15. Jump to a squat with an inward turn and place the ball.
16. Jump straight up, hands on your waist.
XI. 1-6. Polka steps in place with lifting and folding.
7-8. Everyone clap your hands 3 times.
XII. 1. Clap your hands.
2. Clap your hands with a partner (right hands).
3. Same as count 1.
4. Clap your hands with your partner (left hands), lower your hands down (for girls, grab their skirts).
5-6. Girls: half squat on the left leg, right leg crossed behind; boys: tilt your head forward.
7. Squat, take the ball.
8. Straighten up with a turn in the main direction, the ball on your chest.
Complex 3.
Exercises with flowers (paper, foam) for children of primary school age
The formation of schoolchildren before performing exercises is in open formation. The interval and distance between participants is 2 m. The arrangement of girls and boys is the same as in complex 2.
Starting position - main stance, flowers below, in both hands.
I. 1. Arms to the sides.
2. Rise on your toes, arms up.
3. Lower your entire foot, arms to the sides.
4. Hands down.
5-7. Same as counting 1-3.
8. Hands to shoulders.
II. 1. Squat on your toes (knees apart), arms to the sides.
2. Straighten up, hands to shoulders. 3-4. The same as for the count 1-2.
5. Tilt to the right, arms to the sides.
6. Same as on count 2.
7. Tilt to the left, arms to the sides.
8. Straighten up, arms in front of your chest.
III. 1. Half squat with half forward bend, left hand forward, right - back.
2-7. Springy half-squats on each count, changing the position of the hands.
8. Straighten up, hands to shoulders.
IV. 1. Turn left, arms to the sides.
2. Return to the starting position.
4. Same as count 2.
5. Turn (boys - left, girls - right) facing each other.
6. Same as on count 2.
7. Turn (boys - right, girls - left) facing each other.
8. Same as on count 2.
V. 1-3. Boys: take three steps forward (starting with your left foot).
5. Everyone: connect the flowers together.
6. Arms to the sides.
7. Join your hands together.
8. Girls: squat on the left knee, holding flowers in the left hand, right hand above the head;
boys: holding flowers in your right hand, take the girl’s right hand with your left hand.
VI. 1-7. Boys: starting with the left foot, run around the girls (counterclockwise).
8. Girls: stand up straight.
VII. 1. Girls: squat; boys: stand still. 2. Girls: stand up straight; boys: squat.
3-7. Change of positions.
8. Boys: stand up straight and take the girls’ hands.
VIII. 1-4. In small incremental steps, circle counterclockwise.
5-6. Turn (boys - right, girls - left).
7. Raise the flowers up (girls - in the right hand, boys - in the left).
8. Half bend with half squat (girls - left leg crossed - behind, boys - right).
IX. 1-6. Stand up straight and wave the flowers above your head. 7-8. Return to starting position.
Complex 4.
Exercises with flags for children of primary school age
Before leaving, students are lined up in open (2 m) columns (girls in odd columns, boys in even columns). In each hand, participants hold a flag measuring 30 X 40 cm (girls - white, boys - red). With the start of the musical accompaniment, the first line of participants runs out to their points. After her, after 4 counts, the second line runs out, etc. (interval exit). Starting position - crouching position. After the musical phrase, the guys get up and begin to perform a set of exercises.
I. 1. Hands forward.
2. Hands up.
3. Same as count 1.
4. Hands down.
5. Left arm to the side, look at the left hand.
6. Right arm to the side, look at the right hand.
7. Left hand behind your head, look forward.
8. Right hand behind your head.
II. 1. Left hand up and out, look up.
2. Right hand up and out.
3. Arms crossed above your head (left in front of the right).
4. Arms to the sides, downwards, crouching, head down.
5. Raise your head, bend your arms to the sides.
6. Same as count 4.
7. Raise your head, arms forward.
III. 1. Turn your torso to the left, lunge to the left, right hand forward, left hand back.
2. Turn the torso to the right, arms to the sides.
3. The same as on count 1, but in the other direction.
5. Left leg to the side on the toe, tilt to the left; right half-bent arm up,
the left one is half-bent at the bottom.
8. Place your left foot, arms up.
IV. 1. Circle with your left hand inward.
2. Circle with your right hand inward.
3. Squat, arms to the sides.
4. Straighten up, arms up.
5. Arms in outward arcs to the sides, downwards, half squat with half bend forward, knees apart,
arms back and down (palms up) - “swimmer’s start.”
7. Circle with both hands inward.
8. Lower your arms down through your sides, basic stance.
V. 1. Girls: squat, arms to the sides, head down; boys: arms out to sides
up-out, look up.
2. Girls: the starting position is the same as on count 1 for boys; boys: same as for the account
1 for girls.
3. Same as count 1.
4. Jump with legs apart, arms down.
5. Lunge to the left, arms forward.
6. Place your left leg, arms down.
7. Same as counting 5, but in the other direction.
8. Same as on count 6.
VI. 1. Arc downwards, left hand to the right.
2. Arms to the sides.
3. Arc downwards, right hand to the left.
4. Same as count 2.
5. Bend forward, arms forward.
6. Straighten up, arms down.
7. Bend back, arms to the sides.
8. Straighten up, arms down.
VII. 1. Hands on the belt.
2. Half squat.
3. Jump and turn left in a circle.
4. Arms to the sides.
5. Hands on the belt.
6. Same as on count 2.
7. Same as on count 3.
8. Arms to the sides.
VIII. 1. Left leg to the side on the toe, arms up.
2. Main stand.
4. Jump while crouching.
5. Straighten up, arms to the sides.
6. Bend forward, arms forward.
7. Straighten up, arms up.
8. Arms downwards.
Complex 5.
Exercises without objects for children of primary school age
A set of exercises can be performed on sports ground at the pioneer camp. Interval and distance
III. 1. Bend back, arms to the sides, palms up.
2-3. Springy bends forward, arms forward.
4. Straighten up, hands on your waist.
5. Arms to the sides.
6. Hands up.
7. Hands forward.
8. Hands on the belt.
IV. 1-8. Boys and girls: imitation of jumping in place using a skipping rope.
The complex is repeated 2 times.
Complex 6.
Exercises with pennants for middle school girls
After exiting and stopping at the markings, the interval and distance between participants is 2 m.
Starting position - crouching, pennants in front of you, head down.
I. 1. Rise on your toes, arms to the sides.
2. Lower yourself, arms down.
3. Rise up on your toes, arms out to your sides.
4. Lower yourself, arms down to your sides.
5. Bend forward, arms to the sides.
6. Straighten up, arms up.
7. Rise on your toes, arms up and out.
8. Same as count 4.
II. 1-2. Circle your arms to the right.
3-4. Circle your arms to the left.
5. Jump with legs apart, arms to the sides.
6. Bend forward, bending your arms forward and crossing (right in front of left).
7-8. Straighten up, arching your arms upward.
III.
3-4. Same as counting 1-2, but with the other hand. 5-6. Large circle with both hands inward.
7. Small circle with both hands inward.
8. Jump basic stance.
IV.
3. Arms to the sides.
4. Hands up and crossed (left in front of right).
5. Same as count 3.
6. Same as count 4, changing the position of the hands.
7. Arms to the sides.
8. Same as on count 3.
V. 1-2. Smooth circle with your hands to the right.
3-4. Smooth circle with hands to the left; rising on your toes, arms to the sides
5-8. Turn by stepping to the left 270°, arms down.
VI. 1. Circle the right hand back.
2. Same as count 1, but with the other hand.
4. Round half squat with half forward bend, pennants up and forward.
5-6. Wave-like movement of the torso forward, arms arcing upward.
7-8. Same as counting 5-6, but arms to the sides.
VII. 1-4. Rising on your toes, turn by stepping to the right 360°, with your arms arcing upward.
5-8. Four large consecutive circles with the arms in the lateral plane (starting with the left),
Hands up.
VIII. 1. Turn right, arms to the sides.
2. Putting your left leg in, half squat, arms down.
3-4. Rising on your toes, arch your arms outward.
5-7. Cross movements with pennants at the top.
8. Lowering your arms downward in outward arcs.
Complex 7.
Exercises with pennants for girls of high school age
After exiting, the participants arrange themselves in a chess formation. Interval and distance - 4 m.
Starting position - main stance, pennants up and out.
I. 1-2. Face circle with right hand inward.
3-4. Same as counting 1-2, but with the other hand.
5-6. Small circle with both hands inward.
7-8. Large circle with both hands inward, arms up.
II. 1. Arc outward with your right arm down.
2. Same as count 1, but with the other hand.
3. Pennants to the sides.
4. Pennants cross up.
5. Same as count 3.
6 - 7. Same as counting 4-5.
8. Pennants down.
III. 1 – 2. Two additional steps to the right (1st numbers - to the right, 2nd numbers - to the left) and two circles with hands
right; stand on the right leg, left to the side on the toe, pennants to the sides and up.
3 – 4 Same as count 1-2, but pennants to the left.
5 – 8 Same as counting 1-4, but in the other direction.
IV. 1. Signal signal with pennants to the sides.
2. Stand on the left knee, pennants back.
3. Straighten up, pennants up.
4. Pennants to the sides.
5 – 8. The same on the other leg, pennants forward.
V. 1. Circle the right hand back.
2. Same as count 1, but with the other hand.
3. Same as count 1, but with both hands.
4. Pennants up.
5 – 8. Rotate by stepping 360°.
VI. 1. Step the right foot forward into a stance on the right, the left foot back; circle with pennants back.
2. Step back with your left foot, pennants to the sides.
3. Same as count 1, but with the other foot.
4. Place your right foot, pennants up.
5. Half squat on the right leg, left forward on the toe; the right pennant is forward, the left pennant is backward.
7 – 8. Same as counting 5-6, changing the position of the legs.
VII. 1 – 6. Consecutive large circles in the lateral plane.
7 – 8. Turn to the right into a stance with legs apart, pennants to the sides.
VIII. 1 Lunge to the right, pennant arcing upward to the right.
2. Straightening up, arc the pennant to the left.
3 – 4. The same as counting 1-2, but in the other direction.
5 – 7. Three large circles with both hands.
8. Putting your right foot in, pennants up and out.
Complex 8.
Applied floor exercises (GTO) for middle school children
Interval and distance - 2 m.
I. 1. Bend your arms to the sides.
2. Hands up and out.
3. Same as count 1.
4. Hands down to the sides.
6. Straighten up, basic stance.
7. Same as counting 5.
8. Straighten up, arms down.
II. 1. Bend forward, touch your feet with your hands (legs straight).
2. Take the “barbell” to your chest (squat, bend your arms forward, fingers clenched into fists).
3. Stand up straight.
4. Push the “barbell” (arms up, fingers clenched into fists).
5. “Pull up” (rise on your toes, bend your arms forward, fingers clenched into fists).
6. Hands up (palms forward).
7. Turn left, arms down at sides.
8. Place your right foot, left hand forward, right hand back - “skier stance”
(half squat with half forward bend).
III. 1-3. “Skiing” (three springy squats, changing the position of the hands for each count).
4. Hands behind your back - “skater’s position” (half squat with half bow down forward).
5. Left foot on toe.
6. Place your left foot.
8. “Swimmer’s start.”
IV. 1-2. Straighten up, arms up.
3-5. Imitation of swimming: 3 circles with arms downwards (starting from the right).
6. Standing emphasis.
7. Squat emphasis.
8. Lying emphasis.
V. 1. Bend your arms.
2. Straighten.
3-4. The same as for the count 1-2.
5-6. Emphasis lying on your hips.
7-8. Bent over position (“house”).
VI. 1-2. Emphasis lying on your hips.
3. Squat emphasis.
4. Jump to the right and stand with your feet apart and your arms to the sides.
5. Starting position for the “shot put” (inclined lunge to the right, left arm to the side,
right behind the head).
6. “Push the shot” (with a turn to the left, straighten your right leg, arms forward and upward).
7. With a turn to the right, an oblique lunge to the right, arms to the sides (right arc to the left).
8. “Grenade throw” (straightening your right leg, turning to the left, stand on your left leg,
right back on the toe, arms forward and upward (palms forward).
VII. 1. With a turn to the right, stand with your legs apart, arms to the sides (right arc downwards).
2. Arms down in arcs; put your palms together (clap), arms up.
3. Bend forward.
4. Straighten up, arms up (palms together).
5. Same as count 3.
6. Straighten up, arms arched outward to the sides.
7. Jump while crouching.
VIII. 1. Jump, stand with your legs apart, arms up through your sides.
2. Jump to the main stance, arms down to the sides (clap your palms on your thighs).
3-4. The same as for the count 1-2.
5-7. Starting with the left foot, 3 steps in place (with high hands).
Complex 9.
Exercises with hoops for middle school girls
Before performing the exercises, the participants run out to the markings to the sounds of polka music.
The interval and distance between them is 4 m.
I. 1-2. Bend over, rise onto your toes, hoop up.
3. Half squat, hoop forward.
4. Straighten up, hoop up.
5. Bend your legs, half-tilt to the left.
6. Same as count 4.
7. Same as counting 5, but in the other direction.
8. Same as count 4.
II. 1-4. Turn left 360°.
5. Half squat, chest hoop.
6. Straighten up, hoop up. 7-8. The same as for the count 5-6.
III. 1. Left leg to the side on the toe, tilt to the left.
2. Place your foot, main stance, hoop up.
3. The same as on count 1, but in the other direction.
4. Same as count 2, but with the hoop down.
5-6. Squat, hoop on knees vertically, head down.
7-8. Straighten up, hoop on chest.
IV. 1-2. Rise on your toes, hoop up horizontally.
3-4. Oscillatory movements of the edges of the hoop up and down.
5. Squat in the hoop and place it on the ground.
6. Straighten up, arms up.
7. Hands up and out.
8. Squat, take a hoop.
V. 1-2. Straighten up, hoop up.
3. Chest hoop.
4-6. Three jumps in place on both legs (with rotation of the hoop for each jump) - “jump ropes”.
7. Rise onto your toes, hoop up.
8. Squat, hoop down; touch the ground with the far edge of the hoop, tilt your head forward.
VI. 1-2. Hoop on your knees vertically, raise your head. 3-4. Straighten up, hoop up.
5-8. Rising on your toes, turn by stepping to the right 360°.
VII. 1. Left leg to the side on the toe, hoop on the chest.
2. Lunge to the left, hoop up.
3. Straighten your left leg (push), hoop on your chest.
VIII. 1. Bend your legs, half tilt to the left.
2. Straighten up, hoop up.
3. The same as on count 1, but in the other direction.
4. Same as count 2.
5-6. Half squat with a half forward bend, tilt your head forward.
7-8. Straighten up, hoop up horizontally. Oscillatory movements of the edges of the hoop up and down.
Complex 10.
Exercises with hoops for girls of high school age
The participants are positioned in open formation. Interval and distance - 2 m.
Ordinal calculation of columns - from left to right.
Starting position - main stance, hoop down.
I. 1. Chest hoop.
2. Hoop up.
3. Left leg to the side on the toe, hoop on the chest.
4. Place your foot, hoop up.
5-6. Same as count 3-4, but with the other leg.
7. Rise onto your toes (heels together).
8. Squat, hoop down and forward, lower your head.
II. 1. Straighten up, left leg to the side on the toe, hoop up.
2-3. Two springy tilts to the left.
4. Place your leg, half squat, hoop down and forward.
6-7. The same as counting 2-3, but in the other direction. 8. Place your right foot on the hoop
up horizontally.
III. 1. Squat, put the hoop down.
2. Straighten up, arms to the sides.
3. Hands behind your head.
4. Bend over.
5. Hands up and out (palms facing out).
6. Hands on the belt.
7. Squat, take a hoop.
8. Straighten up, hoop up.
IV. 1. Lower the top edge of the hoop onto your back.
2. Bend over.
3. Hoop up.
4. Chest hoop.
5. Half squat, hoop to the left.
6. Straighten up, hoop on chest.
7. Half squat, hoop to the right.
8. Straighten up, hoop up.
V. 1. Step to the left, legs apart, hoop down.
2. Lunge to the left, hoop up and left.
3. Straighten your left leg (push), hoop down.
4. Place your left foot, hoop up.
5-8. The same as counting 1-4, but in the other direction.
VI. 1. Turn inward (odd columns - to the left, even - to the right), hoop on the chest.
2. Place your foot (odd - right, even - left), hoop up.
3. Squat, put the hoop (without letting go of your hands), tilt your head forward.
4. Straighten up with a turn (odd - to the right, even - to the left) into a stance with legs apart,
hoop up.
5-6. With a turn (odd - to the right, even - to the left), sit down, put the hoop (without releasing
7. The same as on the count of 4, but with a turn in the other direction.
8. Same as count 2, but with the hoop down.
VII. 1. Turn (odd - to the right, even - to the left), hoop on the chest.
2. Place your foot (odd - left, even - right), hoop up.
3. Round half squat, hoop forward and down vertically (bottom edge on the ground).
4. Straighten up, hoop up.
5-7. Three jumps in place on both legs (with rotation of the hoop for each jump) - “jump ropes”.
8. Hoop up.
VIII. 1-4. Turn by stepping (odd - to the right, even - to the left) 270°, facing
main direction, hoop up horizontally; oscillatory movements of the hoop
up - down.
5. Half squat in a hoop (hoop at waist level).
6. While straightening up, throw the hoop up (horizontally).
7. Catch the hoop.
8. Quick oscillating movements of the hoop up and down. Formation into ranks.
Exercises in closed ranks Starting position - hoop at the bottom in the right hand.
I. 1. Turn the hoop to the left.
2. Squat.
3. Take the hoop from below with your left hand.
4. Take your hoop and the one next to it (on the right) with your right hand.
5. Straighten up, turning to the right, hoop up horizontally.
6. Squat with a turn to the right, hoop down.
7-8. The same as counting 5-6, but in the other direction.
II. 1-2. Consecutive wave-like raising of the flanks of the ranks: rise four
(1st-4th) participants standing on both flanks.
3-4. Same as count 1-2, but the next four (5th-8th) participants stand, and
the previous ones raise the hoop up.
5-6. The same as on the count 1-2, but the next four (9-12th) participants stand up,
and the previous ones squat (1-4th) and lift the hoop up (5-8th).
7-8. Continuation of the “wave”; everyone: squat, hoop in front of you.
III. 1-2. Odd ranks: straighten up, hoop up.
3-4. Odd ranks: squat, hoop up; even: straighten up.
5-6. The same as for the count 1-2.
7-8. Same as count 3-4 (squat with your back to the stands).
IV. 1-2. Straighten up and turn left in a circle (8th and 7th ranks).
3-4. The same as for the count 1-2, but for the 6th-5th ranks.
5-6. The same as for the count 1-2, but for the 4th-3rd ranks.
7-8. The same as for the count 1-2; everyone: sit down facing the stands.
V. 1-2. Everyone: straighten up, turn right, hoop down.
3-4. Everyone: squat with a right turn, hula hoop down.
5. Everyone: stand up straight, hoop up.
6. Everyone: squat, hula hoop down.
7. Same as counting 5.
8. Everyone: stand up straight, hoop in front of you. Rebuilding in a circle.
Exercises in circles Starting position - squat facing inside the circle. The grip of the hoop is the same as for the exercise in closed ranks.
I. 1. Straighten up, turning to the right, hoop up horizontally.
2. Squat with a turn to the right, hoop down.
3. The same as on count 1, but in the other direction.
4. Same as count 2, but in the other direction. 5-6. The same as for the count 1-2.
7. Straighten up, hoop in front of you.
8. Squat, hoop down.
II. 1-2. The left (in relation to the stands) half of the circle straighten up.
3-4. Squat down with the left half, straighten up with the right.
5-6. The same as for the count 1-2.
7-8. The same as on the count of 3-4, everyone: crouching position.
III. 1-8. Consistent, wave-like straightening and squatting in circles;
hoop in front of you and up.
IV. 1-8. Continuation of wave-like movements in circles. Transition to care.
Complex 11.
Interval and distance - 2 m.
Starting position - main stance.
I. 1. Arms to the sides.
2. Hands to shoulders.
3. Hands up (palms facing out).
4. Hands down to the sides.
5. Half squat, arms forward.
6. Straighten up, arching your arms downwards through your sides upwards (palms forward).
7. Bend forward.
8. Squat emphasis -
II. 1. Straighten up, left leg to the side on the toe, arms through the sides up.
2. Putting your foot down, crouching down, arms down at your sides.
3. Same as count 1, but with the other foot.
4. Place your right leg, arms to the sides.
5. Bend your left arm behind your head, look at your right hand.
6. Same as on the count of 5, changing the position of the hands.
7. Arms to the sides.
8. Hands up.
III. 1. Squat, knees apart, arms out to the sides (palms back), head down.
2. Raise your head, turn your hands, palms forward.
3. Same as count 1.
4. Jump with legs apart, arms to the sides.
5. Tilt to the left, hands on the waist.
7. Same as counting 5, but in the other direction.
8. Stand up straight.
IV. 1. Turn the torso to the left, hands on the belt.
2. Turn your torso to the right, stand with your legs apart, arms to the sides.
3. The same as on count 1, but in the other direction.
4. Same as count 2, but in the other direction.
5. Lunge to the left, arms down and crossed (left in front of the right), lower your head.
6. Stand with legs apart, arms to the sides.
8. Same as on count 6.
V. 1. Jump with a left turn, basic stance.
2. Squat emphasis.
3. Lying emphasis.
4. Lying on your hips. 5-6. Standing position bent over.
7. Same as on count 2.
8. Straighten up, basic stance.
VI. 1. Jump turn right.
2. Squat emphasis.
3. Stand with your legs apart.
4. Same as count 2.
5. Standing emphasis.
6. Straighten up, arms out to your sides (palms forward).
7. Hands on the belt.
8. Same as on count 2.
VII. 1. Jump, stand with your legs apart, arms to the sides.
2. Hands out to the sides up (palms forward).
3. Bend forward, touch your palms ankle joints.
4. Straighten up, hands on your waist.
5. Squat, knees apart, arms to the sides.
6. Same as count 4.
7. Bend forward.
8. Jump basic stance.
VIII. 1. Jump with legs apart, arms up.
2. Jump basic stance.
3. Same as count 1, but arms to the sides.
4. Same as count 2.
7. Starting with the left foot, take 3 steps in place.
8. Place your right foot, basic stance.
Complex 12.
Exercises such as exercises for middle school children
Interval and distance - 3 m.
Starting position - main stance.
I. 1. Arms to the sides.
2. Bend your arms to the sides, fingers clenched into fists.
3. Hands up, look at the hands.
4. Hands down to the sides.
5. Left leg to the side on the toe, left arm to the side, look at the hand.
6. Put your foot down, lower your hand.
7. Same as counting 5, but in the other direction.
8. Same as on count 6.
II. 1. Boys: arms up and out (palms facing out), girls: crouching position.
2. Boys and girls: change starting position.
3. Same as count 1.
4. Girls: straighten up, arms up and out.
5. Bend forward.
6. Half squat, arms to the sides.
7. Straighten up, arms up.
8. Arms downwards.
III. 1. Bend forward, arms to the sides.
2. Straighten up, hands on your waist.
3. Bend back, arms to the sides (palms up).
4. Same as count 2, but hands down.
5. Left leg to the side on the toe, arms through the sides up.
6. Put your foot down, arms down.
7. Same as count 5, but with the other foot.
8. Place your leg, arms down at your sides, crouching down.
IV. 1. Straighten up, left leg back on your toes.
3. Same as count 1, but with the other foot.
4. Squat emphasis.
5. Left leg to the side on the toe, look straight.
6. Put your foot down and lower your head.
7. Same as count 5, but with the other foot.
8. Sit down, lower your head.
V. 1. Straighten up, basic stance.
2. Jump, stand with your legs apart, arms to the sides.
3. Turn the body to the left, lunge with the left leg, arms forward (right arc downwards).
4. Same as count 2.
6. Same as on count 2.
7. Jump to the main stance, arms to the sides.
8. Hands down.
VI. 1. Squat emphasis.
2. Straighten up, hands on your waist.
3. Swing your left leg to the side, arms up.
4. Place your foot and hands on your belt.
6. Same as count 4, but hands down.
7. Arms to the sides.
8. Same as count 1.
VI I. 1. Jump with legs apart.
2. Arms to the sides.
3. Squat, arms to the sides.
4. Straighten up, hands on your waist.
5. Bend forward.
6. Half squat, arms forward.
7. Same as count 4.
8. Jump your feet together, arms down.
VI II. 1. Step left in place, left hand to shoulder.
2. Same as count 1, but with the other leg and arm.
3. Step left in place, left hand up
4. Same as count 3, but with the other leg and arm.
7. Three claps of your hands above your head (arms bent).
Complex 13.
Exercises such as exercises for middle school children
Interval and distance - 2 m
Starting position - main stance.
I. 1. Hands to shoulders.
2. Hands up and out.
3. Same as count 1.
4. Hands down to the sides.
5. Squat, knees apart, arms to the sides.
6. Main stand.
7. Same as counting 5.
8. Same as on count 6.
II. 1. Tilt to the left, left hand on the belt, right hand up.
2. Main stand.
3. The same as count 1, but in the other direction, changing the position of the hands.
4. Same as count 2.
5. Bend forward, touch your ankle joints with your fingers (palms connected).
6. Straighten up, basic stance.
7. Same as counting 5.
8. Same as on count 6.
III. 1. Squat emphasis.
2. Lying emphasis.
3. Bend your arms.
4. Straighten your arms.
5. Same as count 3.
6. Same as count 4.
7. Squatting on your left leg, right leg to the side on your toe.
8. Turn right into the sed.
IV. 1-2. Support lying behind.
5--6. The same as for the count 1-2.
7--8. The same as on the count of 3-4.
V. 1. Bend your legs.
2. Straighten your legs.
3-6. The same as on the count of 1-
7--8. Turn to the left, resting on your hips.
VI. 1-2. Bent over position (“house”).
3-4. Emphasis lying on your hips.
5-6. The same as for the count 1-2.
7. Lying emphasis.
8. Squat emphasis.
VII. 1. Jump (with a turn to the right) with legs apart, arms to the sides.
2. Arc your arms downwards (clasp your palms together).
3. Bend forward.
4. Straighten up, palms together.
5. Same as count 3.
6. Jump straight up, arms up, palms together.
7. “Swimmer’s start.”
8. Straighten up, arms up (palms forward).
VIII. 1. Swing your right leg forward, touching your shin with your hands.
2. Return to i. p.
3. Same as count 1, but with the other foot.
4. Same as count 2.
5. “Swimmer’s start.”
6. Squat emphasis.
7. Straighten up, arms out to your sides, clap your hands above your head.
8. Arms downwards, basic stance.
Complex 14.
Exit to the marking - marching step, stick to the right shoulder.
Starting position - main stance, stick below.
I. 1. Stick forward.
2. Stick down.
3. Stick up.
4. Same as count 2.
5. Squat knees apart, stick up.
6. Extend your legs, bend forward, and touch the ground with the stick.
7. Half squat, stick on chest.
8. Straighten up, stick up.
II. 1. Left leg to the side on the toe.
2. Lunge to the left, stick on the head to the left, look to the left.
3. Stand on your right leg, left toe to the side, stick up.
4. Place your left foot.
5. Same as count 1, but with the other foot.
6. Same as count 2, but in the other direction.
7. Same as count 3, but with the other foot.
8. Same as count 4.
III. 1. Half squat, knees apart, stick on chest (left end up).
2. Straighten up, stick up horizontally.
3. Same as count 1, but stick with the other end up.
4. Same as count 2.
5. Turn the body to the left, stick on the chest (grip shoulder-width apart).
6. Same as count 4.
7. Same as counting 5, but in the other direction.
8. Hands up.
IV. 1. Bend your left leg forward, arms down; touch the knee of your left leg with a stick.
2. Place your left foot, stick up.
3. Same as count 1, but with the other foot.
4. Same as count 2:
5. Stick behind the head.
6-7. Two springy bends forward bending over.
8. Jump with legs apart, stick up.
V. 1. Lunge to the left, stick on the head to the right.
2. Extending the left leg, stand with the legs apart, stick up.
3. The same as on count 1, but in the other direction.
4. Same as count 2.
5. Bend forward and put the stick down.
6. Straighten up, arms to the sides.
7. Bend forward, take a stick (grip shoulder-width apart).
8. Jump straight up, basic stance, stick up.
VI. 1. Crouch down and put down the stick.
2. Lying on your hips.
3. Sitting down, take a stick.
4. Straighten up, stick up.
5. Half squat, knees apart, stick behind head.
6. Bend forward.
7. Sit on your heels, stick on your chest.
8. Sit on your knees, stick up.
VII. 1. Sit on your heels, leaning forward.
2. The same as on count 1 (indicate).
3. Stand on your knees, stick up.
4. Stick down.
5. Left leg to the side on the toe, stick up.
6. Place your foot, stick down.
7. Same as count 5, but with the other foot.
8. Same as on count 6.
VIII. 1. Stand on the right knee, left leg bent forward, stick on chest.
2. Straighten up, placing your right leg.
3. Step back with your left foot, stick up.
4. Place your foot and stick on your chest.
5. Jump with legs apart, stick up.
6. Jump main stance, stick down.
7. Stick to the right shoulder, maintaining a grip with the left hand.
8. Left arm through side down, basic stance.
Complex 15.
Exercises with gymnastic sticks for middle school boys
The interval and distance between participants is 2 m. Gymnastic sticks are painted red. Starting position - main stance, stick below.
I. 1. Rising on your toes, stick forward.
2. Stick up.
3. Stick forward.
4. Stick to the chest.
5. Turn the body to the right, stick forward vertically (left hand on top).
6. Turn the body to the left, stick on the chest.
7. The same as on the count of 5, but in the other direction, changing the position of the hands.
8. Turn your torso to the right, putting your right leg aside, stand your legs apart, stick down.
II. 1. Stick to the chest.
3. Stick forward.
4. Same as count 1.
5. With the body turned to the right, stick forward vertically (left hand on top).
6. With the body turned to the left, stick on the chest.
7. The same as counting 5, but in the other direction, changing the position of the hands.
8. Turn your torso to the right, putting your right leg aside, stand your legs apart, stick down.
III. 1. Stick to the chest.
2. Putting your right foot down, stick up.
3. Swing your right leg forward, stick forward.
4. Same as count 2.
5. Same as count 3, but with the other foot.
6. Same as on count 2.
7. Half squat, stick forward.
8. Straighten up, basic stance, stick up.
IV. 1. Stick to the shoulder to the left.
2. Stick to the shoulder to the right.
3. Swing your right leg to the side, stick to your shoulder to the left.
4. Putting your right foot, stick to your shoulder to the right.
5. Same as count 1.
6. Same as count 3, but with the other foot.
7. Putting your left foot down, arc the stick up.
8. Stick to the chest.
V. 1. Bend forward, put the stick at your feet.
2. Straighten up,” arms up and out.
3. Bend your arms to the sides (fingers clenched into fists).
4. Hands up and out.
5. Circle with arms outward.
6. With outward arcs of your arms downwards, clap your palms on your thighs.
7. With outward arches of your arms up, clap your hands above your head.
8. Squat, arms down in arcs outward, head down.
VI. 1. Raise your head.
2. Lying emphasis.
3. Lying on your hips, legs apart.
4. Same as count 2.
5. Lying down, legs apart.
6. Same as on count 2.
7. Sitting down, take a stick.
8. Straighten up, stick down.
VII. 1 -2. Turn (first numbers - right, second - left).
3-4. Step forward with your left (right) foot.
5-6. Turn in the main direction (toward the audience).
7. Sit down, lower your head.
8. Raise your head.
VIII. 1. Right leg to the side on the toe.
2. Place your foot in a crouching position.
3. Same as count 1, but with the other foot.
4. Same as count 2. 5-6. Rising on your toes, stick up.
7. Stick to the chest.
8. Stick down.
IX. 1. Stick forward.
2. Stick up.
3. Stick to the right shoulder.
4. Arc outward, left arm down.
5-7. Three steps in place, starting with the left foot.
8. Place your right foot.
Complex 16.
Interval and distance - 2 m.
Starting position - main stance.
I. 1. Hands forward.
2. Hands in front of the chest.
3. Hands up.
4. Arc the arms downwards.
5. Left hand to the side, turn your head to the left.
7. Squat, arms out to the sides, palms back.
8. Lower your head.
II. 1. Raise your head, palms forward.
2. Lower your head, palms back.
3. Same as count 1.
4. Sit down, lower your head.
5. Straighten up, arms in front of your chest.
6. Hands up and out, look straight.
7. Arc the arms inwards to the sides.
8. Jump, stand with your legs apart, hands on your waist.
III. 1. With the body turned to the left, lunge with the left leg.
2. Stand with your feet apart, hands on your waist.
3. The same as on count 1, but in the other direction.
4. Same as count 2, but arms to the sides.
5. Squat on the left leg, hands in front of the chest.
6. Same as count 4.
7. Same as count 5, not with the other foot.
8. Stand with legs apart, arms arched downward.
IV. 1. Jump, crouch down, lower your head.
2. Jump straight up, hands on your waist.
3. Swing your left leg to the side, arms to the sides (look at your left hand).
4. Put your foot down, arms down.
5. The same as on the count of 3, but in the other direction.
6. Place your right leg, hands on your belt.
7. Arms to the sides.
8. Hands out to the sides up.
V. 1. Stand in a crouching position, arms arcing forward downwards.
2. Straighten up, left leg back on your toes, arms up and out (palms forward).
3. Squat emphasis.
4. Straighten up. Same as count 2, but with the other leg.
5. “Swimmer’s start.”
6. Hands forward.
7. Straightening up, arms up and out (palms facing out).
8. Arms to the sides.
VI . 1. Circle with your left hand downwards.
2. Circle with your right hand downwards.
3. Squat, arms out to the sides, head down.
4. Turn your palms forward and raise your head.
5. Hands forward.
6. Straighten up, arms arched downwards to the sides.
7. Bend your arms to the sides (fingers clenched into fists).
8. Hands up.
VII. 1. Lean forward.
2. Straighten up, hands on your waist.
3. Tilt back.
4. Half squat, arms to the sides.
5. Jump and turn left in a circle to stand with your feet apart, hands on your waist.
6. Jump while crouching.
7. Same as count 5, but arms to the sides.
8. Hands on the belt.
VIII. 1. Jump into a half-squat on the left leg, the right one forward on the toe, arms to the sides downwards (palms up), look to the left.
2. Jump straight up and rise on your toes, hands on your belt.
3. Same as count 1, changing the position of the legs.
4. Same as count 1.
5. Jump with legs apart, arms forward.
6. Jump to the main stance, arms to the sides.
7. Same as on the count of 5, but clap your hands above your head.
8. Jump basic stance.
Complex 17.
Exercises such as exercises for children of primary and secondary school age
The interval and distance between participants is 2 m.
Starting position - main stance.
I. 1. Hands forward"
2. Hands up.
3. Hands in front of the chest.
4. Hands down.
5. Right hand to the side.
6. Left hand to the side.
7. Half squat, clap your hands above your head (arms straight).
8. Straighten up, arms to the sides.
II. 1. Lunge to the right, arms forward.
2. Push straightening your right leg, placing it next to your left, arms to the sides.
3. The same as on count 1, but in the other direction.
4. Same as count 2.
5. Right hand forward.
6. Left hand forward.
7. Jump with legs apart, arms to the sides.
8. Arc your arms down in front of your chest.
III. 1. Turn the body to the right, hands on the belt.
2. Turn the torso to the left, hands in front of the chest.
3. The same as on count 1, but in the other direction.
4. Same as count 2, but in the other direction.
5. Jump to the main stance, arms to the sides.
6. Squat, arms forward.
7. Straighten up, arms to the sides.
8. Hands up.
IV. 1. Lunge to the right, left hand behind the head, right hand to the side.
2. Place your right foot, arms up.
3. The same as count 2, but in the other direction, changing the position of the hands.
4. Apply the left harness, arms up and out.
5. Squat, arms down to the sides.
6. Straighten up, arms up and out.
7. Bend forward.
8. Straighten up, hands on your waist.
V. 1-2. Rising on your toes, arch your arms upward, palms together. 3-4. Lowering your entire foot, place your hands on your waist.
5. Arms to the sides.
6. Half squat, knees together, clap your palms on your thighs.
7. Straighten up, hands on your waist.
8. Jump with legs apart, arms to the sides.
VI. 1. With the body turned to the right, lunge with the right leg, arms forward (left arc downwards).
2. Turn the torso to the left, arms to the sides (left arc downwards).
3. The same as count 1, but in the other direction, changing the position of the hands.
4. The same as count 2, but in the other direction, changing the position of the hands.
5. Jump while crouching.
6. Lying on your hips.
7. Same as count 6, legs apart.
8. Squat emphasis.
VII. 1. Right leg to the side on the toe, arms forward.
2. Place your foot, arms down, crouching down.
3. Same as count 1, but with the other foot.
4. Same as count 2.
5. Straighten up, arms up and out.
6. Half squat with half forward bend, hands behind your head.
7. Straighten up, arms up and out.
8. Hands down.
VIII. 1-3. Three steps in place, starting with the left foot.
4. Place your right leg, arms to the sides.
5. Arms up through your sides, clap your hands above your head.
6. Hands downwards, clap your palms on your thighs.
7. Same as counting 5.
8. Same as count 6, basic stance.
Complex 18.
Exercises without objects for girls of middle school age
The interval and distance between participants is 3 m.
Starting position - main stance.
I. 1. Hands forward
2. Arms to the sides.
3. Hands up.
4. Hands behind your head.
5. Half squat with half turn to the right.
6. Straighten up with a half turn to the left, hands behind your head.
7. Same as counting 5, but in the other direction.
8. Same as counting 6, but in the other direction.
II. 1. Jump turn right.
2. Half squat, arms forward.
3. Straighten up, arms down.
4. The same as on count 1, but in the other direction.
5-8. Same as counting 1-4.
III. 1. Left leg to the side on the toe, hands in front of the chest (fingers clasped in a “lock”).
2. Hands up.
3. Tilt to the left.
4. Place your left leg, with your arms arched outwards and downwards.
5. Same as count 1, but with the other foot.
6. Same as on count 2.
7. The same as on the count of 3, but in the other direction.
8. Same as count 4.
IV. 1. Lean forward.
2. Sitting down, looking straight.
3. Lower your head.
4. Raise your head.
5. Standing bent position.
6. Same as on count 2.
7. Straightening up, rise on your toes, arms to the sides.
8. Hands up.
V. 1. Lowering your entire foot, place your right hand behind your head.
2. Left hand behind your head (fingers clasped in a “lock”).
3. Hands up (fingers in the “lock”).
4. Hands behind your head.
5. Left hand through the side down.
6. Right hand through the side down.
7. Clap your hands above your head.
8. Arms downwards.
V. 1 - 2. Rising on your toes, smoothly raise your arms to the sides and up.
3 - 6. Turn by stepping to the left 360°.
7 - 8. Hands behind your head, bend over.
1. Jump into a half-squat on the left leg, the right leg forward on the heel, arms to the sides (palms up).
2. Jump up onto your toes, hands on your belt.
3. Same as count 1, but change the position of the legs.
4. Same as count 2.
5 - 8. Same as counting 1-4.
Complex 19.
Exercises such as exercises for children of primary and secondary school age
The interval and distance between participants is 2 m.
Starting position - crouching position. Introduction. Everyone stand up straight.
I. 1. Girls - left, boys - right leg to the side on the toe, arms through the sides up.
2. Everyone: crouching position.
3. Same as count 1, but with the other foot.
4. Same as count 2.
5. Girls - left, boys - right hand to the side.
6. Change the position of your hands.
7. Everyone: arms to the sides.
8. Everyone: hands up.
II. 1. Everyone: squat, arms down, head tilted.
2. Girls: raise your head.
3. Girls: lower your head; boys: raise your head.
4. Same as count 3, but change the position of the head.
5. Everyone: straighten up, bending over and moving your leg to the side on your toes (girls - left,
boys - right).
6. Squat emphasis.
7. Same as count 5, changing the position of the legs.
8. Basic stance, hands on waist.
III. 1. Turn: girls - to the left, boys - to the right, arms to the sides.
2. Place your foot and hands on your belt.
3. Squat, arms forward.
4. Rise on your toes, arms back.
5. Same as count 3.
6. Straighten up, arms down.
7. Turn: girls - to the right, boys - to the left, arms up and crossed.
8. Same as count 2, but arms downwards.
IV. 1. Jump turn: girls - left, boys - right.
2. Everyone: crouching position.
3. Straighten up, arms back.
4. Same as count 2.
5-6. The same as on the count of 3-4.
7. Straighten up, hands on your waist.
8. Jump turn: girls - to the right, boys - to the left, hands up.
V. I. Girls - left, boys - right hand to the side.
2. Everyone: arms to the sides.
3. Hands down and crossed.
4. Same as count 2.
5. Hands up and crossed. *
6. Same as on count 2.
7. Hands to shoulders.
8. Squat emphasis.
VI. 1. Jump straight into a standing position, legs apart, arms to the sides.
2. Jump while crouching.
3-4. Same as for I-2.
5. Straighten up, hands on your waist.
6. Hands up and out.
7. Hands to the side-down. 8. Hands down.
VII. 1-4. Cross movements with bent arms above your head.
5. Girls: half squat, right leg behind; boys: head tilt forward;
everyone: arms to the sides, downwards.
6. Girls: stand up straight; boys: raise your head, hands down.
7-8. Turn around.
VIII. 1-8. Rebuilding.
Complex 20.
Exercises with poles for boys of senior school age.
Participants (5 people per pole) are arranged in a chess formation. Interval and distance - 4 m. Calculation of fives - from left to right.
Starting position - main stance, pole below.
I. 1-2*. Pole forward.
3-4. Pole up. 5-6. Pole on the chest.
7-8. Pole down.
II. 1. Step left, pole forward. 2. Pole up.
3-4. Bend forward followed by straightening, circle your arms to the left.
5-6. Bend forward followed by straightening, circle your arms to the right. *
7. Pole on the head.
8. Place your left foot, pole down.
III. 1. Pole up.
2-3. Two springy forward bends, a pole at the ankle joints.
4. Straighten up, pole up.
5-6. Half squat, knees apart, pole forward.
7. Same as count 4.
8. Pole down.
IV. 1-2. Step to the left, circle your arms to the right.
3-4. Step to the right, circle your arms to the left.
5. Arcs to the left, circle with arms to the left.
6. Same as counting 5, but in the other direction.
7-8. Arc your arms downwards.
V. 1. Squat, pole down.
2. Interception with the right hand into an underhand grip.
3. Straighten up and turn left, pole up.
4. Place your right foot and the pole on your right shoulder.
5. Pole on the left shoulder.
6. Pole on the right shoulder.
7. Pole up.
8. Left hand on the belt.
VI. 1-2. Circle with your right hand forward.
3-4. Bend forward followed by straightening, circle with your right hand forward.
5-6. Two quick circles forward with your right arm bent.
7. Turn right, circle with your right hand to the left.
8. Place your left foot, the pole up (with your left hand in an overhand grip).
VII. 1. Squat, pole down.
2. Interception with the right hand into an overhand grip.
3-4. Odd numbered ranks raise the right and lower the left end of the pole
(with appropriate squatting or lifting areas); even ones perform
the same in the other direction.
5-6. Change the position of the ranks.
7-8. Everyone: basic stance, pole up.
VIII. 1. Odd: main stance, pole up; even: squat, pole down.
2. Change the position of the ranks.
3. Same as count 1.
4-7. Everyone: jump, stand with your legs apart, arms up and out.
8. Jump main stance, pole to chest.
IX-XXIV. Figured marching "patterns".
After warming up, immediately start exercising. It is best to learn 2-3 exercises a day, this makes it easier to remember the movements. In a week or two you will completely master the entire complex and will perform it with ease and pleasure.
At first, I advise you to limit yourself to two or three approaches to each movement, otherwise an untrained person will certainly feel muscle pain. In my opinion, it is better to do everything gradually; I approached mastering the complex in such a way that the load increased gradually, and the exercises did not cause pain or discomfort.
Exercise 1. Stabilization of breathing
Stand straight, feet shoulder-width apart or slightly wider, arms at your sides, body relaxed. Focus your attention on your hands.
As you inhale, smoothly and slowly raise your arms in front of you just above shoulder level, palms facing down and in a relaxed state.
As soon as your hands reach shoulder level, exhale and bend your knees so that your knees are level with your big toes. This position is called “quarter squat” in qigong gymnastics. At the same time, the body maintains a straight position, the head does not tilt, and the chest does not shift. Simultaneously with bending your knees, relaxed arms smoothly lower down and touch your knees, after which straighten your legs.
While performing the exercise, make sure that your back remains straight at all times, inhale during the upward movement, and exhale during the downward movement.
Benefit: exercise has a positive effect on the cardiovascular system, eliminates blood stagnation and promotes proper distribution of energy. It is especially useful for people suffering from hypertension, heart and liver diseases.
Exercise 2. Expansion of the chest
As you inhale from the quarter squat position, smoothly straighten your knees, at the same time raise your arms forward to shoulder level and turn them with your palms facing each other and spread them to the sides with your palms up. Attention is focused on the chest.
As you exhale, bring your arms in front of you with your palms facing each other, smoothly lower your arms, while simultaneously turning your palms down, moving into a quarter squat. The hands smoothly touch the knees, the legs straighten.

Benefit: exercise is useful for diseases of the heart, lungs, shortness of breath, rapid heartbeat, and neuroses.
Exercise 3: Rainbow Swing
As you inhale after completing the previous exercise, slowly raise your straight arms up with your palms facing each other.
As you exhale, transfer the center of gravity to your slightly bent right leg, while keeping your foot on the floor and keeping your left leg straight and touching the floor only with your toe. At the same time, tilt your body to the left, pointing your left hand horizontally to the left. The right hand passes over the head, palm down.
Repeat the movement in the other direction. While doing the exercise, imagine a colorful rainbow floating above you. Watch your breathing: arms up – inhale, arms to the sides – exhale.

Benefit: exercise is useful for diseases of the thoracic and lumbar spine, reduces fat deposits in the lumbar region.
Exercise 4. Parting the clouds
Having completed the swing, we lower our arms, crossing them at the level of the lower body, while simultaneously moving into a quarter squat.
As you inhale, straighten your knees, raise your crossed arms up and, palms up, unfold them above your head. Then we straighten our arms with our palms to the sides and, as we exhale, lower them down through the sides, returning to a quarter squat, again crossing them in front of us. Focus your attention on your chest.

Benefit: exercise strengthens the muscles of the lower back and hips, useful for diseases of the shoulder joints and heart.
Exercise 5. Pulling the shoulder back
This exercise was the most difficult for me; for a long time I couldn’t understand from the description whether I was doing it correctly, but over time I began to get the hang of it. Therefore, I will try to describe it as clearly as possible.
Remaining in a quarter squat, extend your left arm straight out in front of you, palm facing up. Simultaneously with this movement, bend your elbow and turn your right arm palm up and move it to your hip. As soon as your right hand is at hip level, begin to turn your body to the right, and raise your hand in a smooth, wide movement to ear level. The eyes follow the right palm.
Then bend the right arm at the elbow and forcefully push it forward with the palm somewhere at ear level. At the same time, the left arm bends at the elbow, describes an arc with the palm and lowers to hip level.

Benefit: the exercise has a very good effect on the hands, shoulder and elbow joints, it is also recommended for diseases of the upper respiratory tract, and helps with asthma.
Exercise 6. Boating
After finishing the previous exercise, bend your knees, but a little more than in the previous exercises, lean forward a little and lower your arms freely. From this position, we move our straight arms back, turn our palms up, then raise our arms as high as possible, straightening our knees at the same time.
The arms describe a circular motion and lower down, while bending the legs at the knees. We concentrate our attention on the arms and back. As you inhale, raise your arms, as you exhale, lower them down.

Benefit: exercise has a positive effect on nervous system, heart and digestive organs.
Exercise 7. Playing with the ball
The Chinese call this exercise ball play, but in reality it is more like playing with a balloon, since the movements must be performed smoothly and easily. Let me remind you that each exercise leads into the next. From the previous position, slowly straighten up, body to the left. The left hand remains in the same position, and point the right hand up to the left, palm also up.
When your right hand is at the level of your left shoulder, make a motion with it as if you are throwing balloon. In this case, shift the center of gravity to your left leg.
Lower your right arm and repeat the movement on the other side. When doing this, follow the imaginary ball with your eyes and focus on your hands. Try to make your movements enjoyable, slow and smooth. As you inhale, move your hand up, and as you exhale, move your hand down.

Benefit: exercise has a tonic effect on the entire body.
Exercise 8. Admiring the moon
In the quarter squat position, lower your arms along your body, while inhaling, turn your body as far as possible to the left, while straightening your knees and raising your left hand, palm up. The right arm is bent at the elbow at chest level. Turn your head to the left and look at your left hand. As you exhale, lower your arms and return to the starting position
Besides proper nutrition, many decide to add weight loss exercises to their daily activity. But it is not always clear how to do gymnastics at home - what exercises to do, when and how exactly to do them correctly so that the kilograms begin to fall off. In this article we will look at some features of a home gymnast for those who want to lose weight. overweight and tone your body.
How to do gymnastics at home
The first and probably most important thing is the right motivation. It is this that will help you at the initial stage not to break away from your training regimen, not to abandon them. Correct motivation is an image of an ideal and healthy body compiled in your head. In this case, beauty is health, as well as strength and endurance. Keep this image in your head and remember it whenever you want to be lazy and skip a workout.

It is believed that the best time for gymnastics is morning, but this is not always the case. If you are a night owl according to your biorhythms, then it is better for you to train after 16.00, since this is the time of peak activity of the night owls. “Larks” will cope well with the workload in the morning. But general rule for everyone is that gymnastics is performed 1.5-2 hours after eating and, in no case, not on an empty stomach. You need to eat something containing the “right” carbohydrates - oatmeal, buckwheat or brown rice, and you can supplement your dishes with vegetables.
Gymnastics at home for beginners
If you have not previously exercised at all, you should start with exercises that are simpler in technique and do not use weights. Don’t chase results from the first weeks, just get used to the loads and develop a stable habit of exercising. Also, if you immediately give the body an unusual load, you may encounter severe muscle pain or, due to unaccustomment, damage tendons and muscles during exercise. Therefore, gymnastics at home for beginners should include simple exercises, which would involve the muscles of the whole body: abs, legs, back, arms.


Gymnastics lessons at home
To start training, you don’t have to immediately look for money for a gym. It is enough to include regular morning exercises in your daily plan, but make it more effective through effective exercises. Such gymnastics should not be an ordinary warm-up for the muscles, but a full-fledged workout, after which you will feel real fatigue.
You can get real gymnast lessons at home from video lessons from famous coaches, stars, and athletes, who very often maintain something like a video blog about their training and make special episodes for those who want to train according to their program. Also, your friends who go to the gym can tell you how to do gymnastics at home. Usually they know whole sets of exercises that can be performed at home. In this article we will present only a few video examples.
Gymnastics at home: exercises for weight loss
As you know, in order for your body to start losing weight, you must burn more calories than you consume. Diets alone cannot solve this issue, so you need to add gymnastics to your daily activity. It should be taken into account that exercises in such gymnastics must be energy-intensive, i.e. you must make efforts “to the maximum”, to do through “I can’t”. It is these activities that will force your body to work in an enhanced mode, during which calories will be lost.
What should be effective gymnastics at home, exercises for which are designed to literally “burn” calories? These workouts should include all muscle groups. A set of exercises, for example, may be as follows.
- “Scissors” - this exercise perfectly works the abdominal muscles. To perform it, you need to lie on the floor, resting your hands on it, and begin to slowly raise your legs to an angle of 90 degrees, while crossing them alternately. In the same way, you need to slowly lower your legs down. This counts as one time. Perform three sets of 10-15 reps.


- “The Book” is an exercise for the press that involves all the muscles of a given part of the body. Sit on the floor with your hands shoulder-width apart behind you and tilt your head back slightly. Then simultaneously pull your legs, bent at the knees, and your body towards each other, as if “folding”, like a book.

