
How to make a good New Year's card. Do-it-yourself voluminous cards for the New Year
New Year With Christmas just around the corner, many of us are buying gifts for family and friends, decorating the house and baking birthday cakes.
Typically, one thing we remember about at the last minute is sending a New Year's card. As a result, at the last minute we are racking our brains to come up with something like this and where to get a creative idea.
To save you time and energy, here are 50 great New Year card design concepts to inspire your original greetings.
So let's take a look.
01.Don't be predictable

This holiday card is a little unconventional. She doesn't stick to the standard Christmas red and green color palette, but instead uses blue and pink colors. There is not even a holiday theme here, instead there are only faint hints. Fresh and unexpected.
02. Play with illustrations

An elegant handwritten font along with a cute illustration of children. Children always decorate and enhance holiday wishes.
03. Keep it simple

Postcards like these - good example breaking the standard template of New Year's greetings. The illustrations and handwritten inscriptions are made in the same color palette, making up a series of congratulations. And at the same time, everyone around you can receive a unique postcard. Great way make people feel like they have a special place in your life.
04. Graphic style

The simple yet unique graphics of this greeting card offer an interesting retro style. The layering of red and blue paint creates contrast and helps break up the repetitiveness of the pattern.
05. Using paper sleeve

Here the postcard is equipped with an interactive element - the use of a paper sleeve with a round hole. When you pick up a card, you see a festive themed design. And as soon as you pull it out of the envelope, the congratulation itself appears in front of you. A fun and unique way to convey a personal greeting.
06. Don't be shy about styling

It would seem like a banal holiday card with a deer. But, the complex textured pattern and subtle white dots reminiscent of snow help balance the illustration and the colored background. Background gradient adds volume
07. Using photos

This card is truly unique. All the figures on it are photographs, but since they are paired, the composition is illustrative in nature. All the characters are the same two people, which adds a special personal touch to the postcard.
08. Elegant to the touch

This design is extremely elegant. The subtle design is used not only on the card, but also on the envelope. The contrast between the black card and the white envelope looks really cool. This greeting is really sensual and exudes extra class.
09. Create simple illustrations

To surprise someone, you don’t need to create elaborate illustrations. You can achieve a cool effect with quick and simple graphics. Take a look: the simple graphic Santa hat stands out from the background, while the strong shadow gives the design a three-dimensional look. The simplicity of the design is juxtaposed with slightly more ornate lettering, which helps achieve balance.
10. Add sparkle

Who doesn't love sparkle during the New Year holidays? This card features pine cones made of beautiful gold foil. The muted background makes the simple yet striking illustration stand out even more.
11. Use metaphors

The holiday card features Santa Claus with his iconic red bag full of gifts. The inscription on the bag is “ festive mood"- conveys the main idea of the design.
12. Use literal imagery

Warm holiday wishes paired with detailed illustrations of cozy knitted pieces are the basis of this card. The use of slightly unusual illustrations along with winter greetings makes us associate warm scarves and sweaters.
13. Holiday looks

This card features George - but not your typical Yeti. He's huge, has antlers, and for some reason loves Christmas.
14. Breaking traditions

At first glance, this card doesn't look like a Christmas card. The color scheme is not red and green, the symbols and images are not festive either. But this is what makes the card unique. Simply adding the message “Merry Christmas” immediately makes the design themed.
15. Use symbols

The graphic circles on this card symbolize Christmas balls-decorations. Visually, these elements are not so obvious, but paired with a seasonal greetings banner, you can immediately feel the festive spirit.
16. Retro style

An example of a vintage New Year's classic. The beige color with red trim, subtle textures and font evoke a retro feel. Nostalgia makes congratulations truly deep and sensual, but at the same time light and cheerful.
17. Use interactivity

A very funny, quirky and unexpected card. The colors are not festive at all, and there is no New Year’s theme either. But, as soon as you pull your tongue, “Happy Holidays” appears, and the card immediately becomes festive. This congratulation is ideal for creative people or teams
18. Use illustrations as backgrounds

The design of this greeting would be great even if it used a simple black background. Adding winter themed illustrations to the background enhances the mood. The texture of branches and snow adds space to the card.
19. Using Negative Space

Here white and blue are used together to create interesting effects with negative space. White snow seeps into the cold blue of the mountains, and at the same time looks like tinsel around the snow-covered trees.
20. Add an industrial feel

This card uses industrial motifs in a very clever way. The design takes a whole phrase and spins it, turning it into a joke at the end. The drawing has general shape Christmas tree, which is crowned with a printer with a star. Very simple, but incredibly funny and effective.
21. Using silhouettes

Soft and bright colors The colors used in this design focus your attention on the middle of the composition. White soft blurry silhouettes turn into feathers and snowflakes. They work together with beautiful blocks of color to create a deep shape. As a result, the ornament looks three-dimensional.
22. Let others fill in the gaps.

Similar to the previous example, here the colors also create a nice background in the center of the composition. However, in this card, the background color forms the inscription "2016", while simultaneously destroying the "2" and "6", making these numbers illegible. This allows the recipient to come up with the message themselves.
23. Create something from something

Holiday themed icons come together to form the iconic Christmas image - the Reindeer. You can clearly see each icon individually. To balance the rather heavy image from a design point of view, it is surrounded by round snowballs.
24. Symbiosis of typography and illustration

This card features decorative embellishments falling from congratulatory messages. Ornaments, despite simple form, create a bright, festive spirit. The inclusion of triangular shapes and snowflakes gives the decorations extra charm.
25. Texture mapping

This design uses texture to make the card less flat. A very subtle, but very effective technique.
26. Gather all your holiday paraphernalia together

Do your friends celebrate Hanukkah? Then the idea of collecting a bunch of cute little things in one illustration—the attributes of this holiday—is just for you. And for those who do not celebrate this Jewish holiday, it will still be interesting to receive such a postcard as an informational and educational greeting.
27. Add a sense of humor

Kitten who got entangled in festive garland, will make anyone smile. The image itself is funny, but paired with the ironic phrase: “I can explain everything” next to the kitten, it simply sparkles with humor.
28. Use flat icons

Flat Christmas themed icons decorate the background of this holiday greetings. There's everything from a Santa hat to a birthday cake. These cards will show your designer friend where to go creatively in the next year.
29. A little more sparkle

Here the congratulatory text is filled with silver. It is reflected in the light and symbolizes the hope that everything planned will come true. The contrast with the yellowish golden paper offsets the silver of the letters.
30. Write your own greeting

A handwritten message adorns the back of this card. The unique personal contact makes it individual.
31. Handmade cards

A unique hand-drawn technique. Everything from the font to the imagery is handcrafted and truly personalized. Of course, it would be much cooler to make a lot of unique cards with your own hands for all your friends and relatives. But it’s more effective to make one and multiply it. She'll still keep the feeling self made, and you won't stay awake at night drawing cards to countless people you know.
32. Break the stereotypes

The apparent inconsistency of this card's design gives it a mathematical, scientific appearance. However, the letters, which at first glance seem like formulas, add up to a cheerful holiday greeting
33. Manipulate Photo Images

Here, photos of two clinking beer mugs transform beer foam into something festive. Thanks to the manipulation of images, the image of a Christmas tree appears on the card, and the message inside the card adds to the mood.
34. Adding volume to text

A bright and cheerful snowman stands out against a patterned background. If the white text did not have red accents, it would “melt” into the background and would not be so obvious. The color red helps highlight and draw attention to the lettering.
35. Make a joke

This holiday card will be appreciated by many designers. To non-designers, it looks like a simple graphic Christmas tree. For those who are in the know, it’s clear - in fact, this is a pen tool, designed in the shape of a Christmas tree. Great way send Best wishes colleague and at the same time entertain him.
36. Push people to be creative

An insert inside this card allows people to create their own deer and tree designs. The postcard is not only fun, but will also serve as a unique element New Year's decor in the house.
37. Ditch the postcard.

In today's technological world, paper cards can generally be seen as an anachronism. Instead of sending a physical card, create a custom email greeting. This will not only allow you to send it to many people at the same time and without the cost of postage, but will also save paper.
38. Traditions Illustrated

The card design illustrates the American tradition of Christmas pickles - a cucumber hung on the tree. Anyone who finds pickles hanging from a Christmas tree will have good luck for the coming year. A somewhat unusual and humorous choice of illustration for a greeting card.
39. Combining different fonts

The combination of a thin, italic font with a thick, sans serif font provides good contrast. If this design used only one font, it would dominate the composition. The combination we see in this design always works well, including on greeting cards.
40. Congratulations for everyone

Christmas and New Year are a holiday that is celebrated all over the world. Here is a design that includes traditional greetings in various languages. All of them are collected in the form of a regular stripe, very conveniently interrupted by the image of a deer. Using fonts various types creates a unique texture.
41. Create your own greeting font

A font consisting of solid stripes and striped parts. By adding something personal to a plain font, we make the recipient feel special.
42. Using geometric shapes

The geometric shapes used in this design form a Christmas tree. Incredibly simple, but truly original. Green stripes also imitate pine needles - an excellent solution.
43. Add functionality

But this design gives a new meaning to warm wishes. The card itself is made of a thin sheet of wood, and you are encouraged to actually burn it, thereby warming yourself up.
44. Get creative with food

This special holiday card uses real cookies and powdered sugar. A fun twist from boring graphics to a themed greeting. Especially if you want to congratulate partners who are somehow related to the products.
45. Congratulations written by hand

Handwritten wishes give cards an organic and joyful feel. The lettering is designed to fill the entire space, making it feel like a full-fledged illustration.
46. Let the message speak for itself

Here, the phrase stands out against the bluish-green background and speaks for itself, while the texture at the bottom of the background grounds and adds dimension to the entire design.
47. An ordinary look in an unusual way

Here Santa Claus looks very cheerful and interesting. Instead of showing off the red color of the suit, it blends into the background, causing us to only see bits and pieces. Even if you can't see where things end and begin, your eyes still recognize the image unmistakably.
48. Have fun with a card

There's no need to be serious when sending a New Year's card. This design can bring joy to the recipient. A white sheep is paired with a wish that is written in a way that makes you imitate the bleating of a sheep.
49. Kaleidoscope

There are no inscriptions at all. Yes, they are not needed in this design. The nature of the painted Christmas tree decorations is quite complex and detailed. And subtle silver foil accents add a winter holiday feel.
50. Blurring boundaries

Before us is a wonderful interweaving of letters and illustrations. The words “joy”, “love” and “peace” intertwine to form a Christmas tree. The dot in the 'J' is a star, and the subtle dotted accents act as a garland. All this gives the card something special.
No matter what good gift– it is considered incomplete without a postcard. The range of greeting cards today is very large. However, if you want a unique postcard, then it is better to make it yourself. This is exactly what we will do now: consider ideas for DIY New Year greeting cards.
You will need: thick colored cardboard A4 format, scissors, corrugated paper, PVA glue or double-sided tape, a simple pencil, decorative elements (sparkles, beads, ribbons...).
Master class

New Year card in scrapbooking style
Scrapbooking is a whole art that teaches you how to create and decorate photo albums (in our case, a postcard) with your own hands. Scrapbooking has a whole history of how a notebook turned into an album. At the end of the 17th century, notebooks with additional blank pages appeared. Their owners pasted in images, creating entire collections. This is how scrapbooking began to develop.
You will need: thick colored cardboard in A4 format, PVA glue or double-sided tape, scissors, scrap paper, pencil, decorative elements (sequins, beads, rain, buttons, sequins...).
Master class
- Make 12 rectangles from scrap paper. The size of each rectangle should be different, starting from the smallest to the largest. (Width from 1 to 12 cm, length 5 cm for all rectangles).
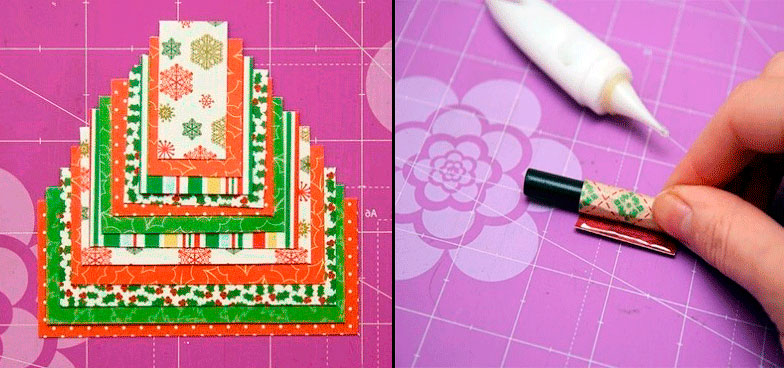
- Roll each rectangle into a cylinder in the width direction using a simple pencil securing each cylinder with glue.
- Glue all the tubes together, starting with the largest, ending with the smallest, creating a Christmas tree shape.

- Let the Christmas tree dry well, then glue it to the right half of the card.

- Decorate the card to your taste with sparkles, sequins, buttons, rhinestones...
You will need: A4 colored cardboard, wrapping paper or candy wrapper, thin black marker, scissors, PVA glue or hot melt glue, stapler, decorative elements (sequins, beads, rain, buttons, sequins, bows...).
Master class

New Year card in minimalist style
Minimalism(from Latin - smallest) is a style that is distinguished by its simplicity and laconic composition.
You will need: A4 colored cardboard, a shaped hole punch or a stationery knife, thread, needle, sequins, a simple pencil, a ruler and scissors.
Master class
- Make the base of the card by folding a piece of cardboard in half.
- On the right half of the card, sketch out a Christmas tree and a star top. Use a ruler and pencil.
- Cut through the star with a shaped hole punch or a stationery knife.
- Use a needle to make holes in the shape of a Christmas tree - a triangle.
- Take a thread and a needle and make stitches. After each stitch, string sequins.
- Carefully fasten the thread on the reverse side.
New Year card in origami style
Origami- This is a type of decorative and applied art, literally translated from Japanese as “folded paper” into various figures.
You will need: multi-colored A4 cardboard, PVA glue, scrapbooking paper or thick paper, decorative elements (sequins, beads, rain, buttons, sequins, bows...).
Master class
- Make the base of the card by folding a piece of cardboard in half.
- Take 3 squares of thick paper whose sides are 20cm long.
- Fold the square diagonally, unfold it and fold it crosswise again diagonally (conditionally marking 4 triangles).

- Fold 2 opposite triangles inside.
- Press the resulting triangle to the surface and mark the conditional center.
- Fold the bottom corner parallel to the middle. Repeat this procedure with the second corner. The module is ready!

- Make 2 more of these modules, maybe in different colors.
- Assemble the Christmas tree in this way: glue the origami module to the right side of the postcard, form the Christmas tree from top to bottom, insert the next module into the previous one.

- Decorate the Christmas tree to your taste with sparkles, sequins, buttons, rhinestones...
You will need: A4 colored cardboard, scissors, a simple pencil, ribbons, PVA glue, decorative elements (sequins, beads, rain, buttons, sequins, bows...).
Master class
- Make the base of the card by folding a piece of cardboard in half.
- Glue the tree trunk to the center right side of the card. The barrel must be made of tape brown shaped like a trapezoid.
- Cut 6 strips of ribbons 2 cm wide, 2, 4,6,8,10,12 cm long.
- Cut the corners of the ribbons on both sides.
- Glue the tapes from bottom to top, in the shape of a triangle.
- Decorate the Christmas tree to your taste with sparkles, sequins, buttons, rhinestones, stars, bows...
You will need: A4 colored cardboard, scissors, a double-sided round napkin, a ruler, a simple pencil, double-sided tape, decorative elements (sequins, beads, stars, rain, buttons, sequins, bows...).
Master class

You will need: A4 colored cardboard, colored paper A4 format, scissors, ruler, simple pencil, stationery knife, flat paper decorations (snowflakes, stars...), decorative elements (sequins, beads, stars, rain, buttons, sequins, bows...).
Master class

You will need: colored cardboard and A4 paper, double-sided tape with backing, scissors, tape, hole punch.
Master class
- Make circles from colored paper using a hole punch. (If you don’t have a hole punch, don’t despair; circles can be drawn and cut out by hand).
- Make the base of the card by folding a piece of cardboard in half.
- Place tape in a circle shape on the right side of the card.
- Remove the protective layer from the tape pads.
- Glue the circles in several layers to create a voluminous wreath.
- Tie the ribbon in a bow and glue it up.
You will need: A4 colored cardboard, scissors, a simple pencil, multi-colored pieces of fabric, thread, needle, decorative elements (sequins, beads, stars, rain, buttons, sequins, bows...).
Master class
- Draw a star pattern, a tree trunk, a triangle triangle on pieces of fabric and cut them out.
- Make the base of the card by folding a piece of cardboard in half.
- Create an applique as shown in the picture in this way: stitch a square of fabric to the right side of the card. (Use sewing machine or stitch by hand).
- Sew on the tree trunk, then the Christmas tree and the star.
- Decorate with decorative elements to your taste.
Make cards with your own hands, using your favorite colors, decorate according to your personal design taste, experiment and create entire collections of masterpieces with your own hands. Happy New Year to you and your loved ones!
Summary: DIY New Year's cards. How to make original cards for the New Year with your child. New Year's crafts. Homemade New Year cards, postcard ideas. Volumetric cards for the New Year holidays. New Year's paper crafts with children. New Year's application.
1. DIY New Year cards (“Christmas tree”)
The New Year tree is an indispensable attribute of the holiday. Therefore, postcards with her image will be especially appropriate. Plus, these cards can be very easy to make.
The New Year's tree applique can be made from plain or multi-colored strips of paper. Even a small child can make this New Year's craft with his own hands.


Strips of paper can be replaced with colored tape or braid. They also make very beautiful New Year's cards.


A more complicated option is a New Year's card "Christmas tree" made from paper tubes. This original three-dimensional New Year's card "Christmas tree" is made of paper tubes. The Christmas tree is decorated with multi-colored buttons. Its trunk is made from a twig. To make this New Year card, it is advisable to use special scrapbooking paper or corrugated cardboard.


It’s very easy to make a Christmas tree applique using store-bought stickers. Even a two-year-old can do this craft for the New Year with his own hands.


Simple and effective - homemade New Year's cards "Christmas tree" from ordinary buttons.


You can also embroider a Christmas tree with threads. Only in this case, the New Year's card should be made of high-density paper or cardboard. The holes must first be carefully made with an awl. For the simplest version of a Christmas tree, see the photo below.

For a more complex version of a New Year's card with a Christmas tree made of threads, see here >>>> To make this New Year's craft with your own hands, you will also need sequins or beads.


By the way, you can embroider not only a Christmas tree with threads, but also something else, New Year’s. For example, this cute deer.

You can make an original DIY New Year's card from a fern leaf or any other plant similar to it. For example, cypress branches. Just take the top of the leaf and glue it onto the card. This will be a Christmas tree. All you have to do is decorate it with sequins or confetti made using a hole punch from colored paper. Instead of confetti, you can glue multi-colored pieces of plasticine to the Christmas tree. Even a child can do this part of the work of making a homemade New Year’s card.

You can make a New Year's card either from a whole leaf of fern, or just from its upper part.


Manufacturing technique volumetric Christmas trees similar to the method of making New Year's balls. See the link >>>> But you don’t have to glue them together completely, instead glue the Christmas trees onto the card.
Option 3.
Do-it-yourself voluminous New Year's card. To make such a voluminous card with a Christmas tree for the New Year, you will need three sheets of green paper square shape: large, medium and small. Also, in order to make a Christmas tree trunk, you will need a rectangular sheet of brown paper.

Fold each square piece of paper in half first (horizontally and vertically) to mark the center lines. Then fold them two more times diagonally. After this, fold each sheet into a pyramid (see photos 3 and 4). Glue a Christmas tree from the resulting pyramids by inserting them into each other. How to make a trunk for a Christmas tree is shown in photos (8, 9 and 10). Finally, glue the Christmas tree to your New Year's card.

Option 4.
Do-it-yourself voluminous postcard for the New Year. Making this voluminous paper card is much easier than it might seem at first glance. First you will need to cut out 5 halves of circles from green paper different sizes: big, smaller, even smaller, etc. Fold each half of the circle in half, then in half again, and in half again. Unfold each piece and form accordion folds (see photo).

Now insert one piece into another and glue them together along the three central folds.
For the trunk, cut out a rectangle from brown paper and also fold it like an accordion.
Glue your paper Christmas tree onto the card base. The easiest way to make snowflakes is from white paper using a hole punch or drawing with a cotton swab.
Option 5.
Very beautiful New Year's craft with your own hands, accessible in complexity to a preschooler - a voluminous New Year's card "Christmas tree". The Christmas tree is made of rectangular strips of paper folded like an accordion. But there is one nuance here. If you look closely at the photo, you will see that the tiers of the Christmas tree are made of strips of paper of different widths: the ones at the bottom are the widest, the closer to the top the narrower. In addition, the depth of the fold of the accordion is also different. The bottom strips of paper are folded into an accordion with a large "step". The higher you go to the top, the shallower the bend depth.


Here are two more voluminous cards with a New Year tree made from a triangular-shaped sheet of paper folded like an accordion. Simple and tasteful!


Option 6.
Another voluminous New Year's card. Again, this New Year's craft for children is attractive not only in appearance, but also in its ease of manufacture.

To make such a New Year's card with your own hands, print out the templates (template-1 and template-2) on two sheets of cardboard or thick paper and use the detailed instructions from the photographs below. It is better if the sheets of cardboard are of different colors.


 Finally, decorate the Christmas tree to your liking. The voluminous New Year's card is ready!
Option 7.
Origami Christmas tree. We invite you to make a three-dimensional New Year's card decorated with a Christmas tree made of paper made using the origami technique. To make the card look more elegant and festive, choose more beautiful paper for your New Year tree. Special paper for scrapbooking is well suited for this DIY New Year's craft. By the way, making such an origami Christmas tree is much easier than it seems at first glance. For one origami Christmas tree you will need 4-5 square sheets of paper of different sizes.

Option 8.
There is an easier way to make a Christmas tree using the origami technique. Detailed instructions in the photo below.


Option 9.
You can make a voluminous New Year's card with your own hands from corrugated paper.

Option 10.
The elements of the New Year's card in the photo below are made using the quilling technique.

3. DIY New Year cards (" Christmas balls")
Do-it-yourself New Year's cards with images of New Year's balls look good. The New Year's applique "Christmas balls" can be made from bright paper and decorated with ribbons.

Beautiful New Year's balls are made from colored strips of paper. Cut an unnecessary glossy magazine (advertising brochure) into thin strips and stick them on a white sheet of paper. After this, cut out circles of different sizes from the resulting striped paper. Decorate your New Year's card with them.

New Year's balls can be made not only from paper, but also from buttons.

Instead of buttons, you can use purchased decorative rhinestones.

Original three-dimensional New Year cards with images Christmas balls proposes to create a website www.hgtv.com

To make such a New Year's card with your own hands, print the following template. See link >>>> On each square using a compass or an object with round bottom suitable size draw a circle. Cut out all the circles, then use the following instructions to make Christmas balls. See link >>>> But you don't need to completely glue the balloon, stick it onto the card instead.

One more thing christmas decoration- a garland of flags will look impressive on a New Year's card. Flags can be made from paper or fabric and then glued or sewn onto the card.

Even very young children can make their own New Year's card with the image of a multi-colored garland of fingerprints.

And from a handprint you can make a New Year's card with Santa Claus or funny snowmen.


1. On any surface that does not absorb paint (for example, a regular sheet pan), make a rectangular frame (the size of your card) from tape or tape.

2. Apply paint to the surface in an even layer. Use a cotton swab to draw a picture on a New Year's theme.

3. Attach a piece of paper. Your DIY New Year's card is ready!


4. Do-it-yourself voluminous New Year’s card “Snowman”
Separately, I would like to talk about this original, voluminous postcard for the New Year. Making such a paper snowman is very simple. Even a preschooler can cope with the task. You need to cut out three circles of different sizes from thick white paper. It is advisable to shade the edges of the circles so that they stand out better against each other. This can be done using crushed pencil lead or eye shadow. Also cut out a scarf, pens, carrot nose, eyes and buttons from colored paper. Glue all the parts of the snowman sequentially onto the blank of your New Year's card.
Here is the original card made by a scrapbooking artist.

And here are the versions of this voluminous New Year's card made by children.


5. DIY voluminous New Year cards
Another way to make volumetric New Year cards can be found on our website at the link >>>>

6. New Year's crafts for children. New Year's applique
Cards decorated with New Year's applique from grains of rice.


7. DIY New Year cards. New Year cards with snowflakes
Another DIY New Year's card idea is a card decorated with a snowflake cut out of paper. For information on how to cut very beautiful, unusual snowflakes from paper, see our special section “DIY New Year’s snowflakes”.

If you have paper lace doilies at home, you can cut out snowflakes from them.

8. New Year's paper crafts. New Year cards made using the Iris folding technique
The Country of Masters website offers to make original New Year's cards using the Iris folding technique. The name of this technique - iris folding - can be translated as "rainbow folding". The design is filled with thin paper strips, which, overlapping each other at a certain angle, create an interesting twisting spiral effect. Detailed master class For making this New Year's paper craft, see the link >>>>

Here is another New Year's card made using this technique. Instructions at the link >>>>

9. Original do-it-yourself New Year cards. DIY New Year's Eve
We would like to introduce you to another interesting technology Making New Year's cards with your own hands. The Christmas tree and New Year's ball in the photo below are made using this technique.


To make a Christmas tree card, you will need:
Red cardboard sheet
- a sheet of colored origami paper (on one side - dark green,
on the other side - light green)
- scissors or a special knife for cutting paper
- glue
Print a stencil on a piece of green origami paper. Make cuts along the lines on it. Where the trunk of the Christmas tree is located, cut out a piece of paper completely. If you fold a sheet of paper in half before making cuts, you can cut it with scissors. In this case, even a preschooler will be able to make a postcard. If you want to avoid a fold in the center of the card, then it is better to make cuts with a special knife for cutting paper. Now all you have to do is fold the corners back and stick your workpiece onto the cardboard.

The "New Year's Ball" card is made in the same way. The stencil for making this original New Year's card can be downloaded from the link >>>>
The snowflakes from the section were made using the same technique. They can also decorate a New Year's card.

And another do-it-yourself New Year’s card “Christmas tree”, made using this technique.

To make this New Year's card, print the template onto a piece of cardstock. white. Glue a thin sheet of green paper on the back side. Using a paper cutter, cut out the corners and fold them over. Now cut out and fold your New Year's card in half. If you want to write inside New Year's greetings, then glue an additional sheet of green paper so that the letters do not show through the holes. Detailed New Year's master For a class on how to make this card, see .
Another idea for a New Year's card that you can make with your child yourself. For a detailed master class, see the photo below.


DIY New Year's card ideas. When making New Year's cards with your own hands, it is appropriate to use colored self-adhesive foil. It can be purchased at craft supply stores.

The last card with which we would like to complete our review of DIY New Year cards is the three-dimensional “Snow Globe” postcard. In the photo below it is shown on the left side. This Christmas card is made using a clear dairy lid. You will find a master class on how to make such original three-dimensional postcards on Veronica Podgornaya’s website.

These two postcards were made by the author of the blog Naftusina's hand-made art. A snowdrift and a cloud are cut out of felt. Christmas tree and bear - figured buttons. There are white beads sprinkled inside the card. The postcard looks incredible! You shake it and it snows! On this site you will find two more interesting DIY New Year cards. Santa Claus and the Snowman are hurrying through the snowy snowdrifts. The snowdrifts and cloud are cut out of felt, the characters are made from buttons and felt, the tree is a real twig, which is slightly pasted over with pieces of padding polyester, snowflakes are drawn with a helium pen.

Material prepared by: Anna Ponomarenko
Guys, we put our soul into the site. Thank you for that
that you are discovering this beauty. Thanks for the inspiration and goosebumps.
Join us on Facebook And VKontakte
In stores today you can find New Year's cards for every taste. But the editors website believes that homemade ones are much warmer. After all, when we make something for someone with our own hands, we put our love into it.
Below we have collected ideas for beautiful, original and, most importantly, “quick” New Year’s cards, the creation of which does not require any rare materials - beautiful paper, cardboard, and colorful ribbons and buttons lying around the house.
Volumetric Christmas trees
Volumetric Christmas trees made of white and colored paper are so simple to make that you can make them at the last moment. Read more on the Bog&ide blog.
Making 3D Christmas trees even faster. All you need is a ruler, sharp scissors and cardboard. This blog shows you how to cut them.
Penguin
We really liked this penguin, well thought out. You will need black and white cardstock (or white paper), a triangle made of orange paper and 2 miniature snowflakes, which we all know how to cut out. The eyes are, of course, the highlight of the postcard, and you will have to look for them at a hobby store (or tear them off from an unnecessary children's toy, with the consent of the children, of course).
Gifts
This cute and simple card requires 2 sheets of cardstock, a ruler, scissors and glue. And also pieces wrapping paper, which you have left over from gift wrapping, ribbon and ribbon. The manufacturing principle is very simple, but for those who want more details, we recommend taking a look at this blog.
Grandfather Frost
A friendly Father Frost (or Santa Claus) can be made in just half an hour. The red hat and pink face are strips of paper pasted onto a card or gift bag. The fur of the hat and the beard are obtained like this: you need to take drawing paper and simply tear off strips of the desired shape to get uneven edges. Place on the card over the red and pink stripes. And then draw two squiggles - a mouth and a nose - and two dots - eyes.
Simple drawings
An irresistible idea in its elegance is to draw Christmas balls with patterns with a black gel pen. The main thing here is to draw the correct circles and mark the lines for the patterns. Everything else won't be difficult - stripes and squiggles that you draw when you're bored.
The same principle that underlies the card with black and white balloons. Simple silhouettes, painted with simple patterns, this time in color - best done with felt-tip pens. Warm and very cute.
Many, many different Christmas trees
This is where patterned paper or cardboard left over from children's crafts or wrapping paper for gifts will come in handy. The Christmas trees are sewn in the center - this is not at all necessary, you can glue them on. But if you really want to, you first need to make holes with a thick needle along a ruler, and then sew with thread in 2 rows - up and down, so that there are no gaps left. Draw a snowball with white gouache.
Laconic and stylish idea- a grove of Christmas trees, one of which is glued to foam double-sided tape (and therefore rises above the rest) and decorated with a star.
This card requires 4 or 3 layers of cardboard (you can do without the red one). You can use paper rather than cardboard as a color layer. In the top, white one, cut out a Christmas tree (a stationery knife will do this well) and glue it with double-sided tape for volume.
A round dance of Christmas trees made from various leftover cardboard, scrapbooking paper, and wrapping paper, tied with a simple ribbon and decorated with a button. Try playing with colors and textures - here you can find an incredible number of options using different colored ribbons, paper and even fabric.
Wonderful watercolor so in the spirit of New Year and Christmas! A simple watercolor sketch can be done by anyone, even those who last time painted with paints in school years. First, you need to outline the patterns with a pencil, color them, and when dry, carefully erase the pencil sketches and complete the patterns with a felt-tip pen.
Winter landscape
For this card it is better to use structured cardboard, but you can get by with regular, smooth cardboard - it will still turn out impressive. Using sharp scissors, cut out the snowy landscape and moon and paste it onto a black or dark blue background.
Another, white-green, option for a winter landscape that will take a little more time. If you find velvety cardboard (remember, back in school they made crafts out of this), it will be great; if not, you can simply color the Christmas trees with a felt-tip pen. Snow - polystyrene foam disassembled into peas. You can also use a hole punch to make circles out of cardboard and glue them to the card.
Hugging snowman
Snowmen peering inquisitively into the starry sky will look better if you can find a bright ribbon for a scarf.
For that postcard on the left, You need unpainted cardboard, white drawing paper and foam tape to glue the snowman with. Drifts are made simply: you need to tear off the drawing paper so that you get a ragged wavy edge. Fill it in with a blue pencil and blend it with anything, even with your finger or a piece of paper. Also tint the edges of the snowman for volume. For the second You will need buttons, a piece of fabric, eyes, glue and colored markers.
You will want to keep this card for a long time. All you need are circles made of cardboard, a nose and twigs made of colored paper. All this must be assembled using double-sided bulk tape. Draw eyes and buttons with black paint, and a snowball with white gouache or watercolor.
Balls
Balls are one of the main symbols of the New Year and Christmas. These are made from velvety colored paper and ribbon. But balls are such a win-win option that you can allow yourself to fantasize: make balls from patterned paper, wrapping paper, fabric, lace, cut out from newspaper or glossy magazine. And you can simply draw the strings.
Another option is to stick paper with a pattern on the inside of the card, and cut out circles on the outside with a sharp stationery knife.
Volumetric balls
For each of these balls you will need 3-4 identical circles of different colors. Fold each one in half and glue the halves to each other, and the two outer halves to the paper. Another option is colored stars or Christmas trees.
Multi-colored balls
Wonderful translucent balls are obtained using a regular eraser on a pencil. It’s worth starting with a pencil to outline the outline of the ball. Then dip the eraser into the paint and leave marks on the paper. Fun and beautiful.
Cards with buttons
Bright buttons will add volume to the cards, and will also evoke subtle associations with childhood.
The main thing is to find buttons of interesting colors, but the rest is up to you - to “hang” them on the Christmas tree, on a branch with cute owls, or on newspaper clouds.

To please your loved ones, you don’t have to buy expensive gifts: it’s better to use your imagination and, with a little effort, make a homemade gift.
It’s easy to give positive emotions to others: just give them a New Year’s card made by yourself. With the help of such a gift you will convey your warm regards those around you and surprise them with a beautiful handmade craft.
A postcard with congratulations to friends and family for the New Year will perfectly complement the main gift; you can also make it yourself. A similar gift duet - good way show your loved ones your attention.
Homemade postcards are remembered and stick into the soul much more than store-bought ones. You can create a creative masterpiece from the most ordinary things, showing a creative approach and existing creative abilities.
The tradition of giving each other cards for the holidays appeared a long time ago; recently it has been forgotten a little, but this situation is easy to correct. Modern technologies cannot give as much body and emotions as simple cards made with soul.
Give joy to those around you by congratulating them on their New Year's holidays homemade postcard. A colorfully decorated piece of paper can give a festive mood and create a New Year's atmosphere.
DIY New Year cards, photo
Handmade cards can be given to relatives, friends and even work colleagues. Homemade cards can make you happy older generation; This method of congratulations from loving grandchildren will be appreciated by grandparents. Believe me: beautiful craft with wishes of happiness will not seem as banal as a standard store souvenir.
Making a New Year's card with congratulations is not difficult, and this article provides several ideas for creating New Year's holiday cards for children and adults.
Bright Christmas tree
The New Year is associated, first of all, with a beautifully decorated forest Christmas tree. The fluffy New Year's tree is a central attribute of winter festivities. So why not decorate your holiday card with this traditional New Year's symbol?
To make a greeting card decorated with a colorful Christmas tree, you only need paper.
Advice. To make the card more original, it is best to use paper with different patterns.
Make a semicircular paper blank, fold it, focusing on the picture. You should end up with something like a fan.
The second option is to make “branches” out of paper and glue the paper parts together, otherwise they will open up. To decorate the top of the tree, glue a small star or bead to the top.
 New Year card, photo
Presents slide
It’s not difficult to implement this creative idea, and the joy from receiving such a wonderful postcard will be genuine.

Take a bright piece of paper, preferably with a pattern, and fold it in half. Use a ruler to mark three squares (each subsequent one should be slightly larger than the previous one). The squares will serve as gift boxes. Using scissors, make cuts (not all the way) at the top and bottom: this will make the drawers look voluminous.
Decorate the boxes as you wish. The original congratulatory present is ready.
Unusual Christmas trees and a button snowman
Making an original New Year's card couldn't be easier, and the following ideas will let you see for yourself.
You will need:
- paper sheets with different textures;
- sheet of cardboard;
- blue felt-tip pen;
- ribbon cuttings;
- buttons;
- office glue.
 DIY New Year card, photo
 Winter tree
To create a paper tree, cut out a triangular shape and make the top long. Decorate the Christmas tree with two small bows made of thin white ribbon. To decorate the top, use a snowflake with glitter.
Note! To make the Christmas tree elegant, use snow-white paper with a pattern.
A Christmas tree made from paper circles looks even more unusual. different colors, differing in size. Parts in the shape of circles are glued to the base, creating an imitation of a Christmas tree.
The top of the Christmas tree on the postcard is crowned with a star.
 DIY Happy New Year cards, photo
 Snowman made of buttons
This idea will allow you to make a children's card featuring an adorable button snowman. Take three buttons (they should be different sizes). One button should be especially small and always have two holes (instead of eyes).
Glue the buttons one above the other, put a headdress (for example, a paper bucket) on the snow man's head and tie a thread scarf for him.
Next to the snowman, draw snowflakes using a blue marker. Tie a bright ribbon at the top of the card.
 Beautiful DIY New Year cards, photo
 Button compositions
Using buttons, you can realize various creative ideas.
Make a button Christmas tree: beads, rhinestones or paper circles are suitable for filling the gaps. Buttons in one color scheme combine with decorative elements of the same color.
You can decorate with buttons purchased greeting card or create your own unique masterpiece, abandoning templates.
The buttons do not have to be fixed with glue; they can also be secured with thread. Snowflakes, beads and ribbon bows are suitable for decorating a button tree.
 Beautiful New Year cards, photo
 Not only Christmas trees are made from buttons, but also New Year's wreaths. The main thing is to choose a successful combination of buttons that differ in size and configuration. Lubricate the bottom of each button with glue and lay them out in a circle, forming a wreath, complete it with ribbon, gluing it to the base in the same way.
The analogue of the European postcard is ready - the composition looks festive and unusual. One wreath can consist of multi-colored buttons: feel free to create original designs from them.
 New Year cards: do-it-yourself photos
Creativity and savings
When making New Year's greeting cards, use pieces of ribbons, lace, flaps, ropes, threads - everything you can find in the house.
 DIY Happy New Year cards
 Crafts in rustic style
Tie the cuts in the center different materials ribbons with lace and fix them with glue, placing one element on top of the other - the rustic New Year's tree is ready.
Decorate it with beads and shiny buttons.


Original card "Christmas stocking"
Such cards imitate tags and look very cute as a gift. This New Year's card will perfectly complement any souvenir.
 Beautiful New Year cards
 To make it, you will need thick cardboard and a sheet of colored paper to match, an image of two socks (cut out or drawn), ribbon, beads, beads for final design.
If you have special scissors for cutting scallops and a hole punch, that’s great: the tools will come in handy to make a hole for hanging our craft.
We cut out a wide strip of paper, decorate the cutting line with scallops, and glue it on. We sign the congratulations and glue the cut out socks. We decorate their lapels with beads or seed beads.
We pull the ribbon through the hole made by the hole punch and tie a knot.
For connoisseurs of minimalism
Those who like the minimalist style will appreciate the following idea: take thin emerald ribbons of different widths and secure them one on top of the other using beads or colored buttons.
By performing simple manipulations, you will receive an unusual postcard.


"Live" New Year's tree
Attach the stick to the paper base and tie ribbons of different lengths to it: they will serve as spreading spruce branches. Decorate the top with a miniature star.
Even a child can make such a stylish card from ribbons.
Scrapbooking
Do you want to create your own greeting card with an exclusive design, the likes of which cannot be found in the store? Use the scrapbooking technique.
To make such a craft you will need the following materials:
- thick multi-colored paper sheets (preferably cardboard);
- paper for scrapbooking (can be ordered in the online store);
- glue;
- pencil;
- decorative elements.
First of all, decide on the size of the future Christmas tree and, depending on this, using scrapbooking paper, make rectangular blanks that differ in width.
Using a pencil, twist the rectangular blanks to form tubes and secure them with glue so that they do not unwind.
The resulting tubes should be glued together, starting with the longest. Glue a Christmas tree made of tubes to the cardboard base. Decorate as you wish.
 New Year cards, scrapbooking: photos
 Quilling postcard with the symbol of the coming year
Respect the patron saint of the coming year - the Fire Cockerel - and decorate the postcard with his image.
For this you need the following materials:
- stripes of different colors for quilling;
- office glue;
- cardboard (for the base);
- a ready-made stencil or pencil for drawing the outline;
- glitter and other decorations.
You need to create an image of a bird on cardboard. Twist the quilling strips and, using a little glue to prevent them from unwinding, form the required configuration. Having prepared the parts, “assemble” the image of the rooster by gluing them to the base.
Think about the bright plumage of a rooster and add some chic to your craft by decorating it with sparkles, feathers and other decorations.
Don't forget to write warm wishes inside the card.
 Creative DIY Happy New Year cards
 Postcard with embroidery
Another way to decorate a New Year's card is embroidery.
For this you need simple materials:
- cardboard;
- multi-colored knitting threads;
- needle;
- printed words or image;
- scotch;
- small details for decoration.
Fold the cardboard in half. Paste a set of words or an image according to New Year theme: You can temporarily secure it with tape at the base. Using a needle, carefully make holes along the outline of the letters or image.
To create an applique, use threads of different colors.
Advice! First, “draw” the contours, and then move on to decorating the interior.
Decorate the finished craft with ribbon bows or beads.

Let's consider another option for creating a postcard with thread applique, but it will look completely different.
To create a thread card you will need:
- a thick sheet of paper (preferably colored) or cardboard;
- PVA glue;
- thick multi-colored threads;
- scissors;
- sequins.
Fold the cardboard sheet in half. Cut the threads into pieces, but with different lengths(from smallest to largest or vice versa). Attach the threads with glue to the base (the longest one is glued first, the next ones are smaller, and so on). The order of alternating colors is not important.
Glue two small pieces of thread (identical length) at the bottom of the postcard: they will serve as a trunk for the tree.
All that remains is to decorate the thread tree with sequins.

Geometric herringbone
Here is another example of an original postcard with a Christmas tree. To create it you need a thick sheet of paper (very beautiful postcard it will work if one side is white and the other, for example, light green), a printed image of a Christmas tree, a stationery knife. If a printout of the drawing is not found, you will need a pencil and a ruler.
Fold the paper sheet in half (the green side should be wrong side). Using a pencil, draw a triangle (it’s easiest to do this under a ruler, in this case the triangle will be straight). Divide the inner part of the triangle into small triangles - it is important that they are the same.
Using a utility knife, carefully cut the triangles without touching the base.
Fold the triangles down from the front of the card.

"Herringbone-accordion"
The principle of creating a New Year's greeting card “Herringbone-Accordion” is quite simple, and for this you will need:
- cardboard;
- a sheet of green paper;
- scissors;
- decorative elements;
- office glue.

Fold the cardboard in half - it will serve as the base for the postcard. From a green paper sheet (you can take any other color you like), make six rectangular pieces of identical width, but with different heights (each subsequent piece should differ in height by 15-20 mm).
Form an accordion out of each rectangular piece. Try to make the accordion proportional and identical in all parts.
Fold each of the resulting accordions in half and stick them on the inside of the card along the fold line, starting from the bottom and moving up.
Note! The largest size accordion is glued first, and the smallest size last.
The finishing touch is the “accordion” Christmas tree decoration. Complete the composition with congratulatory inscriptions. Warm words– it’s always nice.


Greeting cards with felt Christmas trees
To create a greeting card decorated with felt Christmas trees, in addition to multi-colored felt, you will need scissors, stationery glue, and thick paper.
Make trapezoidal and triangular shapes from felt fabric that differ in volume and color.
Glue the fragments onto the base and decorate with sparkles and congratulatory inscriptions.

There is nothing difficult about making homemade cards with congratulations for the New Year. Try making this craft with your own hands: creative process is exciting, and handicrafts will give you a lot of pleasure and allow you to please those around you with unusual postcards.
Combine the suggested ideas with your own creative ideas, and you will make unique New Year's cards that will keep your hands warm and lift your spirits.
Video
There are other holiday ideas original postcards for the New Year: watch MK in the video lesson below: