
How to make New Year's from a notebook. Master class “How to make Christmas tree decorations with your own hands” for real needlewomen
A4 size and fold them in half. Cut a cover measuring 210 x 298 mm from thicker paper and fold it in half as well. Place all the sheets inside each other and place the cover on top. Using a sewing needle, make two pairs of through holes along the fold line, stepping back from the edges of the paper by 2-3 cm. In each pair, make the distance between the holes 1 cm. Take 2 from a stapler or a couple of pieces, insert their ends from the cover side into the holes and clamp, opening in the middle. Then fold the notebook and cut the sheets to fit the cover.
If you have a stapler, you can make a notebook. To do this, fold 10 sheets of writing paper in half and cut all the sheets along the fold line. Cut two sheets of thick paper measuring 210 x 149 mm. Fold the paper into a stack, placing thicker sheets on top and bottom, and punch it 5-6 times along the short side with a stapler.
If you need a notebook of greater thickness, then you cannot do without a needle and strong thread. Take 18 sheets of writing paper and fold each in half. Cut one sheet of the same size from thick paper for the cover. Stepping 3 cm along the fold line from each edge, mark two points with a pencil at a distance of 1 cm from each other on all sheets. Pierce each point with a needle, including those marked on the cover. Thread a double thread into the needle and sew the notebook along the pierced points in two places. Tie the thread with a strong knot. Trim any protruding sheets around the edge of the cover.
Video on the topic
Sources:
- what can you make from a notebook
A notepad is a small notebook that contains many interesting facts from the owner’s life. The notepad remembers all important dates, all phone numbers and tells you when and with whom the meeting will take place. In general, such a quiet assistant. How to draw a notebook?
You will need
- - album sheet;
- - pencil;
- - eraser.
Instructions
Make sketches in the middle of the album sheet. Draw a rectangle, slightly rotated counterclockwise. Divide the notebook into two parts - draw a vertical line close to the left edge. Round the corners of the notepad. Draw another parallel line under the bottom side of the rectangle. This will be the back hard pad. Draw the pages - draw a few repeating lines at the bottom between the covers.
On the right side of the rectangle along the entire height, draw page bookmarks located in close proximity to each other using smooth lines. In the middle of the cover there is a so-called email sign. "Dog". To do this, draw a small capital letter “a” with a wide line and take the letter with its extended tail to the center of the circle.
Draw rings holding the notebook together. On the narrow left side of the depicted object, place five small circles at equal distances. Draw a “c”, the top edges of which will dive into the marked circles, and the bottom ends will rest against the spine of the notebook. Position them so that they lightly touch each other.
Color your notebook. Paint most of it in one tone. Make the upper left corner a half tone lighter. Draw the left side with a dark background. Please note that the back cover must also be painted taking into account the division of the notebook into two parts. Paint the pages and bookmarks in a light gray shade.
Sketch the fastening rings. First, cover the entire surface with gray. Then draw dark gray lines in the middle of the rings and draw highlights. Darken the ends of the rings greatly. Add light touches of the same paint that was used on the cover of the notebook.
A notebook is a small notebook with tear-off sheets, fastened with a spiral or paper clips, and intended for notes and notes. You can buy a notebook at any stationery store, or you can make it yourself with a little effort and imagination. Making an exclusive item will not require much time, and the results will meet your expectations.

In search of an unusual gift for a loved one, you can spend hours wandering around stores and looking at all sorts of banal goods in the windows, or you can spend very little time and make an exclusive gift. An excellent present is a notebook that can be easily made from notebook sheets and decorated with beads, ribbons, lace or fabric. Having made such a wonderful gift for a loved one, you will probably want to make the same notebook for yourself.
Preparing for work
To make a notebook from a notebook, you will need the following materials and tools: a general notebook in a thick cardboard cover or A4 paper, scissors, a pencil, colored paper. To assemble the structure, you need to prepare a stapler, which can be replaced with an awl or a thick needle and thread. To design the cover, you can use any materials at your discretion.Making a notepad
Take a general notebook, open it in the middle, carefully straighten it and remove the paper clips. Cut rectangles of the same size from notebook sheets. To make the work go faster, cut the paper blanks in small batches or cut the sheets along the fold line, and then each page into four more parts. Instead of notebook sheets, you can use regular office paper. The notebook can be divided into several sections with colored paper inserts.Now take care of the cover. Take a cardboard cover from a notebook, straighten it and mark on it the dimensions of the front side of the wrapper, the end fold allowance and the back side of the cover. The end fold allowance is equal to the thickness of your notebook. If you want to get a notebook in a vertical (portrait) format, the parts on the pattern should be adjacent to each other with narrow edges, if in a horizontal (landscape) format, with wide edges. Cut out the pattern with scissors and bend it in the right places.
Next, place the sheets into a cardboard cover, align their cuts on a flat table surface and fasten the entire pack together with the cover with a stapler along the edge. If you fasten the workpiece along the narrow side, the notepad will have a portrait orientation; if along the wide side, it will have a landscape orientation. If you do not have a stapler, or if the stapler cannot pierce the thickness of the notebook, you will have to stitch the workpiece with threads, after first piercing it in several places along the edge with an awl or a thick needle.
Notepad design
The front part of the cover can be covered with fabric, self-adhesive film, scraps of photo wallpaper or colored paper. You can paste a postcard, photograph or applique onto your notebook. To decorate your notebook, you can use buttons, beads, seed beads, ribbons, lace, yarn and any other materials, the choice of which is limited only by your imagination.If you like all kinds of beautiful notebooks, notepads, with unique content and interesting covers, then perhaps you should think about creating such a thing yourself. Ideally, you will need a color printer, you can try to come up with a design in black and white, you can create a design (or download it - we will give a link to the first version of such a design just below) and print it in a printing store, in a printing house. Perhaps your library has a color printer. The main thing here is to set the printing settings correctly (they are indicated in the news with the notebook design option). Also, ideally, you will need a sewing machine, but if you don’t have one, you can use an awl, thread and a needle, but you need to do this very carefully (for our little visitors only with the help of adults).
So, you will need two types of paper - one simple office paper, and the other, depending on what is available - the main thing is that it is not too thin. Matte photo paper will do.
The author of the lesson uses these layouts for the cover and pages:
We offer you these layouts in the style of Ever After High characters. (Layouts with other characters will also be added to the site over time)

You will find a complete set of options for pages with different Ever After High characters: .
Print out the cover and the required number of inner pages. The pages must be printed on both sides of the sheets.
We stack the sheets and fasten them at the edges with clips.
There are markings on the layouts - a central line both on the cover and on the pages, it will help you do everything neatly. If there are not many leaves, then it is convenient to sew this line on a sewing machine. It is important to make an indent from the edges of the paper, laying a line, 1-1.5 cm, under the trim.
Note (on the layout of the Ever After High pages, the dark central line does not extend along the entire height; before stitching, it is better to carefully continue it along a ruler with a pencil to make it easier to sew. But you need to stitch along the height of the entire colored part of the sheet, you will need to cut off the white edges)
This is what the line looks like:
You can also sew a notebook using an awl and thread with a needle. We bend the stitched notebook in half.
And leave the fold under the clips for a while.
Now all that remains is to trim it. For such a small thickness it is very easy to do it yourself using a knife and a metal ruler. If this is difficult, then any printing house has a cutter and, most likely, they will not refuse you help.
We trim 3 sides of the notebook, removing unnecessary edges.
That's all, your unique notebook or notebook will be ready.
Every person likes to decorate a Christmas tree. And if you decorate it with toys that you made with your own hands, it’s doubly enjoyable. Christmas tree decorations can be made of fabric, paper, beads, or light bulbs. And you don’t need to have professional skills to make such toys. The main thing is desire. In this article you will familiarize yourself with the master class “How to make Christmas tree decorations with your own hands.”
Collecting unnecessary light bulbs
If you have unnecessary or burnt out light bulbs at home, then Christmas tree decorations made from light bulbs are just for you.
To make a toy from a light bulb, namely a snowman, we will need: a light bulb, a children's sock (or a regular sock, but in a bright color), tape, acrylic paints, as well as tools for applying paint - a sponge and a brush, scissors and hot glue (glue). gun).

First we need to glue the tape to the top of the light bulb. After this, you need to paint the light bulb with white acrylic paint using a sponge. After the paint has dried, you need to apply a second layer and wait for it to dry again. Making a hat for a snowman. Cut off the upper part of the sock from the elastic band + 2-3 cm. Cut the upper part of the sock into two parts. Take one part and sew the edges halfway. Then, we put the cap on the dried lamp and cut the edges of the cap, as shown in the master class.

You can make a girl snowman, depict this using braids of threads that need to be glued under the hat. We draw the eyes and mouth using paint. The nose can be made from plasticine or polymer clay, or you can simply paint it with red paint. From the rest of the sock you can make a scarf for our snowman. To fix the ends of the scarf, we will apply a little glue. We make the arms of our toy from ordinary wire. We fix them with glue.
Thus, ordinary burnt out light bulbs can be turned into a beautiful New Year's snowman.
Fabric accessory
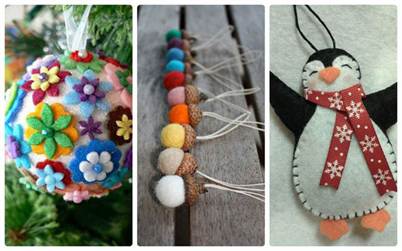
Christmas tree toys made of fabric are very comfortable and completely safe, they are also incredibly beautiful and bright toys for the New Year's mood. You don't need to put in a lot of effort to decorate your Christmas tree with something original. A fabric toy, as in the photo below, will take you literally 10 minutes, and a good mood is guaranteed for all holidays.

To make a toy you will need: fabric of different colors (three are enough), scissors, thread with a needle, 30 cm wire, a pair of beads.
Cut out 6 circles of different sizes from fabric, from largest to smallest. Then, we baste a thread along the edge of the circle and carefully tighten it. We do all the circles this way. After this, we take the wire and connect our circles in the form of a Christmas tree. We string a bead on top, make a loop from the wire, and the Christmas tree is ready.
With these trees you can decorate the entire New Year tree and surprise your guests with your skill and talent.
Introducing felt
A good example of a felt Christmas tree toy is a New Year's boot. You can hang it on the Christmas tree and place a candy there. This will be a nice gift for your child or your significant other.
To make a New Year's boot we will need: a sketch of the boot, felt, scissors, thread and needle, beads for decoration.
We attach the sketch to the fabric, trace it and cut it out. Then, using thread and a needle, we make a snowflake on the boot. We sew cotton wool or fur to the top of the boot. We sew both parts of the parts. Sew on the loop. The boot is ready.
The boot adds a little magic and wonder to the holiday. Make a miracle with your own hands, and it will decorate your Christmas tree.
Paper fantasies
How to make a New Year's tree toy from paper, unnecessary notebooks or sheets? Very simple.

We take an old unnecessary notebook, a pair of satin ribbons - green and red, glue, 2.5 mm knitting needles, a paper knife.
We should have a carrot. Carefully remove the staples from the notebook. Fold notebook sheets in half and cut them. Apply a little glue along the strip of paper. Starting from the corner of the strip, tightly wind the paper onto the knitting needle. We take the knitting needle out of the tube. We need several dozen of these tubes. We place two tubes one on top of the other in a cross. We take the third tube and glue it to one of the tubes at the intersection. Bend the glued tube to the one closest to the right.

We continue to bend in a circle. We secure the weaving with a clothespin and extend the tubes. We press and fold the sharp end of the tube in half, coat it with glue and insert it into the tube, twisting it slightly. Thus, we increase the remaining four tubes. To make the weave expand towards the top, we will reduce the angle of bending of the upper tube from the lower one. To narrow our carrot, the angle between the upper and lower tubes needs to be increased. We secure the ends of the tubes by bending them inside the carrot. Then we paint our carrots and let them dry. Glue on the loop and bow. Our toy is ready!
Thus, you get an interesting toy made from plain paper that can attract the attention of many guests.

The notebook is a constant companion for our children. In kindergarten, this is a notebook for speech therapy classes, a notebook for drawing, for mathematical dictations.
When a child goes to school, he will need a whole “bunch” of notebooks, in all subjects and more than one each. There are also printed workbooks.
And the covers of the notebooks are thin and immediately bend. And if they are not very thin, they get dirty quickly.
Covers help protect notebooks from damage. By the way, buying them in bulk is of course cheaper. If the class is friendly, parents can order covers in bulk from "Stationery Wholesale in Ukraine". But you can do it on your own.
I offer two options for DIY notebook covers.
Method one.
Quite simple. Sometimes teachers use it to cover notebooks for tests.

A double leaf is torn out from the middle of an ordinary notebook.

A strip 1-2 centimeters wide is folded at the bottom of the unfolded sheet.

This fold is tucked under the spine of the notebook.

That's it - the cover is ready!

The only disadvantage of this cover is that it is not very durable and does not adhere well to the notebook.
The second method is no more difficult, but with its help you can make a high-quality cover.
Method two.
We will need large paper. For example, sheets of colored paper for children's creativity. You can use wrapping paper or even leftover wallpaper. The main thing is that the paper is not too thick.
I have an ordinary double sheet from a set of colored paper. The set is cheap, the paper is single-sided, and one half of the sheet is orange, the other is purple. But that doesn't interfere.

Colored paper is immediately the right size. If you use other paper, you need to cut out a 28 cm by 40 cm rectangle from it and fold the leaf in half along the larger side.
We unfold a large sheet of paper and place the notebook on the fold, leaving approximately the same distance at the top and bottom.

We bend the strip at the top.

We measure the height of the notebook and fold the remaining part at the bottom.

We tuck the folded strips “under the spine” at the top and bottom.

We bend the protruding part of the colored paper to the left.

To prevent the curved ends from puffing up and sticking out in untidy tails from the front side, it is advisable to tuck the corners inward.

And only then bend it completely.

Do a similar procedure with the back cover of the notebook.

And for reliability, you can glue the bent parts with adhesive tape.
