
How to draw on a bottle. Decoupage for beginners: step by step with a photo of a bottle, on wood, on plastic, from napkins, on fabric, and this is not a complete list! Decorating step by step
To decorate bottles and glasses for a wedding, you need to use with the following scheme:
- The surface is degreased first. To do this, wipe it with alcohol
- Then a special primer for decoupage is applied, which is sold in art stores. However, acrylic paint as a base is also great. The paint is applied with the most common foam sponge, which is usually used to create makeup.
IMPORTANT: Often there is a need for a second layer of acrylic varnish.

- Once the varnish is dry, you can treat the bottle with glass glue, and then attach the napkins. It is recommended to use a special pistol. Do not worry about the fact that the glue is formed in the form of ampoules - they melt in the gun
- After 60 minutes, the bottle should cover with a few more layers of acrylic varnish
- An hour later you can start painting the day of the bottle
- But now can be decorated to your taste with sequins, ribbons, flowers, lace, beads


Glasses are decorated according to the same principle as bottles. It is recommended to tie two glasses or two bottles with ribbons as a symbol of a strong relationship.

If you want something out of the ordinary you can design one bottle in a masculine theme, and the second in a feminine one. Also, things that capture the hobbies of the newlyweds will look quite interesting.


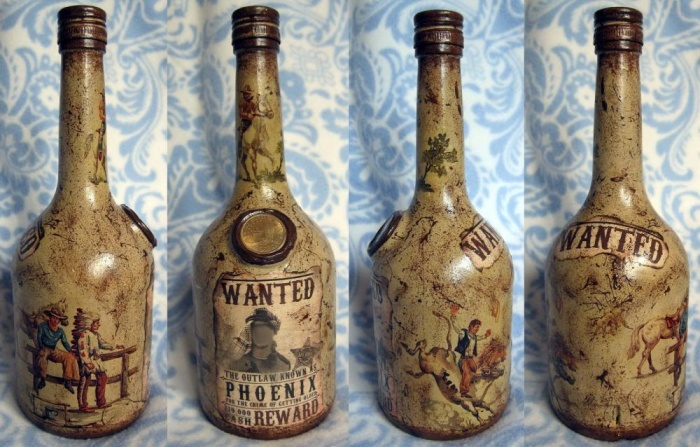
Decoupage bottles for a birthday for a man
A good option for designing a birthday bottle for a man is birthday portrait design:
- Be sure to degrease the surface with alcohol by first removing all the stickers on it
IMPORTANT: The remains of the old glue must also be removed, otherwise it will affect the quality of decoupage.
- Print two photos for direct and reverse technology
- Pour a small amount of water into a container. Dip the photo face down in the water- this will help the delamination of the sheet. After holding the image for a couple of minutes in water, gently roll up the excess layers with your fingers so that only one thin color remains

- Meanwhile, on the bottle, in accordance with the size of the photograph, a place is indicated for it. This place is smeared with acrylic varnish. Above photo pasted face inward
IMPORTANT: Smooth the paper well - there should be no bubbles or wrinkles.


- After the photo dries, you should stick a second one on it. Only this time the image will be facing the viewer. Smooth out the picture

- In the most ordinary syringe, type texture paste, which can be purchased at a craft store. Squeeze it on photo outline. Can also be done inscription


- To make the bottle look more elegant, you can use colored paste draw some patterns


Do not think that a design for a gift for a man cannot be bright. Here are some examples of gift bottle decoupage:


Decoupage of bottles for a birthday for a woman
A rather interesting and unusual effect will be obtained if you make decoupage cloth. You can take some unnecessary tights:
- Degrease bottle surface
- cut off part of pantyhose saturate with the mixture, consisting of water and PVA
IMPORTANT: The proportion of glue and water should be 1 to 1.
- After soaking in solution pantyhose are laid out on a bottle in the form of waves, coat tail. At the same time, do not forget to leave a place for sticking napkins.
- Wait complete drying material
- Produce a primer acrylic paint or a special compound purchased at a craft store
- All that's left is decorate to your liking


Very a good option for decoupage bottles as a gift to a woman - p rickle lace. small chains, beads will also fit.

Decoupage as a gift to fans of French charm


Decoupage with eggshells on bottles
Such decoupage will add volume to the patterns on things, making the bottle truly unique. You will need:
- Shell, cleaned of dirt and films
- Wide flat brush
- Special napkin for decoupage
- acrylic paint
- Toothpick
- Lacquer for the final coat
Let's get to work:
- Crush the shell with your fingers before applying to the bottle. into small pieces. However, adjust the size depending on the idea.
IMPORTANT: Some masters glue large pieces of the shell to the surface, and only then crumble them with a blunt object, placing them with a toothpick. However, it is better for beginners not to resort to this method.

- Apply glue to the surface of the bottle. It is recommended to start from the neck. Pieces of shell are applied to the glue and leveled with a toothpick. Remember to lightly press the material

- Cover the entire bottle in this way, but do not touch the bottom. Top coat the entire workpiece with acrylic white varnish

- Since you need to highlight the cracks, you should cover the surface of the bottle with a brown varnish with a sponge. It is better to mix several shades in advance to get the desired

- Waiting for the varnish to dry wipe the bottle with a damp cloth. Thus, the varnish will remain only in the cracks, which is required.
- Cut out the desired images from the napkins. Peel off the top layer

- Now selected attach pictures to the bottle and apply glue on top
IMPORTANT: Spread the glue from the center to the edges with a wide brush.

- The final stage - applying acrylic lacquer


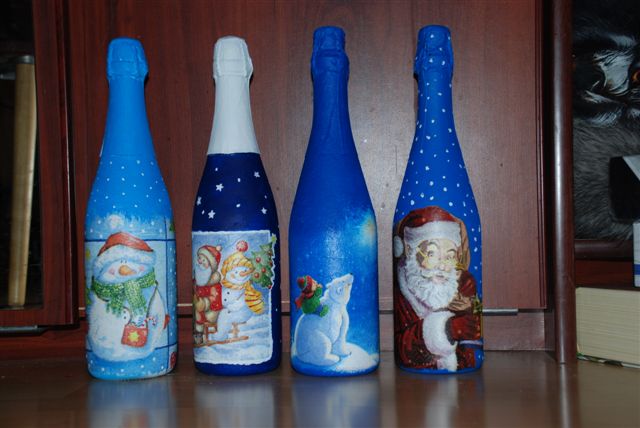
Decoupage of bottles for the New Year
For this decoupage, we will need:
- Bottle
- Acrylic white primer
- Decoupage napkin
- Acrylic paints
- crystal paste
- Finishing varnish for fixing the coating
- Glitter golden red
- Synthetic brushes
- Sandpaper with fine grains
- foam sponge
- Palette knife, with which artists remove excess paint or apply primer
Let's get to work:
- First thing you need to clean the bottle from labels and traces of glue. To do this, it should be placed in a container with water. room temperature- so the labels are detached. But glue residue is easy to get rid of with the help of baby cosmetic oil.
IMPORTANT: Do not forget to rinse the bottle with dishwashing detergent if you use cosmetic oil.
- Then alcohol degrease the glass surface

- Sponge should be applied primer. It is recommended to make the first layer thin, and then dry it with a hairdryer - this way the primer will lie on the glass in the best way. The second layer should also dry well.

- Tear off the images you want to stick from the napkin. Remove the bottom two layers, leaving only the colorful
IMPORTANT: Images are best torn off rather than cut out, because torn edges are easier to mask with the background so that they merge with it.
- The top layer must be placed face down on the file. Pour a little water directly on the napkin. Smooth out any unevenness on the napkin. You can help yourself with a brush. After a while, remove excess water from the paper
- T now attach the file to the bottle so that the wrong side of the napkin is adjacent to the bottle. Carefully smooth out wrinkles
- Pull one corner of the file to remove it. The napkin will remain on the bottle
- Smooth out the wrinkles and cover the bottle with glue or acrylic varnish. Let the bottle dry properly.
IMPORTANT: Make movements from the center to the edges.

- Small folds, which probably still remain, should be dealt with separately. They are easy to remove with fine-grained sandpaper. Run the sandpaper along the uneven
- The turn has come finishing varnish

- Now we need to work on the main background. Apply white and blue acrylic lacquer with a sponge, being careful not to forget to remove excess from the sponge

- Mix shades with which it is worth working out the edges of the picture - you can’t do without it if you want to achieve a natural image

- The cork should also be tinted

- Take an unnecessary toothbrush and use it make splashes of white paint

- Apply again finishing varnish
- Do it with a syringe inscription

- The image should be voluminous. To do this, a transparent paste with glass pieces is carefully applied to the bottle - it will imitate ice. Acrylic paint in a silver shade will also help.
IMPORTANT: This is where the palette knife comes in handy. It is most convenient for them to apply such a coating.


Another great way decorate the bottle New Year - sprinkle it with large salt crystals. The technique is simple - salt is attached to the glue.

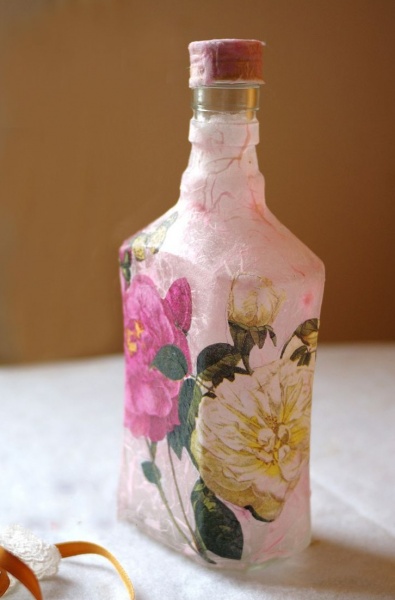
Decoupage of bottles with napkins
Decoupage with napkins looks especially chic if it is used in the process of work. craquelure varnish- it helps to create the effect of antiquity. So for such a case need:
- Bottle
- Acrylic paints
- Craquelure varnish
- Napkins
- Glass degreasing alcohol
- Flat brush made of synthetic fibers

Getting Started:
- So, first of all, do surface degreasing and cleaning of old labels
- Now cover the bottle with acrylic lacquer. Try to keep the layer even. Best applied with a sponge
IMPORTANT: Regarding colors, then keep in mind that the base should be of the color that is planned for cracks. Therefore, if the bottle itself is white, then it is desirable to make the base black or dark brown.
- Wait for the varnish to dry. You can use a hair dryer
- Now apply on top craquelure varnish. This layer does not need to dry.
- Then, with neat strokes, close to each other is applied acrylic lacquer. This layer is important to dry properly
- At this stage Let's start drawing a pattern from a napkin. Separate the top layer. Cut off all unnecessary, while trying to avoid smooth edges, which are then difficult to make natural
- Dilute PVA in water. Apply the solution to the surface of the drawing attached to the bottle. Move from the center to the edges
- Lacquer the surface. Work on the details if you like.

Decoupage bottles with toilet paper
So, to decoupage the bottle with the most ordinary toilet paper useful:
- Bottle
- Toilet paper
- Napkins
- Acrylic paints in various shades
- Salty dough
- Various items for decoration - for example, beads
Let's get to work:
- Of course, bottle degreasing is an indispensable stage of work
- Now tear toilet paper into pieces, glue the bottle with these pieces
IMPORTANT: Pasting should be done in such a way as if you are forming a background.
- Now paper should be made into strips. It is desirable to choose the width within 1.5 centimeters. But the volume should be different - for this, some stripes are created two-layer
- Pour some water on the surface. Wet each strip lightly in some places, and then twist- so the liquid will be distributed equally, and the strip will not completely get wet

- Make balls in the same way. toilet paper . However, the idea will only benefit from the use salt dough. It is recommended to outline the outline of the pattern in advance with a pencil

- Let the work dry. Thereafter you can cover the bottle with paint

- Add additional elements to the decor optional

Decoupage of bottles with ribbons
There is a rather interesting way to decorate a bottle tapes twisted rollers. Need for this decoupage, only a bottle, ribbons and glue.
IMPORTANT: As for the number of tapes, you will have to stock up on 36 meters.
The principle of creating decoupage is simple:
- Cut the tape into small pieces. Roll each piece into a roll
- Glue the rolls on the bottle. It is recommended to start work from below
- After the ribbons are glued, something like a knitting needle spread them out a little. Try to make the bottle still shine through the decor elements
- The neck also needs to be decorated. You can choose the easiest way by wrapping it with ribbon and attaching a flower

But there is also many other ways beautifully and imaginatively wrap ribbons around the bottles:


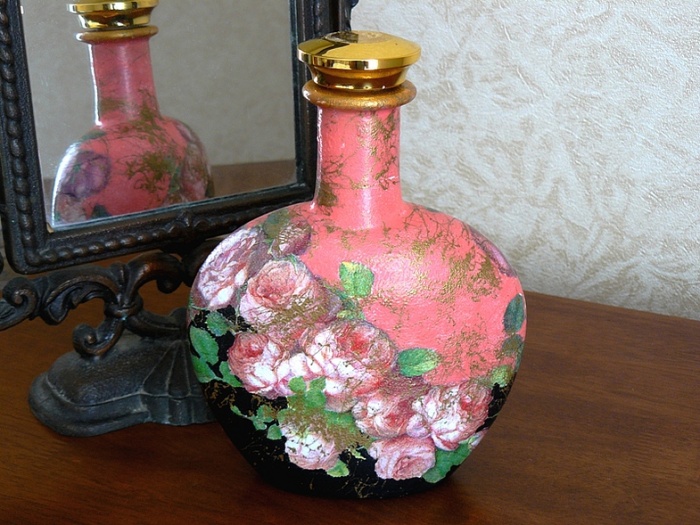
Decoupage bottles with flowers
You can decorate the bottle not just with ribbons, but with ribbons in the form of flowers. AND You will need the following things for this:
- Bottle
- Ribbons
- beads
- acrylic primer
- acrylic paint
- Silver outline
- Glue gun
The work process is as follows:
- To start a bottle degreased lacquer or alcohol
- Now soil is applied with a sponge
- The bottle is covered acrylic paint
IMPORTANT: You can apply the paint with both a sponge and a brush. However, the most interesting effect is obtained if you use a sponge - the surface becomes rough.
- While the bottle is drying, you can start making flowers. The easiest way is to simply string pieces of ribbon onto a needle and thread. The thread will tighten - the outlines of the flower are formed. Another way is to simply fold the corners and burn the edges. The last action will ensure soldering
- Once the bottle is dry you can stick flowers. You can decorate them with beads and thin ribbons.
- Contour around the perimeter of the tapes patterns emerge


A bottle presented for some holiday is, of course, a good gift in itself. However, you must agree, it will be much more pleasant to receive a unique thing, carefully made by someone else's hands. In this case, decoupage is able to help out even those who previously had nothing to do with needlework.
The use of hand-made things to decorate your own home makes it possible to uniqueize the interior, to give originality to the composition. One of these decor elements can be decoupage bottles.
Numerous photos of decoupage bottles clearly demonstrate that such things can be not only decorative accessories for the interior, but also become a wonderful unique gift for a variety of celebrations and holidays.

What is decoupage technique
The word decoupage came to us from France and means "cutting" in translation. If we talk about the technique itself, then it consists in sticking individual paper images on different surfaces, in fact, a simple application.


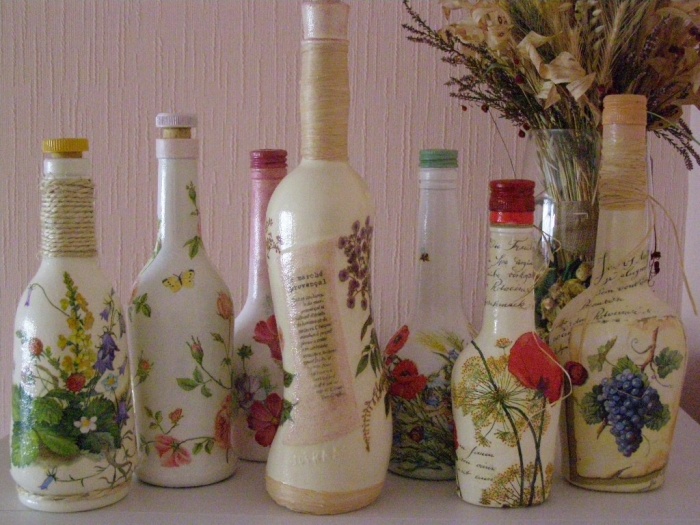
Most often, images are selected from napkins, special decoupage cards or rice paper are also used, if desired, you can use clippings from magazines.

To create a unique interior decor, you can use ordinary bottles interesting shapes. Decoupage of bottles with your own hands is a great opportunity to turn ordinary thing into an original flower vase that you can give as a gift or decorate your home with it.

For example, decoupage of a bottle of champagne is often used to decorate a bottle that will stand on wedding table at the newlyweds. Champagne is also decorated for the new year or birthday.


Materials for decoupage creativity
Both a beginner and an experienced master can use decoupage technique. To start creating, you need to purchase necessary materials and fixtures.

First of all, you need to choose a base - a bottle. It is better to choose a product with a smooth surface, without relief.

Next comes the drawing. To decoupage bottles with napkins, fragments of ordinary paper products are selected, it is also possible to use rice sheets, decoupage cards, clippings from magazines or pictures from the Internet.

To degrease the surface and remove all grease stains, you need to stock up on any suitable liquid that will cope with this task.


After degreasing, the glass surface will need to be primed. For these purposes, acrylic paint of any color that is suitable for the composition is suitable.

To stick a paper fragment to the surface, an adhesive composition is required. It can be a special decoupage glue or ordinary PVA diluted with water in a ratio of 1 to 1.

The required attributes are brushes. It is advisable to use synthetic products from which hairs do not fall out during the process.

A set of acrylic colored paints is required for the artistic design of the product, and acrylic varnish is required to fix the image. To give the bottle the effect of aging, a craquelure varnish composition is used.

In addition to these materials, small scissors are also needed, preferably manicure, foam sponges, containers for paint and varnish, sandpaper.

Step by step instructions
In order to create a beautiful decor accessory the first time, you should use the bottle decoupage instructions for beginners.


Preparatory process of the bottle. Any bottle should first be cleaned of all stickers and adhesive residue. To do this, the container must be soaked in soapy water, and then remove all fragments. Next, the fat deposits are removed with a degreaser.


The next step is to separate the desired fragment of the picture from the paper. To do this, it is better to use small nail scissors. If a napkin is used, then you need to take only one top paper layer.

If thicker magazine paper is taken, then first the surface is varnished, dried, and then soaked for 20 minutes in water. Then the transparent pattern will separate from the base.

Now it's time to glue the paper pattern onto the bottle. To do this, a dry fragment is applied to the bottle and smoothed with a brush dipped in glue from the center to the edges, squeezing out air bubbles and smoothing out wrinkles. In this form, the bottle should dry well.

The work is fixed by applying varnish to the entire surface of the bottle. It is better to apply varnish in three layers.


At the final stage, you can use sparkles, rhinestones, beads, etc. to decorate and decorate the bottle.

A detailed master class on how to decoupage a bottle will help everyone to create a unique composition for decoration.

Photo decoupage bottles


Everyone, a big hello to everyone!
In today's master class there will be decoupage of bottles for beginners. This is a detailed, step-by-step MK for decoupage, so everyone can repeat it.
As a result, you will get a very beautiful bottle, which is not even ashamed to give.
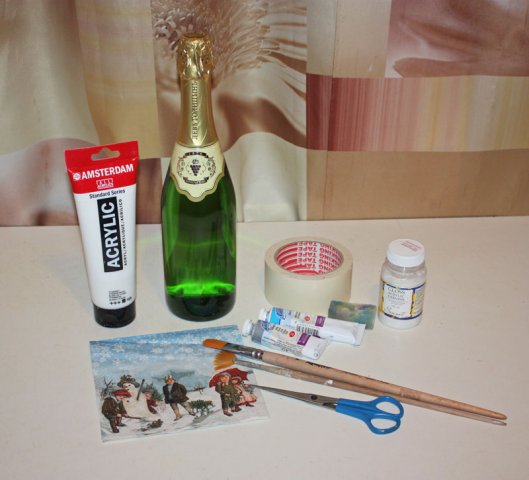
Here are the materials you will need:
- Glass bottle;
- Alcohol;
- Glass primer (optional)
- White acrylic paint;
- Acrylic lacquer;
- Decoupage napkins;
- Decoupage glue or PVA;
- Stencil;
- Acrylic putty or wood putty;
- Black and gray acrylic paints;
- Wax or candle;
- Sandpaper No. 0, soft brush, sponge;
- Lace, twine.
The master class turned out to be quite long, but I tried to describe it in as much detail as possible, so that it would be clear to those who hear about decoupage for the first time.
Step 1.
We clean the bottle from stickers. Wipe thoroughly with alcohol, without touching the outer surface with your hands. With this, we degrease the bottle so that the primer and paint lie well on the surface.

Step 2
We pass the bottle with glass primer. This step is optional, but recommended. However, if you do not have glass primer, then skip this step and move on.

Step 3
We cover the bottle with white acrylic paint, you can use a soft brush, and preferably a sponge. If the bottle is poorly and unevenly stained, apply another layer of paint after the first one has dried.

Step 4
When the paint dries well, it is necessary to cover with acrylic varnish and leave for several hours until completely dry.

Step 5
We apply a decoupage napkin to the bottle and, using decoupage glue or PVA, glue it. We apply the glue directly on top of the napkin, it is thin, it will get wet and stick. With a soft brush, very carefully, glue from the center to the edges, expelling all the air and smooth out wrinkles.


Step 6
We take a flexible stencil, apply it to the bottle and fix it with tape for a while. Apply acrylic putty or wood putty with a small spatula. Once the entire area is covered, carefully remove the stencil. We leave the putty to dry, if necessary, apply a pattern on the other side of the bottle.


Step 7
When the putty is completely dry, sand it with sandpaper No. 0.

Step 8
We cover the entire bottle with acrylic varnish.

Step 9
Using a sponge, we apply black acrylic paint, covering the putty patterns, grabbing the edge of the napkin quite a bit. We leave the paint to dry and coat it with varnish.


Step 10
When the varnish layer dries, we rub our putty patterns with wax or ordinary candles. To apply wax more thoroughly, rub it with your finger.


Step 11
We apply light gray acrylic paint directly on top of the wax and let it dry.

Step 12
With the same sandpaper, we go over the layer of gray paint, as if erasing it a little, so that in some places the lower layer of black paint would be visible.

Step 13
Lacquered for the last time and dried.

Step 14
Using PVA, glue lace to the bottle, top and bottom. We wrap the lid with twine and coat with PVA glue.


This master class is over, I hope everything was clear and interesting to you.
Decoupage is a technique that has no frames or boundaries, allows you to maximize the realization creative ideas and create truly unique decor items with your own hands. Decoupage can be done different ways using paper, textiles, leather, wood, plants, food, etc. on glass containers of any size and shape. The most affordable and effective way to design a glass bottle is with napkins. How to decorate a bottle using decoupage technique simply and attractively - read the article.
Decoupage with napkins and acrylic is the simplest and most effective way to decorate, the technique of which will be clear and simple even for beginners. In order to decorate the bottle, we need a decorative primer, napkins with an interesting pattern, silver or gold acrylic paint, scissors, PVA glue, a household sponge, fixing varnish.

In order to get a beautiful and original product, you need:
- Prepare the bottle for decor: remove the labels, wash and degrease the surface (alcohol, acetone).
- Cover the bottle with decorative primer and allow the layer to dry.
- Cut along the contour of the image from the napkin and glue them to the bottle. Applications should be applied dry, smearing the pattern with glue from the center to the periphery.
- Using a sponge, apply acrylic paint with blotting movements. Wait until the product is completely dry.
- Open the bottle with varnish to fix the image.
This decoupage is perfect for both glass and plastic bottles. Design in this way can be done in any style and theme. The main thing is to choose the appropriate napkins and paint color.
How to decoupage a bottle with a napkin and craquelure
Craquelure is a unique material that can give the surface an aged look. In tandem with floral prints, craquelure decor will allow you to make a unique and incredibly attractive product with your own hands. In order to decorate the bottle, in addition to craquelure and a patterned napkin, we need pastel crayons to match the images on the napkin, light and dark acrylic paints, brushes, a foam rubber sponge, and aqualak.

In order to decorate the bottle, you must:
- On a clean, fat-free surface with a foam sponge, apply dark acrylic paint, wait for it to dry completely.
- Cover the bottle with craquelure varnish.
- After the craquelure has dried, apply light acrylic paint. The layer must be applied quickly with a sponge. One place should be painted over only once, otherwise you can paint over the craquelure cracks that have appeared.
- Open the product with scuba glass and wait for it to dry.
- Stick the images cut from the napkin in the standard way, which describes the first master class, in accordance with the author's idea.
- Use pastel crayons to hide the borders between the background of the bottle and the appliqué. You need to apply the pastel with your finger, as if stretching the color from the picture to the background, making a smooth shading. The color of the crayon should match the color of the element's border.
- Cover the finished product with scuba lacquer in order to maximize the height of the surface of the bottle with the image and fix the result.
For the finishing coat of craquelure and decoupage, it is better to choose a matte aqualak so that the product does not have a glossy sheen that is unusual for antique items. Craquelure decor is accessible and understandable even for novice designers. In this way, small bottles, “pot-bellied” glass jugs, bottles of non-standard shapes, etc. can be decorated.
Decoupage bottles with do-it-yourself napkins using rice paper
Decoupage with rice napkins is the most convenient way decor, in which the boundaries between the pattern and the surface of the bottle are almost invisible, and, therefore, this type of design does not require a lot of time to work with the background and mask the applications. Products made using rice pads look cleaner and more natural due to the light weight of the paper. But, working with rice paper requires a certain skill, because the images from the napkin should not be cut out “on the edge”, but pulled out with your hands. Often, this is accompanied by a break in the picture.
In order to make an attractive bottle, we need: a few napkins from rice paper, acrylic-based paint for the background, decoupage glue or PVA, brushes, foam sponge, top coat.

It is better to choose a background color in pastel colors: such shades will allow the napkin to merge most successfully with the bottle, and the drawings on such a background will look brighter and richer.
Make a bottle should be step by step:
- On a surface that has been washed and degreased in advance, a background should be applied using a foam sponge.
- Attach applications. Images can be glued in the usual way (a dry cloth on a dry surface using PVA with water 1: 1) or a “wet” method, which allows you to fix the image as evenly as possible, without bends and air bubbles. To implement this method, the application must be applied to the file face inward and hold the napkin under water for several seconds. After that, put a napkin on the bottle, remove the file and go over the image with glue.
- Open decoupage varnish.
When choosing rice paper napkins for decoupage of bottles, preference should be given to products with the lowest density (5-14 g / sq.m).
Egg decoupage of bottles with napkins step by step: photo
Decoupage of glass containers can also be done with improvised materials that are easy to find in everyday life, for example, eggshells. This decoupage option allows you to make a unique product with voluminous, convex details that imitate a mosaic. To design a bottle using this technique, we need primer, pieces of eggshell (approximate size - 15x15 mm), napkins with a large print (roses, butterflies, etc.), acrylic paints, pearlescent pigment, brushes, foam sponge, decoupage glue or PVA, scuba.

To decorate the bottle you need:
- Apply a primer to the prepared glass surface.
- Glue the cut out pictures in a dry way.
- Cover the surface between the images with glue and attach pieces of shell to it, pressing them lightly. The shell pieces should be placed at a distance of one to two millimeters from each other: this way the mosaic will look more natural and organic.
- Leave the product for 6-8 hours for absolute drying.
- Mix white acrylic paint with color to get a pastel shade to match the appliqués on the bottle.
- Without going to the drawings, cover the product with the resulting paint using a foam sponge.
- Apply scuba and let the bottle dry.
- Take the pigment on your finger and rub it into the shell and the space around the images.
- Fix the result with scuba.
Decoupage of bottles with napkins for beginners (video)
Bottles decorated using the decoupage technique will become a wonderful element of decor, emphasize your creativity, individual style of the apartment. Such bottles can be safely presented as a beautiful and original present to relatives, friends or colleagues. Decoupage options can be skillfully combined in one product, for example, a bottle can be decorated with craquelure and rice napkins, and pastel shadows or rice shell decor can be added to an image cut out “on the edge”. The main thing is to catch inspiration and do not be afraid of experiments!
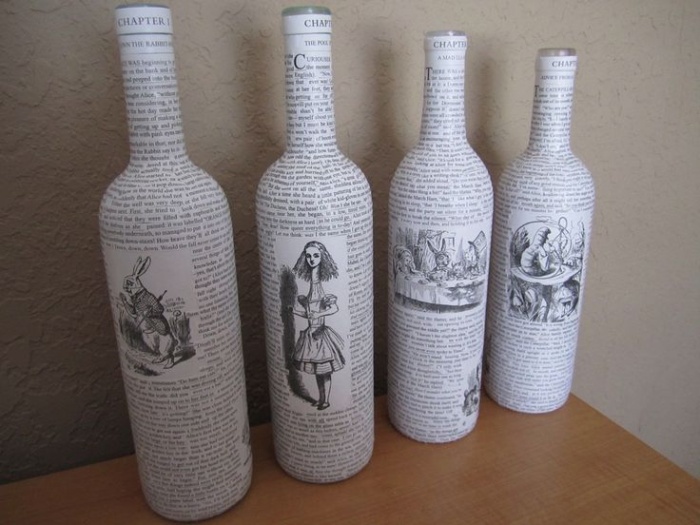
The beautiful French word decoupage today is called the technique of decorating various surfaces using paper-cut drawings. In fact, this is an application, by the way, and the term decoupage itself is translated as “cutting”.
The decoupage technique is quite simple to perform, but it gives a stunning effect - with the help of ordinary drawings, you can transform not only old bottles, various containers, vases or bread boxes. Craftswomen decorate even pieces of furniture or wooden doors with decoupage, making them no worse than vintage or antique interior details.
 1
1
The easiest way to learn decoupage is to start small. For the first experience, you can use an empty container and decoupage on glass or plastic bottles.
What do you need for decoupage
As a material for decorating the surface, craftswomen use the most various elements. It can be:
- clippings from newspapers or magazines;
- three-layer table napkins with a pattern;
- special decoupage cards that are sold in needlework stores;
- thin fabrics with an interesting pattern or texture.

Attention! To transfer a newspaper or magazine clipping to glass, you will need to pre-prepare the paper and the drawing itself.
To begin with, the picture is cut out, then it is covered with several layers of acrylic varnish. Now the paper needs to be soaked in warm water for 20 minutes. After swelling, the paper backing should peel off easily, and the image itself should remain on the varnish layer. It is in this form that the drawing is glued to the base.
The variant with magazine clippings is quite difficult to perform, for such work you need good skills. Decoupage cards are not cheap, and needlework stores are not everywhere. Working with fabric is a priori more difficult than with thin paper, it also requires practice and a certain skill of the master.

That is why it is best to start mastering the decoupage technique with table napkins. For these purposes, napkins already in the house are quite suitable, or the hostess can specially buy material with a pattern she likes. The main thing is that the cost of napkins is affordable for everyone, besides, the remnants of the material after decoupage will definitely come in handy on the farm.

Important! The napkin for decoupage of the bottle must be multi-layered so that the master can separate the upper part of the paper with the pattern applied to it. The thinner the picture, the easier it is to stick it, and the more inconspicuous the joints and other flaws of decoupage work will be.
To work, you will need a number of tools, but these do not have to be purchased materials, they can be easily replaced with improvised means. So, for decoupage of a plastic or glass bottle you will need:
- The bottle itself - it is better to choose a volumetric container, it is more difficult to work with thin and narrow vessels, and the result will not be so bright.
- Degreaser: acetone, nail polish remover, alcohol, window cleaner and other solvents.
- Drawing for decoupage.
- Acrylic paint for painting the entire surface of the bottle (building paint for walls or other surfaces is suitable).
- Colors for paint (if provided by the project idea).
- A special decoupage foam brush can be easily replaced with a regular kitchen sponge or a piece of foam rubber clamped with a clothespin.
- Acrylic decoupage glue is not much better than ordinary PVA diluted with water in a 1: 1 ratio.
- A wide brush made of synthetic fibers (so that hairs are not lost during work) for applying glue.
- Glitter or acrylic marker, with which it is convenient to trace the contours of the picture on the bottle for greater brightness and showiness.
- Various beads, ribbons, shells, twine or burlap - this decoration is selected in accordance with the theme of the bottle design and should be consistent with the overall concept of bottle decoration.

Advice! It is not necessary to buy special tools and materials for the first decoupage experience - they can be easily replaced.
But, if the master constantly works in this technique, it is still better to purchase a professional set, then the finished decor items will be more accurate, and the decoupage process itself will become easier.
Decoupage of bottles with your own hands
The first thing a novice master should do is to visualize the idea, that is, imagine how the bottle will look after the decor. Numerous photos of finished works can help a beginner, various master classes or visiting a handmade exhibition. In accordance with this, paints of the desired shade, pictures, and various decorative elements are selected.
Now you need to find a beautiful vessel - a plastic or glass bottle of an interesting shape. Although the bottle will be colored during operation, it is better to choose a transparent container for the first time.
armed necessary tools, you can get to work.
Preparing the bottle for decoupage
First you should try on the selected picture to the existing bottle - they must match in size. Applying the rest of the decor items, you can understand how the bottle will look after decoupage, and how best to arrange all the decor details.
Now the bottle needs to be prepared for staining:
- first, the bottle is soaked in a warm soapy solution so that all labels get wet and easily separate from glass or plastic;
- with a metal brush, not only paper labels are removed from the bottle, but also all the glue present on the surface of the vessel;
- the wiped dry bottle is degreased by wiping with a cotton swab dipped in alcohol or acetone.

After that, a primer must be applied to the bottle, which in this case is acrylic paint. But this is far from the only way to prepare the basis for transferring the picture. The bottle is often covered with various texture materials, it can be sand, eggshell, sea shells and much, much more. However, it is easiest to work with smooth surfaces, so it is recommended for a novice decoupage master to still paint the bottle with acrylic-based paint.

The easiest way to apply the dye is with a brush, but with this technique, stains will certainly remain on the glass, and the paint itself will lie unevenly. So experienced craftsmen decoupage offer to use a foam sponge.
In this case, the paint is, as it were, tamponed, that is, it is applied to the bottle with short pressing movements. Such staining must be repeated 2-3 times - it depends on the master's idea and the desired degree of tinting of the existing base.
Advice! The base color should be one or two shades lighter than the selected decoupage pattern. This makes it easier to hide the flaws in the work, and the edges of the picture will be less noticeable.
Each coat of paint must dry thoroughly. While the bottle dries after the last staining, you can do the picture.
Preparing a drawing for decoupage
It was decided to use for the first experiment an ordinary table napkin with the pattern you liked. From this napkin, you need to very carefully separate the topmost layer - the one on which the pattern is applied.

Now you need to somehow separate exactly that part of the picture that will be needed for decoupage. You can do this in two ways:
- small sharp scissors (often craftswomen use a tool from a manicure set);
- just tear off thin paper, highlighting the desired fragment of the picture.
As practice shows, the first method is more convenient to use on large patterns with clear lines and borders, for cutting geometric pictures or in the case when the background is very different from the shade of the picture.
The method of tearing off the pattern with your fingers allows you to better mask the junction of paper and paint, but this will only work if the base is matched to the color of the picture itself. It is this method that is best used by those who are just learning the art of decoupage. How to do it correctly is shown in the photo below.
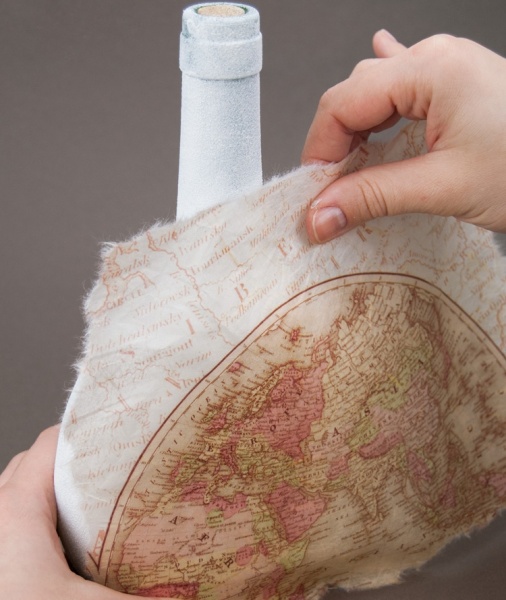
Important! To make your work easier, it is recommended to divide large drawings into smaller fragments. This makes it easier to stick thin paper to glass, and the likelihood of air bubbles in the process of decoupage will be less.
Decoupage bottles: process
Sticking a picture onto a base (in this case, a bottle) is called decoupage. In fact, this is the transfer of the pattern to the surface.

And it is quite simple to do:
- A special decoupage glue or PVA stationery glue diluted with water is taken. The required amount of glue is poured into a container.
- The drawing cut out from the napkin is applied to the place allotted for it on the surface of the bottle.
- A wide and flat brush is dipped in glue and smeared with a napkin with quick movements. Here you need to be very careful, since the picture will be quite thin and will easily tear when wet, so you need to brush over the surface no more than a couple of times. The movements of the master's hand should be directed from the center of the application to its edges. The main task is to prevent paper wrinkles and expel all air bubbles from under it.
- In this form, the bottle is left until the glue dries completely.
- So that the bottle can be used and the picture is durable, the surface is covered with acrylic varnish in three layers. Each coat of varnish should dry well.
Attention! Recently, PVA clerical glue has been sold already so liquid that it is not necessary to dilute it - you can work right away.
There is another option: use building PVA for decoupage, but such a composition must be diluted with water, choosing the proportion based on the desired consistency of the glue.

Finishing touches
You can create decor in several ways:
- glue beads or sequins;
- tie a satin ribbon around the neck of the bottle;
- wrap the neck of the bottle with twine or knitting thread;
- using a glitter (dense acrylic outline in a contrasting color) or a special marker, circle the drawing, make thematic inscriptions on the bottle, add sparkle;
- make decoupage brighter using artistic acrylic paints and a thin brush.

There are a lot of ways to decorate a bottle after decoupage, and this is evidenced by photos of finished works by both novice craftsmen and professionals in their field. It all depends on the skills of the performer and the range of decorative elements.