
How to sew a blanket from old sweaters. Homemade blanket from old sweaters
Winter, frost. We spend a lot of time at home. To make the evenings useful, let’s do what we simply don’t have enough time and energy for in the summer, spring and fall. But you will need a positive attitude. We are waiting for spring, a time of renewal and new hopes. . Therefore, we not only tune in internally to change, but also externally: first of all, let’s put things in order at home. And let's start with this: let's check our closets, chests of drawers and bedside tables. It is behind their doors that all our shortcomings, omissions and long-forgotten unnecessary things are often hidden. Today we will deal with the chest of drawers and the closet in which clothes are stored.
I would like to draw the attention of those site visitors who generally do not accept any alteration of old things, for whom it is easier to throw away everything old. Then this article is not for you. To avoid getting irritated and spoiling your mood, do not read further!
I will share my little experience with everyone else. Today, for the first time, I decided to repurpose old sweaters and blouses into something useful. Circumstances prompted me to this idea:
- too many of these same knitted items (which are not used at any time of the year) have accumulated in the closet
- the new bed is covered with an old tapestry bedspread
- appeared free time, which you want to spend usefully
- I wanted to learn patchwork sewing
I have already tried to master the patchwork technique and sewed it. And I really like him!Such a cozy, handmade wool rug. It fits well into the interior
Let's start work! We open the closet and look for those knitted items that we haven’t worn for a long time. One important condition: we select knitwear according to tones. So, pink, red, gray will look harmonious together.
Note: white will suit any color and will refresh any product well.
Take to work everything that you don’t wear: skirts, pullovers, jumpers, sweaters and warm old woolen scarves! I decided to use red, pink, gray and white knits for my bedspread.
Once you have collected enough knitwear and matched it tones, start cutting things at the seams. The seams must be carefully cut out and placed in a separate bag. Imagine that even these strips can also be used! You can use them to make rugs for your balcony or cottage.
Next, we cut the resulting pieces of knitwear into strips (rectangles), but if you want, these can be squares. It will be much more difficult to work with other shapes (triangles, circles, trapezoids and others). Therefore, we will leave them for real craftswomen.
I cut rectangles 8cm wide.
Important: the rectangles must be the same width in order for the bedspread to be the correct shape.
The length of knitted strips can be completely different: from 10cm to 40cm. For me, the most convenient length of the strips was from 20 to 35 cm.
If you have the patience to cut a large number of strips, that’s already half the battle. Don’t give up what you started and finish everything: sew a new bedspread for your bed!

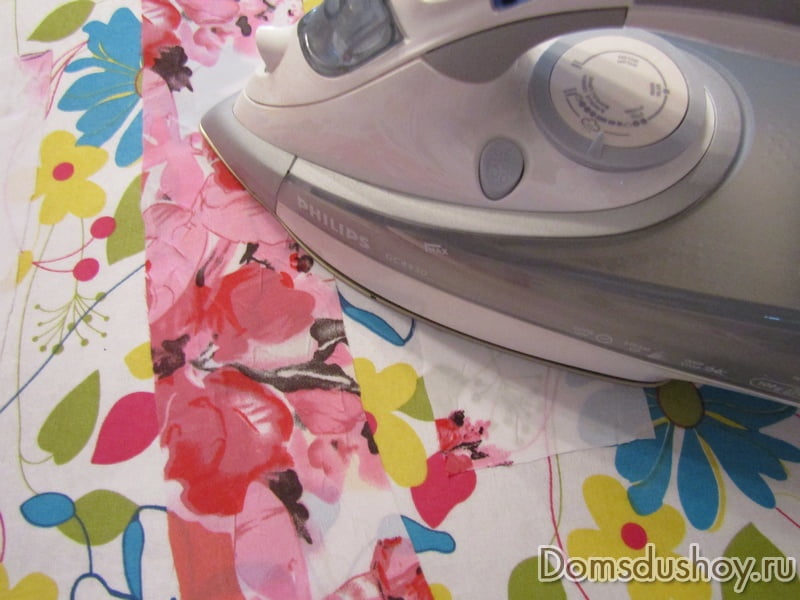
The cut strips need to be ironed. By the way, for my bedspread I used knitwear of different thicknesses. This may not be entirely correct, but in principle it is possible to combine them.
I placed all the cut pieces in in order to make it more convenient to use when sewing. The box helps keep the blanks in piles by color and prevents them from falling apart.

Let's get to work.
I would like to warn you right away: be patient!
It will take several evenings of hard work to sew a blanket from cut-up pieces of knitwear.
You need to sew like this:
- take two pieces of jersey from your supplies box
- place them right sides to each other in width (the side where 8cm is), and on the wrong side make a seam connecting these two rectangles
- then, without tearing off the threads, turn the second stitched rectangle to the front side and apply a new piece of knitwear (from the box) to it, also with the front side and again make a seam from the wrong side
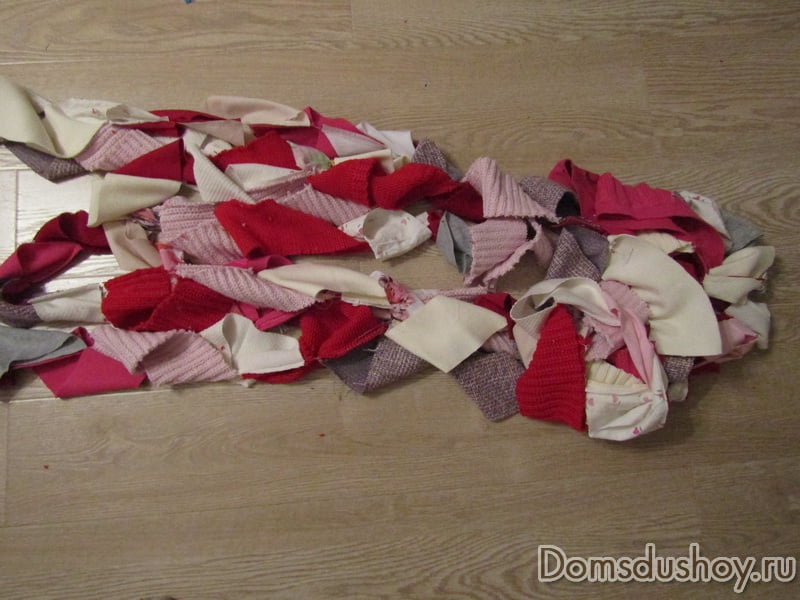
- the next pieces are sewn similarly to the first until you get a fairly long strip of blanks
Note: we alternate the strips in completely different ways, without a system. Of course, it is better if they are not repeated often.

The result of this work will be a strip like this. At first glance, a completely disorderly and unattractive pile of rags. Alas! We have to try to make something more or less acceptable from all this for use in our home.
The resulting strips now need to be sewn along their length. To do this, measure the width of your bed and add another 50 centimeters so that the bedspread can freely cover its entire area and hang slightly over the edges.
We measure the first strip using a centimeter tape and cut it off from the workpiece that we have obtained. And we sew all subsequent strips, focusing on the length of the previous strip. It turns out like this:

The reverse side of my future bedspread turned out like this:
By the way, when you start sewing the strips along the length, you quickly begin to see the end result.
One more nuance: when making products from scraps, it is considered mandatory that the transverse seams be directed in one direction. To do this, start sewing each new row from the same edge as the previous one.

It is better to sew a bedspread from four parts, because it will be difficult to cope with a large and voluminous product at once. Therefore, when you sew one fourth part, iron it from the front and back sides. Do the same with the other parts of the bedspread when you finish them.

So I have already sewn two pieces of the future bedspread. I ironed them thoroughly with steam. I try them on my bed, dreaming of finishing the job quickly and seeing the result!

A little more endurance and perseverance won't hurt! For my future bedspread I need some kind of lining. For this, I wanted to choose fabric stitched with padding polyester. But it turned out that the stores near me do not carry such fabric. Alas! I had to buy faux fur pink color. Not the best best option, I'll tell you. It turned out to be quite heavy and somewhat darkened my joy from the finished work of sewing the bedspread.
But don’t be sad about this! We continue to work, and then we’ll come up with something!

I sewed faux fur to my knitwear blanks around the entire perimeter. And so, I offer you a new bedspread made from old and unnecessary things!

Why did I choose a rose-red tone for my bedspread? Probably understandable, because peonies on the wall will not want to blend in with the blue or brown background.
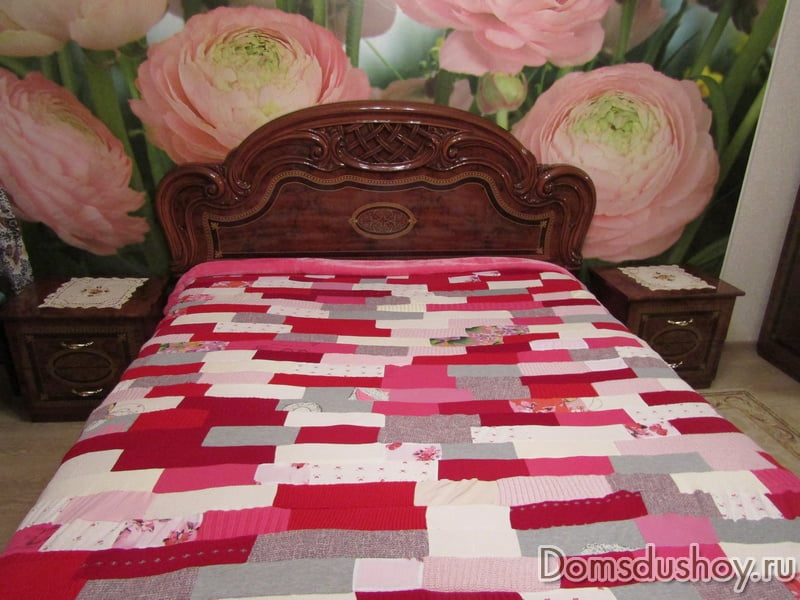
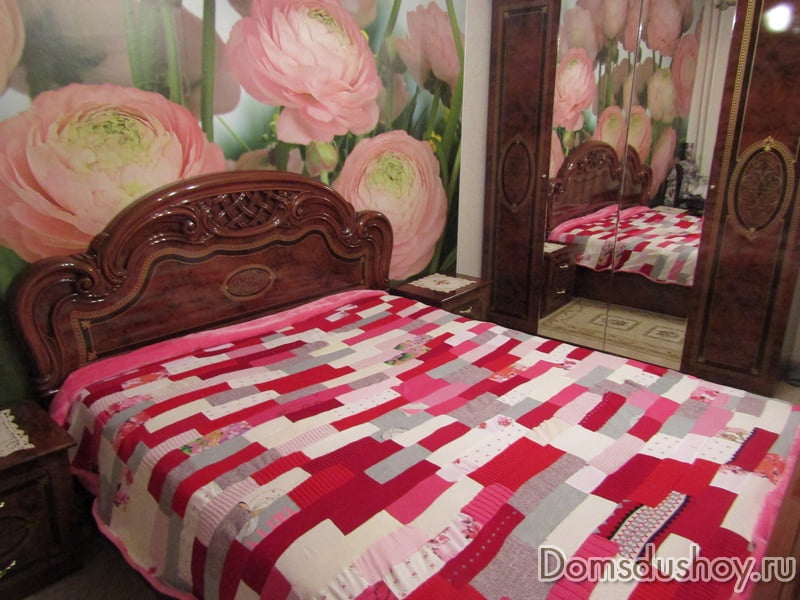
I find a new bedspread livens up my bedroom. Now she looks joyful and renewed. (Yes, this cover can be used as a blanket if your bedroom is cool)
For a completed set from the remaining faux fur I sewed two pillowcases for the pillows. (You understand, this is true for an elegant interior! I take them off at night)
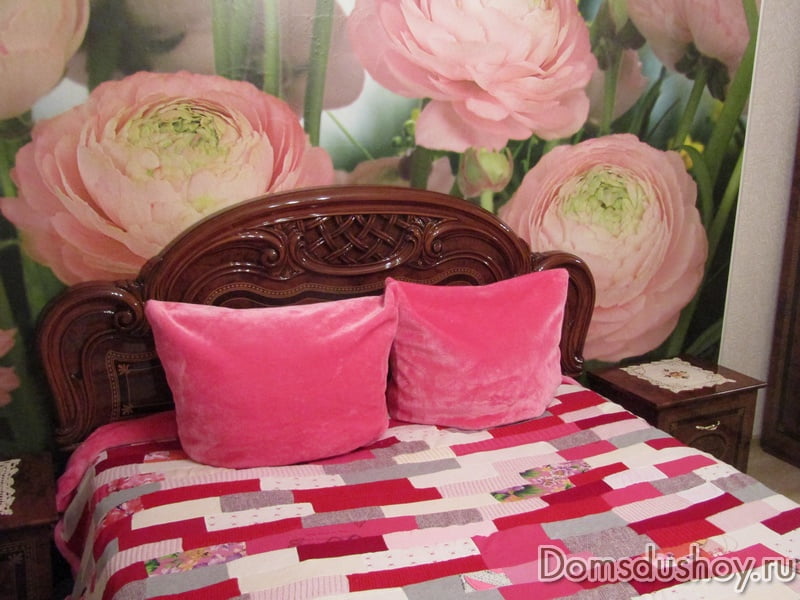
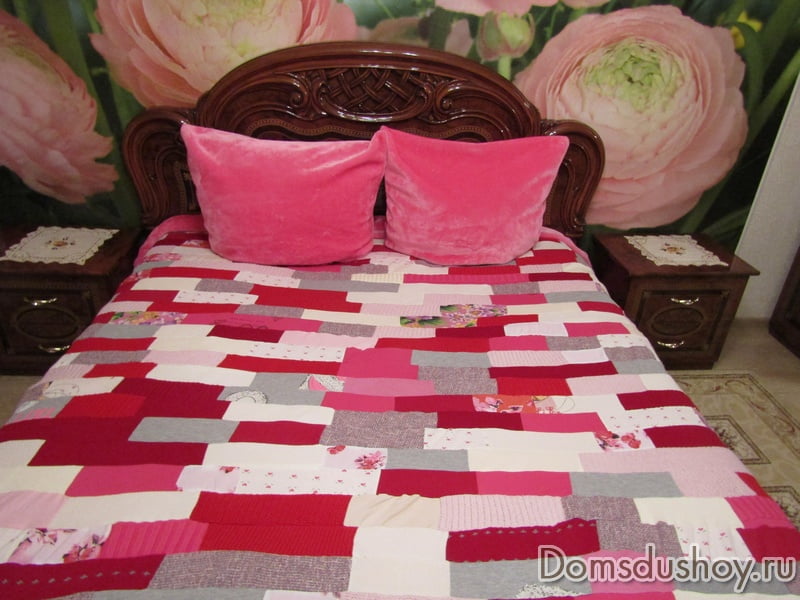
This is what the bedspread + pillows look like together.
Yes, I almost forgot about mine, which I also sewed earlier from an old sweater! Let her decorate the bed too!

Well, the work of making a bedspread from old knitted items has been completed! If you have the desire and the mood, try sewing a bedspread for your home or favorite cottage. Look how many advantages you can find in this work:
- Clearing closets of unnecessary things
- Winter evenings are busy with creative work
- Your loved ones can help you make blanks for the bedspread
- You make a thing self made, so warm and cozy
- The blanket can be used as a blanket, blanket and even a rug for playing with children on the floor
- Surely you won’t see anyone with exactly the same bedspread.
- You are a true thrifty housewife who makes everything work
- When making patchwork items, there is room to use your ingenuity and imagination.

Finally:
If suddenly something doesn’t work out, don’t despair and don’t quit. Tell yourself: I will still do it the way I want. Correct the mistakes and get back to business! You know that perseverance and work always give results!
Good luck to everyone and patience in arranging your life!
To see how to beautifully trim the edge of a new blanket, bedspread or throw, watch this helpful tutorial.
A little more good ideas for those who want to give new life old things.
2018, . All rights reserved.
Now on frosty winter evenings you can easily relax with a cup of hot coffee, wrapped in a warm blanket that you can make yourself. You ask how? Very simple! To do this, you don’t need to know how to sew professionally or go to the store for expensive fabric. You may have everything you need at home. To make a warm blanket, all you need is old sweaters. Choose a color palette that matches your decor, or combine different shades to create a bright and colorful blanket.
DIY
To create a warm blanket from old sweaters, you will need the following materials and equipment:
- pins;
- sharp scissors;
- contrasting or plain threads;
- a sewing machine or thread and needle for those who decide to sew by hand;
- 10-12 soft wool or cashmere sweaters;
- flannel fabric for the reverse side.

You may not have that many old clothes at home. In this case, you can buy sweaters at a consignment store or any other store. If there are various elements on the clothing, such as pockets, buttons or decorative details, they do not need to be removed. They will become bright accent on the finished product and give it originality.
You can also buy ready-made scraps of fabric to create a similar blanket. But they are usually made from cotton rather than wool or cashmere. Therefore, the finished product will not be as warm.
Tip: do not forget to wash the sweaters in a washing machine on delicate mode. They may have stains or be present bad smell.
Step 1. Select a drawing
First you need to decide on a drawing. Arrange plain sweaters with bright colors in a checkerboard pattern or create any other composition at your discretion. Next, you need to decide what size the scraps will be that will ultimately make a blanket.

You can cut the sweater into squares or rectangles. For example, pieces of fabric 22 cm wide and 30 cm long.

Step 2. Sew the flaps into stripes
Place two rectangular pieces of sweater right sides together. Align the raw edges, pin to prevent the pieces from moving apart during sewing, and sew on one side. Press the seams with an iron.

Gradually add fabric until the strip reaches the required length. For a medium sized blanket you will need a minimum of 8 strips.

Step 3. Lay out the stripes
Place the resulting samples on a flat surface. Arrange the fabric so that the colors and patterns look harmonious. If you like everything, you can start stitching directly.

Step 4. Sew the strip fabric
Once you have determined which strips will be next to each other, fold them right side out, be sure to pin them and sew them together.

Step 5. Iron
Iron the item with an iron at low temperature. If some of the edges are uneven, trim off the excess fabric.
Step 6. Sew a blanket
Cut out the flannel fabric. The width and length of the cut must correspond to the parameters of the blanket. Place both rectangles right sides together. Pin and sew along all four sides. Leave a small area of about 20 cm untreated. This hole is necessary for subsequent turning of the product.
If you wish, you can make the blanket even warmer. To do this, place a piece of insulation between the flannel fabric and the sewn patches of the sweater. For example, padding polyester or holofiber. You can purchase them at any sewing store or studio. The insulation must be sewn on by stitching on a machine or by hand along the edges of the sweater scraps. After this, you can already connect the resulting workpiece with flannel fabric.
Step 7. Finishing the job
Turn the blanket inside out through the hole. Sew the cut closed hand stitch. Iron the resulting product at low temperature. A quilt made from old sweaters is ready!

You can see a clear example of how to make such a product in the video.

If you have old woolen sweaters or dresses at home, don’t rush to throw them away! With a little imagination and creativity, you can create new and quite original things from them. Anyone can make such products. Even if you don’t know how to sew or don’t have a machine, it doesn’t matter! You can sew a warm blanket by hand with a regular needle with thread. Now on winter evenings you will always be warm and cozy.
This type of needlework, like knitted patchwork, is gaining popularity. This technique is used to make blankets, pillows, bags and much more. And we will try to create an unusual blanket from ordinary sweaters. There is no cost to us for this! Every practical needlewoman has everything we need at home.
To create a blanket using the patchwork technique we need:
- old sweaters
- leftover yarn
- hook
- scissors
The blanket will be 1.5 double-sided.
Let's get started! We rip the sweater and give its fragments (sleeves, back, front) a rectangular shape.

We crochet the resulting piece in a circle. The first row is a single crochet.


The second and subsequent rows are double crochet. We knit an arbitrary number of rows. The blanket fragment is ready. Let's put it aside and move on.

Using the same principle, we tie the remaining parts of the sweater and proceed to the next sweater, with which we do the same. This method of creating a blanket using the patchwork technique is suitable even for beginner needlewomen.

We connect the resulting fragments together with a single crochet.

Having made the required number of “sweater patches”, we connect them all together with a single crochet.

This is the first side of our blanket. The photo shows that I needed 4.5 sweaters for it.

Using the same “technology” we make the second side of the blanket. In this case, I did not give the flaps a rectangular shape, but connected them as is.

Now you need to crochet both sides of the blanket with a single crochet stitch.


The result is such a unique beauty!

The blanket turned out to be very warm and comfortable, because it “breathes” since it is knitted.

Before use, wash on wool cycle and tuck into duvet cover.
This is how you can save money on buying a blanket with the help of creativity.
You probably have old sweaters at home that haven’t been worn for a long time, but at the same time it’s a pity to throw them away. There is not enough time to unravel and knit new things from them. There is no need to unravel anything for our blanket. A warm, soft blanket made from old sweaters is a wonderful idea for giving new life to old and unnecessary things. Sweaters are often knitted from natural wool, which retains heat perfectly, so why not make a warm blanket that will warm you up on cold winter evenings.
To make a blanket we will need:
- old sweaters
- stencils - large and small square (1/4 part of a large square), they can be cut out of cardboard or thick paper
- roller for cutting fabric, if there is no roller, scissors will do
- regular thread and thick thread for overcasting
Sweaters must be clean before starting work. Cut the sweaters into small pieces, then use a stencil to cut off the edges as shown in the photo below. The edges should be as smooth as possible.

When the blanks from large and small squares are ready, you can start sewing them together. Start stitching small squares first. Then move on to the big ones.

You can use sewing machine and overlock, or sew the squares by hand, in any case, do not forget to make overlock seams on the wrong side so that the parts of the blanket do not unravel in the future.

From the wrong side it should look like this:

Any soft fabric, such as fleece, will help hide rough seams on the wrong side. Cut the fleece fabric to the full size of the blanket and sew it on the back side. Make the edges of the blanket rounded.

When all the parts are sewn, you need to make an overcast seam using thick threads along the entire perimeter of the blanket as shown in the diagram. You can use any wool thread for knitting.

This seam looks neat and beautiful, it will prevent the knit from unraveling and threads from coming out along the edges of the blanket.
