
Snow Maiden kokoshnik template for cutting. DIY kokoshnik made of cardboard for the Snow Maiden costume: templates, patterns with photographs and instructions

Kokoshnik - an ancient Russian headdress - a symbol of Russian traditional costume! The secret of sewing a “flat” kokoshnik is simple: it is sewn with a backdrop, a kind of “cap” on which it rests. Large decorative bows are also sometimes placed on the backdrop.
1:983 1:988

3:4


First, a silhouette is cut out from thick cardboard or glued in several layers, it is also the front part of the kokoshnik. Its inner arc is first cut out in a newspaper sketch, the optimal shape is found experimentally.Then comes the turn of the patterns, the most painstaking part of the work.
5:15455:4
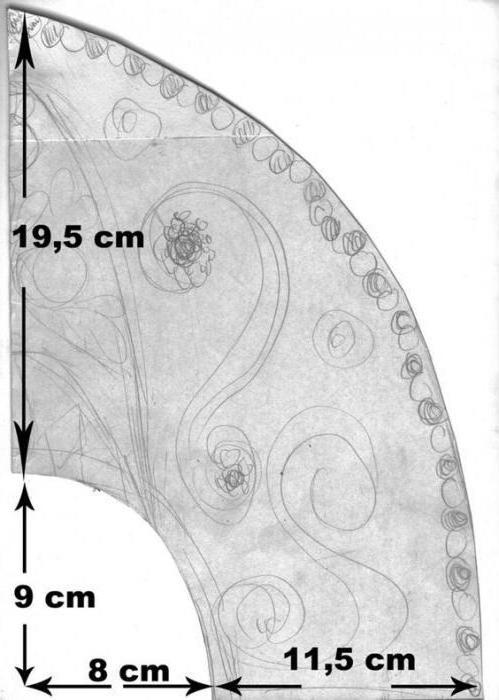
ATTENTION! All sizes are given here just for comparison! (and without seam allowances) - You will still have to measure them again. The kokoshnik is a very individual thing, and if you try to put it on even a similar-looking head, you won’t succeed. But it will sit like a glove!
5:508 5:513
The patterns consist of a tracing paper of the front side, the “face” of the kokoshnik, a long panel of the top and the “back”. Everything is in at least 2 copies.
6:1272 6:1277 6:1282Measurements:
6:1304 6:1309 
7:4
In the figure, the lines along which measurements are taken are indicated in red. The cross is the approximate "top", the corner point of the head. In practice, the distance up and down from it is approximately equal.
7:383 7:388 7:393Open the top of the backdrop:
7:443 7:448 
It is most convenient to first sew the backdrop separately using the first measurements, and then, putting it on your head, adjust it, pinning it with pins along the way - this is the origin of the sharp cutout, indicated by a dotted line on the cutting of the top. Once fitted, it can be stitched straight away.
8:1439 8:1444 8:1449Open the back of the back:
8:1501 8:4 
Place a cardboard base on a tightly stretched, ready-made backdrop and draw chalk along the contour of the contact of the fabric to the cardboard. (This is easy to do in front of a mirror.) As a result, you will get an oval notch on the long top panel. It can be cut out and hidden in the seams, or you can leave it as a “visor” covering part of the forehead (but then it will be a little more difficult to sew on the front part).
9:1204The backdrop is sewn in at least two layers (if the fabric is very thick, you can do it in one, but you will have to hide the underside), with thin fabric or a very heavy top (for example, heavily decorated with stones) - in several layers.
9:15979:4 9:9
Reveal faces:
9:46 9:51 
The face of a kokoshnik can be very diverse different shapes and depends only on the imagination of the author.
10:734 10:739 
2 parts are cut out from the main fabric according to the finished cardboard silhouette (don’t forget the seam allowances). It is not necessary to make a lining for the back part, but for the front part it is simply necessary. Whether the kokoshnik is decorated with embroidery and beads or rhinestones and stones, it will all look much better on the backing. As such, it is good, for example, to use flannel - it is thick and soft, and besides, it can be lightly quilted so as not to bulge and there are no seams along the edges.
11:213811:4
If the main fabric is thin and see-through, the backing should be matching or white.
11:155Then you sew the backing to the main front fabric along the contour (that is, without going into the territory of seam allowances), and sew the first (inner) backdrop along the edge of the inner contour. You perform the same operation with the second copies, with the only difference that here one layer is enough for the backing - it’s still worth doing it, because all the seams will be drawn back. To prevent the edges of the material from puffing up, it is better not to hem it, but to stitch it with a zigzag.
11:983 11:988Now both parts of the “face”, turned inside out, are stitched along the entire length of the kokoshnik arc: on the one hand - from the top (center) down to the bottom corner, and on the other - in the same way, but bending over this corner and including the lower part, to from the very beginning of the backdrop. Next, all the “excess” fabric of the seams is brought to the back, where it is carefully straightened out and masked behind the backing. This is the last moment to ensure that everything is done correctly.
11:174911:4
After this, you can insert the cardboard base inside and manually stitch the bottom of the second arc. If you sew the bottom on both sides at once, it will be difficult to insert and may even bend. Both backdrops are stitched manually, but very carefully, along the inner arc of the kokoshnik. The bottom of the backdrops can also be sewn by machine.
11:575 11:580 


16:4


19:4


22:4


Every girl dreams of being a princess. To do this, it needs special attributes: beautiful dress and shoes and, of course, a real royal crown. A crown or kokoshnik will also be useful for a children's New Year's party, a fun New Year's party, a birthday celebration or a family performance.
Motherhood.ru reveals the secrets of making a real crown and kokoshnik for a little princess. We will consider different materials and manufacturing techniques: frame, knitted, models made from ribbons, plastic, fabric, birch bark and straw, beads, cardboard and even food.
Let's start with the easier-to-make royal headdresses for the festive masquerade, gradually moving towards more labor-intensive masterpieces.
Crown made of paper, cardboard and cardboard cup
A simple and quick crown to make is made from a piece of flat cardboard. In this case, you can use colored and holographic cardboard. We apply the image of the crown, cut it out, and glue it along the edge of the joints. We decorate with sparkles, paints, rhinestones, beads, and nail polish. We thread it with a thin hat elastic. Now the small crown will rest securely on the little princess’s head.The same model can be made from the remaining video from toilet paper. Then it will not need to be glued.

Using a pressed paper seedling cup can make a stronger crown. Cut out the top of the cup to create teeth. Paint the base in white. Then use a scouring sponge to lightly apply gold paint using a dabbing motion. There is no need to paint with solid “gold”. Light white gaps will give the crown more elegance and transparency. We decorate the crown with rhinestones and “ precious stones" We glue a hairpin holder on the bottom side. Now you can pin it directly to your hair!


You can glue together a lightweight crown design from colored paper. Cut equal squares of paper. We make diagonal bends. Now we glue the resulting triangles together, as in the image. With this simple option Even small children can cope. Get crafting together!

Crown made from ready-made semi-finished products: headband, three snowflakes, bright berries
We buy a white headband, several ready-made plastic snowflakes, bright berries or beads for decoration. Glue snowflakes and berries onto the base. If desired, we decorate with carved braid or lace, rhinestones, and gold spray. Instead of a headband, you can use a plastic wreath, hoop, or cardboard blank.
The result was an elegant tiara for a girl playing the role of the Snow Maiden, Snowflake, and Blizzard at the New Year's party.
Royal lace crown
To make such a crown you will need:Beautiful carved lace braid 40-45 cm long. The length depends on the desired diameter of the final product.
PVA glue.
Wax paper.
Gold, silver, bronze or other colored spray in a can. Or acrylic paint.
Glue Crystal-moment or hot melt glue.
A sponge or cloth for applying and wiping off excess glue.
We place our lace on wax paper and coat it with PVA glue 2-4 times until completely dry. After complete drying, paint the workpiece in desired color. Each layer of paint must dry well. Glue the crown along the edge, matching the pattern. We use hot melt glue or Crystal Moment glue. We decorate the crown as desired. It can be gold or silver:


Or match the tone of the royal outfit: soft pink, yellow, blue.

Plastic crown
As a material for this crown, you can take transparent packaging from children's toys or household appliances, large plastic bottle. We cut out the base of our crown. We apply a patterned design. We brush it with thick colored gel with glitter, paint, glue glitter or rhinestones, and paint it with nail polish. And the crown is ready!
Tinsel crown
The essence of making this crown is to wrap the wire base with shiny tinsel. It turns out bright, shiny and voluminous. It can be made gold, silver or colored.
Crown and kokoshnik using quilling technique
You can make a crown entirely using the quilling technique - from intricate paper curls. In this case, you can use colored paper and varied designs: winter flowers, snowflakes, curls. It is very beautiful and unusual, although the work is quite labor-intensive.
You can make your work a little easier without reducing the originality of the product. We cut out the base of the kokoshnik from colored cardboard. We make fastenings from satin ribbons or bows suitable color. Now we decorate the dark kokoshnik with a snow-white pattern using the quilling technique. The result is a kind of frosty design.

Look what they wear with this kokoshnik. This is a “winter” snow-white fluffy cape, decorations in the Russian style.

When choosing a kokoshnik uniform for a carnival costume, you should be inspired by ancient paintings and photographs of Russian beauties in rational clothing.

Royal crown made of wire and ribbons
We make a wire blank in the shape of the crown of the Russian Empire. We decorate it with white and gold ribbons, braid, large stones and pearls. Use the basics of the macrame technique to weave ribbons and braid. Such a masterpiece will be remembered for a long time by all participants of the New Year's holiday!
Birch bark or straw crown
Products made from birch bark and straw are not only bast shoes, hats, boxes, but also crowns. Here, for example, is a luxurious crown in eco-style!
The essence of the kanzashi technique is the production of masterpieces from fabric “petals”. Petals are often made from satin ribbons, which are cut into 5x5 cm squares. They are used to make round petals, simple sharp open petals. Watch a step-by-step master class on making a red satin crown using the kanzashi technique.


The kanzashi technique produces delicate winter flowers that can be used to make hairbands, small or large crowns.


A kokoshnik for the New Year's holiday using the kanzashi technique is made from satin petals fastened with wire and threads. They are attached to the rim. Look how beautiful it turns out!


Crowns made using macrame technique
We all remember flowerpots, funny dogs and owls made using the macrame technique. However, this is far from the limit of skill. You can make a crown from macrame for a little or big princess.The simplest option is to weave a headband for a crown using the macrame technique and decorate it with additional details. This can be a ready-made flat crown, a wire model with ribbons and beads.

Real craftswomen will be able to create truly royal works with gold threads, woven stones and beads, and figured designs.


Wire crown
The crown can be made from “gold” or “silver” wire. At the same time, it is not at all necessary to overload it with decorations. It is enough to make an ornate lace pattern and decorate it with several large stones. It turns out concisely and tastefully. But do not forget about safety - all ends of the wire must be perfectly bent.
Crowns made of beads and stones
The royal crown can be made from “golden” beads. To do this, we string it on a wire and give it the intended shape.
The crown can be literally “studded with precious gems.” Abundant decoration made of beads, bugles, beads, and pearls will create an atmosphere of royal luxury. The crown can be made according to color scheme festive dress.


A crown made of beads and stones can be soft snow-white. This is a great option to complement the New Year's carnival costume and for the wedding ceremony. This way, once you make a masterpiece, you can use it over and over again.


The crown can be monochrome, like in chess. You can organize a party-tournament on this topic: “Whites versus Blacks.” Come up with various competitions: active and intellectual, comic tasks. This New Year's Eve will be remembered for a long time! Make the crowns in a fancy shape.

Such black and white crowns will also be useful for creating the image of Odette and Odile from Swan Lake.
Knitted kokoshniks
Craftswomen and skilled knitters should pay attention to the theme of kokoshniks that suits them. We crochet individual elements in winter colors - snowflakes, curls, flowers. We starch them and attach them to a base rim or kokoshnik with a wire base.

Frame kokoshniks
We make the frame of the kokoshnik from wire, wrap it with tape, and sew on a transparent fabric base. For example, tulle or tulle. We apply a Gzhel style ornament to it. This painting is perfect for winter theme. But you can use others too folk paintings. We color the ornament, decorate it with a ribbon of beads along the edge, and make a fastening in the form of a half-cap or satin ribbons. Large rhinestones can be glued to the fabric base.

An original kokoshnik hat in the shape of a green spruce is an excellent themed accessory for celebrating the New Year. Extravagant, stylish and to the point!

You can make a kokoshnik professionally according to the following scheme: make a frame from wire, cover it with a base fabric, glue brocade to it using paper clips, decorate the kokoshnik with pearl thread, sparkles, rhinestones and bugles, and tulle.


You can combine a frame kokoshnik with a cardboard one. Make carved designs in cardboard and glue translucent fabric over it. Decorate to your liking and the kokoshnik is ready!

And this kokoshnik would look great on the head of Nastenka, the heroine of the fairy tale “Morozko”.

We make a real costume for the Snow Queen from a wire base and fabric decor. We decorate the outfit in the same style. The stand-up collar with large “cold” decorations is especially chic.

Crown of food
You can decorate the cardboard base of the kokoshnik with almost anything. There would be a desire to create! Small, “grainy” products are perfect: peas, corn, lentils, rice, beans, buckwheat, millet. We glue our future “stones” to the base. We color it with pearls and precious stones.

Now let's get down to business! After all, before the New Year you need to have time to build your own crown or kokoshnik design. We wish you creative inspiration and good mood!
Photo sources:
At the time of New Year's children's matinees, parents have to seriously rack their brains over what kind of original costume come up with for your child. Of course, many carnival outfits are sold in stores, but many parents rightly believe that it is much cheaper to make a costume yourself using materials found at home. How many wonderful outfits were made from fabrics lying around in the back of closets! After reading this article, you will learn two ways to make a kokoshnik quickly and easily with your own hands from the most ordinary cardboard, so that your little Russian beauty looks simply beautiful at the matinee.
So, you, like most parents, have decided to sew a costume for your daughter for the matinee yourself, all that remains is to decide which look to choose for your little beauty. It just so happens that girls at New Year's parties are usually dressed up as princesses, snowflakes and fairies. The costumes are certainly beautiful, but their ideas are quite banal. Much more interesting is the Snow Maiden costume, which can be much prettier and more interesting than a suit any princess. Of course, the image of the granddaughter of Santa Claus will be incomplete without such a wonderful headdress as a kokoshnik.
We make a kokoshnik with our own hands from cardboard to complement the costume
So you've already sewed beautiful dress or a fur coat, which is the main part of the costume for your daughter on New Year's party. All that remains is to prepare the headdress, without which it is impossible to imagine the beautiful Snow Maiden - kokoshnik. So, to create the Snow Maiden’s kokoshnik you will need to acquire the following materials:
- Newspaper or plain thin paper of the desired size
- Fabric matching the color of the dress or fur coat
- Thread and needle
- Cardboard
- Beads, beads, ribbons and everything else suitable for decorating a kokoshnik
- Scissors
- Ruler
- Pencil
- Organza to match your suit color
So, let's start our master class on a kokoshnik, made with your own hands from ordinary cardboard for children. Before starting work, it is necessary to take measurements from the child’s head. Measurements must be made along the red lines shown in the figure below.
The size and shape of the kokoshnik is a matter of taste, but one should certainly take into account that if the child is still quite small, then a headdress that is too large may look ridiculous and will not fit well on the head. If suddenly you can’t decide what kind of kokoshnik to make for a doll or for your daughter, look at the selection of photos attached below.


After we have taken measurements and decided on the shape of the future product, we need to prepare a template. It is most convenient to cut it out of a newspaper folded in half so that the kokoshnik turns out symmetrical. For the master class, a rather simple one was chosen, but no less beautiful shape kokoshnik.
Using a cardboard template, we cut out the base for our kokoshnik.
From the prepared fabric, using the resulting template, we make a pattern, not forgetting to leave small allowances for the seams. We lay the fabric on the cardboard and, bending the allowances, sew the edges along the perimeter from the inside. If you are going to make a kokoshnik of a very complex shape, you can do without allowances and simply glue the fabric to the cardboard.
We do all this from the outside of the product, bending the allowances inward and connecting them with an over-the-edge seam or a hidden seam. Again: if the shape of the kokoshnik you have chosen is too complex, with an abundance of corners and details, then just carefully glue the fabric to the cardboard. 
We decorate the front side of our product. For the Snow Maiden costume, it is better to choose silver, blue or dark blue jewelry: beads, sparkles, various beautiful shiny “stones” made of plastic, rhinestones, if desired, you can decorate the edge of the kokoshnik with tinsel.
Using the template, we make a pattern from organza that matches the color of your suit, without making a cutout for the head.
On the inside of the kokoshnik we apply organza and sew it on, folding the allowances and leaving the lower part free. That is, we sew only the side parts so that we can stick our head into the kokoshnik. 
We bend the lower part of the organza, insert an elastic band there and sew it on so that the kokoshnik rests securely on the head.
If desired, you can sew ribbons to the finished kokoshnik: satin or organza. When decorating, feel free to experiment and use different decorations: beads, glass beads, lace, ribbons. You can purchase special paints for painting on fabric and decorate your kokoshnik with fancy patterns. You can watch other ways to create a kokoshnik from cardboard in the selection of videos below. We hope that christmas tree will be memorable for your child, and that your little Snow Maiden or Russian beauty will be the most beautiful on it!
Video on the topic of the article
The lesson on creating a kokoshnik from cardboard has come to an end, and at the end of the article we are attaching a number of video lessons on this topic.
Russian women, which had the shape of a comb. The name comes from the Old Slavonic word “kokosh”, which translates as rooster or hen. The kokoshnik crest can be different: in the form of a rounded shield, a crescent, a high pointed one, a wide cylindrical one, a low one with a cap, or in the shape of a crown.
Now this type of headdress is often used by girls and little girls who wear it on holidays national costumes, for folk dance classes, for matinees in kindergarten and school. This is a very beautiful product, which is traditionally New Year's holiday worn by Snegurochka, granddaughter of Father Frost. For a holiday, you can make a kokoshnik for your child using a pattern in life size for the role of a snowflake, Snow Queen or Snow Maiden.
Required materials
To sew a kokoshnik you need to have thick cardboard for the comb itself, material for gluing it, for example, brocade or satin. It should be bright and shiny so that the Snow Maiden does not sparkle in the light of the lights. Some craftswomen use when sewing wire frame so that the life-size kokoshnik according to the pattern does not fall, but maintains its shape. If the headdress is not too high, then only a cardboard structure will be enough.
You also need to take care of decorating the kokoshnik. It was always beautifully decorated with beads, embroidery, sewn piping, and stones. Now in sewing accessories stores you can select a huge amount of modern materials so that a life-size kokoshnik sewn according to a pattern is the most beautiful and elegant.
After the headdress is ready, it needs to be secured with something on the child’s head. To do this, prepare either wide elastic band, or ribbons to match the main color of the kokoshnik or dress of a fairy-tale character. To make a pattern, you will need to draw a template on a piece of whatman paper. You will need a compass, a simple pencil, an eraser, and patterns.
Drawing a pattern
You need to draw a life-size kokoshnik after you have chosen the silhouette of the comb and taken measurements. To make the pattern even and symmetrical, it is better to fold the paper in half and make a template for one half of the headdress. The article presents the average dimensions of the pattern. After the pattern is drawn, you need with a simple pencil draw decorative elements and roughly think through their placement on the ridge. Then they transfer it along the cut out onto thick cardboard. Then cut out with scissors.
Snow Maiden's Crown
The life-size kokoshnik pattern for the Snow Maiden is drawn in the shape of a crown. This is a special form of comb with beautifully carved symmetrical elements. Here you will need a compass, or you will need to completely redraw the pattern given in the article. When work on decoration is underway, the tops of the crown are decorated with the same elements.

The remaining parts of the ridge are also symmetrical. You can lay out the pattern on the table and try on all the elements, arranging them beautifully over the entire surface. Then the pattern is transferred according to the cut out template onto thick cardboard, and each element is carefully cut out.
Cardboard blank
In order for the life-size comb of a Russian kokoshnik to stay on your head according to the pattern, you need to cut out a support hoop for it. It can be placed both in front of the ridge and on its back side. To draw support, you need to measure the distance from one ear to the other along the line of the forehead. According to these measurements, a crescent moon is drawn on cardboard. You need to step back two centimeters from the inner semicircular line and draw a semicircular line parallel to it. This strip will serve as a support hoop.

You can simply sew the cardboard tightly cotton threads, or you can make a frame out of wire, as in the photo above. Then a life-size Russian kokoshnik pattern made from paper will hold its shape well, and the Snow Maiden will be able to move and dance freely, without fear that the comb of the kokoshnik will be deformed.
Different forms of kokoshniks
The article showed patterns for a life-size kokoshnik for a girl, namely a comb. Readers also understood how to draw a support hoop. But there are other types of kokoshniks, for which it is enough to cut out the long ends and sew them to them satin ribbons, with the help of which the headdress will be held on the child’s head. You can also accurately measure the circumference of your head and sew on a wide elastic band, then the kokoshnik will be put on quickly and easily.

There are also options for holding the comb on your head. This is done with the help of a cap, which is sewn around the circumference of the comb and pulled together at the back with an elastic band. You can also imagine support in the form of a scarf, preferably made of organza or a plain thin fabric. It is also sewn on the inside around the circumference of the kokoshnik and tied at the back under the hair in a knot.
Sewing a kokoshnik
When the life-size kokoshnik pattern is made from cardboard according to the diagram, it is covered with fabric on both sides. A support or cap is made, ribbons or an elastic band are sewn on. They do a fitting on the child’s head. The kokoshnik should not be cramped and uncomfortable. After all, the holiday lasts a long time, and the child should feel comfortable throughout the entire event. The back side remains in its original form, and the front part of the product is decorated.

Decorating the kokoshnik
As can be seen in the photograph, kokoshniks often cover the frontal part of the head using a mesh of beads. You can buy it separately in the store, and if you wish, weave it on a fishing line from beads of different sizes and colors. It is advisable to purchase oval and elongated elements so that the decoration is flatter. The side bevels at the bottom are also decorated. Long identical pendants made of threads with shiny beads or balls are sewn there. You can use plastic pieces of Christmas tree garlands in silver or blue flowers. On the kokoshnik itself, you first need to draw a pattern with a simple pencil, which will subsequently be applied with pebbles, rhinestones or half-beads. You can trim the edges with piping.
Decorating the crown
When making a kokoshnik using a pattern for cutting and sewing in the shape of a crown, you will have to design all the elements of the tops the same way. Only the central part may differ. Also, the strip around the forehead and the support, if there is one, on the frontal part of the head, in front of the crest, should stand out separately.
- In order to tightly glue the fabric to the cardboard, use transparent “Crystal” glue. It doesn't stain fabric and is very durable. Dries quite quickly.
- You can decorate the kokoshnik using applique. To do this, you need to make elements on adhesive non-woven fabric for compaction. An artificial material is taken, usually satin or crepe-satin. The elements are cut out using a burning machine. The edges are heated and the fabric does not fray.
- The individual elements are glued onto the kokoshnik using an iron and adhesive tape.

- The braid and rhinestones are glued using a glue gun. Gold braid of different shapes looks beautiful. Along the edges of the kokoshnik, the braid is covered with coins (with round identical elements), and the frontal semicircle is covered with braid with tassels. They hang over the forehead, and then there will be no need to make a net of beads.
- On back side instead of ribbons that need to be tied, you can sew a wide elastic band onto which a large satin bow in the color of the kokoshnik is attached with long hanging ends cut at an angle.
The article provides life-size patterns for various kokoshniks, and describes in detail the types of different kokoshniks, both semicircular and crown-shaped. Methods and secrets are given original jewelry kokoshnik. It is told how best to decorate it and what glue it is advisable to use. We hope that after reading the recommendations and tips, a novice master will be able to easily make such a beautiful headdress as in the photographs above. Good luck!
Irina Khursulova
For work we need:
4 sheets of white paper (A4 format, tape, pencil, scissors, plywood, small nails, hammer, pliers, wire, white fleece (mesh, white organza, sewing needles, large beads, beads, threads, silver braid, hot gun, various materials for decoration crowns.
Let's get started:
1. Glue together 4 sheets of white paper (A4 format) with tape between each other.
2. Fold the sheet in half and draw that shape crowns what you want to do (having previously measured the length of the headband adjacent to the head).

3. Cut along the contour.

4. Trace the resulting template onto the plywood.
5. Drive small nails along the contour at a distance of 1 cm. from each other.

6. Place the wire along the contour of the driven nails.
7. We make additional jumpers from wire so that the frame does not bend.

8. In order to crown lay comfortably on the head, you can make an additional fastening.

9. We take two fabrics (in this case, white fleece and white matte organza), put them on top of each other, secure both materials with sewing needles. We apply the finished frame to the fabric and trace it around the perimeter of the frame with a margin of 1.5 cm for hemming.

10. Cut along the contour.
11. Sew along the rim, pulling the fabric very tightly.

12. We also cover the additional fastening with fabric and trim it.

13. We trim all edges of the frame with white bias tape.


14. We decorate the additional fastening with a woven mesh made of large beads and beads.


15. From white fabric, cut two meter-long sheets of 40 cm wide.

16. Finished fabrics, folded three times in length, are hemmed on the reverse side crowns.

17. Cover all edges of the frame with wide silver braid on both sides using a hot gun.

18. All that remains is to decorate crown.


19 The crown is ready.

