
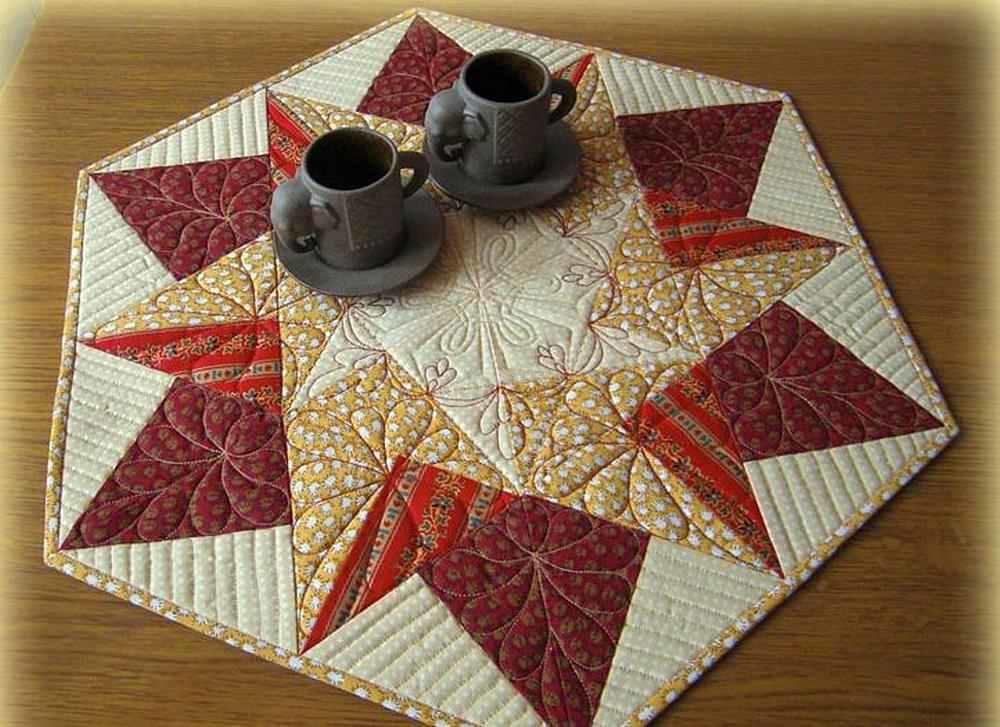
Rounds from the corners! Rugs made from pieces of fabric, folded with beaks, scales, ears…. Patchwork from triangles Patchwork from triangles patterns
A blanket made of “quick” squares in a “patchwork” style is a warm and soft home decoration. Read here how to make it yourself. Schemes, patterns and step by step instructions for beginner needlewomen.
Content:
Grandma's colorful blanket, patchwork rugs and bedding, bright pillows and potholders with multi-colored appliqué have been familiar to us since childhood. Such cute little things always filled the house with warmth and comfort. Unfortunately, only grandmothers remember the technique used to make those cozy and cute blankets. And every girl and woman should get acquainted and make friends with patchwork in order to be able to fill her hearth with something dear and close.
Fabric for making a patchwork blanket

Patchwork is a patchwork of fabric from various household and decorative items - beds, blankets, bags, clothes, tablecloths, kitchen utensils etc. The technique, known for thousands of years, is popular all over the world. Skilled craftswomen create all sorts of outlandish works of art using the patchwork method. And novice needlewomen are advised to start with wide blankets made from “quick squares”. Such products are practical and aesthetic, and are also optimally suited for mastering such a delicate science.
Today, patchwork is considered one of the most popular patchwork techniques. It consists of stitching together various pieces of fabric according to the mosaic principle. In your hands experienced needlewomen bright pieces of material are transformed into luxurious products that surprise and delight. But not all fabrics are equally good for patchwork patchwork.
To choose the right material for creating a patchwork quilt, you can follow the traditions of our grandmothers: simply save all the scraps and leftovers from sewing clothes or bed linen. From such different-sized shreds you will certainly get a motley blanket. Or you can do it much simpler - purchase a set of fabrics for patchwork in any specialized store. Since the most difficult process in the patchwork technique is working with the material, the fabric must certainly not only be beautiful in appearance, but also of sufficient quality.

Cotton fabrics are considered the ideal material for patchwork because they meet all the important requirements:
- Do not wrinkle;
- Don't rush;
- Do not shrink;
- They do not shed;
- Easy to cut.
Sewing material stores offer customers a huge selection of cotton fabrics of different colors and densities. But, unfortunately, they are not always suitable for patchwork. Some options fray too much when cut, others are hard to iron or sag after washing. It is, however, recommended to buy special fabrics for patchwork that have undergone special pre-treatment. This material is very easy for beginners to work with.
Popular types and patterns of patchwork

The patchwork style is a wide field for ideas and experiments, which has no boundaries in combinations of shapes, colors, and types of material. Here, any creative idea of the author can be brought to life. Fancy patterns, applications with animals and flowers, geometric mosaics and other equally interesting options can easily be folded into a warm bedspread or comfortable blanket.
Of course, you can create a diagram for a product with your own hands, armed with imagination and a sharp pencil. Or you can use ready-made ones, of which there are hundreds of thousands, depending on the types of patchwork.
Let's look at the most popular types of patchwork:
- Classic English. In this version of patchwork, all parts of the same shape and size are used, usually in two primary colors. Patterns for English patchwork are very primitive. For example, squares of two shades arranged in a checkerboard pattern, or symmetrically stitched triangles.
- Eastern patchwork. The manufacturing principle is similar to the classic one, but differs in the use of various decorative elements - ribbons, beads, zippers, etc. Most patterns for oriental patchwork products allow greater freedom in the shapes and sizes of parts. For example, these can be arched and wavy patches, connected and decorated with satin ribbons.
- Crazy patchwork. The most “free” look. Characterized by its aesthetics and attractiveness. As a rule, the shape, color and size of parts are not limited by anything other than the pattern used. And the designs can be incredibly diverse: images of nature or flowers, floral or geometric patterns, complete abstraction.
Making a patchwork blanket step by step
Of course, the abundance of various complex patterns and variations of products using the patchwork technique surprises even those craftswomen who have devoted decades to this type of art. And for beginners, there are more primitive, but no less beautiful and functional options. For example, a blanket of “quick” squares. It’s better to start from there.
Preparatory stage

First of all, you need to decide color scheme and the size of the future product. Although for the first time any available pieces of various shades will be suitable. Prepare in advance a piece of fabric for the wrong side of the blanket, corresponding to its future dimensions, and the same piece of padding polyester. Don't forget about the fabric for the edging. It is better to buy it with a reserve. In our case, to make a blanket from squares you will need chintz of three colors, scissors, a ruler, pins, chalk, a template and a sewing machine.
It is recommended to pre-soak chintz fabric in hot water, then rinse with cold water, starch and iron. A tablespoon of starch is diluted in a glass of cold water. Then the mixture is poured into 2 liters of hot water and stirred thoroughly. The chintz is rinsed in a slightly cooled solution, ironed while still wet and dried.
After preparing the material and collecting all the right tools you can start preparing those very “quick” squares that will make up the blanket.
Preparing “quick” squares for a blanket

The production of the elements we need begins with the preparation of the strips. From two pieces of fabric different colors cut two strips of the same width. Then, placing them face to face, stitch along one edge. At the next stage, cut a wide strip from the third piece of chintz, corresponding to the size of the previous two together. Sew the resulting third strip to the first two on both sides, first folding them face to face, just like the first time. As a result, you will end up with something like a sleeve turned inside out.
At the next stage, cut the resulting sleeve with an even zigzag into isosceles triangles. To do this, use a square, triangle or triangular ruler template. As a result, from one long “sleeve” you will get several double triangles, and, accordingly, squares in the spread.
Assembling squares using patchwork technology

To create a product in the patchwork style, a wide variety of patterns and styles are used. The squares you have can be folded into zigzags, scales, triangles or diamonds. The choice of style depends only on the taste of the craftswoman. It is not recommended to rush in such a matter. It is better to fold the parts in several in different ways, among which it will be easier to determine the most successful one.
The assembly of “quick” squares is carried out as follows: first, the parts are sewn together into longitudinal strips, only then the strips are sewn together. The main thing is not to forget to iron the finished seams. Essentially, the front side of the quilt is complete at this stage.
Making a blanket from “quick” squares

You can use any fabric, preferably natural, as the back side of the blanket. Batiste or chintz will do the job best. To quickly assemble a blanket, place the prepared fabric for the wrong side face down, then spread a layer of padding polyester and place a piece of squares on top, face up. Using a sewing machine, stitch around the perimeter of the future product. The border can be the edges of the picture or the edges of the squares.
Before the process is complete, all that remains is to make the edging of the luxurious blanket. To do this, you need to cut a strip of suitable fabric 8 cm wide and slightly longer than the side of the product. Apply the resulting strip to the front edge of the blanket, aligning the edges. Use a sewing machine to stitch the strip to the blanket, then fold it over to the wrong side, turn it under, and stitch again to the right side. Finish the remaining edges of the blanket in this way.
At this point, making a blanket from “quick” squares is considered complete. For the first time, such a product is considered optimal in terms of complexity. But even if the result is not entirely ideal, you should not be upset. The second try will certainly turn out better!

Nowadays, patchwork creations have become more popular than ever. In between the noisy bustle and tiring workdays, you really want to touch something warm and cozy. Even those women who have never thought about needlework before begin to confidently master patchwork. Decorative sofa pillows, aprons, coasters, colorful panels, curtains for a country house, ultra-modern bags and many other things can be created by experienced craftswomen.
Beginning needlewomen should pay attention to a few useful tips:
- Before using new fabric, it must be washed, ironed and only then cut. This will prevent accidental shrinkage, loss of color, or other problems.
- The color of the thread used should match the color of the shred or differ by a couple of tones.
- For drawing, use a pencil or soap. It is prohibited to use a pen.
- Cutting is done along the shared thread. In this case, the part will not warp.
- When cutting, leave a 1 cm indent on all sides. If the fabric is loose - 1.5 cm.
- Ideal templates are made of plastic.
- Without a ruler, patchwork is impossible.
- The resulting fragment must be ironed after each line.
Patterns for making a blanket using the patchwork technique

Depending on the chosen patchwork technique, the needlewoman may need one or another pattern pattern:
- Square technique. It involves creating a product from square patches or square blocks of different colors. In this case, a pattern in the form of a regular square or a pattern of strips from which a square block will be made will be useful.
- Strip technique. This is parallel or circular stitching of strips of different colors and lengths. To create a product using this technique, you will need to cut out different strips.
- Triangle technique. In many ways similar to squares. Most often, patterns of isosceles triangles, identical in size, but different in color, are used for it. Parts can be sewn along a short edge to form a strip, 4 pieces to form a square or in the shape of a star.
- Honeycomb technique. It got its name thanks to the end result. Upon completion of the work, the design of the product will resemble the pattern of a honeycomb. For production, patterns of symmetrical hexagons are used.
- Lapachikha technique. It is considered the most interesting and at the same time difficult. Pieces of fabric with raw edges are attached to the canvas, thereby forming a three-dimensional drawing of a certain pattern or a chaotic image of a three-dimensional abstraction. If a specific pattern is chosen for the product (bird, animal, flower, etc.), patterns for each part will be needed. If you plan to randomly sew on different patches, you can do without patterns altogether.
Products made using the patchwork technique are not only beautiful and cozy home decorations, but also positive emotions from the process of making them. Agree, a few pieces of fabric, a sewing machine and imagination in combination can work wonders.
Patchwork or patchwork, patchwork mosaic is a type of needlework in which, using the mosaic principle, a whole product is sewn together from pieces of fabric (shreds). In the process of work, a canvas is created with a new color scheme, pattern, sometimes texture. Modern craftsmen also create three-dimensional compositions using the patchwork technique. All stitching seams in a patchwork fabric are on its reverse side. It has been used for a long time in Russia patchwork technique, in particular for the manufacture of quilts (quilts) and other products.
In Russia, sewing from rags became widespread in the second half of the 19th century with the appearance of foreign chintz on sale. Unlike homespun fabrics, the width of which was about 40 cm, factory-produced fabrics had a width of 75-80 cm, and when cutting clothes from them, a large number of scraps were formed. Applique appeared later: since English calicoes were expensive in Russia, it was considered inappropriate to cover one fabric with another. Patchwork reached its peak at the end of the century, when the production of cheap cotton printed fabrics was established and sewing machines. Basically, things (mostly patchwork quilts) created among peasants had an exclusively practical function - they protected them from the cold. They were mainly made from scraps of worn clothing; they were irregular in shape and joined together randomly. However, in parallel, there was a tradition of sewing blankets for weddings and the birth of a child. These products combined utilitarian and decorative functions. The shape of the flap (stripe, square, triangle) was determined by the shape of the lunge formed when cutting a straight Russian suit.
At the end of the 19th - beginning of the 20th centuries, patchwork sewing in folk costume replaced complex lace, embroidery, and woven elements. Traditional Russian patchwork is characterized by manual assembly without the use of a base, overlapping patches, and the use of parts of different sizes.
After the revolution, this type of sewing was not included in the list of state-supported types of decorative and applied arts. Later, patchwork became a sign of poverty, a reminder of the periods of war and devastation experienced by the country. Interest in this type of decorative and applied art was revived in the 90s of the 20th century, and its study began at the same time. It has become not only a widespread hobby, but also an independent genre of decorative art. In Russia, every two years (since 1997) the festival “Patchwork Mosaic of Russia” is held, where the works of masters are demonstrated.
Cutting rules
Before the cutting step, keep the following things in mind:
1. Before cutting, new fabric must be washed and then steamed with an iron. This is done in order to prevent possible shrinkage and discoloration of the fabric after washing the finished product.
2. The flaps that have already been used before need to be starched and ironed.
4. It is always customary to cut in the direction of the grain thread, then during stitching the patchwork parts will not warp.
5. When using new fabric, use its edge as a guide.
6. In order to cut out the desired element, attach a template with indents to the back side of the fabric, outline it with chalk, then attach the template on top without allowances and trace it again along the contour.
7. After you have cut out all the necessary parts, you can sew them according to the chosen patchwork pattern.
Types of patchwork
1. Traditional
Refers to the Anglo-American type of needlework. Its main goal is to create a whole canvas from scraps. This creates geometric patterns. For this patchwork you need diagrams, templates and large-scale patterns, for example, blankets. It's the big pieces that look best. Often a lining is used here on the wrong side.
2. Crazy scraps
The material used is fabric scraps different sizes and geometric shape. Curved stripes, appliqués, irregular shapes. The seams are masked using braid or embroidery. An indispensable attribute is the generous decoration of the product.
3. Knitted
IN knitted style, the fragments are sewn to each other using a crochet hook. It is this patchwork technique that is embodied in bedspreads.
4. Japanese style
He combined Eastern and Western motifs. This style uses stitches and silk as the fabric. In addition to practical bedspreads or clothing, this type of sewing is often used in decorative panels. The basis of creating a composition geometric shapes– rhombus, triangle, corner, square.
5.Watercolor
A popular technique, it can also use squares that are sewn into blocks and formed into a canvas. The main feature is correct selection color palette of patches.
6. Stripe to stripe
In this style, strips of fabric of different colors and even textures are used. You can combine the stripes however you like. From such strips you can create a unique palette and even patterns. For example, classic parquet, herringbone, wells.
7. Log hut
The style involves the formation of a pattern of stripes around a central element - a square. They are arranged in a spiral. There are variations of this technique - shifting the square into the corner.
8. Magic triangle
This is the most common pattern in patchwork; in particular, such patterns, patterns and templates are used to create pillows, potholders, and bedspreads. In addition to the magical power of this figure, which many people believe in, the triangle is also easy to use. With it you can create a variety of shapes, including complex stars and simple squares. When using this technique, interesting combinations can be achieved.
9. Corners
The main difference between the style is that the corners are not made from cut-out blanks, but are formed from pieces of fabric different forms. The resulting strips are sewn into fabrics. The result is a voluminous canvas.
10. Chess
The main element is small squares or diamonds. They are arranged in a checkerboard pattern of contrasting colors.
11. Russian square
The central part of the canvas is assembled from squares, and the perimeter is sheathed with isosceles triangles. There is also alternate sewing - squares, triangles - stripes.
12. Honeycomb or grandma's garden
The basis of the canvas is formed by hexagonal blanks.
Why do you need patterns in patchwork?
If you are starting to use the patchwork technique and need to create colored or textured blocks, then for this you will need to prepare a special template that will help you cut out small details faster. It is from small elements with certain sizes and configurations that blocks are formed.
The template is prepared for the part taking into account seam allowances. If you have not purchased a special ruler for patchwork, then you will have to use a template, and the seam allowance is usually set to one size from 5 to 7 mm. The template for working with patterns is conveniently made of cardboard or plastic.
Patchwork is the art of sewing patches, the secrets of which are not so complicated, but the result is always impressive. If you look at photo catalogs of Western decorators and designers, you will see how patchwork products and crafts have found their place in the most modern interiors. And this is not news - recent years patchwork is in the top of the most popular types of needlework. Patchwork– pleasure and beauty that are accessible to everyone, and the crafts in this handicraft are not inferior to many designer things.
The collection of products in the patchwork style includes completely simple work(such as potholders) and quite complex ones (such as patchwork bedspreads). There is a place for both in the house. In the pictures you can see how a bedroom is transformed if the bed in it is decorated with an elegant and cozy patchwork quilt. And for children, patchwork style decor can perfectly match their room.
What else modern can be done in patchwork style:
- Chair upholstery. One such chair will become a bright interior accent, and if you need to diversify a modest decor, consider not throwing away the old chair, but giving it a new patchwork upholstery. It can be a pattern of triangles, stripes, even a traditional checkerboard pattern. Or maybe a chaotic drawing, or a fantasy picture.
- Pillows. Interior pillows made of triangles especially emphasize home comfort. In the photo you can see a variety of design ideas for such pillows, and, inspired by the photo, make the same product.
- patchwork wall– special interior chic. Such patchwork corners are now decorated with the most fashion magazines in interior design. An entire wall in the house is allocated for pasting with patchwork, but usually a separate patchwork fabric is sewn together - patchwork in this case becomes a bright, original wall decor.
- Patchwork rug. Well, what would we do without this classic! Such products are most suitable for a children's room. A patchwork rug would also be appropriate in the kitchen and hallway.
- Stylish potholders As a gift for creating a Russian-style kitchen interior, they will become your favorite helpers.
Well, you can start your handicraft journey using this technique with patchwork sewing from strips. Patchwork and patchwork sewing are mastered from this type, thanks to its simplicity.
Patchwork from strips
Patchwork, patchwork sewing from stripes is the most popular type of this technique. The essence of the work is to first sew the strips and then cut them in a certain way to obtain blocks for making various patchwork products. The patches will not be sewn in order, in lines, but along the edges. The trimmed parts at the edges are easy to sew.
Strip sewing has come back into fashion thanks to interest in ancient handcrafts. This type of handicraft is called quilting. Usually sewing starts from the center, where the first rectangle or square is fixed.
Well, other pieces of fabric are placed around it.

One of the most popular patterns in quilting is the log cabin. Otherwise it is called a well or an American square.
Features of working in the well pattern:
- Colored stripes gather around the hearth (well) in a spiral;
- This hearth is traditionally made of yellow or red fabric, symbolizing the fire in the hearth;
- The color of the stripes that play the role of logs is also symbolic, the light stripes are the illuminated parts of the hut, and the dark ones are the shadow ones;
- Typically, a block is divided diagonally into dark and light sides.
The pictures show that the well pattern is not complicated, but requires an accurate diagram.
The well is one of the basic patterns of traditional quilting.
Well technique: master class (video)
Patchwork mug program
It’s no news that patchwork has become such a popular type of needlework that you can learn it in childhood, what, in your own school or extracurricular educational institution. Many teachers strive to open such a circle at school and pass on the secrets of mastery to children. Teaching children, of course, requires a system. Its basis is the circle program, which outlines each lesson. More precisely, it determines the topics that each lesson will be devoted to.
The program might look like this:
- Lesson 1. Introductory lesson. Patchwork is pleasure and beauty. Crafts made by children.
- Lesson 2. Sewing from stripes. Photos of works. Sewing from stripes using potholders as an example.
- Lesson 3. Squares in patchwork. Quick crafts.
- Lesson 4. Circles in patchwork. Potholders and other crafts with circles.

The teacher, before starting to conduct circle work, must have some methodological reserve. These are at least examples of work, ready-made crafts (even simple potholders), photos and pictures interesting works(or better yet, a whole collection of them), and the program itself, both on paper and in electronic form.
Russian patchwork
Russian patchwork is a separate type of patchwork that barely dates back a couple of centuries. People became interested in patchwork sewing with the import of chintz to Russia. Examples of photos with samples of works in the Russian style are replete with the Internet - the pictures indicate that our people have reached enormous heights in this art.
Traditionally, there are three types of Russian patchwork:
- Patchwork applique;
- Patchwork mosaic;
- Mixed technique.
The well-known term “Russian square” is a block in Russian patchwork sewing, the products based on which turn out incredibly beautiful and deep.


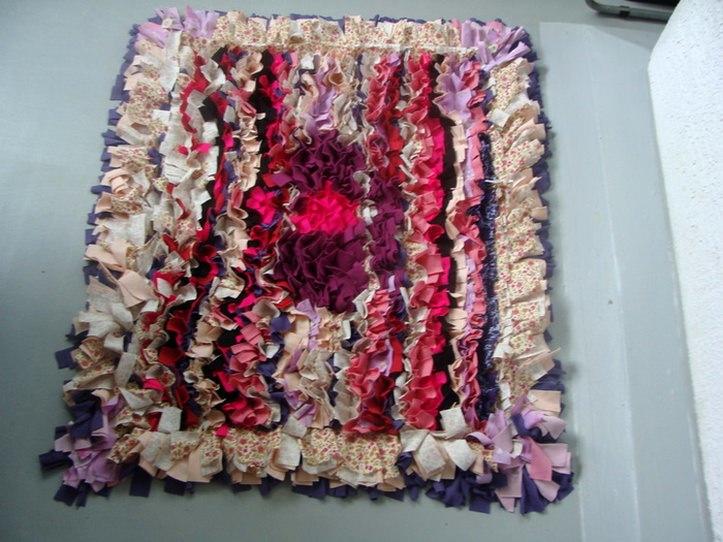
An ancient Russian patchwork technique known as lyapochika is also known.
Lyapochika are rugs and bedspreads that can still be seen among grandmothers in villages. Lyapochika, or rather, its essence lies in the fact that the shreds are attached in one place so that the shred flies away. Many shreds receive a kind of pile.
Lyapochika in a modern version is made on sewing machine. You can make a rug from leftover cotton fabric or knitwear. Not to say that the results will be quick, but the work is worth it. Look at the photos of the craftsmen - the resulting products are original, incredibly cozy.
Patchwork exhibition “Seasons”
Patchwork for children
If the children themselves, even learning patchwork only at home, can find pictures, diagrams on the Internet and sew simple potholders, for example, parents can sew more complex things for their children.
Yes, you may have to watch more than one lesson, read the news (which is in fashion today in patchwork style). Inspiration can also be found on paper, that is, not from Internet sources, but from paper publications. An example of this is “Ashet Collection”.
“Ashet Collection” is a magazine with a huge variety of focus.
You will be interested in a magazine specifically on patchwork sewing. This is a real country of craftsmen, a colorful publication where everything is - instructions, master classes, patchwork news. If a lesson on the Internet is not for you, then you will definitely like the “Ashet Collection” for patchwork more. There you will learn what sewing is using squares, sewing from triangles, how to sew vests from knitwear in patchwork, what a checkerboard pattern is, etc.

"Ashet Collection" offers most interesting options products for children, and “Ashet” is also generous with gifts. Lost the habit of reading something on paper? This is the case when information on paper is more necessary and useful.
Regarding what to sew for children in patchwork:
- Bedspread made of colored triangles;
- Plaid in bright squares;
- Square plaid in Provencal style;
- Rug made of triangles;
- Sofa cushions in squares;
- Round rug made of triangles for a computer desk;
- Triangle vest.
Most often, mothers are interested in how to sew a patchwork quilt from squares or triangles. Here you need to be patient and not deviate from the instructions. But start with something easy - with the same potholder. And then it will be easier to master something voluminous.
Secrets of Russian patchwork masters (video master class)
Patchwork – most interesting technique, which not only allows you to make unique things of great value, but with your own hands. These are also lessons of attentiveness, diligence, perseverance and self-control. So don't miss the opportunity to learn how to make beauty with my own hands, while acquiring enviable character traits.
Great work!
Patchwork (photo)


TOTAL
This topic relates to patchwork for beginners who are mastering patterns and patterns for working in the patchwork technique. You can sew a lot of products from equilateral triangles - blankets, pillowcases, breakfast napkins, cosmetic bags and handbags.
First, the triangles you want to sew are lined up. It is highly recommended to align the triangles. If you line up all the tops straight, and also sew the triangles together in rows, you will be much less likely to have your stripes warp after washing.

Patchwork for beginners patterns patterns of equilateral triangles
Take two triangles that touch at the bases and sew them together.

Unfold the stitched pieces and place them back into the template. Then sew the adjacent triangle with the ones already sewn next to it.

Continue sewing your triangle pieces together until you have two strips. Make sure the corners are square and there is seam allowance.

Once you have sewn all the prepared pieces together, your work should look like this.

Now it's time to carefully press the seams on the wrong side. Most best way- this is to steam them with an iron.

You will enjoy ironing with a hot iron with lots of steam. To prevent the edges from warping during this process, you can press the open seams with your finger, and then simply hover the iron over the seam, this is very convenient. The seams usually fold flat and don't require much effort.

Now it's time to sew your rows together. It is very important to align the two strips seam into seam. Secure them with sewing pins and sew them together. Important: seam allowances must always be the same. This is a guarantee that your triangles will fit together perfectly.

They turned the work over and steamed it.

And bam – smooth and beautiful equilateral triangles. Beauty!

We hope that this master class will be an assistant in the patchwork technique for beginners when drawing up a pattern diagram. Have a creative mood!
Helped you today Adrianne