
Weaving from newspaper tubes - interesting do-it-yourself crafts. Useful things from old newspapers Magazine baskets for beginners
Do you have a stack of old newspapers and magazines lying around? Don't rush to throw it away! Today we will tell you how to weave a basket for your home in just 30 minutes and surprise your loved ones.
By the way, the technique is called " weaving from newspaper tubes ».
Why do you need a wicker basket in the house?
Handmade baskets add a unique touch to your home. And most importantly - no one else will have a second such thing. 🙂
Wicker baskets can be used to store... just about anything! You no longer need to puzzle over where to put paper, stationery and even underwear.
If you put a basket in the bathroom, you can put laundry there, in the bedroom - bedding or clothes, and in the nursery - toys. All you need is to turn on your imagination and give creative process a little time.
By the way, hand-made basket will be a great gift!
Preparing for weaving
You will need :
- Cardboard (any old box will do).
- Newspapers or magazines.
- Glue (PVA) or glue stick for paper.
- Primer.
- Acrylic paints.
- Knitting needle or any other thin but strong stick.
- Clothespins.
- Any heavy object that can be used as a press.

Basket making step by step guide
1. Carefully tear out the leaves from the magazines - they must be the same size. Then each leaf is wound on a stick (diagonally). The paper must be lubricated with glue during operation so that the resulting tube is strong.

2. Each tube must be secured with a clothespin until it dries. After that, it needs to be straightened so that it becomes flat.

3. The bottom is the main detail of the future basket. Thick cardboard is best for it. You will need 2 identical cardboard pieces. Please note that the dimensions of the basket will depend on their size.
On one of the cardboard sheets, you need to draw lines so that you can symmetrically fix the tubes on the sides and corners. After they are laid out, they are covered with a second piece of cardboard, pre-lubricated with glue.
The bottom must be pressed down with a press and allowed to dry completely.

4. You can (but not necessarily) put a box at the bottom of the basket so that the weaving is neat. Paper tubes on top are fixed with clothespins.

5. The horizontal elements are interconnected with glue - you should get one long tube. You can glue them together as you work.
A long tube must be passed through the vertical ones, alternating weaving "above" the vertical tube and "under" it.

6. Weaving can be finished when you reach the desired height of the basket. The ends of the vertical tubes must be bent inside the product and carefully passed through the loops. Lubricate the ends with glue.

7. Our basket is almost ready! If you want it to be more durable, treat it with a primer. When the primer dries, apply to the product acrylic paint to hide his "newspaper-magazine" past. 🙂

8. Wait a few minutes for the paint to dry and... Start using the basket!


Beauty is a terrible force!
Our basket turned out to be white, but you can make it any other color - just paint the product with colored paints.
And if you connect fantasy, then the basket can be additionally decorated with fabric and beads. It's great, right?
We wish you creative success and inspiration! 🙂
How to make a basket of old newspapers that is a hundred times cooler than the store updated: April 20, 2019 by: anuta-ivanova
You will need paper, clothespins and chopsticks
The fashion for wickerwork will probably never go away! Over time, only the form and materials of the works change. Popular paper weaving can be mastered by anyone, and the resulting basket will be no less durable than a regular wicker basket.
What is needed for this:
Photo: Anastasia Kazakova
- unwanted glossy magazines
- Chinese chopsticks
- PVA glue
- clothespins
- cardboard box
- cargo
- acrylic paint
- coating varnish
Progress:
1. Our basket will be square and will consist of tubes transverse to each other, which must be made in advance. Carefully pull the magazine sheets out of the adhesive back. On a wooden Chinese stick, start winding the sheet diagonally. While winding, grease the sheet with glue. Instead of chinese chopsticks you can use knitting needles, then the tubes will be thinner, but by the number of them you will need to make much more.
.jpg)
Photo: Anastasia Kazakova
2. The size of the basket determines how many tubes you need to wind. For an average basket (25x25x15cm), this is about 100-150 pieces, that is, it turns out to be an ordinary thick magazine.
.jpg)
Photo: Anastasia Kazakova
3. We start weaving from the bottom. To determine how many tubes you need for it, flatten one tube and measure its width. For a tube width of 1 cm, and for a bottom side of 25 cm, you need to take 7 pieces (it is best to take an odd number). For convenience, the sticks need to be connected with clothespins to the cardboard, leaving gaps between each other in a centimeter. Pass the other tube through one tube across the others, stepping back from the edge about 10 cm and bending the edge to the side from which you started. Pass the next tube also across the rest, but without returning to the beginning. Pick up sticks until you are satisfied with the size of the canvas.
.jpg)
Photo: Anastasia Kazakova
4. In order to start weaving the sides of the basket, you need to put a load on the bottom (for example, an encyclopedia), and bend the ends of the tubes up. The ends of the tubes for the sides will be very short, so glue other tubes on them (glue the tube with glue and insert it inside the other). On the resulting long tubular ends for the sides of the basket, braid with flattened tubes, gluing in length if necessary. Glue the ends discreetly under the weave. Each row is new tubes glued together, and not a continuation of the previous rows (as for weaving round baskets).
.jpg)
Photo: Anastasia Kazakova
5. When the desired height of the basket is reached, the ends of the weaving must be beautifully bent at the same angle and hidden under the weave.
.jpg)
Photo: Anastasia Kazakova
If you need a cover for the basket, weave it in the same way as the bottom, but without bending the tubules, as at the very beginning of weaving. Such a lid should be larger than the size of the basket itself so that it closes well. The sides are woven like the sides, 2-3 cm in height will be enough.
6. If necessary, paint the basket with acrylic paint, and for a glossy shine with varnish
Weaving from newspapers is very popular. The material is cheap, and weaving from newspaper tubes is even more convenient than from a vine.
The technique of weaving from newspapers and magazines is also good because there are no restrictions on the size of the paper "vine": paper fragments are easily connected and can grow indefinitely. Perhaps, in strength such products are inferior to ordinary wicker baskets, but if they are properly processed and used appropriately, they will last a long time.
Basics of weaving from newspapers and magazines.
Material for weaving.
Main material - plain paper. It can be anything, but the best option is magazine pages or current colored newspapers (although any can be used). Thicker sheets (for example, covers) can serve as frame parts - for example, corner posts when weaving rectangular baskets or boxes from newspapers.
In addition to paper, you will need glue, scissors (or knife), knitting needle (preferably No. 1.5-2) and a crochet hook.
A hook is needed to drag the ends of the "vine" between rows (for example, at the end of work, when you need to hide the edge).
The knitting needle is your main tool for twisting paper tubes. Some craftswomen do without knitting needles, boring the sheet not obliquely, but parallel to the edge of the sheet, but this is less convenient and is more suitable for flat products - curtains, panels, frames, etc. For weaving baskets from newspapers, the leaf is twisted obliquely.
Sheet should be rectangular, 10-15 cm wide, 30-50 cm long (a quarter of a newspaper sheet or a half of a magazine - in the future you will choose for yourself optimal size). Position the paper strip on a table (or in the palm of your hand) with the narrow side facing you. Place the knitting needle on the lower left corner of the sheet (if you are right-handed! - if you are left-handed, then on the right) at an angle of 45 degrees and, firmly pressing and holding the paper, begin to rotate the knitting needle.

When the entire sheet is twisted, grease the corner with glue and press it against the tube.

Have you noticed that the diameters at the ends of the tube are different?
This is important: thanks to this “funnel”, you will lengthen the tubes by inserting them into each other.
At the same time, the difference in diameters should not be large, otherwise the inserted tube will simply “sink” in the outer one.
Make more tubes so as not to return to this part of the work - it’s better to have extra ones left, they will still be useful to you.

Usually craftsmen smooth the tubes (with a rolling pin, iron), making them flat; some work with round ones.
Weaving baskets from newspapers.
There are different techniques, consider one of them. We make a bottom - a cardboard circle, on which we glue the tubes (an odd number!) In the form of "rays". On top we glue another circle of the same kind so that the ends of the tubes hide between the circles, and put a load so that everything sticks together well. When the "sun" round bottom with “rays” sticking out in all directions) is ready, the “rays” are folded, a shape is placed on the bottom, according to which your product will be woven.
 |
 |
There are two methods of fixing the "rays" so that they do not crumble:
pull them off at the top with a string or soft rubber band;
turn the structure upside down, press down with a load and weave not from the bottom up, but from the top down.
Choose what is more convenient for you.
Now we take a working “vine”, smear the tip with glue and fix it (with a paper clip, clothespin, etc.)
We braid the "rays", gradually increasing the paper tube.
You can secure them with glue for reliability.
When the newspaper basket is finished, fold the remaining ends inward, crochet them under several layers of tubes, and cut off the ends. That's all! And now if you want - paint your masterpiece, if you want - varnish it, if you want - decorate it as you like. Then, if you wish, study various ways patterned weaving from newspapers and magazines, start inventing your own.

You can do without a cardboard bottom, especially if you want the product to be completely "openwork". In this case, just weave the grid. This is the most popular and affordable type of weaving - simple weaving.
We start weaving with elementary grid.
 |
 |
 |
 |
 |
 |
 |
 |
 |
 |
If the tube ends, then you can extend it next by inserting it into the ending new tube, after lubricating it with glue.
Now we decide on the size of the future basket. It is necessary to build on an existing sample, such as a flower pot. The woven bottom should match the size of the bottom of this pot.
 |
 |

Then we begin to braid the side walls of the base.
Having gained the desired height, remove the weave from the base, and turn it upside down.
And we continue to weave, but already the horizontal sides of the future basket.
Having finished weaving, we hide the remaining ends of the tubes in weaving.
 |
 |
 |
 |
 |
 |
 |
 |
 |
 |
Painting newspaper tubes.
There are two ways:
- paint each tube;
- paint the finished product.
You can paint wood stain for furniture or acrylic paints. If the tubes are dyed each separately, the effect is more natural. To do this, we use a stain. It soaks through the paper. Then you can twist the tubes as you want.
Acrylic will not allow the paper to be flexible. But it will help to imitate a straw or a vine. It strengthens the paper. Therefore, it is suitable for painting an already finished product. It is easier to paint the finished product. Blow out with spray paint, and that's it.
I advise you to use all the same more "beautiful" method. We spread newspapers on the table. On newspapers - a thin food film, on top - tubes. We put rubber gloves on our hands, pour the stain into a box, and paint over with a foam brush to the desired intensity. We dry with a hairdryer, turn the tubes so that they do not stick to the film. You can start weaving when the paint stops getting dirty.

A simple ring stand.

1. We connect the tubes in threes to get a workpiece length of about 1 m for each ring. Lightly spray the material with water from a spray bottle so that they become damp and flexible. We twist a tight spiral. The tip is cut at an acute angle with a cut inward. Fix well with glue. For a newspaper stand, you need 42 such spirals.
2. We connect the spirals. When they are already dry and strong, you can connect them together. We connect adjacent spirals with each other with the same wet tube. We fix the joint in the center of the spiral. For connection, you can use twine, ribbon, knitting thread. If you use a thread, then we thread it into a needle with a large eye and sew the details. We hide the knot in the center of the spiral.
From the center to the edge, we connect all the parts according to the scheme shown in the figure.
In the photo, the product was painted after assembly. Newspaper weave can be dyed before assembly. Choose the way that suits you best.
On the basis of chain mail weaving, a whole art has developed, which is called "torsion weaving".


Newspaper tube weaving is based on traditional wicker weaving. Currently, it has gained great popularity, because this material is always at hand, and by connecting fantasy, you can create beautiful crafts from newspaper tubes. Master classes on creating crafts for beginners will help with this. After the hand is “full”, you can start creating more complex products.
Clean printing paper is best for weaving. It is soft and spreads evenly. If it is not possible to find such paper, then to create original crafts from newspaper tubes, sheets of ordinary newspapers can be used. You can work with office paper, but it is quite dense, and this is inconvenient.
Basket
- newspaper or magazine sheets;
- cardboard;
- knitting needle or wooden skewer;
- PVA glue;
- scissors;
- ruler;
- tassel;
- pencil.
Cut the newspaper into squares measuring 10 by 10 centimeters (longer tubes will require larger squares).

Put the needle on the corner of the sheet and wrap the paper around it tightly. Pull out the needle. To prevent the tube from unwinding, smear the edge of the newspaper with glue before twisting. Carry out such an operation with all sheets of the newspaper.

From cardboard, cut 2 identical circles for the base of the basket. The volume of future crafts depends on the diameter of the circles.

Glue 8 newspaper sticks onto one cardboard circle as shown in the photo.

Glue the second circle on top. For 10-20 minutes, this workpiece should be put under the press.


After that comes the most important stage - weaving. It is necessary to lift one tube from the workpiece vertically and glue the tube horizontally to it, as shown in the photo.

This tube must be brought behind the nearby frame vine so that it bypasses it from the outside, and the next tube from the inside. If the vine with which we braid ends, then we take another tube and, as it were, screw it into the edge of the last vine, and continue to weave.

Covering the frame tubes from the outside, and then inside, weave all the rows until the desired height of the basket is obtained.

When the last row is made, cut the tube of the vine obliquely, smear its edge with glue and bring it inside the basket to the limit. Cut the frame tubes too, grease with glue and fill the crafts inside.

To make a handle, you need to weave 2 tubes with a bundle. So that they do not unravel, it is better to glue them. Bring the edges of the handle inside the basket and grab it with glue.

If desired, a finished basket of newspaper tubes can be painted, decorated with decorative flowers, beads, decoupage.
Hat
Required materials and tools:
- newspapers;
- scissors;
- glue;
- a bowl.
Make 10 long newspaper tubes (you can see how to make them in the previous master class).

Fold 8 tubes crosswise, as in the photo.

Connect the remaining 2 tubes to each other and lead them over a horizontally lying stack.

Weaving is carried out immediately with 2 tubes using the “rope” technique. Bring one tube under the base of the hat, the other - from above, cross each other. Do this with all ends of the base cross.

Weave the second circle with the same technique.

On the third circle, braid each base vine with a “string”, dividing them among themselves.

To make the hat even and neat, we apply the weave to the convex bottom of the bowl and use it as a shape.

For convenience, we fix the vines with clothespins over the edges of the bowl. So they will not get confused and interfere.

Continue weaving until the hat is deep enough.

Remove the bowl and start weaving the brim of the hat.

Cut the vine that was woven and bring its edges inside the craft.

Take a new tube and thread it into the loops near the base vines, as shown in the photo.

Do this with each base vine, inserting new tubes into the loops next to it.

To weave the fields, you will need one vine, which will braid each tube with a "rope" technique.


Weave until the margins are wide enough.

After that, bring all the remaining base vines inside the crafts and fill them into the cells.

Cut off unwanted ends with scissors or wire cutters.

You can decorate the hat with acrylic paints, decorate with artificial flowers, ribbons.


Fungus
Required materials and tools:
- newspapers;
- wire;
- scissors;
- glue;
- a bowl.

For the base you need 8 newspaper tubes. In order for the fungus to keep its shape well, a thin wire is inserted into the tubes. From them, make the base in the shape of a square, as shown in the photo.
To make the base for the fungus neat and convex, you need to place it on a small bowl. Continue braiding the vines further, but now sticking to the shape of the bowl.
After the mushroom cap is ready, remove the bowl. Bend the tubes in such a way that a leg is obtained.
Braid the inside of the mushroom and go out on the leg, as shown in the photo. At this stage, the leg should be slightly widened so that it does not turn out to be straight.
The wire at the base of the tubes will not allow the craft to unravel, so the edges of the tubes can simply be wrapped inside the fungus.
To decorate the fungus, you need to paint its leg with white paint and the hat with brown. After the whole craft must be covered with a colorless varnish.
panel
Crafts from newspaper tubes with your own hands are a great way to decorate the interior. Exclusive option - panel.
Required materials and tools:
- newspaper sheets;
- PVA glue;
- brush for glue;
- knitting needle or skewer made of wood;
- acrylic or food paints;
- office rubber bands;
- scissors;
- strong threads;
- needle.
Progress:

Bast shoes
Souvenir bast shoes can be made from newspaper tubes, which are considered a family talisman, a symbol of longevity and health.
Required materials and tools:
- sheets of newspapers or magazines;
- PVA glue;
- brush for glue;
- knitting needle or skewer made of wood;
- acrylic or food paints;
- stationery knife;
- scissors;
- linen thread.
Progress:
- Spread the sheets of newspaper across the long side, bend in half and cut with a clerical knife.
- Wind the resulting sheet onto a pencil diagonally from the right corner so that one edge is slightly wider than the other. Lubricate the edge of the sheet with a small amount of glue so that the tube does not unwind.

- Insert three tubes into each other, fixing with glue. Such long tubes need 5 pieces.

- Place the tubes according to the photo and start weaving, taking into account that the right or left product is planned.

- At the end of weaving, thread the end of the tube with a knitting needle along the entire length of the sole.
- After the bast shoes are ready, you can paint them with a water-based stain "Oak", and then apply acrylic paint white color. The paint is applied with a semi-dry brush in random strokes, creating the effect of antiquity.

- When the paint is completely dry, coat the product with a primer. To do this, mix PVA glue with water in a ratio of 3 to 2. This will make the bast shoes strong.
- To decorate the bast shoes, it is enough to use linen thread, wrap the edges of the bast shoes with it, creating the effect of antiquity.


Frame
Another way to use newspaper tubes is to make crafts and decorations from twisted spirals, such as creating an original photo frame.
Required materials and tools:

- sheets of newspapers or magazines;
- PVA glue;
- tassel;
- knitting needle or skewer made of wood;
- acrylic paints;
- scissors;
- white sheet of paper;
- cardboard.
Progress:

Tree
An original way to use newspaper tubes is to create an unusual interior tree.
Required materials and tools:
- sheets of newspapers or magazines;
- PVA glue;
- tassel;
- knitting needle or skewer made of wood;
- acrylic or gouache paints;
- scissors;
Progress:
- Prepare tubes.

- Fasten 13-15 tubes together, wrapping them with a thread and a strip of paper smeared with glue. Thus, a tree trunk is formed.

- With the next tube, smeared with glue, wrap the formed trunk in a spiral to the required height. If the tube ends, insert the next one into it and continue weaving.

- Divide the trunk into 2 unequal parts, forming branches. Wrap each branch with a tube smeared with glue.


- Separate the branches again and wrap them around. Continue dividing until 1 tube remains in each branch.

- Trim the last branches to the desired length and form curls.

- Wrap the lower part of the trunk with another layer of tubes, slightly thickening it.

- Cover the finished tree with a mixture of PVA glue and gouache.

- After the glue has dried, varnish the product and decorate.

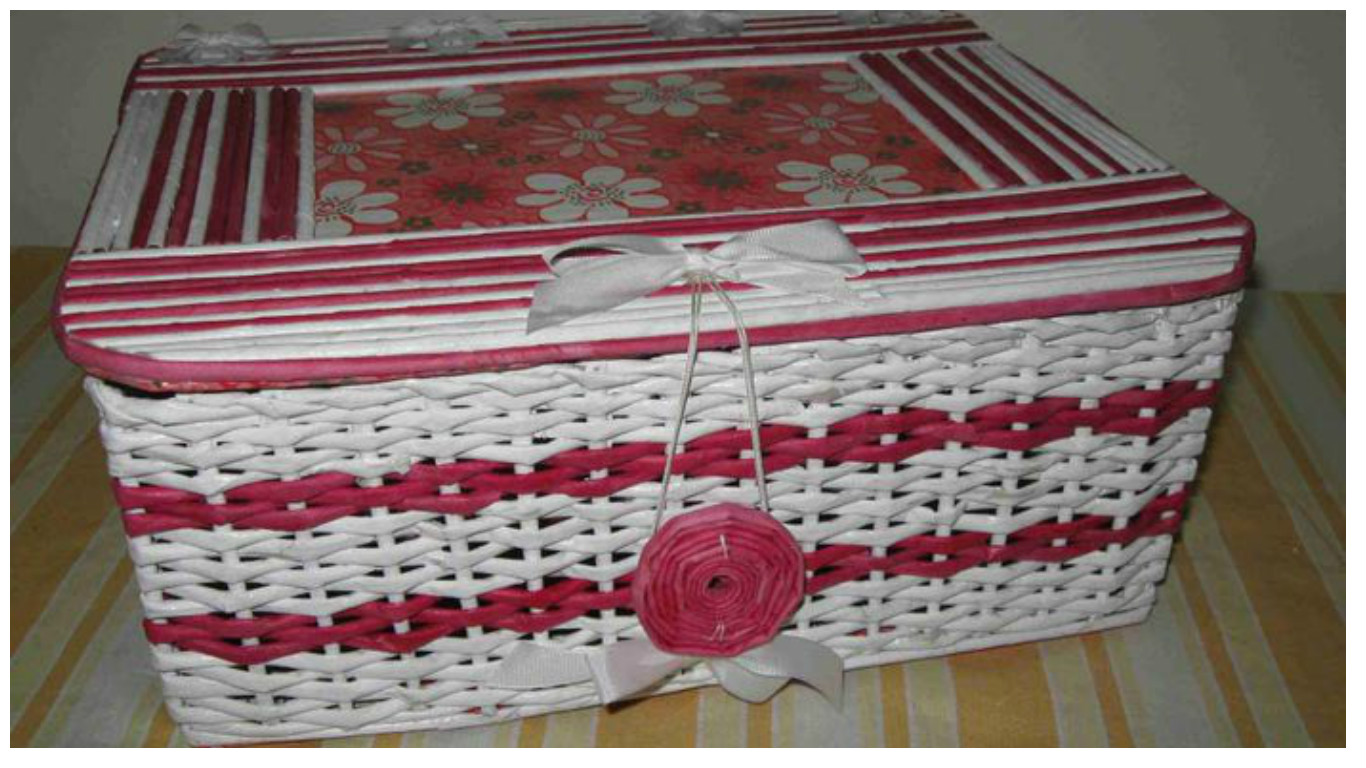
Box
Required materials and tools:

- sheets of newspapers or magazines;
- PVA glue;
- felt-tip pen;
- knitting needle or skewer made of wood;
- scissors;
- dye.
Progress:
- Prepare tubes and a box of a suitable shape, which will be braided during work.


- To begin with, form the frame of the future product. To do this, at the bottom of the box, mark the places where the main tubes pass, given that the more often they are located, the denser and stronger the weaving will be. There should also be warp tubes at the corners of the box.
- Glue the tubes according to the markup.

- Start weaving the walls of the box. To do this, glue an additional tube to the base tube, which will be used for weaving. Braid warp tubes the classic way: the first is outside, the second is inside, the third is outside, and so on.

- In this way, braid the box completely. If the working tube ends, it is “built up” by inserting an additional one into it, smearing the edge with a small amount of glue.


- At the end of the work, cut off the edge of the working tube at an angle of 45 degrees and hide it inside the product. The main tubes are also cut off and brought inside, fixed with a small amount of glue.

- Paint the finished box with acrylic or water-based spray paints.

- After the paint has completely dried, decorate the product using satin ribbons, artificial flowers and beads.
Egg
Required materials and tools:
- sheets of newspapers or magazines;
- PVA glue;
- knitting needle or skewer made of wood;
- scissors;
- dye.
Progress:
- Prepare tubes from newspapers.
- Put three tubes crosswise, fixing the place of intersection with a drop of glue.

- At the intersection, glue the fourth tube and start weaving. Bend one tube over 2 others, take the next one and bend over the other two in the same way, then the next one and so on.


A cup
Required materials and tools:
- sheets of newspapers or magazines;
- PVA glue;
- knitting needle or skewer made of wood;
- scissors;
- dye.
Progress:

Flowers
Required materials and tools:
- sheets of newspapers or magazines;
- PVA glue;
- knitting needle or skewer made of wood;
- wire;
- wrapping;
- scissors;
- dye.
Progress:
- Prepare tubes from newspapers, color them yellow, green and Brown color wait for complete drying.

- Insert a wire into 3 short yellow tubes and wind a non-wooden skewer in turn, forming spirals. These will be the pistils of the flower.

- Take 2 more yellow tubes. Bend one of them in half, and wrap the second with a loop around the first and begin to braid without tightening. This will be the first petal. Also weave 2 more yellow and 3 brown petals.


- Similarly, make leaves from green tubules, only with a sharper bend.


- When all the blanks are ready, collect the flower. Fasten pestles together with wire. Attach brown petals around the pistil with a second layer, and then yellow ones. Attach a stem of 3 green tubules to the flower head with a wire.


- Wrap the stem with wire for strength. In the process of wrapping, attach a leaf.


- To hide the attachment points and wire, wrap the stem with wrapping paper.

- The flower is ready, if desired, it can be varnished.

Heart
Necessary materials and tools
- sheets of newspapers or magazines;
- glue Moment;
- knitting needle or skewer made of wood;
- wire;
- scissors;
- dye.
Progress:
