
DIY Christmas tree crafts made from plastic. DIY Christmas toy
The Christmas tree is, of course, the main decoration of the New Year. On the eve of the upcoming holiday, the whole family dresses up the forest beauty. Standard Christmas tree decorations have already become boring. However, you can decorate the Christmas tree with something you made yourself; for example, a Christmas tree toy made with your own hands from plastic bottles will look great. In addition, the creation process will bring a lot of pleasure to your children.
Today, making your own Christmas tree decorations is not difficult. Even if you lack skills in this area, you can always use a helper such as the Internet. This article will look at the simplest ways to create toys for the Christmas tree with your own hands.
Volumetric toys
Before diving into the creative process, you need to decide on the type of material used. You can make a three-dimensional decoration from absolutely any available materials. Naturally, paper products are the most popular. They have earned their fame due to their ease of manufacture. In addition, such Christmas tree toys, created with your own hands, look quite impressive on the forest beauty.
A voluminous toy can also be made using dense thread or twine. It’s just important to take into account the fact that creating such a masterpiece will require a large amount of glue. Jewelry made from beads looks quite original. Of course, it will take a lot of time to make such a toy, but it is worth it.
Volumetric paper decoration
To make jewelry you will need the following:
- Colored paper.
- Ribbon.
- Paper glue (preferably quick-drying).
Step by step instructions
Do-it-yourself voluminous Christmas tree toy is done as follows:
- First of all, you need to cut out eight circles from paper. To make the decoration look impressive, it is recommended to use different colors. It is important that the circles are the same size.
- Each piece is folded in half, with the front side on the inside.
- After that, glue must be applied to the wrong side of each half, then the parts are connected to each other.
- And finally, the first and last halves are glued together. Don’t forget to thread a ribbon through the toy, with which it will be attached to the Christmas tree.
A DIY Christmas tree toy created using the method described above can be made not only using colored paper. You can also use clippings from old magazines, old postcards, or even your children’s self-drawn pictures.
New Year's balls made of threads
As mentioned above, Christmas tree decorations can be made from more than just paper. Balls made of thread look quite attractive. And most importantly, their creation does not require special skills or large financial costs.
To make Christmas tree toys from threads with your children’s hands, you will need the following:
- Yarn.
- Bowl.
- Balloons.
- Scissors.
- Fat cream (vaseline).
- PVA glue.
How to make balls of thread - instructions

- First you need to inflate the balloons. Their number depends on how many Christmas tree decorations you plan to make. Please note that you do not need to inflate the balloons to a gigantic size, because the decorations on the Christmas tree should be miniature.
- After the “template” is ready, you should move on to the main stage creative process. To do this, you need to dilute water and PVA glue in a bowl in a ratio of 1:3. Yarn is placed into the resulting mixture (for about 5 minutes).
- While the “base” of the toy is soaking, it is necessary to cover the balls thick cream or Vaseline. This is done so that the thread does not slip off the workpiece.
- The yarn should then be wound around the ball. The distance between the threads must first be large. When wrapping the ball with thread, this distance will be reduced.
- At the end of this process, the thread must be cut and glued to the ball. Now almost finished toy on the Christmas tree, made with your own hands, must dry.
- After a day, the balloon is deflated and then removed from the toy. The Christmas tree decoration is ready. All that remains is to attach the rope.
When making this decoration, you can use multi-colored yarn. The finished craft is also decorated with sparkles, tinsel or beads.
Christmas tree decorations - heart and ball
For such decorations you will need the following tools and materials:
- Scissors.
- Tweezers.
- Glue gun.
- A reel of small plastic beads.
- Small and large plastic garlands.
- Decorated cord.
- Heart and ball made of foam.
This method is perfect for decorating not very catchy Christmas balls made of plastic or updating old ones. In this case, you can use cords and beads of various diameters. For small balls, it is advisable to take a thread of small beads and a thin cord; on large ones you can stick both small and large beads. A Christmas tree toy decorated with your own hands using three threads and cords at the same time looks no less original.
Manufacturing instructions

- Unravel the finished garland into separate threads. Take the cord and use tweezers or small scissors to plunge the end into the foam ball.
- Apply a small amount of glue to the surface of the ball (in the place where the cord is attached) and secure the end of the bead thread.
- Then the ball is gradually covered with glue and at the same time beads and cord are laid on it (row by row) until the entire surface is filled.
- Then you need to cut off all the excess and immerse the end of the cord in foam. Thread the needle, then pass it through the cord to create a hanging loop.
The foam heart is decorated in the same way. Using a glue gun, a string of beads is attached to its edge. The beads are glued to one side, the turns are gradually laid in the direction from the edge to the center.
It is not at all necessary to use beads of the same color and size. When you get close to the center of the heart, cut the thread, then glue small parts of it, cutting off the required number of beads using scissors. After completing one side of the craft, move on to the other. Finally, attach a ribbon or string for hanging.
DIY Christmas tree toy: big balls
To do Christmas balls from plastic bottles, you will need:
- Plastic bottle (it is important that stiffening ribs run around the bottle in rings).
- Old CDs.
- Beads or small balls for decoration.
- Sequins.
- Rain - preferably dense, which does not stretch from tension.
- Glue (it is better to use “Moment”).
- Stationery knife.

How to make Christmas tree balls from plastic bottles
- First you need to thoroughly wash the bottle. As a result, a layer of glue from the label will remain on its surface. It can be easily removed with tape; to do this, stick it to the place where the glue is and then tear it off. Such manipulations should be continued until the glue is completely removed from the plastic.
- Let's proceed directly to making a masterpiece. So, 1 ball - 1 bottle. There are grooves on the side surface, along which you need to cut the bottle using a stationery knife.
- The resulting rings need to be trimmed with scissors so that they are the same in width.
- 4 rings are connected and secured to each other using rain. Do the same on both poles, making a loop on one of them.
- For passionate fans of minimalism, this Christmas tree toy, made with your own hands from plastic bottles, is completely ready. Everyone else can move on to the next step.
- Balls can be decorated in various ways and materials. For example, wrap it in rain, cover it with pieces of a CD or sequins. You can also use plastic beads, rain trimmings, shells, beads and much more as decoration.
DIY Christmas tree toy: large plastic decorations
Almost every home has used plastic bottles, but not everyone knows what kind of bottles can be made from them. beautiful crafts. For example, a flower made from the bottom of a bottle. To make such a toy you will need:
- Superglue.
- Decorations.
- Gouache or acrylic paints.
- Colorless plastic bottle.
- Scissors.
- The cord for fastening is approximately 30-40 cm long.

Manufacturing
A DIY Christmas tree toy for kindergarten made from a plastic bottle is done as follows:
- Using a stationery knife or scissors, carefully cut off the bottom of the plastic bottle.
- The surface of the bottom is covered with acrylic paint. This paint is resistant to any weather conditions, so the toy can later be used for decoration. street tree. If you don’t have acrylic paints, use gouache to create a decoration for home use.
- The bottom can be decorated with rhinestones, beads or painting. Glued along the edge of the cut satin ribbon.
- Using an awl, a hole is made for fastening. A ribbon or cord is pulled through it so that a loop appears on the outside, and the knotted ends remain inside the flower.
- A DIY Christmas tree toy for kindergarten!
If you use two bottoms, you will get a more voluminous toy. The sequence of actions when making such a decoration will remain the same, only at the end the halves are connected by cuts. To do this, you will need superglue or double-sided tape, as well as satin ribbon to mask the connecting seam.
Soft fabric Christmas tree
It is not at all necessary for the Christmas tree to be green and prickly; it can be soft and pink. We will sew a decoration that is suitable not only for the Christmas tree, but also as New Year’s decor for your home.
For this you will need:
- Fabric size 15 x 22 cm.
- Pattern.
- Embroidery threads.
- Decorative tape.
- Polyester filling.
- Pins.
- Embroidery needles.
Step by step instructions

So, soft toy The “Christmas tree” is made with your own hands according to the following scheme:
- Download the pattern or make your own, print and cut out. It is advisable that it be on cardboard.
- Fold the fabric in half. Place the pattern on it, circle it with chalk, then mark the hole through which your Christmas tree toy “Christmas tree” will be stuffed with your own hands.
- Next, without touching the holes, sew the pattern. In order not to spoil the shape of the tree, you need to be especially careful when bending.
- Now cut out the pattern as close to the seam as possible. You need to leave a little more space at the material hole.
- Turn the Christmas tree inside out, shape it and iron it.
- Make six marks on the fabric where the knots should be.
- Fill the decoration with a small amount of polyester (about the size of a chicken egg).
- Then you need to sew up the hole. At the top, fasten the thread and tie it with a knot.
- In order to make knots, in the places marked with dots on the pattern, you need to sew stitches in front, back and back.
- Then you should tie a bow from decorative tape and sew it at the very top with a few stitches.
- Now the educational toy “Christmas tree”, sewn with your own hands, is completely ready.

Funny toys for the Christmas tree
- Once you select the shape you like, cut out a template from thick cardboard. Then select the threads - they should be voluminous and dense.
- A thread is attached to the template, after which we wrap it around our Christmas tree toy with our own hands so as to cover all the cardboard.
- Next you need to sew on a rope for hanging.
- The toy must be thoroughly soaked on both sides with glue.
- Once the glue has dried, you can start decorating. If we plan to make a giraffe, then first we apply brown acrylic paint.
- After the paint has dried, use masking tape to cover the areas not intended for painting.
- Next, apply the second layer acrylic paint.
- After drying, the toy can be decorated with beads or sequins, and details can be outlined (ears, eyes).
- The Christmas tree decoration is ready.
New Year's Eve with toys in which a piece of your own heart has been invested will become the most unforgettable event!
Svetlana Nedilko
Very beautiful balls, you can make them from DIY plastic bottles. With these balls you can decorate an outdoor gazebo, and even rain is not a problem for such balls, they will always be bright and beautiful.
For work we need:
1. Bottoms bottles(12 pcs.).
3. Scissors.
5. Foil or tinsel for decoration.
For one ball, we need to select plastic bottles 12 pieces of one color and volume. Cutting out the bottom bottles that resemble flowers.

We take one bottom for the center, and we will attach the other five to it with fishing line, having first made two holes with an awl. In the first stages of my work, I decided to use a stapler. It worked.

We make the second half of the ball in the same way as the first.

Then we fasten them together with a stapler. And at the end
It is best and most convenient to fasten the petals together with fishing line. To do this, we make two holes in the petals with an awl.

Before decorating our ball, we make a loop for it from fishing line or braid so that it can be hung.
You can put foil in the middle of the ball.
In my work, I used small balls of tinsel for decoration.
So it’s ready, the ball is both light and beautiful.
I hope mine master- the class will be not only interesting for you, but also useful.
I wish you all creative success. Thank you for your attention!
Publications on the topic:
 New Year - the fulfillment of your most cherished desires, both adults and children are waiting for magic! Even the smallest fake can be made together.
 "New Year's Ball" Dear teachers and parents! The long-awaited holiday is coming soon. New Year! Waiting for fairy tales and miracles! To create a festive one.
 Everyone knows how beneficial it is to walk barefoot on the ground and grass. This achieves a foot massage, which is very useful, as it stimulates the flow.
Developing subject matter spatial environment- Part educational environment, represented by a specially organized space (rooms,...
Master class on making a tea set from plastic bottles. Educator: Mansurova Ekaterina Serikovna 1. We will need: one.
 Rooster made from plastic bottles. Master class Good evening, dear colleagues! This summer, during renovations at the preschool educational institution, I, as an additional teacher.
I bring to your attention a master class on making the “Hare”. Material: 1. One five-liter bottle 2. One 1.5 bottle 3. Titan glue.
Hello, dear subscribers!
The magical time has come. When you go to a store, and there is such beauty, everything is dressed up and decorated. The soul rejoices and the eyes rejoice. The most amazing thing in all this is when you meet her, and there are toys hanging on her, and they are so different. Just like in that song, there are balloons and firecrackers.
Now there are a lot of all kinds of products on sale, artificial snow, rain, tinsel - all this gives us a fairy tale and gets us going. And of course it lifts your spirits. But, besides all this, we all eagerly begin to create for the New Year and do it with the children, which we happily hang on the forest beauty.
You can make New Year's toys with your own hands from anything, waste material or improvised means. And if you still don’t know what to make them from, then you did the right thing by looking at me in this article. Now you will be shocked and quickly run to make something.
And the main thing is that all these ideas are so simple and unique that they will charm anyone. All the crafts that you conjure can be given to friends and colleagues, as well as to please your favorite teachers or... anyone. Friends, create together with your children, because they certainly won’t wait for it.
So, choose the job you like and get to work, because there is very little time left, before you know it, bam and the holiday has arrived! Get ready today. Good luck.
It seemed that nothing could be easier than taking something unnecessary and creating some wonder. But in order to accomplish this you need inspiration, so that you have something to start from. To do this, I have collected a lot of ideas for you, so that from all the diversity you can find something that suits your soul.

I want to offer you one interesting option that you will be absolutely delighted with. Let's make toys from plywood. You think it’s impossible to do this, I thought so too, until I saw it step by step instructions. Afterwards I gave my husband a task, and the children enthusiastically glued napkins onto the cut out figures and used the decoupage technique. In addition, you can paint with paints. In general, let's take it in order and you, too, will become wizards))).
First, find suitable layouts for which you will make blanks. And of course, find a sheet of plywood or thin scraps of lumber, they will also be suitable for this purpose.
Such homemade things can be made in any size, and unlike glass souvenirs, they do not break, and there is no need to worry about them.

The plywood sheet should be no more than 4-5 mm thick, without knots and without any kind of veneer defects. You should use a jigsaw and an electric drill. Perhaps a hand drill, PVA glue and a heat gun may come in handy.

It is preferable to use acrylic paints and you will also need an aerosol varnish. To make the figures shine and sparkle, decorate them with sparkles, tinsel or artificial snow.
On a sheet of plywood, draw all the blanks you have chosen; you can also draw any decor yourself.

Then carefully and slowly cut them out with an electric jigsaw.
Advice! When cutting, guide the file along the outer line (contour) of the depicted templates.
Then you need to make a hole into which you will insert a thread or satin ribbon.


The first layer of paint should be exclusively white; after it dries, apply any other colors and decorate the craft.

And finally, another option that is amazing is decoupage. You can decorate the cut out figures with regular paper or cloth napkins, can you imagine?

For this purpose, take PVA glue and dilute it with water in a ratio of 1 to 1. Cut out the plot you need and glue it to a piece of wood.

Don’t forget to add brightness to this miracle after drying.


Or from paper strips, fold them like an accordion, and then glue them together like this:


Among other things, you are the same as last time, when we created New Year symbols from threads, remember? You can take the idea as a basis and glue it to the balloon in the same way using silicate glue or PVA thread. And after drying, pierce the ball and you will get a light New Year's souvenir.

In the same way, you can make a big snowman and put him under the Christmas tree.


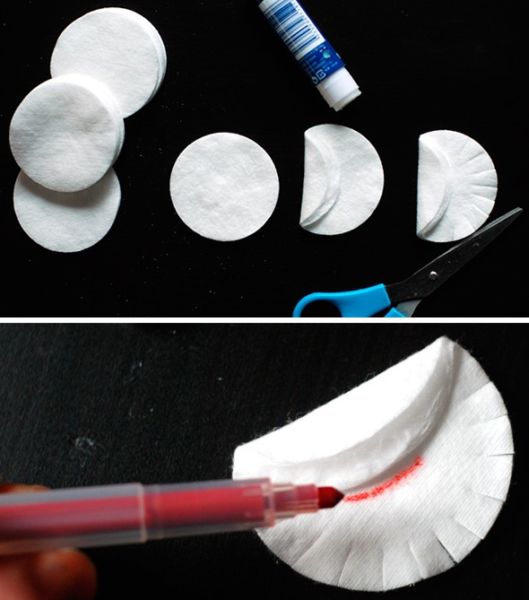
The next job is wow, interesting. It will especially appeal to kids who can’t wait for their moms and dads to want to build everything together, a snowman from cotton pads. Well, did it really turn out lovely?

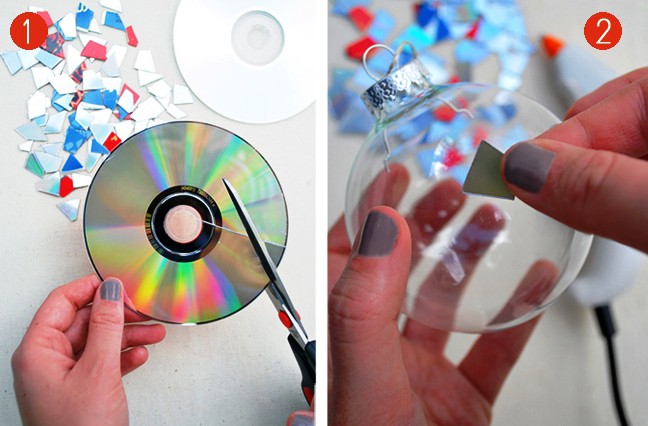
If you have an old CD lying around, then an ordinary plastic ball will shine from it. How to do this? Yes, from disk fragments, and insert a shiny cloth inside.


In addition, you can decorate ordinary glass or transparent balls in completely different ways. For example, by pushing a photo or your family photo into it.


Another work that is made of tinsel or confetti will make an impression.


Another option is to take a foam sphere and glue or stick sequins onto it.

The next work will be bright and green, this is a charming Christmas tree, which will not be difficult to complete, the trunk will be made from an ice cream stick or take wooden skewers. Follow this masterclass:


Such a forest beauty can become a great gift or decorating any interior in a room or hall.
And here is another craft, which is also in the form, but it is made from cinnamon sticks and artificial tinsel. Instead of decorations, multi-colored buttons are perfect.
We will need:
- tinsel
- glue gun
- buttons
- cinnamon sticks
- rope
Stages:
Cut three strips from tinsel different lengths and attach them to the stick.
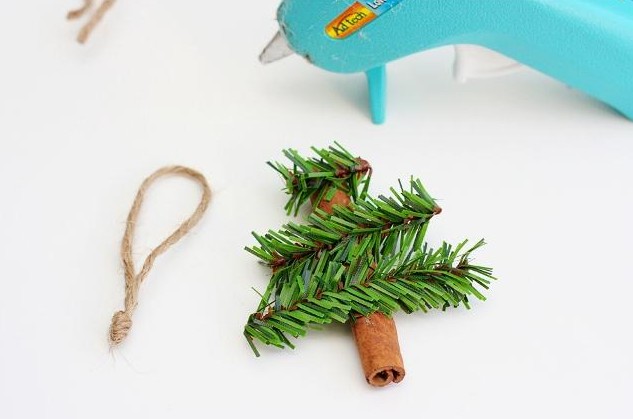
Make a loop out of the string and glue it and the tinsel to the cinnamon stick. And then arrange the buttons in a chaotic order.

Some small masterpieces in the form of houses or snowflakes are also created from ice cream sticks.

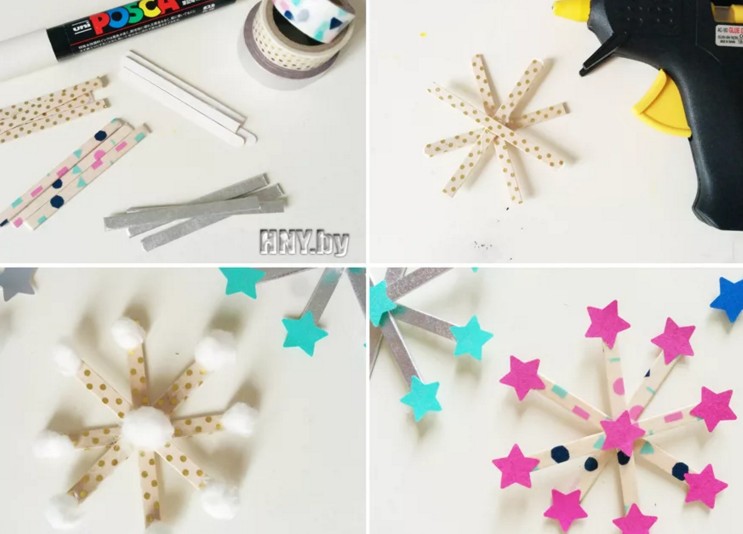


And also from tubes:

Or from wooden clothespins, most importantly decorate with sparkles.

You can find a lot of interesting things, even pasta souvenirs. It was necessary to think of such a thing, crazy hands do not know boredom).

The kids will love another craft option: take a pine cone and turn it into an animal.

Shape the head and ears, and all other parts of the body. You will get the face of a bunny.

Now glue it onto the pine cone.

This is the kind of animal you will get))).

Using the same scheme, you can also make a hedgehog or a squirrel.


Or decorate the cones with soft balls and glue them using a heat gun.

A very unexpected option made from nuts, but look what wonderful animals the author created. Such beauty will also decorate any holiday tree.

Using the classics, you can easily decorate an ordinary pear-shaped light bulb with acrylic paints.

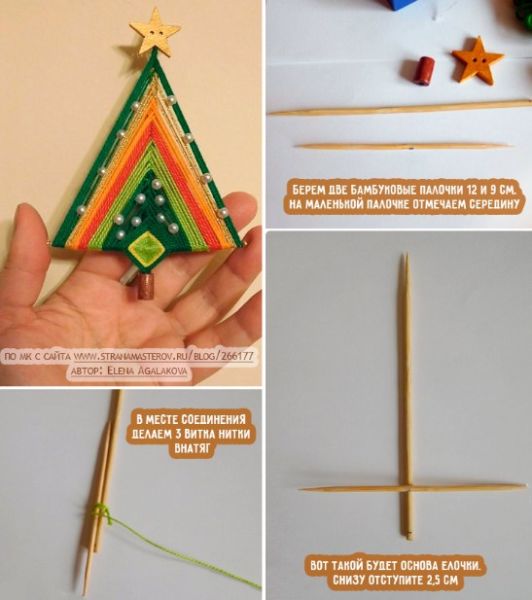
A cool option is to make a Christmas tree-mandala out of threads; you wouldn’t even be ashamed to give one like that. Such a creation looks quite impressive, no one will refuse such work.


From scraps of fabric, create a magnificent souvenir that will please anyone, such as mom or grandpa.


It’s also not difficult to make all kinds of creations from ordinary fabric:


A rather original craft is a beaded Christmas tree, which is made in the form of a spiral using wire.


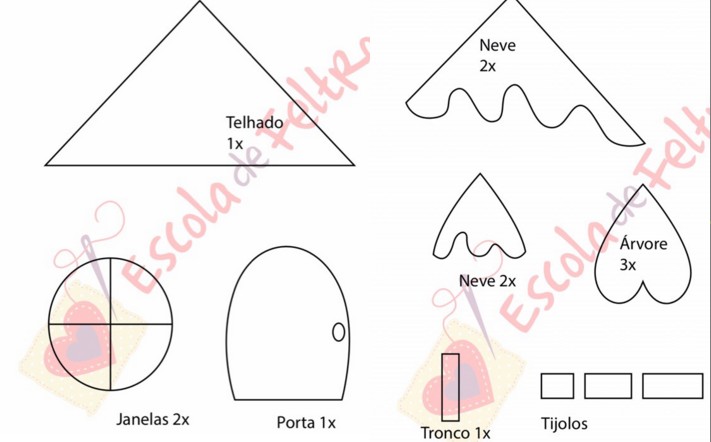
New Year's toys for the Christmas tree 2020 made of felt (patterns and templates inside)
I think that many came to this article to find exactly the right ones felt toys, and take the necessary stencils from the site and go to cut and sew. Among other things, I have one wonderful post on my blog that contains many other schemes and developments, so don’t be shy, go ahead and choose.
I propose to consider a Christmas star, which is made of ordinary white fabric, and the cap is made of felt.

First, take a blank, print it out and apply the outline to the fabric.


Then fill the toy with cotton wool or padding polyester. And then the fun begins, color the star with instant coffee, brew this drink in a glass, and then decorate it.

Sew the cap to the star. Glue the eyes and embroider the nose and mouth with thread.


Now take the following sample as a basis. Who does he remind you of? Yeah, of course a snowman.


It would also be an excellent solution if you cut and sew such a house. Catch his sketches.


Very beautiful toys I also found them in a blue shade, and they were decorated with snowflakes and beads. Great, I thought, and decided to show them to you. Make a printout of the Christmas tree, star and circle.

Cut out the necessary parts from felt.

Then attach the snowflake and bead like this, as shown in this photo.

Carefully glue or sew on the decor, and do the same with the beads.


Another job, take note.


And here are a couple more ideas, I really liked the cedar cones and the boot that Americans give on this holiday, January 31st.


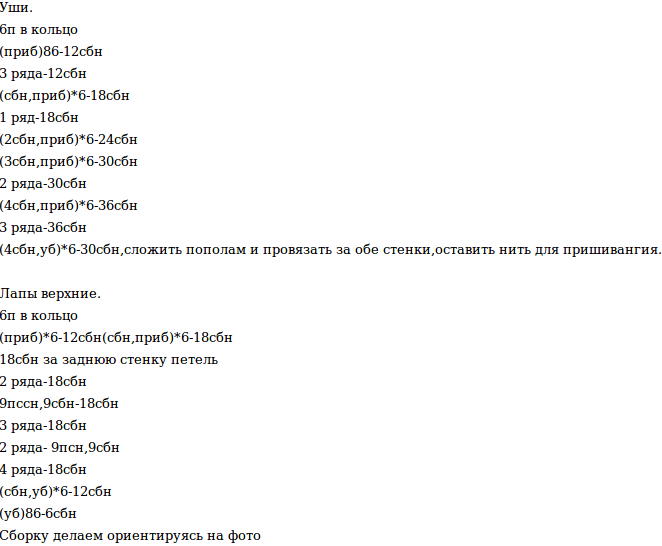
Master classes on stylish crochet toys for the New Year
Well, let's move on. And be sure to first of all knit the symbol of the New Year, which must be present in every home. Choose a scheme and go ahead. In fact, I have a separate topic on my blog in which it is collected, so if you are interested, come visit.


A cute pig that any boy or girl will have if you suddenly decide to knit such a miracle.


These are such funny little pigs or pigs.


Take this video as a basis, it shows everything from A to Z and you will also get the same souvenir:
And if you want to knit New Year's balls, then here's another story for you.
Now another pattern, take it as a basis, because everyone also likes a knitted Christmas tree, no one doubts it.


It will turn out very cool and attractive.

Or like this simple work from a lace that is knitted from posts.

The next work is a bell.

I liked the idea of a snowflake, look how painted it is.

It turns out that even such a winter masterpiece as a Christmas tree is knitted from threads. Cool.


Funny and perky snowmen. Do you want the same? Voila, they are already yours).

Where would we be without Santa Claus, tie him up too.

And a few more diagrams and descriptions.


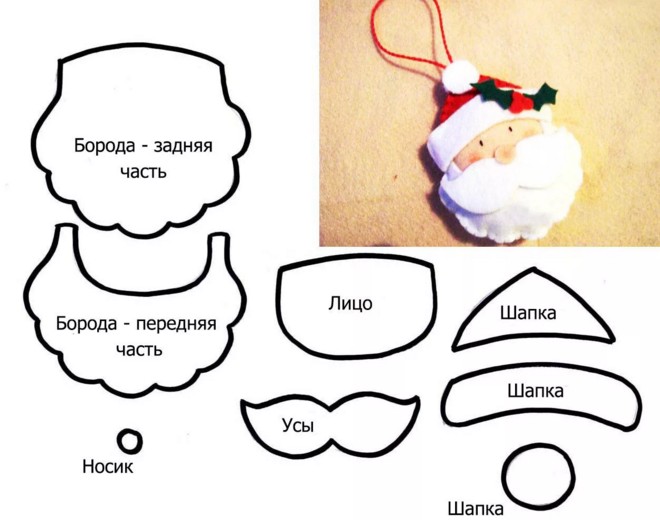
Making Santa Claus with your own hands: 8 best ideas
You can make a grandfather out of different materials, for example, from ordinary cotton pads and ordinary red yarn. You will also need another disposable spoon. Step by step pictures They will help you figure everything out.


The spoon will need to be glued between cotton pads.


Now we make Frost out of paper, or perhaps he will remind you of Santa.


It’s also easy to make a figurine of your favorite character from a regular cone.

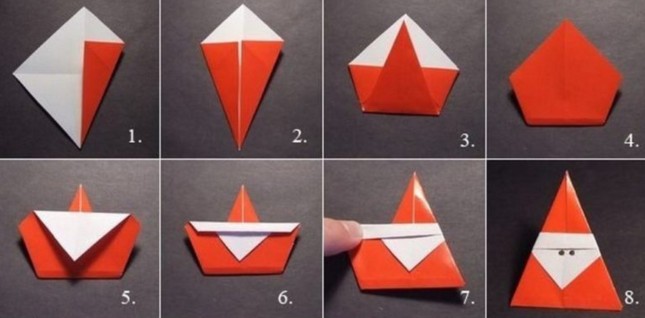
You can make a craft using the origami technique.


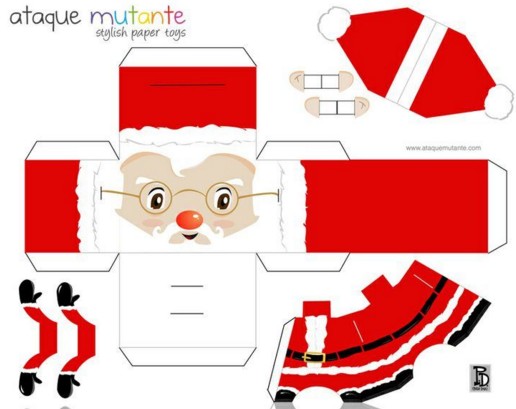
In addition, there are already ready-made stencils using which you can easily glue such a craft together.

Step-by-step instructions on how to make Christmas tree decorations from cotton wool
I recently came across a video that amazed me. I didn't even imagine that this was possible. It turns out that I’m sharing them with you. Create such wonderful souvenirs and decorate the forest beauty with them.
Souvenirs from plastic bottles
What a beauty, I took a soda bottle, spotted the idea right there and now the craft is almost ready. Take into account all your ideas and choose the one that suits you or the one that is easier to do. Involve your children in this activity. Well, let's see.


Craft Christmas tree made from salt dough
Now let's look at another popular option. After all, many needlewomen love to make handmade using regular dough. And you can see what comes out of it right now:
We will need:
- Flour – 3 tbsp. l
- Water – 10 ml
- Dough cutter - herringbone
- Gouache
- Thin brush
- Table salt – 6 tbsp. l

Stages:
Mix all the ingredients according to the list, you should get an elastic dough.

Let the bun lie for 5-10 minutes and rest.
Then roll out the cake and use a Christmas tree mold to squeeze out the shape.
Roll out the dough to a thickness of no more than 5 mm.
This is how the preparation will turn out.
Let it dry for about 24 hours. And then take gouache and paint.
Volumetric star on the top of the Christmas tree
Well, how can a Christmas tree be without a tip; usually it has a five-pointed star or a spire. Let's learn how to make a star yourself so you don't have to run to the store and buy it. How do you like this idea?
All you need is flexible wire and beads, see the master class:

There is another option, it is paper. Although the star looks gorgeous. And the whole point is that scrap paper is used, but it will also shine from ordinary colored paper.

Prepare everything you need for work. These are sheets, glue, scissors and a pencil.

Fold the square in half, and then in half again.

Then fold the leaf diagonally.

With all the folding you get this, shown in the figure:

Now turn the piece over to the reverse side, inside out, and make the cuts. Use a ruler to measure and mark a dot. This is done like this, in the photo you can see that there are 4 squares, and those sides that are located towards the center of the sheet, measure them and divide them in half. Cut it.

Connect each cut to a line to create a triangle on each side.

Apply glue to one side of each triangle.

And attach the opposite one and glue it together.

Thus, you must complete two blanks. It is from them that the star is assembled.

And then glue them together.

Here’s another idea that will attract children’s attention: a craft made from threads that are well moistened with glue.


Don't forget to let the toy lie down and dry completely. Enjoy the holiday you created!

The simplest star, like this one with decorative little things in the form of buttons.


Or something like this nice option, which is made of cardboard, and then rewound with threads and decorated with felt leaves and berries.

A wonderful one is coming winter holiday— New Year 2019. It’s time to decorate your house for his arrival, so that Santa Claus on his magic sleigh does not pass by and leaves good gifts under our tree. It is very interesting to decorate the Christmas tree and rooms with homemade toys for the holiday. The process of making them is fascinating, as is any creativity. Such crafts can be made from the most simple materials, for example, from plastic bottles. From ordinary plastic bottles you can make a lot of interesting and beautiful things that can successfully replace store-bought analogues. Our story today is dedicated to the 7 best and original crafts from plastic bottles for the New Year 2019, which will be held under the sign of the Yellow Earth Pig. Let's look at them in detail in our article.
Christmas tree
Unusual Christmas tree can be made from simple plastic bottles. It is important to collect necessary materials for this craft and follow the master class step by step.
To do this you will need:
- Plastic bottles;
- Scotch;
- Sandpaper (cardboard);
- Scissors.
Work progress:
- The bottom and neck of the bottle should be removed, and then you will get a straight pipe. Then you should prepare blanks from twigs. They must be different sizes so that the Christmas tree turns out to be cone-shaped.
- Then the plastic bottles need to be cut lengthwise into 3 parts so that subsequent tiers are smaller than the previous ones. You need to make needles on each workpiece, and to do this they are cut into thin strips, but not completely. To make the Christmas tree stand stable, it is advisable to use the bottom of one of the bottles as a stand.
- A sheet of cardboard needs to be rolled into a tube and placed in the neck of the bottle. You can secure it with tape. Now each tier of branches needs to be secured to the tree. You can install a toy on the top or come up with something else. To make the Christmas tree fluffy, the needles should be cut thinner. Usually blue or transparent bottles are used for this. That's all, our craft is ready!
Christmas balls
You can decorate your Christmas tree with handmade toys. In your work, it is important to follow all the steps step by step, and then you will get wonderful products.
To do this you will need:
- Plastic bottle;
- Glue;
- Rain;
- Any shiny jewelry.

Work progress:
- The paper needs to be wrapped around the bottle: this will help mark the workpieces on it. It is necessary to cut out 4 rings 1 cm wide. Then the rings must be fastened together using the “crosswise” principle and secured with glue. The result should be a ball of plastic strips. You need to choose beautiful threads or rain so that the toy can be used for the Christmas tree.
- To decorate the resulting blanks, it is better to use foil, beads, seed beads, etc. You can place a small ball inside such a ball. You can use as much imagination as you like with this craft. This will be a very interesting activity for children.
Snowflakes from plastic bottles

To expand the range of crafts made from plastic bottles for the New Year 2019, you can also make snowflakes from the bottoms of bottles as a Christmas tree decoration. This process will also be possible for beginners in this creative endeavor.
To work you will need:
- Scissors;
- Acrylic paints of white, blue, gold, silver - to choose from;
- Plastic bottles, preferably blue;
- Paint brush;
- Wire;
- Pliers.
Work progress:
- We take plastic bottles and, using a utility knife or scissors, cut the bottom as low as possible to the base, leaving only the corrugated part.
- After the bottoms are ready, we begin painting our future snowflakes. Depending on the desired design, select the thickness of the brush, and then start painting. As drawings, you can use various ornaments that come to your mind. This also applies to the choice of paint color with which you will decorate your New Year's product.
- Once your snowflake has turned into a beautifully painted masterpiece, give it time to dry while you use wire and pliers to make a small eyelet for the thread. Attach it to the snowflake and thread the thread into this ring.
Well, our New Year's toy for Christmas tree decoration is ready, which you now have the right to be proud of. A DIY snowflake can serve as a worthy decoration not only for your home, but also kindergarten if you have small child, and also act as an exhibit at an exhibition at the school of New Year's products.
Penguins made from plastic bottles

Original New Year's decoration Your home for the New Year 2019 may include penguins made from plastic bottles, which should be placed in the rooms and under the tree as decoration. This craft will delight all your family and guests, and especially children. Without spending a lot of time, you will create with your own hands a real masterpiece of art that will cause a lot of positive emotions and sincere smiles in your household.
To work you will need:
- Plastic bottles (one toy takes two bottles);
- Scissors;
- Acrylic paints - white, black, red and others;
- Brushes;
- Small colored scraps for a scarf;
- Buboes or bows for hats;
- Glue.
Work progress:
- We take the bottle and cut off the top part almost completely or half to get the body of a penguin. The head is made from another bottle and also from the lower part, but the workpiece should be slightly smaller.
- We connect both blanks by inserting the upper part, which is smaller, into the lower part, which is larger.
- After you have built the penguin's body, start painting it. Take acrylic paints and apply carefully to plastic product, imitating the color of a penguin, as shown in the photo. Use more bright colors, because the brighter your New Year's penguin turns out, the warmer and more cheerful the smiles of your family will be.
- When your penguin takes on a realistic look, you can tie a small scarf around its neck and attach a bubo or bow to its cap using glue.
What a cartoonish miracle you have created!
Video tutorial on making penguins from plastic bottles
Golden bells

Golden bells will look original on the New Year tree. This work is done very quickly and is suitable for kindergarten.
To do this you will need:
- Plastic bottles;
- Acrylic paint; if desired, instead of acrylic paint, you can use fabrics, ribbons and accessories.
Work progress:
- For work, you should take 0.5 liter bottles, but more is possible if the tree is very large. The bottom of the bottle should be cut off. To make bell petals, you need to cut the edge of the bottle in a zigzag shape. Because the resulting edges will be sharp, care must be taken.
- The petals of our craft need to be made pointed, and you can use a knife to give them shape. To make holes for the rope, you need to heat the knitting needle and make holes. You can do this work with scissors, but be very careful. At the end of the work, the bells should be painted, and they will dry within an hour. To give the products a New Year's look, they need to be decorated with tinsel, garlands or sparkles. The instructions are simple, and you can do the work in your own sequence.
Candlesticks made from plastic bottles

To do this you will need:
- Plastic bottles;
- Scissors;
- Glue gun;
- Universal glue.
Work progress:
- You can make a wonderful candlestick for the holiday with your own hands. You can use bottles different colors. The containers need to be cut in half. The edges of the part that remains with the bottom should be cut into strips, not reaching 4 cm. The strips can be of different widths. The resulting container will be a candle stand.
- Strips of plastic should be melted over a candle. Then use a glue gun to attach the candle to the foil. The space around the candle can be decorated with beads or stones. This way the candlestick will have little weight, and our craft is ready.
Video master class on making candlesticks
Cone
You can make original cones with your own hands; this craft from a plastic bottle will perfectly decorate your Christmas tree and home for the New Year 2019.
To do this you will need:
- Plastic bottles;
- Scissors;

Work progress:
- You need to create squares from a plastic bottle, after which their corners should be rounded. The result will be products like chamomile. After this, you need to treat the edges of the petals with a candle so that they fall down.
- All parts must be strung on a thread in descending order. A bead must be inserted between them. Then you need to make a spruce branch and secure it to the pine cone. The product is ready to create a festive atmosphere.
In this article we will tell you how to do Christmas decorations with your own hands on a street Christmas tree using available items. It is quite possible to turn everything ordinary into something beautiful and magical.  Decorations for the New Year's beauty are made from all sorts of things: foam plastic, cardboard, pine cones, pieces of wood and even bottles with light bulbs are used. And each craft is unique in its own way. Look at the photo. These balls are handmade from polystyrene foam.
It's important to know one thing important detail. The weather is not always good on New Year's Eve; it rains often. Therefore, your crafts should not have anything that washes off or gets wet. When the Christmas tree is in the house, use whatever you want there.
Foam crafts
 The material is easy to process and in itself. It will not split, break or hit anyone if it suddenly falls off the branch. You can make Christmas tree decorations from polystyrene foam with your own hands in any form and in different ways.
Getting ready for work
We will need materials and tools:
- foam;
- soldering iron;
- paints;
- glitter;
- needle and thread;
- glue;
- sandpaper.
Don't forget that you are making decorations for an outdoor Christmas tree, so the glue and paints must be resistant to water and frost.
We will use a knife to process the foam blank. The knife should have a thin, sharp blade because the processing should not be too rough. The same goes for sandpaper, choose “zero”. Sandpaper will be needed for final processing: we will use it to remove irregularities (burrs, extra bumps). Using paints, we will color our craft, and then lightly cover it with glitter. We will make a hole with a needle and thread it to make a loop.
Choose strong threads, as a strong wind can easily tear off the decoration!
With a soldering iron, if desired, you can apply indentations in the form of patterns. You will need glue if you want to attach, for example, beautiful bow from tape. 
Follow safety precautions when working with a soldering iron! When processing polystyrene foam with this device, toxic smoke will be released that can cause cancer. Keep this in mind and work in a well ventilated area. It is advisable to use a mask or respirator to protect your respiratory system.
Making beautiful balls
It is best to make your own Christmas tree decorations from foam balls. They are very often found in handicraft stores. This option is proposed because you can’t make a ball out of ordinary foam wrappers. We need balls large size, since we will hang them on a street tree. How more tree, the bigger and brighter the toy!
 So, take a clean foam ball and prepare a flat foam stand. We paint it any color with permanent indelible paint. To avoid getting your hands dirty or smudging paint from the ball with your fingers, use two toothpicks and stick them into the ball, as shown in the photo. You can paint with a brush or spray can. We stick the toothpicks with the ball into the stand and wait for it to dry.
After the ball has dried, you can apply patterns with another paint or glue something beautiful to it. You can apply patterns with the tip of a soldering iron, for example, in the form of snakes. Now let your imagination run wild. Then take a needle and thread in the eye and pierce the part of the ball that you consider to be the top.  The picture shows exactly how to pierce the toy.
Many people use arcs from paper clips as a suspension, simply sticking them into the ball, and then tying a thread. In our case, this option will not work: a strong wind will easily tear the ball away from the suspension. The simpler the design, the more reliable it is!
We tie both ends of the thread into a knot and hide the knot itself. The finished craft will look like a store-bought one plastic ball for the Christmas tree.
Foam figures
 Christmas tree decorations made of polystyrene foam can also be made flat, in the form of various figures. You will need foam boards. First, use a pen or felt-tip pen to make a drawing on the foam. Then we carefully begin to cut. You need to sand rough surfaces with sandpaper, otherwise the craft will not look so beautiful.
 For example, we want to do beautiful snowflake. We draw it on the foam, then start cutting out the internal places.
Always start by cutting out the inside areas. This is much more convenient, and the risk of the toy breaking is significantly reduced.
Now let's start cutting out the snowflake itself from the foam sheet. It will look beautiful even without painting. It is better, of course, to paint it silver, gold or metallic blue. The hole must be made from the upper ends so that the snowflake on the tree is turned with its front part towards the viewer. If you pierce it directly on the plane, then the snowflake in a suspended state will turn edge-on towards us.
 Don't limit yourself to flat figures. cut out volumetric crafts in the form of bells, birds, Christmas trees and so on.
  By the way, such Christmas tree decorations can be made from foam balls. For example, a snowman.
  You will need balls of different sizes. One is big, the other is smaller, and the third is even smaller. Carefully glue them together with strong glue. There is no need to paint such a craft, because the snowman should already be white. Using permanent markers, draw his mouth, eyes, nose and buttons. You can sew him a small hat.
Amazing snowflake - video
From plastic bottles
 There are a lot of options, both simple and complex. Plastic Christmas tree decorations are perfect for a street New Year's beauty. They also do not get wet, are lightweight and easy to manufacture.
Only large bottles, 1.5 or 2 liters, are suitable. Toys made from small bottles will be difficult to see on a street Christmas tree.
 Let's make our own Christmas tree toy from a plastic bottle, which will serve as a bird feeder. We will need supplies:
- 2 liter plastic bottle;
- scissors and awl;
- paints;
- strong nylon thread;
- tinsel, ribbons, etc.
In this option, a large bottle is suitable so that the birds have room to feed in it.
We take a bottle and begin to paint it in any color bright color, along with the lid. Spray painting will not take much time. We are waiting for the paint to dry. We decorate the bottle with ribbons, for example, knit a bow and secure it with glue. You can also use stickers. Then we cut out a small round window (8 cm in diameter) in the wall of the bottle so that it is as close to the bottom as possible. The photo shows interesting options for feeder bottles, where the upper parts are made in the form of a roof.
First you need to paint the bottle, wait for it to dry, and only then cut out a window for the bird. The paint should not get into the area where the food will be placed. An animal may accidentally swallow a piece of dry paint and become poisoned.
 Now unscrew the plug and punch a small hole in it. Take a thread and make a loop. It is better to make the knot large (tie several times). We insert the end of the loop so that the knot rests on the bottom of the lid. A simple and useful feeding toy is ready. We hang it on the Christmas tree, sprinkle it with food and admire the birds.
Flashlight bottle and delicate bells
 A very simple option, familiar to everyone since childhood. Such Christmas decorations made from plastic bottles are also easy to make and process. We will need everything the same as for the feeder. Only now we will cut vertical stripes on the walls.
A sharp thin knife or scalpel is perfect for this procedure. It is better not to use a razor blade, as it can easily hurt you.
 We cut the strips, the gap between them should be approximately 5 mm. The length of each strip is 15-20 cm, depending on the size of the bottle. Now we need to squeeze the bottle so that all the stripes bend in different directions. Let's start painting and decorating. You can put something bright and shiny in the inner cavity of our flashlight.
A plastic bottle and disposable teaspoons will make a wonderful Santa Claus. 
A white bottle will make a unique snowflake. 
Green bottles will become the basis for the Christmas wreath. 
A little patience and a lot of bottles will turn into a big snowman after a while. 
DIY disco ball for a street Christmas tree - video