
Useful DIY toys. DIY educational toys made from waste material
It’s easy to create original toys from socks and leftover fabric. See how to sew a pillow toy, Basik the cat, and make a development board.
Original DIY toys made from socks

Delight your children by making these dolls for them. To do this you will need a little, namely:
- socks;
- threads with a needle;
- scraps of light plain yarn;
- filler;
- narrow braid;
- dark colored beads;
- scissors.
Even those who do not know how to use a sewing machine can make such original toys. Only possession of a needle will be useful.
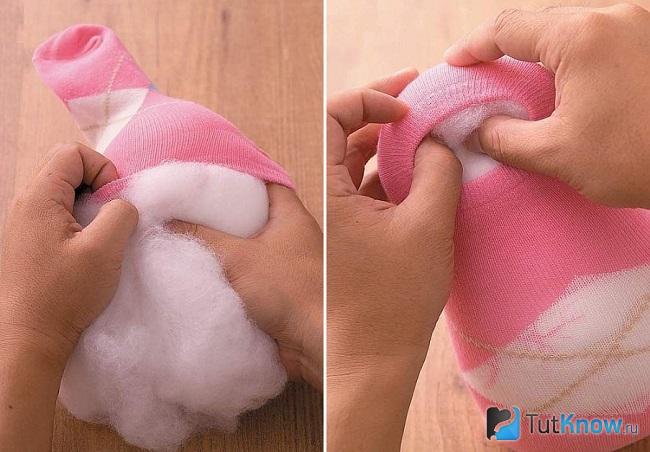
- Cut the sock in half. One part is the foot. The second is the heel with an elastic band. You only need the first one. Fill it with filler, but not very tightly. Sew with a needle on the right and left to mark the sides. You also need to make legs by stitching at the bottom in the middle. Sew up the top hole through which the body for the baby doll was stuffed.
- Cut a small circle out of light fabric, gather it on a thread, tighten it a little, and stuff it with filler. Then you need to tighten the thread more tightly and secure it. Do not cut yet, but sew the resulting head to the body using the same thread.
- Sew beads instead of eyes. You can apply blush on your cheeks to make them brighter. Tie the junction of the head with the body with braid.
- Take the second part of the sock, cut off the heel, it will not be needed. You only need the top part - with an elastic band. Fold it in at the cut and sew along the edge on the arms. Put the cap on the doll’s head, sew it at the top so that you get a “tail” at the end.

To make such an adorable cat, you will need:
- 2 socks;
- threads;
- needle;
- scissors;
- padding polyester;
- Marker is better water soluble.
Sew the hole in a straight line to create two ears.

Using a marker, draw the facial features of the original toy.
If the marker is too bright or not water-soluble, then it is better to use a simple pencil.
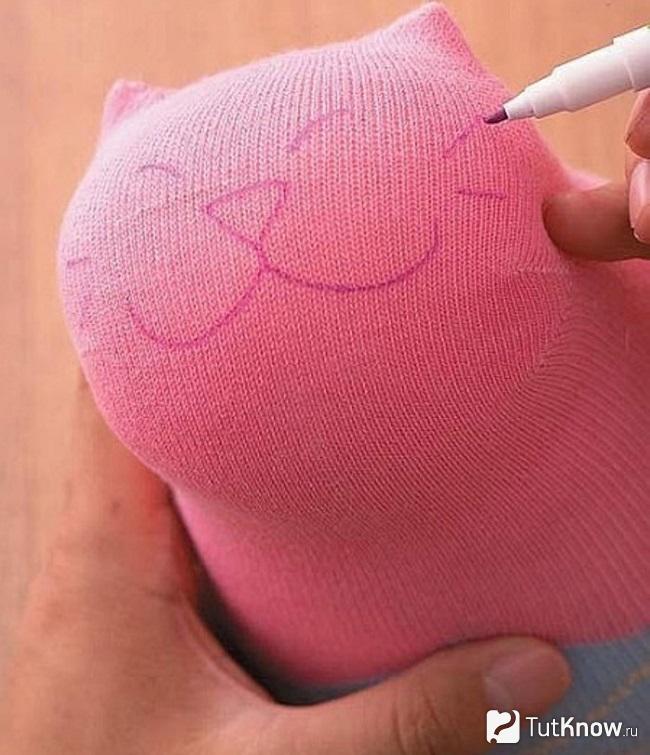
Now you need to embroider according to these marks, taking a thread of the appropriate color.

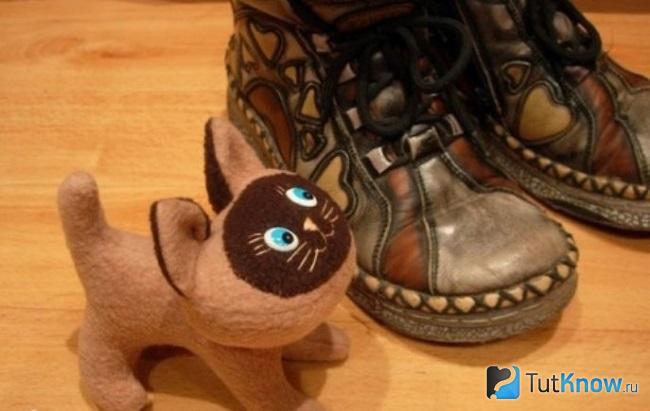
In order for such original cat toys to acquire front paws, you need to make them from a second sock. To do this, first cut it in half crosswise, and then as in the photo.

Now these paws need to be sewn up, stuffed with padding polyester, and sewn to the body of the toy.

This is such a wonderful animal. If you like him, sew him a friend.
DIY soft toy cat

This character is very similar to the cartoon character. The pattern clearly shows how such a soft cat toy is made. It will require:
- soft dense fabric of beige and dark brown color;
- filler;
- threads;
- eyes for toys.
- Cut out two parts of the abdomen and stitch them in the center. Two side pieces need to be sewn on the back. You have 2 parts. Sew them together in the area of the paws, tail, and sides.
- Using the appropriate parts, create the kitten's head. Cut out his muzzle from a dark cloth and sew it onto the character’s face. Fill your head with filler through the bottom. Place it around the kitten's neck and sew it with a hidden seam on the arms.
- Each ear consists of two parts - brown and beige fabric. These triangles are sewn in pairs and turned inside out through the as yet unsewn bottom. Then the ears need to be sewn to the head, making a fold on them.
- All that remains is to sew on the eyes, embroider mustaches, eyelashes, mouth and nose with light threads, and the soft toy, which is so interesting to create with your own hands, is ready.
How to sew an original pillow toy?
Kids love these items very much. They first play with these soft toys, then when they get tired, they use them as cozy pillows.

Before sewing a pillow toy, prepare:
- fabric that is pleasant to the touch;
- filler;
- scissors;
- pink fabric for decoration.
- 2 pcs. for the head;
- 4 - for the ear;
- 2 - for the body;
- 2 - for 2 tails;
- 2 - for ear pad.
Stuff the body and tail with stuffing. Sew the tail to the body, where the markings are. Stitch the head, after filling it with a small amount of filler. Attach the pad to the ear with pins, stitch it, tucking the edges. Design the second ear in the same way.
From pink fabric, cut out a nose, a heart, and decorations for the tail. Sew them on too. It turned out to be a wonderful product. If you want to know how to sew a pillow toy so that it looks like a funny teddy bear, then watch another master class.

For this you will need:
- beige and white fabric;
- a piece of black leather;
- filler;
- threads;
- needle;
- scissors.

As you can see, they are oval, straight on the underside. Sew the pieces in pairs. Sew a light face and a black nose onto the front of the bear. To make it, cut a small circle out of leather, gather it on a thread, and stuff it with filler. Sew toys onto your face.

Now fold the front and back right sides together, placing the sewn tabs between them. Sew along the edge, leaving a gap. Turn the workpiece out through it. Fill it with filler and sew up the hole.
You can make such original toys from leftover fabric. If there is a solid color, you will get the muzzle of a dog and a cat, and if you have a colored one, you will get their bodies.

The following pattern will help you sew a toy pillow in the shape of an owl. It is created from the main fabric, and from colored fabric - a beautiful bird skirt.

If you want your child to like the toy even more, then sew small owls too. Sew a wide strip of fabric onto the owl's belly and stitch it vertically to create pockets. Place the owlets in them. To keep them well, cover them with the wings of the mother bird. Button them up.

Pompom toys
They turn out warm and cozy.
To make them you will need:
- cardboard;
- pencil;
- round templates with a diameter of 2.5–7 cm;
- multi-colored yarn;
- sharp scissors;
- felt;
- glue gun

Using the lids, draw circles. Place coins of a smaller diameter in the center and outline them. Cut out the resulting cardboard rings. Make a cutout on the side of each.

Combine two pieces of cardboard of the same size. Wind the yarn tightly around them. Separate the cardboard. Cutting the yarn in the center, insert the thread in the middle, tighten it, and tie it.

For each animal you need to make two pompoms of different sizes. The smaller one will become the head, the larger one will become the body.

Connect these elements by tying them with threads. Cut out ears, eyes, nose for a charming animal, attach them with a glue gun.

The sheep is made from white threads, the eyes are cut out from black fabric, the nose from pink, the ears from white.

Create a chicken using yellow pompoms.

These are the original toys you can make with your own hands.

If you have kids at home, make useful things for them from leftover materials.
Original DIY educational toys

Soft books are an indispensable thing for a baby. It is interesting to make such developmental aids with your own hands, thereby saving a lot of money. To make such educational toys, you will need:
- textile;
- threads;
- scissors;
- sheet filler;
- finishing elements.
If you don't have a sewing machine, hand stitch each sheet using a basting stitch, using long stitches.
Do the same for the rest of the pages. Everyone should teach their child something. You can sew a sneaker onto one and attach a lace to it so that the child can practice tying it.
Let the girl learn how to braid her hair. To do this, sew three ribbons onto the top of the page.
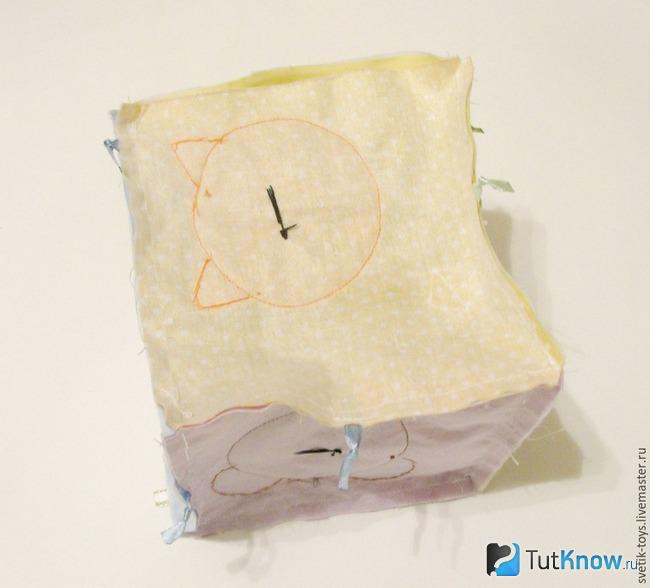
It is useful for a child to become familiar with watches. Cut a circle out of light thick fabric and sew numbers to it. Cut out the clock hands from dark canvas. Secure them in the center of the dial.
To help your child learn geometry from an early age, cut out various shapes from scraps and sew them onto a book. The same pairs need to be created from fabric and Velcro attached to them. The baby will look for paired figures and compare them.
You don’t have to sew the book, but attach it to a thick drape geometric shapes, let the child find pairs for them.

If you have cardboard boxes, use them to make a whole car complex for the boy, which will include:
- washing;
- gas station;
- garage;
- riser.

Cars can be made from the same material. You will make them from wood and plywood.

DIY educational board

You won't get bored with this toy! After all, there are so many interesting things here, you can scroll through the telephone dial, learn how to lock and open a real lock. Now you don’t need to click the door chain or the latch, since it will all be on the board. An abacus will help your child learn to count, and scales will help your child learn to weigh objects.
To make such “smart” original toys with your own hands, you will need:
- door lock, latch, chain, handle;
- abacus;
- scales;
- switch;
- buttons;
- textile;
- elastic bands;
- switch;
- glue gun;
- colored cardboard;
- self-tapping screws;
- MDF sheet;
- sneakers, etc.
- Lay out the items on the prepared board. See how to position the lock so that it closes well. The same applies to the latch and door chain.
- Screw one half of the lock to one plank with self-tapping screws, and the other and the door handle to the second. In the same way, attach these boards to the MDF.
- To keep the abacus in working condition, you can rattle it with “knuckles”; attach only the frame to the board.
- Glue scales, key holder, and other items using hot gun silicone rods. Cut out the base of the phone from cardboard, glue it to the board, and secure the dial in the center.
- Cut out a small dress from fabric, sew buttons and elastic into it in the form of loops. Let your child learn to unbutton and button clothes.
You can use various items that you have at home to decorate your development board.
Original toy - cat Basik
This toy is loved by both children and adults. The cute cat is made from a material that is pleasant to the touch.

If you want to quickly create such an original toy, then use a simple pattern.

At the bottom of the back and tummy you need to make an undercut, then these parts will become more voluminous.
On the Basik pattern, the undercut locations are indicated by triangles. You just need to match the opposite sides of each shape and stitch on the wrong side.
- The muzzle consists of two identical parts, cut in a mirror image. They need to be connected by stitching in the center.
- For each paw you need to cut out 2 pieces. In total, you will need 4 parts for the hind legs and the same number for the front legs.
- Sew the paired pieces on the wrong side, leaving the top unsewn. Turn the paws inside out and fill them with filler. Sew the muzzle to the tummy.
- Here's how to sew Basik further. To assemble this original toy, place the front part on the back part, insert the front and back legs between them, placing them in place. Turn the toy inside out through the hole left at the bottom.
- Stuff the animal with a small amount of stuffing and sew up the hole in the arms.

Here are the paws and toes. Don't forget to sew a tail on the toy. It is given on the pattern.

Sew a fish from a piece of colored fabric and place it in Basik’s paws.
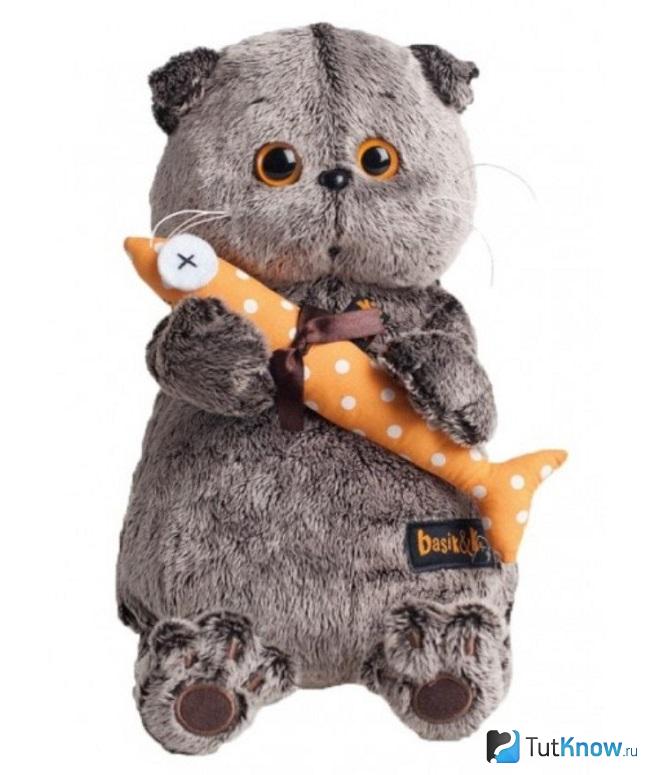
You can dress up the cat at your discretion; clothes for Basik are also not difficult to sew.

If this is a winter option, a hat with earflaps and a scarf will do. You will sew the first one from the remnants of fur, and knit a scarf from yarn.
Here are some original toys you can create with your own hands. Choose the ones you like and start crafting. And to simplify the process of creating new things and get ideas for inspiration, watch the selected videos.
The best toy for a child is the one in which the soul is invested. Even in a store you can find something unusual that will win the baby’s heart for a long time, but a toy made with your own hands is a real treasure. It is unique, no one else will have it.
You can do it yourself make a toy from natural materials, harmless to children's health. And most importantly, a homemade toy greatly develops children's imagination!
These ideas are for children's handmade items cause tenderness. Take a look, maybe you’ll want to please your child with such beauty!
How to make toys for children
- A little housewife's dream
Out of an old bedside table will come this unit for a toy kitchen. What a nice color... - Convenient shelves
Shelves for containers with spices can be used as stands for small children's books made of thick cardboard. They won't be lying all over the kitchen anymore! - Original dress
From dad's old shirt you can sew a cute dress for your daughter. Or for her doll. - Pencil cups
An old phone book is a good place to store a variety of art supplies. - Interior decoration
An interesting way to store children's drawings so that they do not get lost and are in plain sight. - Tic Tac Toe
Even an adult will not refuse such a toy, the design is magnificent! - Kitchenette
Another option for a small kitchen - the girl will be delighted. - Suitcase house
You can arrange it in an old suitcase dollhouse. Great idea! - Toy storage
Storing toys under a children's bench is a classic! Plastic containers are very convenient. - Funny bib
A bib made from a shirt is genius! - Box with a secret
You can build a whole game world from a drawer for bed linen! Which fits very conveniently under the bed. - T-shirt bodysuit
Old T-shirts are great for repurposing into baby bodysuits. - Baskets for toys
Such baskets on the walls will protect the house from clutter and will interest the child. - gift sock
This sock, made from jeans, will definitely make great gifts! - Pig from a bottle
Piggy bank from plastic bottle amazing. - Cars of the future
These are the cars you can make from ordinary plastic canisters! Great idea. - Entertaining maze
A labyrinth of cardboard boxes is a place for frantic entertainment. - Raising a climber
Such a cheerful slide made from old tires will become an island of children's happiness.


While I was looking for ideas for soft books, I discovered many other educational toys that you can make with your own hands. I'm always amazed and inspired by parents who put so much effort, time and love into toys for their little ones, so I really wanted to make a selection of these truly amazing things. Some of them amaze with their finely executed work, others with their ingenious simplicity, others with their wit, but all of them are undoubtedly worthy of attention and, I hope, will prove useful and interesting to you, our dear readers.
1. Knitted cubes.
pic
2. Cubes - creating images
Great idea for using up those boring wooden or plastic cubes.
pic
Here's a similar idea, but on fabric cubes: 
pic
4. Sensory bags.
Such bags are filled different cereals, starch, flour, pasta, medicine caps or construction parts. In addition, you can use fabric of different textures. 
5. All home interesting things on one panel.
I really liked the idea! It seems to me that such a toy will captivate even one-year-old fidgets for a long time. 
pic
6. Zaykina Polyana
In such a clearing you can organize a whole story game. The bunny has a garden in which he grows carrots, fruit trees and flowers. Apples and carrots should be collected when ripe and taken to the hole, and the flowers should be watered so that they bloom profusely. There is also a pond with fish in the garden; they need to be fed on time. 
7. Magic pod.
Zipper pod with colored peas - learning colors. 
pic
Here's another version, in crochet. The peas are attached with buttons. 
8. Cute coats for studying colors and development fine motor skills.
pic
9. Octopus clasps.
pic
10. Vegetable stew.
With the little ones on such wonderful homemade toys You can learn the names of vegetables. And then they will be suitable for different games, for example, to a store. 
Educational toys for children aged 0 and above will help him learn about the world and acquire his first skills. For you - master classes on making toys from threads, fabric, cardboard, baby slings.
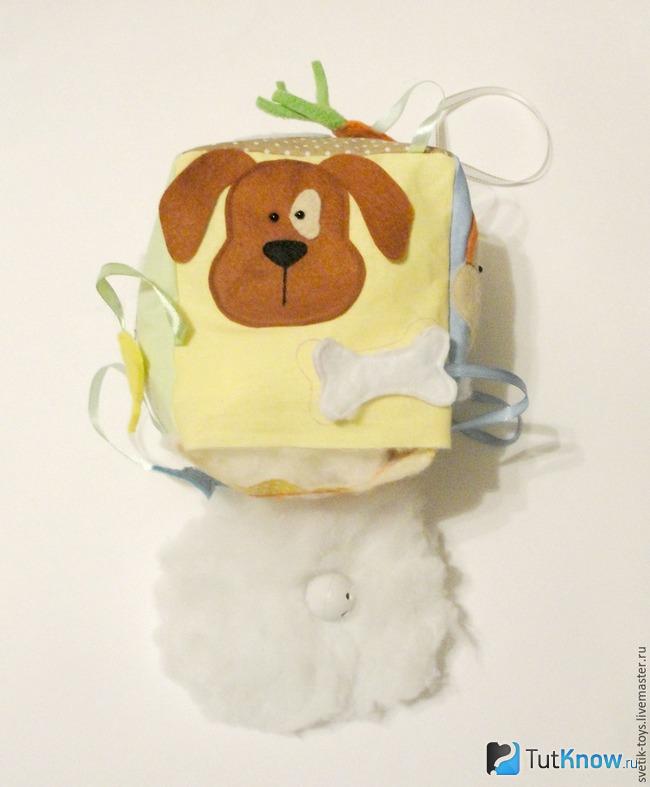
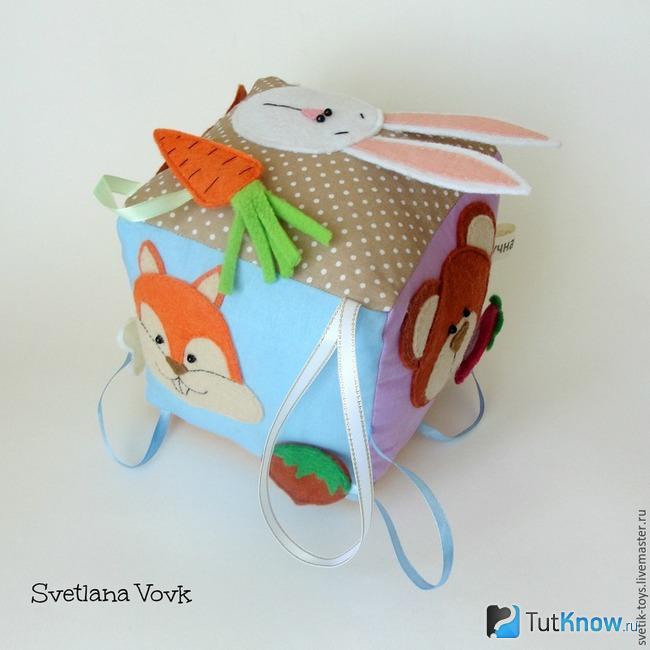
How to sew a developmental cube for children from 0?
As soon as the baby is born, he begins to explore this world. By three months, his gaze becomes concentrated, he intensively absorbs everything he sees. By this age, you can sew a developmental cube for him, with which the baby will play more actively when he already learns to sit.
But also in the very at a young age this thing will be very useful for the baby, especially if you name the objects that are depicted on the cube. The child will learn them, understand what each object and animal looks like.
This cube is soft and pleasant to the touch, so the baby will not get hurt on it.
It is important to take environmentally friendly materials and sew the elements of the cube tightly so that the child cannot tear them off.

To make such an educational toy, you need to take:
- cotton fabric (you can use scraps);
- felt;
- interlining;
- soft filler;
- Velcro;
- disappearing marker;
- pins;
- buttons or beads for eyes;
- scissors;
- satin ribbons;
- pieces of green fleece;
- floss;
- rattle elements.
Using the patterns provided, print them out, then transfer them to felt and cut them out.

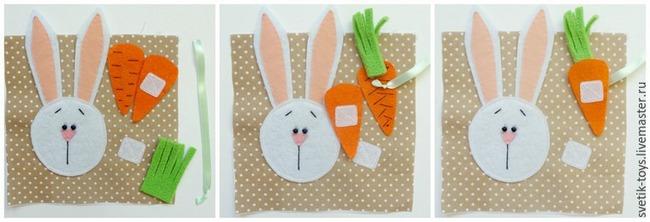
The bunny has a round head; the template shows the markings of his face. Each ear consists of two parts - a white one and an inner pink one. Make the carrot orange, and the tops for it will need to be cut from green fleece. To do this, you need to cut it out of a rectangle measuring 5.5 by 3 cm.
Make the mouse out of gray material, and sew white semicircles to the inside of the ears. The cheese is made from yellow felt.
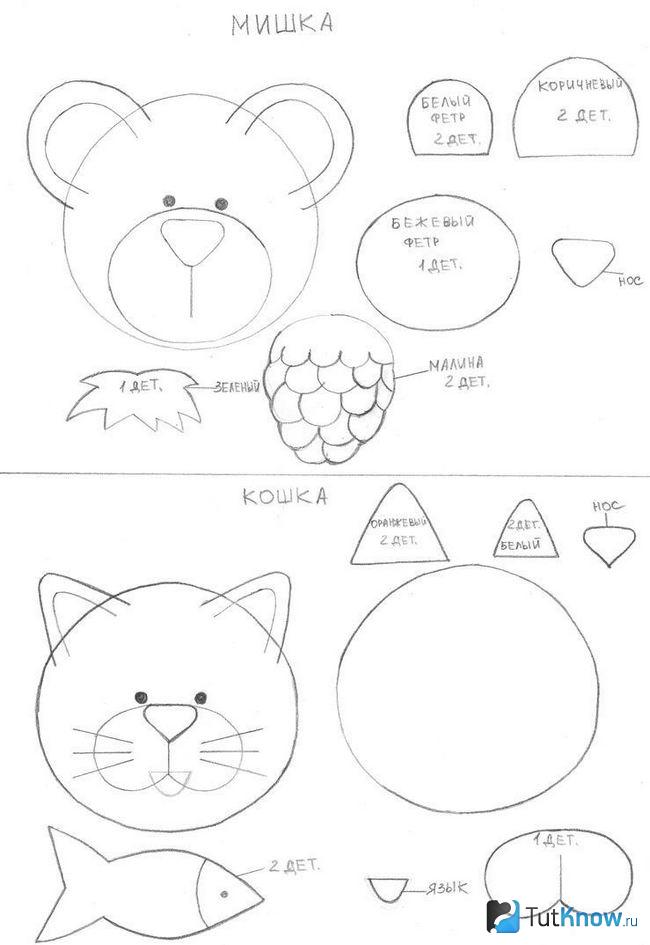
Now start cutting out the next couple - a bear and a cat. The patterns give the names of the colors that need to be used. Next up are the dog and the squirrel.

The dog will have a bone in his hand, and the squirrel will have a hazelnut. When all the parts are cut out of felt of the appropriate color, you can proceed to stitching them.

Draw the features of the face with a water-washable marker. Now embroider them on the bunny's face. To make these parts more dense, put adhesive interlining on the back, iron it, let it stick. Place a triangle of black felt on the hare's nose and sew it on.
Using a disappearing marker, draw a bear's muzzle and ears on one side of the cube. Sew here first the double ears, and then the muzzle, to which the nose and eyes are already attached.
The raspberries are so semi-circular. Embroider scales on it with black thread, and then sew a green tail on top. The raspberry will be double, first sew the Velcro to the back side, and then sew the Velcro to the cube itself.
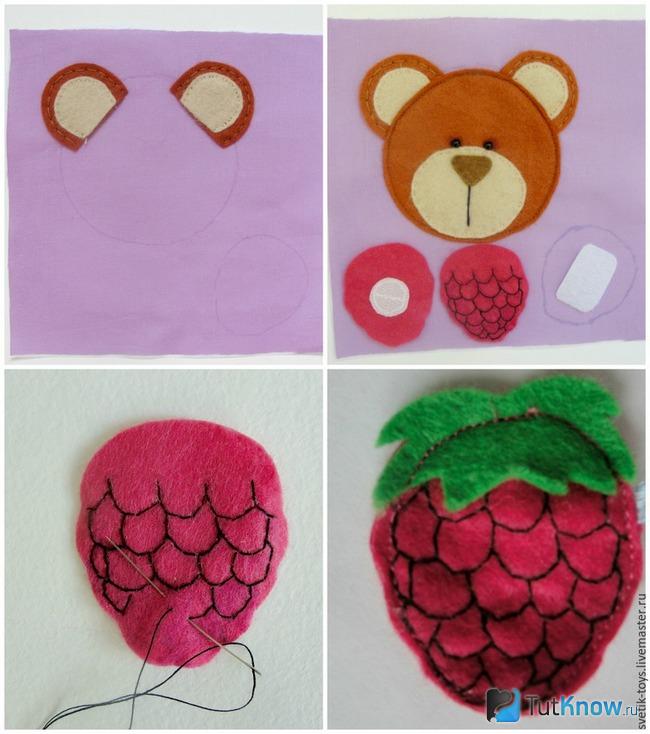
The child will be able to glue the raspberries into place themselves. In the same way he will attach the carrot for the bunny. But first you will need to put felt greens and ribbon between the two halves of the carrot.
To make the greens, cut one side of a rectangle of fleece into fringe.
All characters and food for them are created in the same way. Cheese, carrots, raspberries, fish, nuts, bones must be attached next to the animal for which this food is intended. The child will learn the names of animals and will know what each animal eats.

Now this baby toy should be assembled as follows. Sew the sides of the cube together, first connecting the four sides. Then sew the bottom and top to them.

To make it even more interesting for the child later, place food for each animal not only next to this character, but also near another animal.

The child will quickly master this science and will be able to “feed” food exactly to the animal for whom it is intended.

See how to assemble a development cube.

This photo shows how the four sides should be connected to each other, while the top and bottom are left free for now. This is how you stitch these elements.
Such educational toys for children from 0 will allow them to learn the names of the animals on the cube and gain initial knowledge about them. Now fill the cube with synthetic fluff or other soft filler through the hole that is still left. To make it more interesting for the baby, place rattle elements here that will make a funny noise.
Pin this free edge and sew the sides together using a blind stitch.

Here are some educational toys for children aged 0 and up that you can sew with your own hands.
If you are invited to visit a baby, then you can easily sew such a developmental cube to give it to the child’s parents.
If you have even some sewing skills, then you can create other entertaining and educational things for your baby.
Educational toys for children from 0 - do-it-yourself soft garland
Help your child get to know the world around him. Create a soft garland like this for him.

To make it, you will need:
- pieces of fabric;
- satin ribbons;
- strong rope;
- large buttons;
- beads.
To sew these toys, for children from 0, you don’t even need sewing machine. Connect the paired parts and stitch them with a seam over the edge.
Take a fairly dense and soft fabric that does not fray, for example, felt or fleece.
Leave a small gap at the bottom of each item so that you can then fill the toys with stuffing through these holes and then sew them up here. And at the bottom of the cloud, leave three holes, in each of which you put a ribbon folded in half, and in the middle of each there will be a button.
Then you will need to tell the child that it is raining, and the buttons are big drops. The month is decorated with a ribbon, the elephant with two eyes and a tail, and the star with tassels on its rays.
Sew a loop to the top of each item, tie them to a rope, which should be placed above the bed or above the baby's stroller.
For a child, you can make not only a developing cube, but also a ball. Animals, the sun and other objects that can be introduced to the baby due to his age will also be sewn here. You can knit a flower that will have petals of different colors. Introduce your child gradually to the name of each color. There will also be an educational mat a great gift and help for young parents.

It is quite possible to create such educational toys with your own hands and not spend a lot of money on their purchase.
In order for your child to improve fine motor skills, you will make entertainment for him using available materials. For the following you will need:
- colored cardboard;
- pencil;
- lace;
- scissors;
- awl.
If you have small holes, then make them larger using a hole punch.
Now the child will match the holes on the mushrooms and spines of the hedgehog and attach the trophies of the animal to his back using a cord.

A baby is teething until he is one year old, so during this period children prefer to scratch their gums on various objects. Babywearing beads are sold to help young parents, but you can make them yourself, and from scrap materials.
How to make baby sling beads with your own hands for children from 0?
To make them, take:
- cotton threads;
- suitable size hook;
- beads;
- plastic ball - a container for a small toy.

Then, in the same way, you will need to hide the bead and a small skein of thread.

Now you need to string these beads of different sizes onto very strong thread or rope. To do this, you need to make two opposite holes in a plastic container with an awl. And when you knit the frame, start it with 8 loops so that there are holes left. Place large beads in the center, and smaller ones can remain as they were - wooden.

If you don't know how or don't want to knit, then you can buy individual beads from wood and make nibbler beads from them. Such toys for children from 0 will be very useful for them, especially when teething. But follow a number of safety precautions:
- The beads should not be coated with paint or varnish, because the child will put them in his mouth, and these hazardous materials can enter his body.
- Use a very dense and strong thread so that it does not break.
- Take large beads so that the child cannot swallow them.
Educational tactile toys for babies

If one sock is lost or they become too small for the child, make such a beautiful caterpillar. Take:
- sock;
- filler;
- buttons for eyes;
- thread and needle;
- string or ribbon.
You can use peas, buckwheat, rice, beans, acorns or other similar materials as a filler.
The caterpillar consists of several segments. To make the first one, pour the selected filler into the toe and tie this section with string or ribbon. In the same way, you need to create all other segments of the insect. Sew buttons or ready-made eyes for animals.

Also, by making eyes, you can entertain your child by gluing them on the sock. It will be interesting for your child to follow the plot and the hero of such a puppet production, which you will put directly on your hand.
Other tactile toys are also pleasant to the touch and will help the baby's development. This is the snake you will create from a piece of fabric. Attach threads to it as hair and buttons, which will become the eyes and decoration of this character.

When a child is teething, he will need not only baby sling beads, but also soft rings. You can make them by wrapping metal or plastic rings with thread. It’s just better to take yarn white, which is not painted. You can sew a fleece ring onto the blank and cut its edges into strips so that the child has another toy.

A child at this age is interested in throwing various objects and watching how they fall and what happens to them at this time. Of course, you can’t give him anything that is fragile or heavy, so sew these pads.

For each, you need to fold the fabric in half, sew up almost all the edges and put the filling inside. Then you need to close the remaining sides. You can sew cartoon characters or numbers onto the pads so that your child gradually learns to count.
Such tactile toys can be touched not only with your hands, but also with your feet when the child learns to stand, holding the edges of his crib.
Sensory bags made from balloons are also great fun for babies. They need to be filled with salt or flour so that the child enjoys touching such objects.
But here are the safety measures that will need to be observed and what you need to pay attention to:
- Fill the balls with pasta or other similar items that do not have sharp edges.
- Take it balloons only with thick rubber so that the child does not bite through them and these will last longer.
- You can add not only small grains here, but also a couple of beans. The child will enjoy touching them.
- A ball made from scraps will help your baby master crawling. Watch the tutorial that shows you how to make it.
How to sew a ball for children from 0?
This is how beautiful it will turn out.

This type of ball is called Amish. This name is given by the name of some Christians who formed unusual villages and decided to live here as their ancestors lived. Amish women are excellent sewers; they have a lot of patchwork quilts. They sew various toys from leftover fabrics, including balls for children.
Such educational toys for children from 0 bring many benefits, in particular, the following things:
- Develop fine motor skills of the baby; They teach the baby to crawl, as he tries to reach a bright object.
- They help develop his attention. After all, you can hide a ball nearby so that the child can train his eyesight by looking for it with his eyes.
- They develop hearing and attention, as the elements of the ball ring, and the child will follow these sounds.

As you can see, you will need to cut out three types of elements, from small to large. Cut them from scraps of several colors or two, as in this example. There are 24 petals that will be located inside, they have the same color. And 12 more are outside.
Take two petals, fold 1 and 2 in half and match their folds. Place these two pieces on top of the third one.

Stitch these elements together, but leave a small gap through which you will stuff this dish with soft filling.

Sew 12 of these pieces, stuff them with stuffing and place a small bell inside each pad. Then you need to sew up the holes.

Next, for such a toy for children from 0, you need to start assembling these elements. In this case, the front side of the blanks should be on the outside. First, take three pieces and sew them together.

Now collect these bagels into a ball. Take three such blanks and connect their tops, sewing them together. Now all that remains is to sew on the fourth piece. The technology of this work is shown in the following photo.

That’s it, you can give a developmental ball to your baby so that he can play with it to his heart’s content.
Leftover fabric and thread can also be used to create very nice toys for babies. The next master class and step by step photos will teach this.
Educational toys for children from 0 from thread and fabric

To make this octopus, take a piece of fleece and cut out its corners so that you get a cross like this.

Cut the edges of this workpiece with fringe, now fill the whole square with filler and connect the edges. They just need to be tied tightly with thread. Now weave braids from the chopped elements and tie them with yarn. All that remains is to embroider smiling mouths for the octopuses and firmly sew buttons on them that will become eyes.
Various motanka dolls will also be excellent educational toys for children from 0. And here's how you can use leftover thread.

To make this type of horse you will need:
- dense threads;
- bright threads;
- rectangular sheet of cardboard;
- scissors.

Cut them right and left, and tie them on top with the same yarn.

Pull the top down and tie a small section so that you have this round piece on top.

To make the horse's ears, wrap threads around your middle and ring fingers and tie them in the center.

Divide the threads in half, lift one side and place the ears there.

To make the horse's mane, wind the threads across the cardboard.

Cut them on one side and the other, then wrap this piece around the horse’s neck and secure it with a bright thread.

Now you need to make the legs for the horse. To do this, divide the threads of the main workpiece in half and wrap them with threads almost to the bottom. Then secure.

Wind the threads again across the sheet of cardboard, but cut only on one side. These will be the front legs. Therefore, cut off the excess and rewind them with thread. This is how you should get them.

Divide the remaining thread on the horse itself in half and insert the legs here. And form a tail from the thread itself.
Wrap the bottom of the legs with red thread, tie a knot in the tail to secure it.

This is such a wonderful horse. If you want to see what other educational toys you can create for children from 0, then you can do it right now.
You will see that you can even use unnecessary materials that would normally go in the trash.
A video blogger will share with you the secrets of how to keep a child under one year occupied and what.
Modern parents begin to engage in the development of their child literally from the first days of his life. Pediatricians and psychologists recommend paying special attention to fine motor skills, as they are directly related to speech formation. Toy manufacturers have long picked up this idea and brought it to life, producing numerous educational toys. But many of them can be done with your own hands.
Why you need to develop fine motor skills
Many people know about the need to develop fine motor skills in children with early age. However, not everyone understands why this is needed and what such activities are.
Fine motor skills are the ability to perform precise movements with the hands and fingers. It is coordinated by the work of the nervous, muscular, skeletal and visual systems. Its development begins in the first months of a child’s life with looking at his own fingers and hands. Then the baby gradually learns to master them by picking up toys. Motor skills have a positive effect on manual dexterity, the formation of a student’s future handwriting, and reaction speed.
It has been established that the level of development of a child’s speech directly depends on the degree of formation of finger movements. In the human brain, the centers responsible for speech and motor skills are located nearby. Thus, when one area is stimulated, the other is also activated.
DIY toys for developing fine motor skills in children
The shelves of children's stores offer a wide range of educational aids. It's no secret that their cost is quite high. For interested moms, making your own fine motor toys is a no-brainer. And the main thing will remain uniqueness - after all, they will be made with great tenderness.
Sensory bags
Sewing sensory bags with your own hands is not difficult at all. You will need thick fabric of different colors and textures and filler, which can be used as:
- pasta (spirals, shells, bows, tubes);
- cereals (millet, buckwheat, pearl barley, rice, oats);
- flour and starch;
- legumes (beans, peas, soybeans, beans, corn);
- sweets;
- nuts;
- natural materials (acorns, chestnuts, shells, pebbles);
- erasers of different shapes;
- cotton wool or padding polyester;
- buttons and beads.
Safety rules
Natural materials must be washed and dried thoroughly before use, and toys with food products Be sure to store in a dry place - pasta and cereals are afraid of moisture. The bags must be sewn or tied in such a way that the baby cannot, under any circumstances, reach their contents.
Video: how to make sensory pads with your own hands
Photo gallery: homemade sensory bags
These bags are easy to make yourself, even without a sewing machine.  Filling can be placed not only in fabric: dense balloons Tactile perception can be developed not only with the help of filler, but also by using fabrics of different textures
  Bags can be of different colors and sizes
Touch Cube
This toy is a cube, on the sides of which there are three-dimensional objects of different shapes and shades or applications made of various materials.
How to make a cube to develop fine motor skills
To make a sensory cube with your own hands, you will need:
- small pieces of fabric of different textures and colors;
- synthetic winterizer or foam rubber as filler;
- interlining;
- decorative elements (buttons, ribbons, ropes, rings, remnants of fabric, iron-on stickers);
- threads;
- iron;
- sewing machine.
From scraps of fabric (it can be cotton, silk, velvet and others) you need to cut out 6 squares with edges of the same size.
You need to cut squares from non-woven fabric with a side 1–1.5 cm smaller than from fabric. Non-woven blanks are placed on fabric ones and ironed - both parts will stick together, receive a rigid structure and will keep their shape well.
Each square is designed in accordance with an idea: these can be figurines of animals and birds, geometric shapes made of fur or felt, iron-on stickers, buttons, clasps and much more.
When the design is finished, you need to sew 4 squares into one strip.
The two remaining blanks are sewn to one of the squares at the top and bottom.
The seams are made along the contour of the non-woven edges, after which they are secured. Next, the development is sewn together to form a cube.
On the last edge in the corner you need to leave a small hole and carefully turn the cube out through it. The toy is filled with foam rubber or padding polyester and sewn with a hidden seam. You can also place rustling paper or a bell in the cube along with the filler.
Video: how to make a developing cube with your own hands
Tactile pillow
Sensory (tactile) pillows are suitable for babies from 2-3 months to 3 years. It all depends on the set of elements that are placed on it. A small amount is suitable for the little ones simple materials. Before giving such a toy to a child, you need to make sure that all the elements are firmly attached: if the baby pulls one of them into his mouth, it should not come off.
For children from 1 year old, you can select and sew on more diverse and complex educational items: zippers, buttons, lacing, Velcro, bows and ropes that can be tied and pulled. You can make such a toy by using a ready-made pillow and sewing a pillowcase with decorative elements for it.
Photo gallery: sensory pillows of different shapes
 This pillow is suitable for babies from 2-3 months. For the image on each of the squares, you can use a fabric of different texture
  This pillow is suitable for children from 1 year. It presents more complex elements: buttons, ribbons, bows, Velcro, clasp
  This turtle has several sides, each of which contains different developmental elements: carabiner, lacing, buttons. It is suitable for children from two years old
DIY pillow for developing fine motor skills
You can sew such a pillow at home.
To make it you will need:
- fabric - green (53x30 cm) and blue (83x20 cm);
- non-woven fabric (53×50 cm);
- fabric for the back side (50x55 cm);
- felt of different colors and floss threads to match;
- zipper 50 cm long;
- Velcro, buttons, braid, ribbons, hat elastic;
- Whatman paper, pencil;
- scissors;
- threads, needles and pins for sewing;
- pillow 45x50 cm.
Before you start sewing, you need to make a sketch of the future pillow in life size. You can use stencils for this.
Textile blue color cut into two strips (the first - 30x20 cm for the pocket, the second - 53x20 cm for the base). A piece of green fabric and a blue flap prepared for the base are duplicated in size by non-woven fabric. The cutout for the pocket is folded in half.
A sun is made from yellow felt and ribbons: a circle with a diameter of 10 cm and 7–8 strips, each 10 cm long.
A felt sun with ribbon rays folded in half is pinned to the blue fabric prepared for the pocket.
The parts are sewn together sewing machine or by hand with small, neat stitches.
The elements of the main part (blue and green) and the pocket are connected together.
The base made of green fabric is located at the bottom, and the base made of blue fabric is located at the top. A pocket with a sun is placed in the upper left corner
Then the base and non-woven backing are pinned together and then stitched together.
Elements from the drawn sketch are cut out of felt.
“Felt waves” connect with each other. For each fish you need two parts (you can different colors) and an elastic band 10–15 cm long
Elastic bands with knots tied at the ends are placed between the elements of the fish and sewn together. The waves are laid out on the base (1–1.5 cm away from the edges for seam allowances).
Multi-colored fish are placed between the waves and fixed. The river elements are stitched first at the bottom, then along the entire perimeter.
The next element is wood. For each of them you need two crown blanks, one trunk and several apples or pears. The parts are sewn together, while the fruit is located inside between two crowns, and the trunk remains on top.
The blank for the railway is made of gray felt. Its size is 53x5 cm.
The railway is placed on a green clearing, which already has a river and trees.
To make a steam locomotive and a trailer, you will also need two elements each. The front parts are decorated using felt of different colors (wheels, windows, pipe). The parts are sewn at the top. A small button is attached to the back edge of the train, and a small loop of ribbon is attached to the trailer. A 50 cm long ribbon is threaded through the unsewn edge, and knots are tied at the ends. The structure is located on the railway and fixed.
Clouds are made from blue felt - also two elements each. Through them, like through a train, a braid is passed, the ends of which are sewn to the blue part of the base.
Flowers are cut out of felt of different colors, Velcro is used for the middle, and placed in a green clearing next to the river. The seam is made along the edge of the Velcro, and the petals remain free.
Following the example of fish, a butterfly and a bee are made. Velcro is sewn onto the back of each figure so that insects can land on the flowers.
A lock is sewn into the middle of the piece of fabric that was chosen for the back of the pillowcase.
The front and back parts of the pillowcase are folded with the right sides inward and sewn around the perimeter, leaving seam allowances (1-1.5 cm on each side).
If you wish, you can make figurines of animals that will ride on the train. You can draw faces on them with a marker.
The pillowcase is ready. The baby can play with it, placing animals in a carriage, rolling a train along the rails, planting insects on flowers, looking for fruits on trees.
Testoplasty
Effectively promotes the development of motor ability of fingers. Plasticine, which all parents are familiar with since childhood, should be given one year old baby dangerous, because he tastes everything. Ordinary dough comes to the rescue. You can prepare it yourself from safe ingredients.
Play dough recipe
For it you will need finely ground salt and water (one part each), flour (2 parts).
- Combine salt and flour in a deep bowl, add water.
- Mix well.
- Knead the mixture to the consistency of soft plasticine.
If after cooking the dough sticks to your hands, you can add salt and flour to it (observing the proportion). If you get a crumbly texture, just increase the amount of water.
If your baby loves to sculpt, you can make a lot of dough at once. You need to store it in the refrigerator, pinching off the “working” pieces as needed. But such material should not be stored for a long time - over time, the dough loses its elasticity. For older children, you can add food coloring during the cooking process. After drying, the dough figures become hard and durable. They can be colored and used for games.
Photo gallery: do-it-yourself dough figurines
 You can make such a basket together with your baby - it’s a fun, creative and useful activity.
  You can make figures of your child’s favorite animals from the dough.
  Dried crafts can be painted acrylic paints
  From the figures you can create whole pictures and use them to decorate a child’s room.
Collapsible elements
Playing with small details develops motor skills very well.
Felt coats
All large parts on such samples (pockets, sleeves and even the collar) are removable. The child will be able to create interesting models, combining colors. Such toys are suitable for children from two years old.
Math strings
When your baby begins to show interest in numbers, you can offer him math strings. They not only develop fine motor skills well, but also help to learn counting.
Video: didactic games with shurks
Lacing
Such devices are great for improving motor activity fingers and arms. After all, you don’t just need to take a multi-colored rope - it must fall into a small hole.
Simple lacing can be made from any safe surface: a wooden plank, a plastic lid or regular thick cardboard. On them, using a screwdriver heated on a candle or an awl, you need to make holes with a diameter of 5 mm in a random order.
An even easier way to keep your child busy with lacing is to use a colander.
More complex lacing can be made in any shape. This will require a little more time, imagination and material.
Sorters
Sorters, in addition to fine motor skills, allow you to develop perseverance, attentiveness and intelligence in your baby. Making them yourself is also possible, although a little more difficult than lacing or mathematical laces.
For the sorter you will need carton and a few small toys different shapes. On one side of the box you need to cut holes corresponding to the shapes of the selected items, only a little larger in size.
Photo gallery: DIY sorters
 Round holes are cut slightly larger than the plastic caps
  This original large sorter is suitable for babies who can already walk.
  For the most simple option for a homemade sorter you will need a box and cardboard blanks
Educational stands - universal didactic devices
An educational stand can combine elements of all the described items and games.
To make such a board, you can attach any objects that you find in the house to a sheet of fiberboard or an unnecessary tabletop:
- bolts,
- locks,
- sockets with plugs attached to them,
- switches different sizes and forms,
- door hooks,
- bolts,
- coat hooks,
- old rotary telephone
- bell on a string,
- glockenspiel.
Over time, existing items can be replaced with new ones, maintaining the child’s interest in the game.
Educational books
Educational books are a great pleasure for children of any age, starting from the moment when the child can sit independently.
You can make a book based on your child’s favorite fairy tale
Video: handmade educational books
Foot massage mat
Fine motor skills are the development of not only hands, but also toes. Orthopedists talk about the positive effect of a child walking barefoot on different surfaces. In summer it is easier to do this - you can walk on sand, grass, pebbles. And in other seasons, miracle rugs will come in handy: for thick fabric small flat pebbles are sewn or glued, plastic lids from bottles, buttons and much more.
Photo gallery: homemade massage mats
 This rug combines materials that give different sensations to children's feet.
  Pebbles are glued to a carpet base
  Do massage mat can be made from many materials, including plastic lids
The development of fine motor skills in a child is possible without expensive store-bought toys. There are always many objects in the house that are interesting to children. Joint family creativity gives an amazing feeling of closeness, and the child’s delight and success are even more pleasing.