
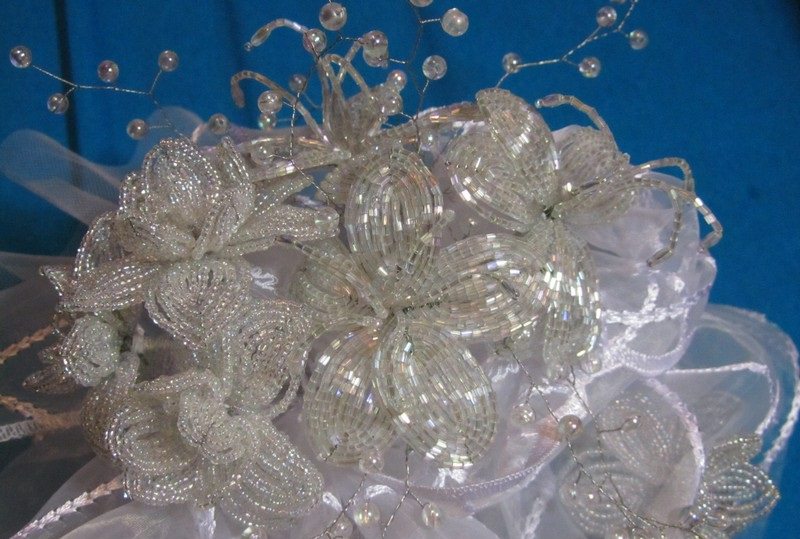
Step-by-step instructions for weaving flowers from beads. Flower bouquets and beaded compositions in master classes (photos)
I did this work in the summer on the “rainbow of handicrafts” forum in the “inspirations” section. I hope someone will be interested in my work and master class.
For the composition you will need:
- beads in 2 shades of the same color for the petals (I have 2 shades of red);
- beads of 2 shades for the stamens (I took the same ones as for the petals, but it would be better to take a different color, because when assembled the stamens merge with the petals);
- beads green for leaves;
- wire for weaving petals, leaves and stamens;
-strong wire for the branches and stem of the flower;
- fishing line and game (needed when weaving stamens);
- threads for winding branches and stems (if you prefer, you can use florentine);
- a vase or any other vessel for mounting the composition.
Let's start with the petals ( french weave):
P.S.: you can learn about French weaving here...
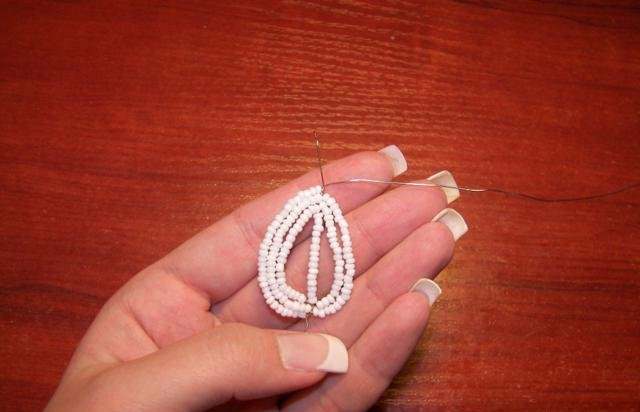
For one bud you will need 6 petals, which are divided into 2 rows.
The first row of petals consists of 3 pieces, weaving according to this pattern:
The axis of the petal is 5.5 cm of beads. I strung about 2.5 cm of a dark shade of red and 3 cm of a lighter shade onto the wire (axle). Then there is an arc, on the 1st row of which there is about 2 cm of dark and then we add light so that it is enough to bend on the axis, we adjust the 2nd row of the arc to the first one so that the lines of dark red beads are approximately at the same distance. On subsequent arcs we reduce the number of dark red beads by a couple of beads, also adjusting in pairs.
To form a petal, you need to shorten the arc, the distance of the indents from the top point of the axis is approximately 1.5 cm in the first case, 1.7 cm in the second and again 1.5 cm in the third (indicated in the photo)
There are 3 such petals - this will be the first row of the bud.
The second row of petals also consists of 3 pieces, diagram:
The axis is 5.5 cm of beads, 3.5 dark red and 2 cm lighter. The essence of the weaving is the same, on the 1st row of the 1st arc there is approximately 3 cm of dark red, the rest is a light shade, further rows also reduce the dark red beads, adjusting them to one level in pairs.
Indentations: 1st case - 2 cm, 2nd - 1.5 cm and 2nd - 2 cm.
The petals for the bud are ready, put them aside, we won’t need them until assembly.
Stamens (mosaic, loop, Ndebele and brick):
I used the same beads for the stamens as for the petals, my choice was unfortunate, because... When reassembling everything came together. I divided the weaving of stamens into 2 parts: the main and the “side”.
The main one is the central stamen.
“Side” - stamens surrounding the central one.
The main stamen is woven with a needle on the ladder. This requires knowledge and experience in Ndebele weaving and brick weaving. The whole stamen is woven light shade red
Scheme:
Fix the bead on the line, add 2 more beads and close it into a ring (you get a ring of 3 beads). Now from this ring we weave 3 rows of Ndebele. It turns out to be a ring from which there are 3 Ndebele branches. We weave the next row like this, from one Ndebele branch we also put on 2 beads and come out of the second branch, now we need to go through one bead of the first branch and put on a new bead, we go to the 3rd branch, here we need to hook one bead from the 1st branch and a new bead in the second, this will create pads for the stamen; on both sides we should have absolutely identical central rings and rows of ndebele.
After our “pad” is ready, we begin weaving the stamen stem with brick weaving from the central ring of 3 beads. I have 17 rows of bricks on the stem, it is 3.5 cm long, together with the pad the stamen turned out to be almost 4 cm long.
For durability, a wire was inserted inside the stamen.
General view stamens:
Now the “side”, here you need knowledge of mosaic and loop techniques.
The pads are dark red beads, the stems are a light shade.
Surely everyone already knows how to weave a mosaic flagellum. The “pads” of the “side” stamen are woven with a mosaic strand of 3 beads, in my case 6 rows. You need 6 of these pads.
After our pads are ready, we take a wire, I can’t say exactly how long it is, about 60 cm. We string 4 cm of light beads onto the wire, hook the pad to the bead in the 2nd row and go back through the strung beads, do it there 5 more times, so that one wire produced a row of 6 “side” stamens.
The stamens are ready, we also put them aside and move on to the leaves.
Leaves (French weave):
There are a total of 15 leaves in the composition, which are divided into 3 categories:
- large leaves, let’s denote them 1;
- medium-sized leaves, -2;
- small leaves - 3.
All leaves are woven according to the same pattern:
Leaves 1: axis = 4.5 cm. 1 indent = 2.5 cm from the top point of the axis, 2 indent-addition to the axis = 1 cm. Bottom eye approximately 1.5 cm.
Leaves 2: axis = 3.5 cm. 1 indent = 2 cm from the top point of the axis, 2 indents - addition to the axis = 1 cm. Lower eye about 1 cm.
Leaves 3: axis = 2.5 cm. 1 indent = 1.5 cm from the top point of the axis, 2 indent - addition to the axis = 1 cm.
The lower ear is approximately 0.8-1 cm.
Flower bouquets and beaded compositions in master classes (photos)
Beading allows us to create amazing floral arrangements from beads that delight with their sophistication, simplicity and unique charm. Such a cute bouquet, made by yourself, can become an exclusive gift for a loved one or good friend. 


How to make a bouquet for the bride from beads
This type of creativity like beadwork opens up many different possibilities for us and allows us to create real works of art from small beads and seed beads. Perhaps one of the most beautiful and delicate creations is a wedding bouquet made of beads, because it is this that complements the image of a happy and loving bride and accompanies her throughout one of the most important days in her life.
Our master class will tell you how, using beadwork, you can create an exclusive and incredibly delicate bouquet. Before starting work, let's prepare all the necessary materials in advance:
- white transparent beads and cutting;
- clear rice;
- beads of the same color;
- the wire is thin and thick;
- floss threads white;
- acrylic varnish;
- ribbon;
- glitter;
- special packaging material for wedding bouquets;
- white rigid mesh.
We will start the master class with making
.
First, we will need to make 5 petals consisting of 15 beads using the loop technique. Here is a diagram according to which you will need to weave the first row of petals: 
Then you will need to string 15 white beads onto a thin wire, and then make a loop and secure it. After this, stepping back a little, you will have to create another loop with your own hands and scroll it 3 times.
We will make the second row of petals using the French weaving technique. It will also consist of 5 petals. 
First we will need to make a small loop at one end of the wire. Then put 8 beads on the resulting axis. 
After this, we make a slightly larger loop at the second end of the wire and secure it. 
Now we must string 10 beads onto the free end of the wire. 
Having done this, we secure the wire. 
Continuing the beading according to the pattern, we form the second side of the future petal in the same way. 
Next, we weave a petal from three arcs and, having finished beading, cut the wire approximately 1 cm from the base. Please note that the loose ends must be twisted 3 times.
We will also make the final, third row using French technology. However, each of its petals will already consist of four pairs of arcs.
As a result, we will get such a wonderful flower as in this photo: 
We will need to make 9 flowers for the bouquet and 1 for the boutonniere.
Now our master class will tell you how to make a flower from a cutting:
We will weave it using the French technique. However, it is worth noting that its axle will consist of 7 pieces. cuttings, and the petals have 5 arcs.
In addition, for each such flower we will have to make stamens. They are made using the needle technique: 
Each stamen will consist of a transparent grain of rice and approximately 5 cm of cutting. We will need one such flower for the boutonniere and 3 more for the beaded bouquet itself. 
At the next stage, the master class will help you create another decoration for your bouquet.
The photo clearly shows that for it we will need silver wire and transparent beads. You will need to thread the bead onto the wire and then twist it about 7-10 times.
In this way, you will need to make one small branch for the boutonniere and 9 larger branches for the beaded wedding bouquet. 
Having completed the beading, we will need to start assembling the bouquet. We will have to attach 3 branches of decoration to each flower from the cutting and wrap the resulting stem with threads. 
If you look closely at this photo, you will notice that the branches for decoration are tied so that their tops are several cm higher than the flower itself. Thanks to this, our bead composition will turn out more voluminous and lush.
Then we will need to attach 3 beaded flowers to a thick wire and wrap the resulting stem with white threads. 
After you twist all the branches and wrap them with threads, you will need to spray them with varnish and sprinkle them with glitter. Thanks to the varnish, the stems of the flowers will retain their original appearance for a long time and will not lose their beauty and attractiveness.
We will make a wedding boutonniere from two flowers and a branch decoration. Its stem also needs to be sprayed with varnish. 
Having finished forming the branches, we can begin assembling the bouquet itself. The center of our composition will be 3 flowers from the cutting. We will wrap them in special wedding packaging. Then we will pack each branch with flowers separately. After this, we will need to assemble the entire composition together and wrap it in a rigid mesh. 


At this point, our master class can be considered almost complete. All we have to do is wrap the stems of the wedding bouquet with white satin ribbon.
Look what beautiful flowers we ended up with: 

In conclusion, I would like to note that wedding bouquets made of beads can be brighter, bolder, and more saturated. To verify this, you can look at the photos of the finished work: 


DIY compositions and bouquets made of beads
This master class will help you create a whole composition of flowers from beads yourself. We will place our bouquet of daisies and beautiful lilies in a regular basket and decorate it with a ribbon, and plant a bright, exotic butterfly on top.
So, let's get started by preparing all the necessary materials:
- bamboo sticks;
- green and white wire;
- beads: green, white, yellow and beige;
- golden beads;
- green floral ribbon;
- an ordinary plastic pot;
- green wool threads;
- basket;
- glue gun;
- gypsum;
- PVA glue;
- plasticine;
- ribbon;
- double sided tape.
It is best to start beading with a lily, as it is the most voluminous and labor-intensive:
First we will need to take 40 cm of wire and fold it. Then you need to put 19 beads on the long tip, and 15 beads on the short one. After this, we screw the longer end to the short one. After this, we again string 19 beads onto the long end and secure it. Thus we have the first row. Each side of the second row will consist of 24 beads, and the third - of 32 pieces. Using the French weaving technique, we will make a petal for our lily. 


In total we will need 6 such petals.
Then we will need to make the center for the lily. To do this, we need to string 21 beige beads and a golden bead onto a 30-centimeter piece of wire closer to one of the edges. Now we must pass the long end of the wire through the beads and secure it, and then string the beads and beads onto it again and push it through the beads again.
Using this weaving pattern, we need to create 5 stamens and connect them together. 


Then we will need to connect together all the details of the future flower. The resulting lily will need to be attached to half a bamboo stick and wrapped with floral tape. 


After we finish weaving the lily, we will need to prepare a pot so that it can be “planted”. First we will cover the bottom of our pot with plasticine. Then, using double-sided tape, decorate the handle of the basket with ribbon. After this, we will need to place the pot in the basket. In order for it to hold tightly and not fall out, we first coat the edges of the basket with glue using a gun, and then insert the pot there. Now we can “plant” a lily in our pot. 


At the next stage, our master class will tell you how to make small beautiful daisies.
First, we will need to string 14 white beads onto a 25-centimeter piece of wire. Then we will have to pass the wire through 1 bead, and carefully tighten it to secure the resulting loop. In this way we will need to make 7 petals for the chamomile. 


Now we can start making the core. To do this, we will need to string 6 yellow beads onto a piece of wire 9 cm long. Then we will have to insert one end of the wire through the 3 outer beads. By carefully pulling the wire and twisting its ends, we get a core like this: 


After this we will screw the core to the petals. Having made 3 such daisies, we will screw them to half of a bamboo stick. Then we will need to wrap the resulting stem with green thread. Having created the required number of stems with daisies, we will need to insert them into the basket. 


Then, using the French weaving technique, we will need to make jagged leaves according to this pattern: 


We will have to attach each leaf to a bamboo stick and wrap it with floral tape.
After this, we will need to “plant” them in the basket. Then we will have to fill the drainage basket and carefully pour the plaster. After the plaster has dried, we will need to pour PVA glue into the pot and place green woolen threads on it. In the end, all we have to do is attach a beautiful butterfly to the handle of the basket and we can say that our composition is ready. 


In order to find inspiration and find something new and interesting for yourself, you can also look through photos of finished works, which depict various beaded flowers in pots: 


Whatever exotic flower or unusual composition you decide to make from beads, the main thing is that you are not afraid to experiment and boldly bring your fantasies to life. After all, each of your creations will undoubtedly become a real work of art and will delight you and your loved ones for many years.
Today at step-by-step master class we will tell you how to weave a very beautiful, but at the same time the simplest flower from beads using detailed diagram for beginners with photos.
Tools and materials Time: 1 hour Difficulty: 2/10
- thin wire for working with beads;
- thicker wire for the stem;
- beads of different colors;
- floral tape.
Make one like this beautiful flower Even a novice craftsman can make beads! Go for it! 😉
Bright juicy flowers do not please the eye for long! Photographs and drawings, as well as, of course, beads, help us preserve the memory of flowering plants. Other interesting schemes and master classes on beaded flowers for beginners can be found in a special section of our website.
Weaving pattern
In total we will need 5 petals made using the parallel weaving technique.
Step 1: make a petal
To form one petal, we string one bead onto a piece of wire, move it to the center of the piece, and cross both tails of the wire in the next two beads. IN next row We cross the threads in three beads.
In this way we continue to weave until the number of beads for one row increases to 6 pieces. After this, you can already reduce the number of beads for each row.


As a result, you get a narrow thin petal, which we put aside. In total, as already mentioned, you will need 5 petals.
Step 2: weaving leaves

Next we form the leaves.
- To do this, string 6 beads onto a piece of wire, and cross the threads in the next string of 6 green beads.
- We tighten all this, and string 4 more beads onto the upper tail. We insert them into the center of the resulting circle.
- We carefully twist the tails of the wire together and put the resulting sheet aside.


We collect five ready-made leaves, twist them, and set them aside.

Step 3: making the stamens
Now you can work on the stamens of the flower. They are carried out according to the scheme. As the upper part of the stamens, you can use small 4 mm beads or bicones of the same size.


Step 4: collect the flower
When all the details are ready, you can assemble our simplest beaded flower. We simply twist the petals together, with the stamens in the center, and wrap it all around a stem made of thicker wire. We screw our leaves to it.
Floral tape is used to hide the twists and decorate the wire. It wraps the trunk and petals, giving the product uniformity.
So, we just managed to weave a flower from beads quite easily. Did you succeed? Share examples of your work in the comments!
A great activity for at least 2 reasons:
1) We protect nature and preserve it in its pristine beauty, because plants are alive and how you and I feel pain! Therefore, let's be aware and sensitive to the world around us.
2) And just you can object, how can you admire flowers if you don’t pick them, because you can’t always go into nature. This is where weaving flowers from beads will come in very handy, which you can admire endlessly and gain energy from the memory that you created such a creature with your own hands.
Dear friends, do you agree with our reasons? Tell us why you like to weave flowers from beads? Be the first to start and let the others follow and we think it will be a great discussion!
Recently, it has become important to decorate the interior of your apartment. various crafts from beads. This original and unusual element is able to emphasize the individuality and creativity of the owner of the house. Beading is not as difficult as it might seem at first glance, but it still requires perseverance and composure.
 Almost every person can master the techniques of weaving flowers with their own hands. Of course, making complex and large flowers can take a lot of time, but the result will exceed all expectations. For beginning needlewomen, it is important to learn to understand patterns for weaving and assembling craft elements. Thanks to attentiveness and effort, you will learn how to create unique and beautiful ones, just from beads and wire. They can decorate clothes and accessories or make bouquets and paintings.
Even the most simple work It is worth collecting, guided by the diagrams. It is important to keep in mind that the final appearance of the product will depend not only on the skills of the craftswoman, but also on the color, shape and size of the beads.
Materials for work
The main feature of beads is its versatility. From it, in addition to standard ones and decorations, you can create various compositions, from several flowers to a lush bouquet or an entire flower basket. Such products will become great gifts for any holiday.
The creation of masterpieces should begin with the acquisition of materials.
You will need:
- beads (the color and quantity will need to be determined independently, based on the desired result);
- copper wire 0.3 millimeters thick or fishing line;
- scissors or nippers;
- for stems - wooden skewers or thick wire, thread or green satin.
Choosing beads
Beads are small beads with narrow through holes. Their the color range is very diverse. In craft stores you can find bright and pale, matte, pearlescent and transparent materials for creativity, as well as solidly colored or simply lightly dusted with paint.
Bead quality First of all, it depends on the manufacturer. For example, Chinese has a low price, but it is still not good enough. Such material may be poorly colored, holes are often missing, and the beads have different sizes and shapes.
Czech and Japanese companies are rightfully considered the best manufacturers. Their products are characterized by a smooth and neat surface, as well as minimum percentage of defects.
Of course, you can train and do your first works with Chinese beads. But when making large and beautiful things or gifts, it is better to switch to Czech and Japanese materials. You will also need wire or fishing line for crafts. Fishing line is used to create three-dimensional products; it allows you to give the desired shape, for example, when weaving lush roses from beads. On a wire frame you get stiffer beaded flowers.
Color schemes for beginners
Let's meet the most in simple ways weaving flowers. They are perfect for beginning needlewomen to learn the basics of beading. There are many various techniques do-it-yourself weaving for bead crafts, the most popular of them are parallel and French.
Forget-me-not

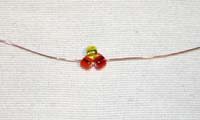
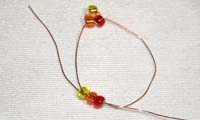
- First you need to put six beads on the wire. The first of them is yellow, the other five are blue.
- The free end of the wire is pulled through 2, 3 and 4 beads, and then into the yellow one - the very first one.
- The end of the wire is twisted under the yellow bead. The first flower is ready!
Make as many buds as you need to create a full-fledged flower or even a whole basket of forget-me-nots. After this, proceed to weaving the leaf:
- Place three green beads on the wire and move them to the middle.
- Pull the wire through beads 2 and 3. Thus, you have two first rows, there will be eight in total.
- Place three beads on the wire, pull it through the beads of the previous row, and then through the three collected ones. This will give you the third row.
- The remaining rows are done in the same way. This method of beading is called parallel. To create the fourth and fifth rows you will need to cast on 4 beads. For the sixth - three, for the seventh - two. For the eighth, only one bead will be enough.
- Using twisting, secure the wire at the base of the leaf. Make as many of them as you need for your composition and connect all the parts to form a bouquet.
- If you want to decorate the stem, wrap it with thick green threads or satin ribbon of the same color.
Beaded Lily
It will be quite easy for you to make such a flower; it is also made using the parallel weaving technique. For this craft we will need large beads for the middle and beads of two colors to make the petals.

- The first, second and third rows consist only of pink beads.
- Fourth row - two pink, 1 white and 2 pink beads.
- In each subsequent row, the sequence is maintained, but one white bead is added.
- This weaving continues until the middle row, which will contain five white beads. The remaining rows are performed in the same way, but the white beads are now not added, but decreased by one.
- You should end up with a petal like the one in the photo above. You will need five of them for one flower.

Now we need to weave five more petals, but smaller ones. They are woven similarly to large ones, but there should be only one pink bead at the edges, and the widest part of the petal (middle row) should consist of three white ones. As a result, you will get blanks, as in the photo above.
The next stage of our work will be the pistil - the middle of the flower. To make them we will need five medium-sized beads. To do this, put one bead on a wire and twist the ends together right under it, as in the photo.

Now all the parts for our lily are ready, all that remains is to put them together to make a beautiful flower.
- Connect the bead pestles together by twisting the ends of the wire together.
- Screw small petals to the resulting center of the flower.
- Now attach large petals at the bottom.

The remaining wire can be just cut or form a stem from them, wrapped with thread or green ribbon.
The resulting lilies can be decorated with leaves made using the same technique.

Gorgeous roses
Using the parallel weaving technique, you can create an entire basket of large and lush roses without much effort.
Chamomile (parallel weaving)
Lovers of these plants will be pleased to receive a bouquet as a gift that will never wither and will delight the eye for a long time.

- Weave 10-12 petals using the parallel technique using white beads.
- Make a round center from yellow beads, and leaves from green beads, based on the diagram above.
- When all the chamomile parts are ready, collect them together. To do this, connect the white petals together with wire, placing the yellow center inside. Wrap the leaves to the wire base.
Your chamomile is ready!
Chamomile (French technique)
Chamomile is quite easy to weave from beads even for beginning needlewomen, and there are many step-by-step schemes to make this flower. In addition to parallel weaving, another simple way to create a field daisy is the French weaving technique. Even children will have no difficulty mastering this method.
The French technique involves weaving beaded arcs, from which elements of fakes are then obtained. Each element has the shape of a kind of “boat” (from the center to the edge), due to which you can get a pleasant pattern and the necessary volume. Bouquets of flowers created using this technique look just like real ones.
French weaving is not recommended to be done on fishing line, as it does not have elasticity, which is why the resulting flowers do not hold their shape well.
- Prepare wire and beads of yellow, green and white colors.
- Cut a piece of wire 25 centimeters long and put 15 white beads on it.
- Bend it in half and, having passed the first bead, thread the free end through the entire row.
- String 17 white beads onto both free ends of the wire.
- Pull the wire through the very first bead and tighten.
- Now dial 19 beads on both ends and repeat step 5.
- You should end up with a white petal. So you will need 6-8 more pieces.
- Cut a piece of wire 30 centimeters long, put 3 yellow beads on it and make a loop.
- Place 5 beads of the same color on the working end, press them tightly to the previous row and twist the wire around the free end.
- Repeat step 9, but on the other side of the central (first row).
- In the same way, weave two more rows on each side using 8 beads.
- Repeat step 11, but when doing this, collect 10 beads each.
- You will get a voluminous round center for the chamomile.
- To make a cup, put a lot of green beads on a piece of wire and twist them into several loops about 1.5 centimeters long.
- Assembling the flower: connect all the petals, placing the yellow center in the center. Attach a green cup to the bottom of the daisy.
In any form of art, beginners should start with the simplest products. Beginning needlewomen who want to master the beading technique must learn how to work with large beads. Ready-made jewelry often looks no worse than the assortment of fashion stores. It is better to start beading flowers from glass or plastic crystals, which will shimmer in the sun, striking with their beauty. Having mastered the simplest technique, later you will be able to make entire compositions and large bouquets.
Beading for beginners: color schemes from large beads
To make it, you will need silver or gold wire, 5 large translucent beads, and a small dark-colored bead. Along with these materials, you will need scissors or wire cutters for working with metal. Cut a wire 30 cm long, make a knot on one side, start stringing one large bead at a time, securing them at the base. This manufacturing method is the simplest in the art of flower beading. The schemes consist of six step by step photos which demonstrate how to string beads correctly. When all 5 elements form a flower, make the middle, secure the wire and cut off the excess. Use the resulting flower as a hair clip or insert it into a common bouquet with roses or other buds.
Beadwork

The next step you need to master is working with a needle. Bead embroidery looks no less wonderful than three-dimensional compositions, but it is much easier and faster to do than beading. For beginners, color schemes may seem overwhelming, so experts recommend starting with more simple type work. To embroider a picture, in addition to beads and a needle, you will need canvas or thick fabric, hoop and thread of the corresponding color. If possible, use thin transparent fishing line, which will be perfectly camouflaged under the beads.
Draw the embroidery design yourself or use ready-made sketches. To make it easier for you to navigate, make notes with the location on the fabric and start embroidering the pattern. The knots should be on the wrong side.
Rose using the parallel weaving technique

Most beginners who want to learn the craft of making flowers from beads start with this weaving method. You will need red and green beads, wire and scissors - a standard set without which flower beading is indispensable. The diagrams demonstrate how simple the technique is to weave a rose. The first two rows consist of three beads, the number of which increases from row to row. Having finished the last, tenth, stretch the wire with beads to the base of the petal and secure.
The sepals and green leaves are made in a similar way, only from fewer rows. You don't have to guide the wire with additional beads to the base. Beading of flowers ends with assembly, which occurs as follows: the petals are twisted one after the other, then the sepals, then a stem is formed, to which green leaves are attached.
Features of the CCR technique

It is impossible to imagine beading flowers without a weaving method called “frame with a central row.” This is one of the most difficult, but wonderful weaving techniques, thanks to which you will be able to make buds similar to living analogues. This skill is achieved through the ability to tightly weave small beads and give the finished petals any shape.
First, cut the required piece of wire and tie a knot at one end. Make a central row of several beads, then make a large loop on top. Turn the workpiece over so that the knot is on the bottom. String the beads and braid them around the central row so that round loops are formed around it. Keep doing this until the right size petal. Once you master this technique, you will be able to make thousands various options colors, and beadwork will not seem complicated to you.
Flowers: master class on making orchids from beads

Mosaic weaving is not made from wire, but from fishing line or strong thread. A product made from this material is much cheaper, but this does not deteriorate the result. At correct selection color palette, your small works of art will practically not differ in appearance from their living counterparts - this is what attracts beginning beadworkers.
An orchid flower is made using the mosaic weaving technique using fishing line and a needle. The product consists of six petals of two different sizes. In the diagram, the orchid is made of dark blue and purple colors, but if you wish, you can choose a different palette. To make the middle you will need one large bead. To avoid mistakes, follow the diagram exactly, which indicates the number of rows and beads. To weave the first row, string one bead at a time, passing both ends of the fishing line through it. Subsequent rows are performed using a needle. String one or two beads depending on the type of row. Do not forget that the edge of the petal is made of a dark color, and the middle is made of a light color.
Scarlet Rose

Using the “frame with a central row” technique, you can make any flowers, including those that women love most in the world. Let the scarlet rose be the first product with which you begin to master beadwork. Schemes of rose flowers using the KCR technique are carried out according to a single instruction: the central row is made of seven beads, and the number of rows depends on the size of the flower part. The large 5 petals consist of six loops, the middle 3 - of five, the small 3 - of three. Three green leaves are made according to a similar principle. To make the middle, you need to twist a small petal.
Flower beading is an art that requires creativity. How you bend the resulting product will determine its appearance. Try to disguise the wire under the floss threads, choose natural colors and their shades. Admire living vegetation and reproduce their true beauty in your work, and then you will be able to fully master the craft.
Flower making is a special section of beadwork, in which it is important to follow a few simple rules so that the product looks decent and your work is not in vain.
In the first stages of learning, follow the diagram exactly and practice on small compositions.
Buy high-quality beads that will not subsequently lose their original beauty. Make flowers from several shades of red, pink or blue so that the product does not differ from its living counterpart.
Use thin wire, sold in specialized stores. Braid the legs of the product with green threads or floral ribbon - another material without which beading is unthinkable.
The flowers, the making master class for which was presented in the article, are well preserved thanks to proper care. Wipe the dust off them with a small brush or brush once a month, and then they will not fade even after many years.