Simple DIY vegetable crafts. Crafts from vegetables for school and garden
One of the most relevant autumn themes for creativity is autumn crafts from vegetables and fruits. Crafts from vegetables and fruits for kindergarten are of great interest because young children take special pleasure in making unusual figures from autumn fruits that are familiar to them.
Crafts from vegetables and fruits for school are distinguished by more complex execution techniques, a large number of small parts and the complexity of their attachment.

Many children have a desire to learn more about various vegetables, they remember the names better autumn gifts, learn to distinguish vegetables from fruits.
Animals made from vegetables and fruits
Children will surely love making animals out of vegetables and fruits.
Vegetable craft “zoo”. A giraffe, a zebra and a vegetable turtle will live in our zoo.
For the “Giraffe” craft, we will need toothpicks, a pear and young, dense tomatoes (you can use small plums or gooseberries). Insert toothpicks into the pear. We will need four toothpicks from the bottom - these are the legs. For long neck for the giraffe, we will need to insert either a longer stick or use two toothpicks.
We string tomatoes on the neck one by one.
A funny autumn hedgehog is made from pears and grapes.
Eggplant crafts
For the zebra craft we will need toothpicks, eggplants and small tomatoes. Peel the skin from the eggplant using narrow strips. Place the end of the eggplant on the toothpicks.
We place the head from the tip of the eggplant and the stems with tomatoes on toothpicks. Eggplant zebra - ready!
You can also make a funny penguin in a tailcoat from eggplant.
A handsome cockerel made of vegetables and fruits comfortably sits on the base of a pineapple.
You can make a fast helicopter out of eggplant and carrots.
DIY zucchini crafts
A whole family of penguins can be made from zucchini.
The curved zucchini itself begs to be used for making funny animals and birds.
You can make an airplane out of zucchini.
What do you think of the idea of making a zucchini train with cheerful passengers made of onions?
You can make a “basket of emotions” from various vegetables. Children love such crafts very much, because they help them experience and understand various emotions and feelings.
"Basket of emotions" from vegetables
Turtle made from small and large zucchini.
From zucchini and autumn leaves you get the head of the hero of children's fairy tales, the Scarecrow.
You can use zucchini to make a charming vase containing flowers, fruits and leaves.
From zucchini, cucumber and carrots you can make wonderful crafts for boys: a tank and a racing car.
The turtle is very easy to make. We will need a flat pepper and a broccoli floret.
Using a knife, cut holes in the pepper.
We insert the head and legs of broccoli into the holes. We make eyes from berries or greens.
We glue eyes and horns from vegetables and herbs to the giraffe. We give the zebra eyes and ears. Our zoo of vegetables and fruits is ready!
Potato crafts
You can make a lovely autumn hedgehog from potatoes and berries. We attach the berries to the potatoes using toothpicks.
Potato and carrot pigs
You can make wonderful pigs from potatoes and carrots. Attach the carrot ears and snout to a small red potato using toothpicks.
We attach the four legs in the same way. Eyes made from cloves or peppercorns can be glued on. Potato pig - ready!
You can make several pigs and set up a small farm with bedding, a bush and a trough for feeding pigs.
Craft “Elephant made from beets”
You can use beets to make another funny autumn character - an elephant. We make the elephant's head from beets with a tail, and the ears from cut beets. We secure all the parts with toothpicks.
Cut out the stems from the beet slices. We fasten the head, legs and body together.
Our elephant will be a wonderful exhibit at the autumn exhibition!
Craft “Elephant made from beets”
Autumn craft from onions
You can make a big-eared bunny from an onion. The parts of the craft are attached to each other using matches.
DIY crafts from cucumbers and tomatoes
You can make a beautiful duck from a cucumber.
From cucumbers and tomatoes you can make a funny pair - a king and a queen.
Mushrooms from tomatoes and cucumbers
From tomatoes and cucumbers you can make luxurious fly agarics in the meadow.
Cauliflower Crafts
Perhaps the most popular craft made from cauliflower is the sheep.
This is a fun cauliflower turkey.
The very shape of cauliflower tells us another original idea- snowman.
A very simple and very original dragonfly is made from peas.
Very simple craft, but causes complete delight in children - a crocodile made from carrots.
Another simple but very touching carrot craft is a rocket.
DIY cabbage hare
You can make a touching autumn hare from zucchini and cabbage. The cabbage heads are held together with toothpicks.
We make the arms, legs and ears of the bunny from zucchini, which we also attach with toothpicks.
Transport from vegetables and fruits
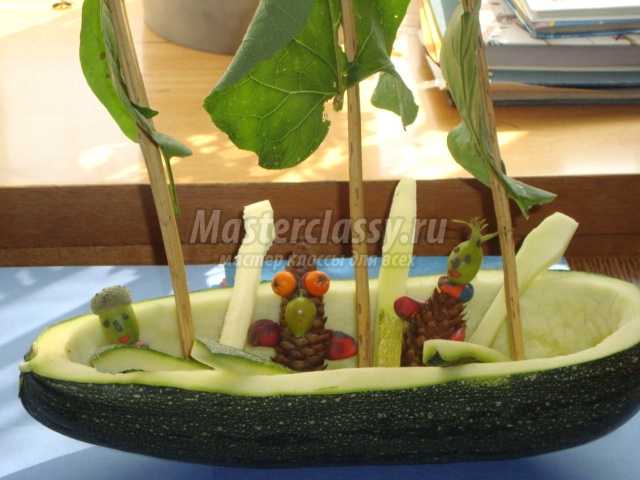
You can make a very impressive boat from zucchini, eggplant, carrots and cabbage leaves. Make a hole in the zucchini. Cut off the end of the zucchini. Using a toothpick, attach the tip of the eggplant to the zucchini.
Cabbage leaves should be boiled a little. They will become softer and more pliable.
Look at the video on how to make a boat from zucchini:
DIY pumpkin crafts
The most festive vegetable vehicle is a pumpkin carriage. For a large orange pumpkin, you will need to hollow out the inside and cut out windows and doors. The rest of the design of the carriage depends on the available materials and your imagination.
DIY pumpkin house
A hollowed out pumpkin can be used to make a beautiful fall house for display or play.
Crafts from various vegetables
Pumpkins, cabbage, beets, turnips, onions, radishes and herbs can be used to make a dad, mom and baby for the fall display.
DIY apple crafts
Apples can be used to make quick racing cars.
Apples make a very beautiful cockerel. We make the body, tail and stand. We fasten the parts with toothpicks.
We make the comb, nose and beard from carrots. We also secure the head with a toothpick.
Apple craft “Cockerel”
You can carve an elegant, handsome swan from an apple. The curved neck of an apple cut along the circumference is especially impressive.
Apples can be used to make a very impressive autumn caterpillar. We secure the apples together with a toothpick. We make legs from carrots, which are also attached with a toothpick.
We also attach the apple head with a toothpick. The apple caterpillar is ready!
You can make horns, a nose and a necklace from natural materials for the apple caterpillar.
You can tie bows between the apples.
Berries on skewers will make a beautiful peacock out of an apple.
You can make a gorgeous bear out of apples.
Look at the video for a selection of wonderful apple crafts:
You can make funny autumn hedgehogs using apples and toothpicks.
Autumn hedgehogs can be made on a base of zucchini or dense pear. Toothpicks are inserted into the base onto which grapes or gooseberries are pricked. Crafts from melon, orange, carrots and berries Owl from apples and grapes Hummingbird from fruits Stamps from vegetables
Fruit flowers are real little works of art. For example, see how you can make a tasty and healthy “flower in a pot” dish from apples and berries.
This bouquet is crowned with a rose flower.
Craft “Queen Autumn” made from corn
Crafts made from corn look very original. We decided to make a fall queen out of corn. We decorate the corn with an autumn crown of berries and flowers, and hang beautiful voluminous earrings on it. We put a fruit face on it. We fix all parts of the craft with glue.
We make a corn dress from dry corn leaves. We decorate it with berries and flowers. Queen Autumn is ready! This craft will take its rightful place in the competition. autumn crafts.
Corn craft "Queen Autumn"
It turns out that you can make very elegant autumn flowers from corn leaves:
DIY cereal crafts
Making crafts from cereals is not only very exciting, but also very useful, as it develops fine motor skills, perseverance and hard work. Sometimes, when you get carried away, you may not notice how much time has flown by during this activity. Try lining your turtle's shell with lentils and peas. The base of the turtle is a plastic plate. The parts are glued from cardboard.
 Autumn bouquet of apples
 Watch how you can make a bouquet of apples in the video:
As a rule, children make crafts from vegetables and fruits with their own hands with great joy. You can combine different ideas to create something original. After creating your unique character or picture, don’t forget to take a photo as a souvenir.
Autumn crafts from vegetables and fruits reviews:
“I would never have thought how many things can be made from vegetables)” (Anastasia)
“Pineapple flowers))) a dream!”
In autumn, exhibitions of crafts made from vegetables and bouquets of flowers are very popular in kindergartens and schools. Most often, parents have to figure out for a very long time how to help their child make crafts. We bring to your attention a bright selection of 40 crafts in kindergarten from vegetables, with descriptions and pictures. The process of creating crafts will become exciting activity both for children and parents.
Ram
For a vegetable ram, a minimum of material is required. The body of the ram itself is a very branched head of cauliflower. The horns can either be attached in the form of separate twisted pieces of cabbage, or cut with a knife (without cutting all the way through) from the ram’s body itself. You can take special purchased eyes or make them from scrap materials (buttons, plasticine, beads). Attach the parts with glue or toothpicks.
Alarm
Material:
- round pumpkin;
- eggplant;
- toothpicks;
- plasticine.
Cut 2-3 centimeters off the side of the pumpkin (without cutting through to the pulp and seeds). Cut off the tail of the eggplant. Cut 5-6 centimeters from the nose of the eggplant and exactly from the tail. Cut out Roman numerals from the eggplant skin. Form arrows from plasticine. Secure all the parts of the alarm clock with toothpicks.
Helicopter
Material:
- 2 medium zucchini;
- 2 small zucchini;
- carrot;
- toothpicks or skewers.
One medium-sized zucchini is the main body of the helicopter. We cut the second zucchini and make wings for the helicopter, as shown in the picture. We form the tail of a helicopter from a small zucchini, and attach a propeller from a thin plate of zucchini and a carrot ring.
Mushroom clearing
Material:
- base for the clearing (boxes, board, cardboard);
- leaves or greens for grass;
- carrot;
- apple;
- potato;
- toothpicks.
Form grass or fallen leaves onto the base. Make mushroom stems from carrots, and caps from apples and potatoes. Secure all parts with toothpicks. You can decorate the composition as desired.
Caterpillar
Material:
- apples;
- carrot;
- green;
- base-stand;
- olive;
- toothpicks.
Connect the apples into a caterpillar using toothpicks. Form horns from olives (string on toothpicks). The eyes and nose can be made from scrap materials (buttons, plasticine, beads). Attach the legs from carrot rings. Place the caterpillar on the base. Decorate as desired.
Cabbage Lady
Material:
- head of cabbage;
- red bell pepper;
- carrot;
- parsley;
- hat;
- toothpicks.
Form a composition of cabbage, parsley and hat. Place on a stable base. Attach a nose made of carrots, a mouth made of peppers and eyes made of plasticine or olives.
Hedgehog
Material:
- base (cardboard or board);
- oblong pumpkin;
- carrot;
- grapes or olives;
- potato;
- apples;
- mushrooms;
- toothpicks.
Form a clearing on the base. Make a hedgehog from carrots, pumpkin and potatoes, as shown in the picture. Attach eyes, nose and spines. Place leaves, mushrooms, apples on the thorns. You can decorate as desired.
Hare “Krosh”
Material:
- medium-sized head of cabbage;
- 2 cabbage leaves;
- carrot;
- zucchini;
- parsley.
Make hare legs from two zucchini rings. Place the cabbage body on the legs. Cut ears from cabbage leaves and insert them into the cuts in the hare's head. Attach handles from pieces of zucchini. Attach a small carrot to the hare's hand. Use parsley to make hare hair and carrot tops. Eyes can be attached purchased or drawn. Make the nose and teeth from suitable material at hand.
Cactus
Material:
- large potato or sweet pepper;
- cucumber;
- toothpicks.
Visually divide the potatoes into three parts and cut off ⅔. Use a spoon to clean out the indentation in the potato and decorate the edge with carved cloves. You can do the same with sweet peppers. The pot is ready. Insert the cucumber into the notch. Make cactus spines from toothpicks. You can paint the spines. Decorate the face of the cactus using available materials.
Coach
Material:
- large round pumpkin;
- 4 small squash;
- toothpicks;
- decorative material (flowers, ribbons, beads, rhinestones).
Using the carving method, you need to cut the pumpkin, form windows and carriage doors. Make wheels from squash (can be replaced with thick zucchini rings). Decorate the carriage as desired. You can seat the coachman and add horses.
Stroller
Material:
- oblong watermelon;
- 2 pineapple rings;
- 2 zucchini or orange rings;
- 4 olives.
- toothpicks.
Remove the pulp from the watermelon, keeping the rind intact in a stroller shape as shown in the picture. Make a handle from the remaining peel. Make wheels from an orange or zucchini. Insert a berry or olive into the middle of the wheels. Decorate the roof of the stroller with flowers made from pineapple and watermelon pulp. Secure all parts with toothpicks.
Candy Pig
Material:
- oblong watermelon;
- pink felt;
- buttons;
- toothpicks.
Make a cut in the watermelon and remove the pulp, keeping the rind intact, as shown in the picture. Use buttons to decorate the pig's face. Make ears and tail from felt. Make the pig's legs from pieces of watermelon peel.
Ship
Material:
- zucchini or large eggplant;
- red bell pepper;
- 4 cabbage leaves;
- long skewers;
- toothpicks.
Using a knife, cut out the shape of a ship from a vegetable, as in the picture. Make sails from skewers and cabbage leaves. Make a flag from sweet peppers.
Basket
Cut out a basket from one large round pumpkin, select seeds and pulp. You can decorate the basket at your own discretion with carvings or improvised decorative materials. You can put fruits and vegetables in the basket.
Cat
Peel the onion very carefully, leaving the tendrils. Place it on an onion ring. Make small cuts for the pig's ears. Cut out the eyes and mouth. Make a tail from scrap materials.
Crocodile in a helicopter
Material:
- zucchini squash;
- many small cucumbers;
- toothpicks;
- carrot;
- beet.
Use the zucchini to form the base of the helicopter (cut out the cockpit). Make a helicopter's tail and wings from cucumber slices. Make a propeller from beets. Form the wheels and steering wheel from carrots. Collect a crocodile from cucumbers and put it in the cabin. You can make protective glass out of plastic. Attach the eyes and hat to the crocodile from scrap materials.
Lapti
2 long zucchini must be cut to the shape of a bast shoe, as shown in the picture. Select all contents of the zucchini. The bast shoes can be painted or a pattern scratched.
Lesovik
A medium-sized zucchini needs to be planted in a clearing. Make a clearing from leaves, flowers and branches. Make clothes for the forest man according to your own wishes. Draw a face, attach hair, put on a hat.
Frog
Material:
- 1 green apple;
- 1 dark grape or olive;
- small cucumber;
- 5 light grapes;
- toothpicks.
Make a frog's body from an apple by cutting out the mouth. Attach arms, legs, and eyes from grapes. Cut out a cucumber and attach a crown.
Car
Material:
- 1 cucumber;
- 1 carrot;
- 3 small and 1 large grapes;
- zucchini ring;
- toothpicks.
The cucumber will act as the machine itself. Make wheels from carrot rings. Make a cabin from a peeled zucchini half ring. Attach the grapes in the form of headlights.
Teddy bear
Material:
- 3 large oval potatoes;
- 1 medium potato;
- 1 small potato;
- toothpicks.
Use two large potatoes to fasten the body and head of a bear. Make hands and ears from the third large potato. Cut medium-sized potatoes and make legs. Make a pot of honey from small potatoes and place it in the hands of the bear. Draw eyes and nose.
fly agaric
Material:
- green zucchini;
- oblong pumpkin;
- plasticine;
- colored paper and glue;
- toothpicks.
Cut off the nose of the pumpkin, leaving about 8-10 centimeters, this will be the mushroom cap. Form a cylinder from the zucchini that will serve as the stem of the mushroom. Secure the parts with a toothpick. The mushroom cap can be painted and given white dots. Use colored paper and plasticine to decorate the face of the fungus.
Mouse
Material:
- watermelon with white rind;
- 2 dark grapes or olives;
- small melon;
- toothpicks.
Using a knife, carve eyes, mouth and teeth on the watermelon, scratch antennae. Attach halves of grapes or olives as pupils. Make a nose out of a whole olive. Attach the ears from the two halves of the melon.
Monkey
Material:
- pineapple;
- large orange;
- small orange;
- 2 olives;
- small white-skinned watermelon;
- toothpicks.
Cut the pineapple straight from both ends. Fasten pineapple with watermelon. Make small thin slices on the watermelon where the eyes will be. Attach half an olive as pupils. Cut a mouth out of a large orange and attach the muzzle to the head. Attach the olive spout. Cut a small orange in half and attach as ears.
Octopuses
To create this composition you need to find two carrots branched at the end. Use scrap materials to make eyes and mouths for ready-made carrot octopuses. Decorate as you wish.
Palm trees
Material:
- 1 green sweet pepper;
- 1 red sweet pepper;
- 1 orange;
- green onions;
- olives (black and green);
- skewers.
Cut the orange in half. Insert skewers into half an orange and thread olives onto them along their entire length. Cut out the tops of the palms from the peppers, as in the picture. Make one palm tree using a bow. Place olives on the treetops.
Spider
Material:
- oblong yellow pumpkin or squash;
- round flat green pumpkin;
- 12 small identical carrots;
- base-clearing;
- leaves;
- toothpicks.
Cut an oblong pumpkin and insert it into the green one (make a hole first). Form the carrots into legs, as in the picture. Place the spider in the clearing. Make eyes and mouth from plasticine or other available materials.
Penguins
Take the required number of eggplants and cut them into penguin bodies, as in the picture. Make paws and nose-beaks from carrots.
Train
Make wagons from young small zucchini. Make wheels from zucchini rings. Use sticks to decorate as in the picture. Make a pipe and spout from carrots.
Piglets
Take the required number of oblong potatoes (preferably pink). Use pink plasticine to sculpt ears, tails and nickels and attach to the pigs. Make eyes from black plasticine. You can place the piglets in a clearing or in an imaginary fence.
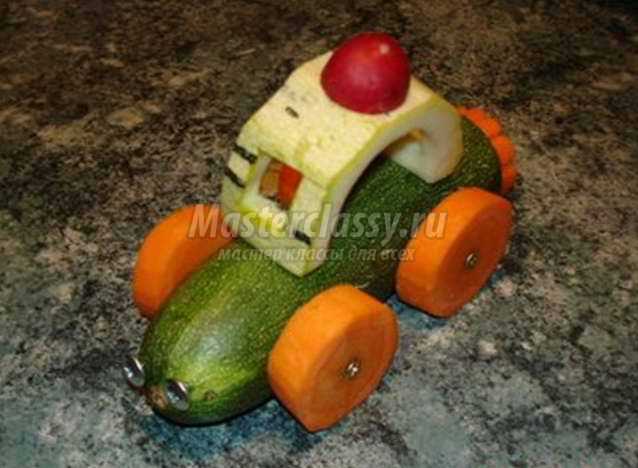
Retro car
Take an oblong, but not very long, zucchini. Attach wheels to it. You can make wheels from golden or silver cardboard (you can use disks). From black cardboard you need to cut and glue the roof and cabin and connect it to the zucchini. You can make a small steering wheel out of wire.
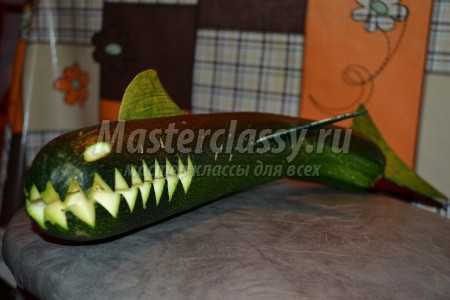
Fish
Take a suitable long zucchini with the tail wrapped. Create a fish using cardboard, plasticine and paints. Glue the tail and decorate the face. You can decorate the fish as you wish.
Service
Material:
- 1 large round pumpkin;
- 2 small round pumpkins;
- pieces of flexible thin hose.
Cut the caps off the pumpkins and remove the seeds and pulp. For a large kettle, make a handle and a spout from a hose. The lid, cut off earlier, will do. Attach two handles on the sides to the sugar bowl. Make the cup one handle, and the cut-off lid will serve as the saucer. You can decorate the service.
Smeshariki
Material:
- round potatoes;
- round apple;
- round onion;
- pear;
- plasticine;
- zucchini squash;
- toothpicks.
Make a car out of a zucchini. Make car wheels from zucchini rings. Headlights made of plasticine. Give each vegetable a face using plasticine, as in the photo.
1 carrot; plasticine; cardboard base. Design the base as a clearing or road. Make a tractor base from one zucchini. Cut out the cab from the second zucchini. Attach zucchini rings as wheels. Make a pipe out of carrots. Use carrot rings to make a steering wheel and headlights. You can seat a plasticine driver in the cab.
Pumpkin house
Place a round pumpkin on a cardboard base decorated with leaves and grass. Cut out windows and doors in the pumpkin. Decorate the roof with grass. You can decorate the house at your own request, using any suitable materials at hand (fabric, sticks, flowers, toy inhabitants).
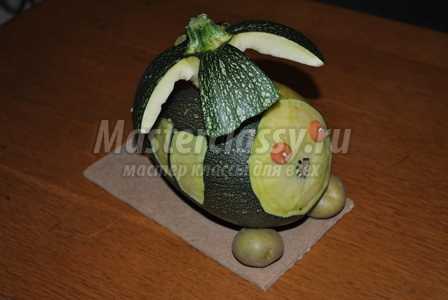
Snail
Trim the zucchini and pumpkin as shown in the picture. Connect the snail parts on a cardboard base. Use beads and buttons to make eyes, a nose, a mouth and horns for the snail. Decorate with rhinestones, sequins, fabric, artificial butterflies and flowers.
Owl
Using the carving method with a thin and sharp knife, cut out the details of the eagle owl from the watermelon, as in the picture. Use scrap materials to make eyes and eyelids for the bird. Make a beak out of carrots.
Turtle
Material:
- 3 cucumbers;
- head of cabbage;
- wire;
- toothpicks;
- cardboard base.
Cut the cabbage so that it lies firmly on the base. Form a turtle shell from identical cucumber rings. Make a turtle head from a third of a cucumber. Attach bead eyes to your head and put on wire glasses. You can sew a small hat.
Elizaveta Rumyantseva
Nothing is impossible for diligence and art.
Content
The first educational institutions that parents and children go through are children's schools early development, clubs, courses. Teachers of these institutions are often asked to work with children at home, and in order to be able to test this, crafts made from vegetables for kindergarten are brought to the exhibition. Such competitions allow each child to gain new ideas, knowledge and develop logical thinking.
To make it easier for parents to do interesting craft, we offer step-by-step master classes the best vegetable options.
Step-by-step lessons on making children's crafts from vegetables for kindergarten
Crafts from vegetables for kindergarten can be very different and unimaginable. The more unpredictable the accessory, the more attention will be paid to it, thereby increasing the child’s self-esteem and creating a positive attitude towards him. To ensure that homework in the form of vegetable crafts for kindergarten is completed perfectly, we recommend viewing the best options for master classes.
Ship made of zucchini
- We prepare a zucchini, 30-40 cm long and 7-10 cm in diameter. It needs to be rinsed under water and dried with towels.
- We place the zucchini on the most stable side so that its back end (with the spine) is slightly raised. If the vegetable does not want to become the way you want, then it is easy to cut it a little at the bottom to make the bottom even. With this treatment, the boat will not fall or tilt to the sides.
- We cut out the upper part of the zucchini so that the edges of the vegetable remain untouched by 5-7 cm. In this way, we form the nose and back of the ship closed.
- If, after cutting out the top part, you can reach the seeds and entrails, then you need to pull them out and completely clean the zucchini of seeds. After this procedure, it is better to dry the vegetable with paper towels.
- Using a knife on one side and the other in the center of the zucchini, we cut out small square windows (3 pieces each), with a width of 1-2 cm on each side. This way we will have a hole so that we can insert the “oars of the ship”.
- Near such windows, a vegetable anchor is cut out with a knife or a ready-made accessory (made of cardboard, carrots, zucchini skin, etc.) is attached.
- At the beginning and end of the ship we insert wooden skewers, 10-15 cm long. Instead of them, it is allowed to take green branches of a bush or a vine.
- In the center of the vegetable ship we insert similar skewers exactly vertically, this will be the basis for the sails.
- We prepare sails from cardboard or thick colored paper. They can be different sizes or the same, large or small, rectangular or square - all this is at the request of the child.
- We string the sails onto skewers, bending the cardboard slightly. In this way, “inflated” sails of a vegetable ship are obtained.
- Through the outer skewers and the central, highest one, we pull a thread that will imitate ropes.
- We insert small wooden toothpicks or sticks into the cut out windows; this will be the basis of the oars of the vegetable ship.
- Using plasticine, we sculpt the edges of the oars and attach them to the poles, which are already ready.
- You can decorate a zucchini ship with any kind of people, animals, or cartoon characters.
Eggplant penguin
- To make this vegetable craft for kindergarten very beautiful, you need to prepare several medium-sized eggplants with a bright purple and black coloring.
- We take a knife with a small tip (possibly a stationery knife) and begin work.
- The green caps of the eggplants do not need to be removed, these will be the caps of the penguins. But on the other hand, the root should be cut evenly so that the animals are stable.
- Using a knife, cut out 2 eyes from the vegetable, at a level of 1.5-2 cm from the top cap. A little lower we make a round hole for the nose.
- Take a small carrot, cut off 2 cm from its lower end and insert such a nose into the resulting hole for the nose.
- We use a knife to outline an oval on the “belly” of the vegetable penguins and peel the inside of the eggplant to the green pulp. From the skins that remain, we cut out several circles with a diameter of 1 cm and, using a toothpick, pin them in the center of the “belly”. In this way we obtained unusual buttons on the belly of animals.
- Using a knife, carefully make a small cut in the skin on the left and right sides of the eggplant and turn it 2-3 cm upward. This way you will get penguin wings.
- It is allowed to decorate an original vegetable craft with herbs, autumn leaves, artificial snow or stones.
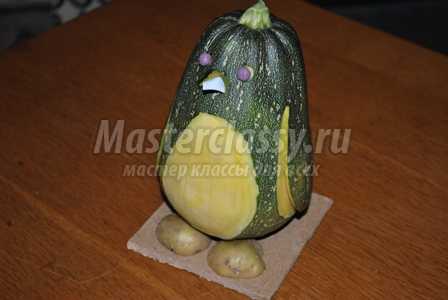
Cool faces or pumpkin men
- Let's take a few pumpkins large size, wash them and dry them.
- Using a can of spray paint, coat each pumpkin with bright orange or yellow paint. We wait until the vegetable dries.
- Using a black or dark brown felt-tip pen, a thin marker or a greasy pencil, draw the contours of the eyes, nose, mouth (if you want to create unusual craft, then it is allowed to finish drawing teeth, mustaches, glasses, moles, nostrils).
- We paint the eyes, nose, mouth with the desired colors (blue, white, red shades of felt-tip pens).
- Similarly, on the vegetable we draw the edges of the hair or hat and paint it in the appropriate color.
- We put the pumpkin men on a tray, decorate them with leaves, belts, earrings, beads, and other accessories and present them!
Original cauliflower lamb
- Prepare small pieces of white cauliflower, long clove flowers, hard black olives with pits, a knife, and toothpicks.
- We pierce each clove with a wooden skewer and insert it into the cabbage. We carry out similar actions with 3 other spices. In this way we get the legs and wool of a vegetable sheep.
- We take one black olive as a head and pin it to the cauliflower using a toothpick.
- Using a knife, cut small pieces of the olive on the sides to make ears.
- We do the same with the eyes. To make them look more organic, it is allowed to use grains of round rice, buckwheat or white berries. The eyes are glued on with artificial ones from old small toys.
- It is advisable to place the resulting vegetable lambs on green grass, moss, or create a special composition for them.
Cartoon characters Smeshariki made from potatoes and onions
- Cooking the onion brightly orange color, medium size. My potatoes are of a similar format, the color does not matter. Additionally, among the vegetables you can take beets, lemon, tomato, and small squash.
- To make the vegetable figures stable, one edge of the bottom should be cut off a little with a knife.
- We knead multi-colored plasticine in our hands and make eyes, a nose, and a mouth for each Smesharik.
- In order for the vegetable craft to be spectacular, the body parts of the characters should be made in the same color that is used in the body (onion with orange, beet with purple, lemon with yellow, etc.)
- Place the resulting vegetable Smeshariki on a beautiful tray, having previously laid out the base with grass or autumn leaves. Such a simple craft will be even more original if it is supplemented with small colorful mushrooms, berries and fruits.
How to make crocodile Gena from cucumber and Cheburashka from potatoes
- For such a vegetable craft, you need to take several large potatoes, cucumbers, colored paper.
- Cut a ring 2 cm wide from the potato, place it across the remaining piece, and pin it with toothpicks. In this way we got the torso and head.
- Cut 2 potato circles, 1 cm wide for the ears, and pin them similarly to the head using toothpicks or wooden skewers.
- We cut off several small pieces from the potatoes for legs and arms and attach them in the same way.
- Using colored paper and scissors, we cut out eyes, nose, mouth, and buttons for the body for the Cheburashka. Glue them with glue to the dried potatoes.
- Cut the cucumber into 2 pieces in proportions of 60%, 40%. The larger piece will serve as the body, and the smaller one needs to be cut from the entire edge and inserted a small piece of a toothpick. In this way we get an open mouth; we attach it to the body with a skewer.
- We cut small pieces from another cucumber for legs and arms and attach them in the same way.
- We cut out the eyes and nose from colored paper and glue it to the finished cucumber crocodile Gene.
- We decorate the vegetable composition of Cheburashka and Gena the crocodile with leaves, vegetables, fruits, and other gifts of nature.
A simple craft for children - a carrot flower using the kirving technique
- We prepare several large carrots, wash them under running water. It is advisable for such a vegetable to be a little limp; for this it is recommended to leave it in a warm place for 2-3 days.
- We peel the carrots with a knife along the entire length, making vertical triangular cuts.
- Cut the carrots into thin slices. In this way, curly petals of the future vegetable flower are obtained.
- We place carrot circles on a skewer, bending them upward. The largest petals should be lowered down, and the smallest ones will be located at the top.
- The leaves of such a vegetable rose from carrots can be made using onions, dill, parsley or other herbs.
Funny hare made from white cabbage for the autumn holiday in kindergarten
- We prepare a small cabbage, separate the topmost leaves from it - 2 pieces.
- We peel the carrots, cut them into 2 parts, and make vegetable legs from each half.
- We attach the cabbage to the carrots, thereby creating the basis of a hare on legs.
- We attach the remaining 2 cabbage leaves to the top with toothpicks, making ears.
- We make the eyes and nose of the vegetable hare using black olives.
- The mouth is allowed to be made using red bell pepper.
Very beautiful autumn composition in a basket of vegetables and fruits
- Such a fantasy vegetable craft should be framed in a beautiful basket made of vines, zucchini or pumpkin.
- You definitely need to put bright tomatoes, peppers, cauliflower, corn, squash, zucchini, carrots, and small watermelons in it.
- It is advisable to supplement the vegetable composition with lettuce leaves, dill, yellow and white daisies, field plants, and pine cones.
- A basket of vegetables decorated with ears of wheat, oats or barley will be especially original.
Photo ideas for autumn crafts from vegetables and fruits for kindergarten
Among the most popular children's crafts made from vegetables, it is worth highlighting animals (hedgehogs, bunnies, squirrels, bears), cartoon characters and cars. If you plan to create accessories for Halloween, then you definitely need to take a pumpkin, zucchini or watermelon and make unusual shapes out of them. Most easy way do the job perfectly - analyze ready-made vegetable crafts in photographs and methods for making them. Best options We suggest you consider:
Found an error in the text? Select it, press Ctrl + Enter and we will fix everything! Carving
This option is more suitable for adults and schoolchildren, i.e. for those who can handle a sharp knife well. Squash fruits seem to be ideally suited for carving, because these vegetables are quite elastic and soft, and they are quite easy to cut. Well, the patterns turn out to be unusually attractive due to the contrast between the light flesh of the zucchini and their dark green skin. Of course, to become a real master, you will have to spend a lot of effort and time, but if the next fruit was spoiled due to your slightly unsuccessful actions, then you can always prepare and please the whole family with a delicious dish, which is also quite easy to prepare .
As for the options for crafts, there are countless of them - a variety of vases, figurines, a tea set and even a pair of stylish shoes. We suggest you make small openwork candlesticks. Cut off the bottom of the fruit for stability, determine exactly what height the future candlestick will have, select the core with seeds with a spoon and cut beautiful patterns on the walls. Well, now all you have to do is put a round tablet candle inside and light the wick. Using the same principle, you can make lanterns that can create a romantic atmosphere in your home.
You can also use beautiful carved vegetable products for decoration. festive table. To do this, purchase vegetable cutters at a hardware store that will allow you to cut strips of different thicknesses. Ready-made zucchini strips can be rolled into the shape of a variety of colors by tinting them food coloring- this is how you get roses, peonies, daffodils.
ShipTo make such a beautiful “handicraft” you should take a large squash fruit (do not peel it, as you usually do when cooking) and cut it so that the cut part is a third, and the remaining part, respectively, is two thirds.
To work, take a large part and leave about a third of the raised deck from one end, make a depression in the remaining part - select the pulp with a spoon or cut it out with a knife.
Peel the carrots and cut them into layers; use them to make an anchor and a couple of flags. Chop another carrot, also peeled, into slices; they will later be useful for making portholes and a steering wheel.
From the remaining third of the vegetable, or rather, using its skin, make a pair of stairs, their length should be equal to the height between decks. Make a steering wheel - stick several broken toothpicks into a large carrot circle. Use the same toothpicks to secure the portholes along the boats and to secure the anchor. If you want to further decorate your boat, you can stick broken matches with sulfur heads along the top side.
Cut a few large whole cabbage leaves to size - secure these sails using long bamboo skewers. Decorate the top of the mast with carrot flags. If you don’t have cabbage leaves, then don’t be upset, because regular colored paper is also suitable for sails. Make a through hole on the bow of the boat and place a whole thin peeled carrot there. You turned out so wonderful!
DIY zucchini craft – photo:
Zucchini crafts for kindergarten
If in the near future kindergarten there will be an exhibition in honor of the autumn holiday, then be sure to do zucchini crafts for the holiday. Such cute “homemade products” will undoubtedly appeal to teachers, children, and parents.Torn shoe
Take an oblong-shaped zucchini with a thickening at the end and make a hole in a narrow place, remove the pulp from the hole.
Cut the zucchini lengthwise into about a third to simulate a torn shoe sole. Amuse both cut parts, in this case the “gape mouth” will be more expressive. Cut several paired holes for laces in the top of the peel, insert plastic strips inside (a plastic bottle is suitable for cutting them out), paint them with nail polish white. Using a knife, apply a pattern on the sides that imitates the usual pattern on sneakers; tie regular white laces or a connected chain of air loops to the plastic strip. Stick several matches into the “mouth” of the shoes, which will act as shoe studs. So the funny one is ready zucchini craft for kids kindergarten
Penguin
Take a small fruit with a soft skin. Cut out an oval belly in the center. Cut out the wings on the side, cut them a little from the bottom so that they protrude slightly. Cut holes for the eyes and use matches to secure the plasticine button eyes.
A triangular slot should be made for the beak; the beak part itself should be cut from plastic bottle, paint with white nail polish, and then insert into the squash pulp.
A small potato oval shape Cut in half lengthwise and use the potato halves as penguin legs. Here's another one ready in just a couple of tens of minutes.
Airplane
The fuselage of the aircraft will be made from a medium-sized zucchini - make a slightly in-depth medium on top for the wings. Near the stalk, make an oval cut at an angle.
Cut the longest fruit into 3 parts lengthwise, you won’t need the middle, but in the upper and lower parts you will need to make oval depressions, the fuselage will lie in them.
Cut the smallest zucchini into halves lengthwise, one half will be used to make the tail of the plane, and the other for the propeller. Cut the second half of it lengthwise once, then make a hole in the center of the outer round part and place a small carrot circle there.
The next stage is assembling the aircraft. Use a pair of toothpicks to secure the tail. Secure the upper wing with the fuselage with three toothpicks. Insert a pair of sharp sticks into each wing from the edge. Attach the bottom wing by inserting two toothpicks at an angle. Well, now attach the screw using half a stick.
Helicopter
Take a round vegetable, cut off the skin at the front without touching the flesh - this will be the windshield of the cabin. Similarly, cut off the skin on the sides to create side viewing windows. Using matches, fix a couple of carrot circles on the windshield - a kind of peephole.
Use small potatoes for the chassis, make a pinwheel from the cut off top of a small pumpkin, cut as needed.
Crafts from zucchini – photo:
Crafts from zucchini for the autumn holiday
In the fertile autumn, many vegetables and fruits ripen, which is why kindergartens and schools hold themed holidays dedicated to the harvest. Autumn craft from zucchini will be welcome at any exhibition of handmade products.
TractorThis technique is indispensable during harvesting, which is why it is symbolic that this craft is made from zucchini. To work, you will need to take two fruits, and one of them will not need to be cut. Cut the second one into two parts, and the one near the former flower should be smaller in size. This will be the vehicle's cabin. Trim the core slightly so that the cabbage slightly encircles the second zucchini. Be sure to cut through the back and seat in the cabin. The second half of this vegetable is cut in such a way that you get 2 large and medium-sized circles, one small one for the steering wheel.
Lay the untouched fruit horizontally and secure the cabin on it, secure it with a toothpick at the back. Attach the stick at an angle - this will allow your “tinkering” to be more durable. With another one, attach the cabin diagonally across the floor so that you can then attach the steering wheel to it. Attach the large and medium wheels to the base - do not insert the toothpicks to fix them all the way, otherwise the wheels may fly off. Make a pipe from a miniature zucchini, cutting off the excess. Cut this excess into two headlights and also attach to the tractor.
Using the same principle, you can make other transport crafts - cars, locomotives, etc.
DIY autumn zucchini craftThe natural cylindrical shape of such vegetables allows you and your children to make a wide variety of animals - crocodiles, bears, hippos, dolphins, whales. The basis for the crocodile will be a long green zucchini, but the short and wide fruits are perfect for making funny piglets.
Bunny
Take a couple of spherical zucchini, different in size - this will be the head and body of the animal. The legs can be made from oblong zucchini, or you can use other vegetables. Children will surely love this vegetable mix, because they are crazy about variety. The nose for the bunny will be a cherry tomato, the eyes - circles of radishes and black olives. The ears can also be squash or eggplant.
RatThe basis for the cute rodent will be an oblong zucchini, a slightly smaller carrot will be used to make the nose. The ears will be carrot circles, the paws will be small carrots, the eyes will be pumpkin seeds. That's all you need for the rat.
As you can see, there are many options for making crafts from this vegetable. Also, don't forget the benefits of this natural material– it is quite inexpensive during the season, and besides, it does not darken when cut, as potatoes do. That's why you can use both whole fruits and cut pieces for work. The pulp of zucchini is not hard, pliable, but at the same time quite dense. This makes the vegetable ideal for creativity. So, quickly choose the optimal master class for yourself, sit down with your child and start tinkering.
Useful tips
You can make a huge number of different crafts from vegetables and fruits.
Many of these crafts can be made together with children - this will not only bring pleasure, but will also have a positive effect on the child’s imagination.
Here you will find crafts for every taste and color.
Arm yourself the necessary materials and use the accumulated information to create beautiful and original crafts.
Read also:
Crafts from autumn vegetables for children
Children will love playing with paints. To make it fun for them, make vegetable stamps for them.
Potatoes, for example, can be cut in half and a certain pattern can be cut out in each half - the child will dip the potato in paint and stamp it on the paper.
Besides potatoes, there are other vegetables that can be used.
Look closely at the pictures to see how you can surprise children with simple vegetables and colors.
Crafts from vegetables for kindergarten: eggplant man
You will need:
1 eggplant
Glue stick
Pompoms
Plastic (toy) eyes
Everything is very simple, and even small children can do the craft.
1. Glue the toy eyes to the eggplant.
2. To make the nose, you can glue a large pompom or cut a circle out of paper and glue it on.
3. You can glue small pompoms in the shape of a person’s mouth. Instead of pompoms, you can also use colored paper, cardboard or even other vegetables - a strip cut from a carrot, for example.
DIY vegetable crafts: potato men
Making eyes
* To make eyes for a potato man, you can use small buttons of any color (except white), which should first be sewn to a piece of white fabric - then cut the fabric in a circle, grease it with glue and glue it to the potato.
* You can also make eyes from: peas, berries, black pepper, seeds, colored paper, or pieces of carrot, which are secured with a toothpick.
Making the nose
To make a convex nose, use a button sewn to a piece of fabric - cut the fabric in a circle by a couple of millimeters more buttons. Spread the fabric with glue and attach it to the potato.
Making ears
To make the ears, use pumpkin seeds - just insert them into the potatoes, pointy end down. You can also make ears using plasticine.
Making hair
Hair can be made from different materials, for example, from thread, paper (cut fringe) or thin wire.
Crafts from vegetables for school: potato pony
INyou will need:
Three potatoes
Toothpicks
Carrot
1. Insert one toothpick into a small potato - this will be the head.
2. To make the neck, take out a small potato and insert the other side of the toothpick (from step 1) into it.
3. For the body you will need a large potato. Attach it in the same way.
4. Use toothpicks to make the horse's legs. Insert them into a large potato, i.e. horse's body.
5. To make the horse stand, attach small pieces of carrots to the toothpicks that act as the horse’s legs.
6. You can also make ears from carrots. Insert the ears into the pre-cut holes.
7. For the mane and tail, use knitting threads. Just cut as many as you need and glue to the craft.
How to make a vegetable craft: radish flower
Before you start cutting the radishes, soak them in cold water for a couple of hours - they will become firmer and fresher.
1. Cut off the bottom of the radish. Decide how many petals you want for your future flower, and think about where you will make the cuts.
2. Take a knife and start making cuts from bottom to top (see image).
*You may need to practice a little to ensure that all the petals of the radish flower are even.
* If you want the petals to be more open, gently move them with your finger from the center of the flower in the opposite direction.
3. Using scissors, cut the petals so that you get “arrows” (see image).
4. Repeat the previous steps to make a second layer of petals from the middle of the flower, but this time the petals should be between the outer petals.
A similar flower can be made from tomato or kiwi peel:
How to make a flower from a tomato - video:
Crafts from vegetables instructions: flowers-decorations from vegetables
These crafts can be used as decorations for dishes or simply as a beautiful display of vegetables for children who are known to not be very fond of vegetables.
Can be used different vegetables. This example uses cucumber and carrots. You will also need a toothpick.
Food crafts: snowman made from eggs
You will need:
6 large boiled eggs
6 small boiled eggs
Black pepper (peas)
1 carrot
1 skewer
1. Peel one large and one small egg and cut off the top and bottom parts.
3. Place a small egg on a large one and secure them with a skewer - thread it through.
4. Make a hat from carrot rings. To attach it to the snowman, first make one hole with a skewer through the circles. Now place the hat on the protruding skewer.
* You can safely trim off the excess part of the skewer.
* Instead of a skewer, you can use thick, uncooked pasta.
5. Make eyes, nose and buttons using black pepper and for the nose you can use a small piece of carrot.
6. You can use parsley as arms for the snowman.
Children's crafts from fruits: decorations from dried orange slices
You will need:
Orange
Oven
Oven rack
Satin ribbon
1. Cut the orange into several slices approximately 1-1.5 cm wide.
2. Place the orange slices on the grill.
* Do not use a baking sheet, otherwise the slices may burn.
3. Place the slices in the oven and keep them there at 130 degrees Celsius for a couple of hours (monitor them periodically).
4. Remove the orange slices from the oven and let them cool. You can put them on a plate to cool.
5. Now the slices can be used to decorate dishes or for a Christmas tree or interior - they not only look beautiful, but also smell nice.
6. You can make holes in them and thread a ribbon so that the slices can be hung.
DIY fruit crafts: fruit cup
You will need:
Orange or grapefruit
1. Take an apple and place it on the table with the handle down. Cut off the top part, and the bottom part will act as a cup.
2. Using a knife, cut out the core of the apple.
3. To prevent the apple from turning black inside, brush it with lemon juice.
4. Make a cutout in your apple cup for a handle. Cut a slice of kiwi and insert it into this cutout - it will act as a handle.
5. For the saucer, just cut a slice of orange or grapefruit.
You can also make a fruit cup like this to decorate the table:
Berry crafts: strawberry Christmas tree
You will need:
Scissors
Baking paper
Paper (lace) napkin
Adhesive tape (scotch tape)
Strawberry
Chocolate
1. Make a cone out of cardboard. To find out how to make a cone, you can go to our article: Paper cone. Also cut a circle from cardboard - this will be the base of the tree.
*Instead of a paper cone, you can look for a foam cone in stores.
2. Cover the cone with baking paper. You can insert the ends of the paper inside the cone. To secure the paper to the cone, you can use adhesive tape.
3. Melt the chocolate to glue the cone to the base.
4. Cut a circle in a napkin with the same diameter as the base of the cone and push the cone through the napkin.
5. Prepare the strawberries and separate them by size. Remove the tails.
6. Start gluing the strawberries from bottom to top, starting with the largest berries. Dip the strawberries into the melted chocolate and stick to the cone (wrapping paper).
* Save the smallest berries for the top of the tree.
7. You can also attach other chocolate decorations (ready-made or homemade) to the tree.
Children's crafts from vegetables and fruits: butterflies
You will need:
Clothespins
Toy (plastic) eyes
PVA glue
Sealed bag (ziplock bag)
Thin brush or wire (if desired)
Paints (if desired)
1. Using glue, attach the toy eyes to one side of the clothespin and let the glue dry.
2. Place your favorite treats (yours or your children's) in a ziplock bag - you can distribute them to the sides, but this is not necessary.
3. Use a clothespin to grab the bag as shown in the image.
4. If you wish, you can make antennae for the butterfly from a thin brush or wire. You can also paint the clothespin if you feel it is necessary.
Crafts from vegetables: pumpkin faces