
Owl made of pine cones: a master class using natural materials. Lesson on sculpting an owl from pine cones and plasticine for children and adults. Do-it-yourself large owl from pine cones.
In summer and autumn you can find a lot of natural materials for needlework in the forest. Therefore, these periods of the year are the most fertile for doing handicrafts with children. Acorns, twigs, leaves or cones are suitable for making crafts. In general, you can use almost everything, the main thing is to show a little imagination.
Products made from materials that can be found in the forest develop children's imagination and fine motor skills. In addition, they allow you to keep your child occupied for a long time, and also help him learn about the wonderful world of plants. Joint creativity between parents and children strengthens mutual understanding and friendship, and also teaches perseverance.
Cones are a wonderful natural material from which you can make beautiful and interesting things. For example, owls made from pine cones make excellent . Such products can be used as room decoration or as a holiday gift.
As a general recommendation for crafts made from this material, we can give a little advice: before making the products, bake the cones in the oven at 200 degrees for about half an hour. This procedure is aimed at drying wet natural material and disinfecting it.
In addition, this natural material can hide a lot of unsafe living creatures - spiders, ticks, etc. The smallest cones must be heated for 15-20 minutes, otherwise they will burn. After this, you can start crafting!
Owl with felt eyes
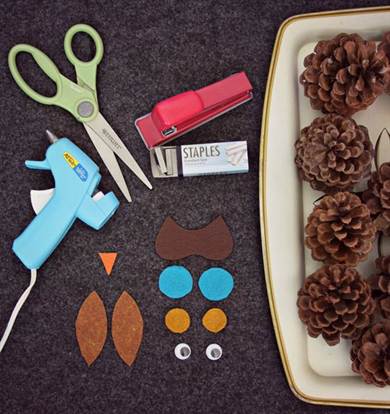
This master class requires adult assistance. To make an owl or owlet you will need:
- pine cone;
- trimmings different colors from felt;
- glue;
- glue-based doll eyes;
- stapler or needle and thread.
Step by step guide:
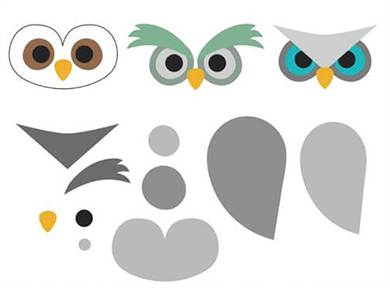
First you need to cut out all the parts for the bird's head from felt. First, the owl's eyes are made from felt. To do this, you need to cut out 2 circles of different diameters. A circle of larger diameter is cut along the edges in the form of a border.

Then you need to cut out the part of the owl's head on which the eyes will be attached. In the photo she is dark brown. The sizes of all parts are chosen arbitrarily, the main thing is that they are in harmony with the owl’s body. To make an owlet, the parts are made smaller.
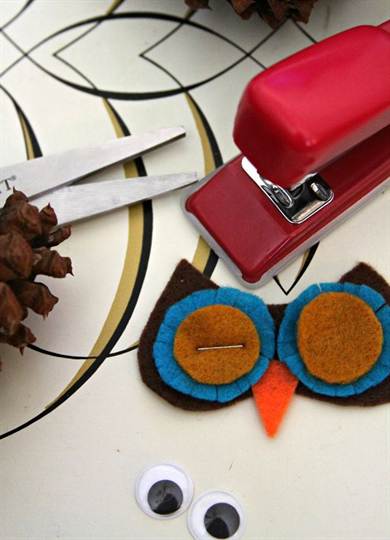
It is necessary to collect all the parts of the bird's head. The felt eye pieces can be stapled to the main part of the head or sewn on by hand. The beak is glued.

Then you need to glue doll eyes to the central parts of the felt parts for the eyes. You can buy them at almost any sewing supply store. After this, the owl's head can be glued to the body.

The pine cone owl is almost ready! All that remains is to glue the wings on the sides of the body.

As you can see, the process is not complicated. The only difficulty may be handling the glue, so adults can help the child make the craft.
Owl made of paper and pine cones
Owl cones almost always turn out well. You can try your hand at making a bird with paper eyes and wings. In this master class, to make a craft you will need a pine cone, glue and a printer.
The cone will serve as the body of the bird. All details are shown in the picture. You can print the image and then cut out the elements you like.

To make wings, you can use either ready-made samples or cut them out of newspapers. The last option will look quite unusual. All parts are attached to the pine cone using glue. The product is ready! The toy is made with minimal labor and time costs.

Owl made of corrugated paper and pine cones
This product is similar to the previous one, except that the bird parts are made of corrugated paper. The craft looks very unusual, and it can be used as a gift to friends or relatives for the holiday.
What you will need for production:
- fir cone;
- corrugated paper of different colors;
- glue;
- colored markers.
The whole process is divided into several stages:
First you need to cut out all the elements from corrugated paper - the bird's head, wings, beak and eyes. To make them, you can use a diagram that shows all the elements. You can print the diagram, then cut out all the details and transfer them to corrugated paper.

Eyes can be drawn on paper with markers using yellow and black colors.
After this, all parts are glued to the base using glue. The craft is ready! To hang it on the Christmas tree, you can attach a thread or string to it.

Owl made of plasticine and pine cones
A child can make an owl from pine cones and plasticine on his own, without the help of adults.
For the craft you will need:
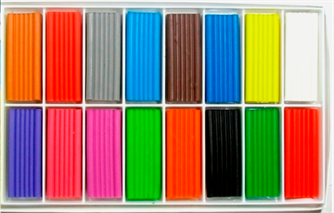
- plasticine of different colors;
- spruce or pine cone.
To make a product, you can use visual images of similar crafts.


The algorithm of actions is as follows:
- The cone acts as the body of the bird. All plasticine parts will be attached to it: eyes, wings, beak, and also ears if an owl is being made.
- All parts are molded from plasticine to arbitrary sizes. It is necessary that they look harmonious in comparison with the body of the bird.
- After sculpting, you need to attach the plasticine elements to the owl’s body. The product is ready! You can additionally use decorative elements, for example, plant an owl on a spruce branch.
Product examples
How an owl can be made is already known, and other products can be made in a similar way with pine cones. Spruce and pine cones make beautiful owls, you just have to try a little.
What other crafts can be made using pine cones:
Toys for the New Year:
- The basis for this craft is a pine cone. The wings, beak and eyes of the bird are made of colored paper. The owl is decorated with a cute cap. You can sew it yourself. It is also necessary to attach a string to the owl in order to be able to hang the toy on the Christmas tree;

- Christmas tree toy, more labor-intensive. A cone is used as the body of the bird. The plumage can be made from small twigs. Ready-made plastic eyes are used as eyes. They are attached in the center of a pompom, which can be made from tinsel or thread.

Big owl on the wall.
This craft is labor intensive and requires a lot of spruce and pine cones to make a large owl. They are glued together and, if desired, can be attached to the frame for reliability. A similar craft can be done in large children's team, then it will become a decoration of one of the walls.

Natural composition of leaves, artificial plants and other natural materials.
The cones can be attached to a plasticine base. Bird wings can be made from leaves. The eyes are made by analogy with the previous example. The beak can be sculpted from plasticine. Twigs are used as plumage. An owl sits on a snag. You can attach artificial plants to plasticine nearby.

Other crafts. From pine cones you can make other cute animals with your own hands, for example, a hedgehog or a bear.

Roll two identical balls from colored plasticine, and then crush them into round pancakes of the same size. These will be the eyes for your owl. Attach them to the fir cone so that they are almost right next to each other. Make two sticks from plasticine of a different color and glue them vertically in the middle of the pancakes. These are the pupils.
Using your fingers, roll two round craft ears and two teardrop-shaped wings. Make the beak into a triangle and attach it right next to the eyes. Form two paws using a special knife, cutting each plasticine cake into three parts and sharpening the ends with your fingers so that it looks like claws.
Another version of a simple owl can be made from two cones. The small bump will be the owl's head, and the larger one will be the body. Cut out the owl's ears, wings and beak from thick paper and place on the pine cone, smearing them with a drop of glue. Sculpt the paws from plasticine.
Secure the two cones together.
Various details for the owl can be cut out not only from paper, but also from pieces of felt.
Fluffy owl
To make a fluffy owl, select pine cones that have the most exposed scales. Divide the ball of cotton wool into separate small pieces. Use a brush with PVA glue to coat the inner parts of the pine cone and fill them with cotton wool. Don't pack it in tightly. You can separately fill with cotton only those parts where the owl’s chest and head are located.
For your second furry owl, you'll need a feather boa. Wrap the large open pine cone completely around the boa, tucking it tightly into the gaps that form the scales.
Owls will look even more interesting if you paint the pine cones before starting work. acrylic paint or gouache.
Cut two circles from a piece of cardboard. Draw pupils for the bird on them with black paint. Glue the resulting eyes to the fluffy blanks. You can use acorn caps to make owl eyes. Draw pupils on their convex side and attach them to the bird.
Ready-made plastic eyes with moving pupils can be purchased at craft stores.
Cut out the owl's beak from a piece of cardboard. Paint the resulting triangle with dark brown paint and bend it in height. Glue the beak with clear glue.
Improvise with the decoration of your craft. You can make a headdress for the owl. From
DIY crafts made from pine cones will be interesting for both adults and children. Among the crafts from natural materials crafts made from pine cones look the most vibrant and original.
What kind of craft can be made from pine cones?
Most interesting option crafts from pine cones for children - this is some well-known animal or bird. The children treat the little inhabitants of the forest kingdom with special care.
Hedgehog from a pine cone on a plastic bottle
Such crafts made from pine cones will be relevant, because the hedgehog is the most favorite character in exhibitions dedicated to autumn. Take a small plastic bottle with a stopper. We use a black marker to color its upper part - this is the future face of the hedgehog.

Wrap the rest of the bottle with thick cloth. The threads sticking out at the edges can be set on fire - this will prevent the fabric from unraveling and give the craft a neat look. We fix the fabric on the bottle with glue.

Glue the pine cones onto the fabric in rows. Fill the entire surface of the fabric with cones.

All that’s left is to glue on the hedgehog’s eyes and ears! The finished look of the craft will be given by the gifts of autumn - apples, rowan branches and dried leaves.

Hedgehogs made from cones (ideas)
These hedgehogs are based on plastic bottles. You can play around with the muzzle by sculpting it out of plasticine.

You can knit a muzzle from yarn. This hedgehog will turn out to be very cute and homey.

Hedgehog made from pine cones and plasticine
One of the most simple ways to make a hedgehog from a cone is to use a pine cone for a craft.

Another option for making a craft is to make a hedgehog from a pine cone and felt. We make the eyes and nose from beads.

Hedgehog made from fir cone scales and salt dough
You can make a hedgehog from a fir cone and salt dough. We “disassemble” the cone into scales. We insert these scales into the base of salt dough.

Dry the hedgehog a little in the oven.

Draw the hedgehog's eyes and nose. Our hedgehog is ready!

Bird made of cones and fabric
The cones themselves tell us interesting images. For example, you can make a funny bird out of cones. To make it we will need fabric of different textures, glue and factory-made eyes.

Glue canvas wings, beak, belly and felt paws to the pine cone. We put the eyes in their place.

Funny birds made from pine cones - ready!

Owls made of cones and cotton wool
You can use the pine cones to make adorable fluffy owls. We take cotton wool and insert it between the scales of the cones.

Glue two felt circles.

We attach factory eyes to felt circles. Glue the beaks.

Owls made from cones - ready!

Paint the cones with golden paint and place them on a small stand.

You can use pine cones to make a large and beautiful owl for an autumn exhibition. The craft is based on two foam balls, into which pine cones are inserted and fixed with glue.

Autumn nest with chicks made from pine cones
From cones, chestnuts, leaves and twigs you can make a very impressive autumn craft. Using good glue, glue the pine cones and chestnuts together. This is the future head and body of the bird.

Glue the wing leaves to the blanks.
 Leaves - wings
 We intertwine the branches together. We should now have a small bird's nest. We weave leaves into the bottom of the nest.

Glue the birds' eyes and beaks. Our birds are in the nest - ready!

Bunny made of pine cones
From the cones you can make the favorite of all children - a bunny. For the craft you need very little - a piece of felt, small pompom, factory eyes, beads and good glue. Glue felt ears and a pompom tail to the pine cone. Glue the eyes into place.

Glue a bead in place of the nose and decorate the craft with mustache strings. The cone hare is ready.

DIY figurines made from pine cones
Children will surely like such funny figures and will decorate the autumn exhibition in kindergarten. By gluing pieces of felt onto the cones we will get an adorable little fox.

Or a squirrel with a nut.

If you paint the cones yellow and attach ball heads to them, we will get adorable chickens.

A pine cone, fluffy wire and a few factory eyes will make a funny spider.

You can make a wonderful winter snowman from pine cones, felt and felt.

Do-it-yourself arborist from a pine cone
You can make a funny old man forester from a pine cone, twigs and plasticine. We sculpt a head and a nose from plasticine, and attach the twig handles.

We attach the forest man's legs, eyes and hair.

You can wear a scarf made of leaves. The craft is ready!

From the gifts of autumn you can glue together the wonderful Serpent Gorynych. The walnuts are glued together. Glue a piece of red fluffy wire between the nuts. We glue eyes to the top nut - we get a head. We make three such blanks. We glue a stick to each head, which we then insert into the cone (be sure to fix it with glue). We glue the legs from walnuts, as well as the wings and tail from dry leaves.

Very interesting idea- make proud deer from fir cones. We make the body and neck from pine cones. We make the legs from twigs. We make the deer's head from an acorn. We connect the parts of the craft using a glue gun. We make the nose, eyes, horns and hooves from plasticine.

You can also connect the details of the craft using plasticine.

We attach the branches-legs, the head-acorn and branched horns.

Watch the video on how to make deer from pine cones:
A very beautiful autumn deer is made from a pine cone, twigs and an acorn.

DIY pine cone topiary
You can make a lot out of pine cones beautiful topiary or tree of happiness. We insert a sharp stick into the pot of plaster.

Using a glue gun, attach the pine cones to the foam ball. We place this ball on a stick. We wrap the pot with rope.

All that remains is to decorate the topiary with ribbons and paper leaves. We decorate the pot with shot pebbles and shells. Cone topiary is ready!

DIY basket of pine cones
You can make a very original autumn basket from cones. This craft is suitable for an autumn exhibition in a kindergarten or school. Using glue, we connect six cones in a circle - this is the future bottom of the basket.

Now we also connect eight cones - this is the upper part of the basket.

Take the top part of the basket and glue the pine cones to it in a circle. We will have a blank of two rows.

On this blank we glue the bottom of the basket, which we made at the beginning. There will be a hole in the central part of the basket, which we will “seal” with a pine cone.

We connect the cones for the handle with wire. We attach the handle to the basket.

Decorate the basket with flowers and ribbons.

Watch how to make a beautiful basket of pine cones in the video:
Another option for making and decorating a basket of pine cones:
The bumps in the upper part of the basket and the handle can be placed outward rather than inward.

DIY bouquet of flowers from pine cones
You can make a very original bouquet of flowers from cones. To do this, we attach wire to the lower scales of the pine cone.
How to keep your child occupied when the weather outside is inclement? Of course, handicrafts! One of the most simple options– making crafts from waste material, which is easy to find. Pine cones are a great solution. Finding them is easy, and working with pine cones is a real pleasure.
We offer an easy-to-follow master class on how to make a funny owl, which can become not only a decoration for a shelf above the fireplace, but also interesting toy for your child. And to make the creative process even more exciting, you can introduce an element of competition: the mother decorates the owl with cotton wool, and the child with feathers. If there are several children in the family, then a fun time is guaranteed!
We will need:
- pine cones;
- cotton wool;
- glue;
- felt;
- feather boa;
- plastic eyes.


 |
 |
 |
 |
The owls will look more original if the cones are painted before decorating. We glue on eyes made from painted acorn caps, and instead of wings we attach two fluffy feathers.
 |
 |
But a craft made from a fir cone can look like this: thin twigs will serve as the ears, a piece of brown cardboard will serve as the beak, and the head and breast will be covered with cotton wool.

You can create a funny owl professor if you decorate a pine cone with parts cut out of thick felt.
 |
 |
Well, if you have plenty of pine cones, as well as free time, then you can take a swing at crafts large size. Of course, creating a large owl from pine cones requires patience, skills, additional tools and materials, but the result will surprise everyone!

Spend your time interestingly, usefully and with pleasure!
The cone is a symbol of hard work, success and strong family ties. Crafts made from pine cones have strong positive energy and can increase wealth and achievements. The owl is a symbol of knowledge, wisdom and broad outlook. And made from cones, it will be a powerful talisman, helps increase accumulated knowledge, helps achieve incredible success in study and career, strengthens family relationships, brings prosperity and joy to the house. Do you want such an energetically strong amulet as an owl to take up residence in your home? Make an owl from pine cones with your own hands; a master class on creating crafts will help you with this.
Felt craft
Creating crafts together with children is a pleasure. This is a fun and useful activity for both kids and adults. Creativity brings people together and brings joy and satisfaction.

We invite you to cooperate and make amazing crafts together with your children - owls from pine cones.

Let's prepare necessary materials. First of all, you need to collect the cones. A wonderful reason for a walk in the forest together.
Before starting to create the craft, it is recommended to dry the collected material in the oven at a temperature of no more than 200 degrees for 30-40 minutes.

To make owlets we will also need:
- multi-colored felt;
- scissors, glue gun;
- wire and glue.
- Let's get to work. We choose the three most beautiful cones - the bodies of our future night birds. We prepare patterns, transfer them to fabric, and cut out the details. We suggest using the templates provided.

- We assemble the parts in the same way as shown in photo No. 2.
- Glue the parts together using a glue gun and let dry (photo No. 3).
- We carefully glue the resulting blanks of muzzles and wings to the cones, as shown in photo No. 4.
- We prepare bird legs from wire, in accordance with photo No. 5.
- We glue the legs to the bodies of the owls, as illustrated in photo No. 6.

The trio of wise owls is ready.

Other options for making crafts from cones and felt are presented below.


A video on how to create an owl from felt and a pine cone is in front of you.
Night bird made of plasticine

We continue to work together with children. We offer the simplest option for creating talismans in the form of wise birds. We only need plasticine and pine cones.
The cone, as in the previous case, acts as a body, and we will make the owl’s muzzle, wings and legs from plasticine.

Fantasize and create unique night birds from pine cones and plasticine.


Acorn symbol of wisdom

We continue to create with children. Here is another interesting idea for implementation. We suggest making an owl from cones, leaves and acorns. In this case, we use not the acorns themselves, but their caps to create owl eyes, and the leaves make wonderful wings.
To make such a cute bird, we will need:
- pine cone, two acorn caps, leaves;
- glue gun, glue,
- pieces thick fabric for beak and paws (felt or artificial leather);
- beads, buttons or ready-made eyes.

- First of all, you need to prepare a place for the eyes. To do this, remove a pair of symmetrical petals from the pine cone using scissors.
- Glue the acorn caps onto the prepared areas.
- Prepare and cut out the details from felt: beak, paws. Attach them to the pine cone with a glue gun.
- Carefully glue the leaves - wings - to the pine cone, symmetrically on both sides.
- We decorate the eyes, glue a black bead into the middle of each hat or use plastic eye blanks.