
Artificial Christmas tree topiary. DIY topiary tree: master class with step-by-step photos
The main element of New Year's decor - an elegant Christmas tree - cannot always be installed in home interiors. Sometimes there is not enough space in the room to accommodate a large Christmas tree, and smaller copies of New Year’s beauties are used as a replacement.
You can make an imitation of a small Christmas tree with your own hands, using available tools and spending a minimum of time. They are called topiaries (translated as trees of happiness) and can be used not only as an element of the interior, but also as a gift for guests on New Year's Eve.
The possibilities for decorating such Christmas trees and trees can be limited only by your imagination: for decoration you can use almost any material that comes to hand.
But some ideas for decorating topiary have already become traditional, so let's learn how to create together original jewelry for your home by taking a master class on DIY New Year's topiary.
DIY New Year's topiary photo
New Year's topiary: manufacturing options
Surely you have paid attention to the ready-made topiaries that are sold in stores: from the outside, such decorations look complex and professional, but in fact, you can make an even better and more original Christmas tree with your own hands.
Our master class on topiary Christmas trees will tell you how to create such decorations without having the skills to make decorations and accessories yourself.
The main feature of such decorative elements is the interchangeability of decorations used for decoration.
Smaller copies of Christmas trees can be decorated in different ways, focusing on color scheme and variety of New Year's interior design.
By the way, you shouldn’t limit yourself to creating mini-Christmas trees: topiaries can also look like small trees decorated New Year's toys and other devices.

DIY New Year's topiary: master class, photo
Decide what your topiary should look like: depending on the shape, size and decorative features, you will have to use different materials. Stock up on everything you need - and you can transform your room in a short time, focusing on the photo and master class on DIY New Year's topiary.
Required materials
To create a topiary Christmas tree with your own hands, you may need the following materials and tools:
- ball made of foam plastic, papier-mâché, plaster, plastic or a large Christmas ball that will be used as a crown. If you decide to create a small Christmas tree, use durable paper or cardboard;
- flower pot, yogurt cup, a small box or other container in which the finished tree will stand. Keep in mind that the topiary must stand firmly in such a base, so do not choose options that are too small in size;
- pencil, wide wire, knitting needle, branch or other axis, which will be used as a holder for the finished structure;
- materials for the pot that harden quickly after use: for example, gypsum or cement;
- glue or a similar mass that will reliably hold together all the decorative elements, as well as the components of the New Year's topiary;
- decoration accessories. Give preference to the brightest and most brilliant accessories that will highlight the celebration of the holiday;
- permanent paints and brushes. They will be used to decorate some parts of the Christmas tree, for example, to paint a pot or create an imitation of white snow on the surface. Best option– water-soluble acrylic paint.
When all materials and decorations are prepared, you can begin to observe step by step instructions DIY New Year's topiary: if you wish, you can decorate New Year's trees or trees using your own ideas.

New Year's topiary photo
Preparatory work
How to make a New Year's topiary? The first step of this process should include preparing the crown of the future tree. It will be easier to create an imitation of a small Christmas tree: just choose durable paper or cardboard and roll it into a cone shape.
Advice: If you plan to decorate the Christmas tree with heavy toys and accessories, you should not make the inside of the base hollow. It can be stuffed with cotton wool or foam rubber, or a ready-made cone can be made from wood, plaster and other materials.
More often the cone-shaped base of the Christmas tree is wrapped with a wide thread: firstly, this approach allows you to disguise the material, and secondly, it serves as the basis for further decoration, as it allows you to attach almost any accessory.

If you are planning to create a tree, its crown will be a large ball. Many people prefer use a regular large Christmas tree ball, but if you do not have such an accessory or you are afraid that it may deteriorate and lose its shape, choose more reliable materials.
For example, foam plastic is excellent as a ball: glue a large cube from small pieces of foam plastic and cut off the excess parts using a stationery or wallpaper knife.
Remember! Solvent-based glue will corrode the foam, so it is not suitable for gluing individual fragments of the ball, nor for subsequent gluing of decorations and accessories.
To ensure that the finished foam ball has a smooth surface, smooth the base with your hands.
Minor flaws can be disguised with accessories, so you shouldn’t waste time correcting all the flaws. By the way, this approach allows give topiary and other unusual shapes: Christmas trees with an inclined end are made this way.
You can immediately stick Christmas tree decorations or other decorations onto this ball.

Another option for creating a crown ball is usage balloons . Inflate them up required sizes, wrap it with thread over the entire area - and carefully treat it with glue. After the surface has hardened, you can deflate the ball and pull it through the base.
Second stage of creation Christmas trees topiary is making an axis on which the finished decoration will be held. The trunk of a tree or Christmas tree can be made from a small twig or tube, plastic sticks or pencils.
If there are no available materials suitable in shape and size, create the axle yourself made of cardboard or papier-mâché.
Don't forget that the barrel must withstand not only the ball or cone, but also all decorative elements that will be involved.
Such elements are connected very simply: if it is polystyrene foam, the barrel is lubricated with glue and inserted inside. If it is a more durable base, you will have to glue the elements together without inserting them into each other.
Advice: decorate the tree trunk in advance using paints, glitter, varnish, bright threads or beautiful paper. After connecting the two parts, it will be more difficult to transform it.
If you want to create a tree or Christmas tree that can be tilted in different directions - use thick wire as a post. This axis will look more original if you select the wire different sizes or flowers - and intertwine them with each other.

New Year's topiary with a flexible trunk
Topiary base
Don't forget that the base for your Christmas tree should be both stable and beautiful. The standard way to create a topiary base is to use a small flower pot. It can be painted with New Year's pictures, decorated with cotton wool that imitates snow, or transformed with threads, bows, or coffee beans.
Instead of a flower pot, you can use a small vase, jar, plastic glass. Even matchboxes are suitable for small Christmas trees.
Don't forget that the originality of your craft will depend on appearance bases, so you can show your imagination and make a base of non-standard shapes with your own hands.

To create a pot or foundation for a Christmas tree, you can use the papier-mâché technique. Prepare a small vase, paper or newspapers, glue, scissors and a brush. Treat the vase with Vaseline or thick cream, wet the pieces of paper and stick them on the prepared surface. All subsequent layers of paper are applied in the same way, but coated with glue for reliability.
For convenience, you can use paper different colors, so as not to get confused in the layers. As a rule, five to six layers of paper are sufficient for a strong base.
Once the applique is dry, you can easily remove the paper from the base of the vase. Such the pot can be immediately attached to the tree post. A material like gypsum or cement is poured into the bottom. The mixture is diluted with water (you should not start by pouring liquids, as the base will get wet and the dry mixture will affect the respiratory tract).
The tree is immediately attached to the solution and held until the base hardens. If desired, at this stage of work you can decorate the post and the inside of the pot: use beads, beads, rain, coffee beans and other decorations. Such elements will serve as an additional holder for the entire composition.
At the next stage of the master class on New Year's topiary, you can begin decorative work. After all, such a tree should replace christmas tree- which means that it should be decorated no less brightly and interestingly.

Decoration methods
There are many different ways to decorate these mini Christmas trees. If you like standard imitation Christmas tree– use small Christmas tree decorations and rain. Garlands and tinsel are useful as decorative elements, but try not to overdo it with the decor: sometimes an abundance of accessories can make the Christmas tree tasteless.
Complex but interesting ways to create a bright and festive Christmas tree include using a plastic ball. Holes for garlands are drilled inside it.
Using the ball as a tree top and decorating with other accessories, you will create a bright element of the New Year's interior. This topiary can be placed on a table or the darkest areas of your room.
Most toys and decorations are attached to topiary using hooks, glue or double-sided tape. If the Christmas tree or ball is wrapped with thread or fabric, you can sew accessories to the prepared surface.

What other decorations are suitable for decorating New Year's topiaries? We present you the most common design ideas:
- creating smaller copies of toys from plastic or felt to imitate a real Christmas tree;
- fastening small cones(if desired, they are decorated with sparkles, paint or decorative snow);
- use of small Christmas balls of different colors;
- decor using tangerine and candy;
- decoration with bows or ribbons over the entire area of the tree and its post;
- gluing coffee beans throughout the base of the ball or cone or in the form of separate compositions;
- usage rain or small spruce branches;
- gluing beads and seed beads to add brightness to the New Year's composition.

As a rule, in the New Year's interior of the rooms several topiaries of this type are used at once. They can be made in the same style to follow a given design theme, or they can be made different in color, brightness and shape - and placed in different areas of the room.
Since creating a topiary Christmas tree with your own hands involves decorating for every taste, a variety of Christmas trees and trees can be given to your guests and loved ones. Such crafts will harmoniously fit into any New Year's interior and emphasize the solemnity of this night, so they are increasingly used not only as a replacement, but also as an addition to a regular Christmas tree.

Now you know how to diversify New Year's decor and make the festive evening even brighter and more interesting. Watch Elena Rogacheva’s video tutorial on how to make a decorative topiary with your own hands from scrap materials:
Follow our advice, implement your ideas - and the decor of your room with the Tree of Happiness in the New Year will be unforgettable.

It won’t be surprising if a master class on what to give to friends and family for the New Year will soon be in demand. When you run out of ideas, you really want instructions to miraculously appear, and it becomes clear what to give, so that the gift will be liked and remembered. Handmade gifts are good taste and an excellent sign of attention. And one of these gifts could be a New Year’s topiary.
Topiary is a decorative tree in a pot, usually with a round crown, a beautiful souvenir, the materials for which can be any objects. These include natural materials, handicrafts, and the most unexpected things.
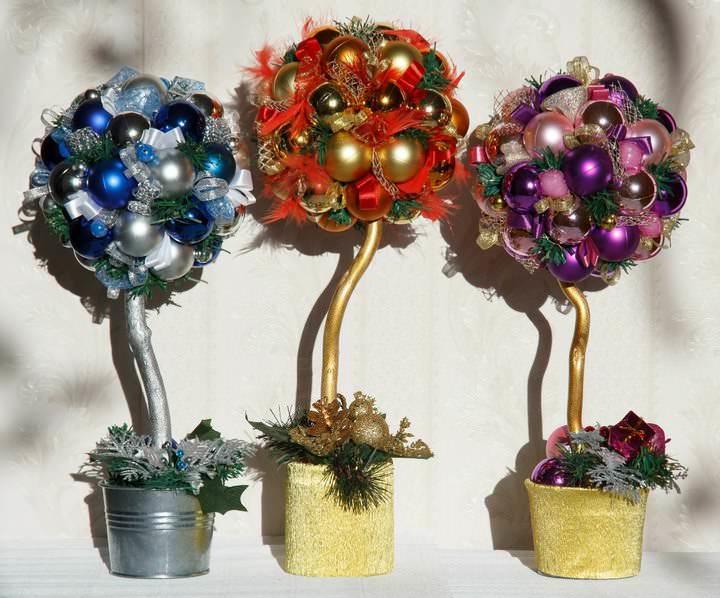
New Year's topiary can be a variant of the Christmas tree, in an interesting way decorated. But one more bright topiary, which will decorate your home or work area on the eve of 2018, is a topiary made of balls.
Step-by-step instructions - how to make a New Year's topiary with Christmas balls:
- The materials you will need are the following: foam cone, small Christmas balls, a fairly large candlestick, wide ribbon, hot glue.
- The candlestick in this MK is used instead of a pot. The more refined and elegant it is, the better it will emphasize the festive nature of such a topiary. Apply hot glue to the top of the candle holder. The foam cone must be firmly pressed to the place where the glue is applied. You need to hold the cone for some time so that it “takes” well.
- While the glue dries, you can work with the balls. The first thing you will do with your own hands is remove the metal fasteners. For such a Christmas tree topiary, it is important that the balls are well fixed and do not cling to anything.
- It's great if you prepare the cone for gluing the balls. Still, there can be, and probably will be, gaps, so the cone needs to be spray painted. For example, golden or silver, or maybe green with gold. Sometimes the cone is simply wrapped with thick golden threads with your own hands. There is no single method, one master class suggests painting, another – winding, a third – pasting with napkins.
- Grease the top of the ball with hot glue. The ball must be literally pressed into the cone, very carefully, but so that it has a good grip. Many MKs indicate that it is better to pour the glue somewhere so as not to take the gun every time. An unnecessary frying pan will do. The ball is simply dipped in glue in the frying pan, and this way the process goes faster.
- Slowly the entire surface is filled with balls, creating a Christmas tree. You can tie a ribbon with the numbers “2018” on the candlestick or just an elegant, beautiful one.

Ready! This master class is extremely simple, the main thing is not to put too much pressure on the balls, remembering their fragility. In the photo you can see the color combinations of this Christmas tree ball topiary.
New Year's topiary: ideas and MK (video)
New Year's topiary: master class
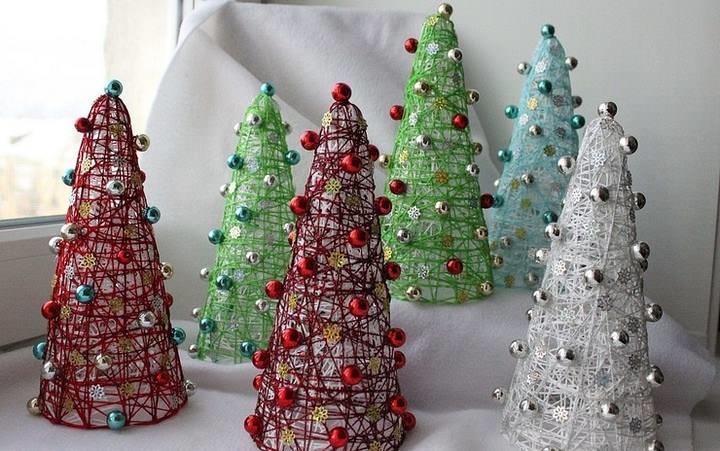
To create another interesting Christmas tree in a pot you will need yarn. By the way, this MK is suitable even for children; it does not use hot glue, which is dangerous for them.
You will need:
- Foam or cardboard cone;
- Skein;
- Scissors;
- Sewing needles;
- Very small Christmas balls;
- Round nose pliers;
- Pot;
- Small rod-trunk;
- Ribbon.
It is fair to say that such a tree is often not planted in a pot at all, but while observing a certain tradition, it is still worth doing everything more conservatively.
So, if you look at photos of such topiaries, you will see that it is better to take thick yarn, maybe embossed, or heterogeneous. But some Christmas tree colors should be visible in it - green, blue, white, light blue, silver, etc.

A DIY yarn Christmas tree is made like this:
- Secure a skein of yarn with sewing needles at the base of the cone. Attention, the cone must not be hollow! Please worry about this in advance.
- Gradually wrap the cone with yarn with your own hands, the turns should be tight, no gaps.
- The threads can be secured in place during the process with the same sewing needles.
- Having reached the very top of the Christmas tree cone, the thread is cut and fixed with a needle.
- Half the work is done. You can place the cone on the trunk. At the Christmas tree it should be very small, almost invisible. A piece of pencil, any small cylindrical object. Think about how to secure it in a foam cone. At this point, it is still better to use glue, but if the child is making the Christmas tree with his own hands, fix it with glue yourself.
- Now the tree needs to be inserted into the pot. In fact, you can use any flower pot, small and elegant. So the decor still awaits him; initially, color and texture are not so important.
- Usually the master class suggests using plaster or alabaster. And this is the most reliable option. Be sure to decorate the top plaster layer or New Year's tinsel, or sparkles and other decorative things associated with the New Year.
- When the tree is in its pot, you can start decorating. Hang miniature balls on the yarn. An alternative to them is to make berries on needles, which are used in making jewelry. The top of the tree can be a star, also made by hand, for example, from twine or designer cardboard.

The pot can be decorated with the inscription “2018”, wrapped beautiful ribbons with gold or silver threads.
Christmas tree made of threads: New Year's topiary (video instructions)
New Year's topiary Christmas trees: step-by-step instructions
Good ideas on the eve of 2018 - soft Christmas trees. They are quite easy to make with your own hands, especially if you have already dealt with wool for felting.

And yet, what nuances can this master class have:
- If a foam cone is not found, make a cone with your own hands from cardboard. Paint it the same color as the fur to prevent any gaps.
- You need to stretch it to the very top of the cone a thick wire that will make such a “squiggle” at the top of the tree, with which the Christmas tree will be cute and cute.
- The trunk for the tree can be wooden skewers. The base of the cone needs to be glued onto skewers, after which they are painted in brown so that they resemble a trunk.
- The result is a Christmas tree that needs to be planted in a pot.. Look at the examples in the photo; they use both beautiful expensive pots and ordinary plastic glasses that are decorated with fabric.
- A thin piece of wool needs to be separated from the total mass, and glue it to the squiggle wire. And from there the winding is carried out, so that there are no gaps.
A pot in the form of an unsightly container can be wrapped in a beautiful corrugated paper or foil and tie with ribbon or tinsel.
Topiary for the New Year: master class with coffee
Coffee, or rather coffee beans, is such a universal material that it is perfect for the 2018 New Year’s topiary.

A master class using coffee will be similar to other instructions.
Master class - topiary for the New Year 2018 with coffee:
- For a change, you can stick to the idea of a round tree. The basis, therefore, will be any spherical blank. If you don't have a foam ball or a small rubber ball, a wad of newspaper tied with thread will do.
- The ball must be perfect, therefore, if it is not hard enough, it is covered with napkins according to the papier-mâché principle.
- Next, the ball needs to be painted brown. acrylic paint . And after drying, you can start pasting with coffee beans. There are craftsmen who then specially paint over some of the grains with golden paint to make it look “2018”. It is better to glue coffee beans with a glue gun.
- The blank ball leaves space for fixing the barrel. The trunk for such a coffee tree can be made from a drumstick or a thick pencil tightly tied with twine.
- The trunk is fixed in plaster, which is poured into a pot. This must be done quickly and carefully.
Well, then directly what will make an ordinary coffee tree look like a New Year’s tree. Numerous examples in the photo offer several options at once. First, the pine cones lying in the pot. Ideal if you paint them with gold spray.

In some photos you can see beautiful ribbons with the inscription "2018" and Christmas tree prints. The Christmas tree can also show off like a picture on a pot. By the way, you can make a Christmas tree out of coffee beans on the facade of the pot.
The aroma of coffee beautiful decor– a great gift for a coffee lover in 2018. Often such trees are used as an idea for a photo; photo sessions with such an accessory turn out to be very interesting.
New Year's topiary made from coffee beans in the form of a Christmas tree (video master-cash)
You can make your own photo or video master class, because many ideas come to mind while viewing someone’s work. One inspiring photo and you are ready to make your own Christmas tree topiary. Creative inspiration and interesting finds!
New Year's topiary (photo)


Topiary for the New Year “Berries on the Snow” made of nuts and sisal is very easy to make for beginning needlewomen, and the tree of happiness looks stylish and atmospheric. The crown is formed on a foam ball covered with halves walnuts with snow-white paint and bright red decor: sisal balls, berries, stamens. A New Year's topiary with a curved trunk is planted in a wooden pot and reinforced with plaster casting.
The total height of the topiary for the New Year is 33 cm, pot - 9 cm, crown diameter with decor - 18 cm. To make a tree of this size you only need 2-3 hours.
Materials for creating topiary for the New Year “Berries on the Snow”

- Wooden pot.
- Pieces of foam or sponge.
- Gypsum (alabaster) and water - 200 gr. mixtures.
- Acrylic white.
- Trunk - Corilus branch - 22 cm.
- Walnut halves.
- Foam ball d=12 cm.
- Fabric for wrapping the ball.
- Artificial snow in a can.
- Thermal gun, 3 silicone sticks 20 cm each (d=11.2 mm).
- Red sisal for base + balls - 20 pcs.
- Plastic snowflakes - 10 pcs.
- Small apples in a bundle - 12 pcs.
- Large apples made of polystyrene foam - 3 pcs.
- Smooth foam plastic berries - 0.5 bunch, 20 pcs.
- Sugar berries - 1 bunch, 40 pcs.
- Snow-covered stamens - 2 bunches of 10 branches.
- White fabric leaves - 6 pcs.
- Rhinestones and half beads on a blister.
Video master class - topiary for the New Year 2019
Convenient and simple master class in excellent FullHD 1080p quality on how to make sisal topiary for beginners on New Year theme. Watch, get inspired, generate new ideas and share them with friends!
How to make a New Year's topiary with your own hands - MK in 1 picture

Did you like the format of the master class in 1 picture? Watch everything from Alena Tikhonova!
Master class with photos - New Year's topiary step by step
Preparing the ball and base
Stage 1. Wrapping the ball. We slightly sharpen the prepared barrel (smooth) of the required length at one end, coat it with glue or hot silicone, and fix it in a pre-made hole in a foam ball. We completely wrap the base with any fabric.
The winding is necessary so that the hot silicone does not melt the foam ball when gluing large decor. Also, the base of the tree of happiness can be painted or wrapped with twine (knitting threads).
Stage 2. Crown formation. We clean the walnuts so that we get whole halves and empty halves inside. Minor defects or cracks are acceptable. Carefully glue the ball, leaving minimal gaps between the decor.


Stage 3. Painting the base. We paint the finished base of the crown, as well as the trunk, with white acrylic paint - always in 2 layers to get a rich color. At the same time, apply the 2nd layer with a soft brush so that the paint lays evenly and without strokes.


Crown decor
Stage 4. Making sisal balls. You will need red sisal, which combines effectively with the white crown. We make it as described in the instructions. You don’t have to reinforce them with PVA glue, just roll them well enough. The balls should be comparable in size to nut shell or a little less.

Stage 5. Preparing snowflakes. We paint the plastic snowflakes white on the front side.


Stage 6. Decorating the crown. We paste the decor over the entire surface of the crown of the New Year's topiary - in a chaotic order, covering the gaps between the nuts and the flaws in the shell:
- Red sisal balls and small foam apples are the main decor.
- 2 large red apples on white petals are the accent and highlight of the “Berries on the Snow” topiary.
- Bouquets of stamens glued together.
- Artificial sugar berries.
- White foam berries.
- Plastic snowflakes.
We glue quickly: the foam decor melts from the hot silicone.


Pouring, decorating and filling the pot
Stage 7. Flowerpot decor. We glue plastic snowflakes, red rhinestones, miniature white half-beads - on each side of the pot, evenly.


Stage 8. Filling with plaster. We place pieces of foam plastic or sponge in the pot so that the plaster does not push the walls of the wooden box apart when it expands. Mix a thick solution of gypsum or alabaster with water (proportion 2:1), fill the pot to ¾ of the volume.
Before pouring, check the tightness of the wooden pot and seal the cracks with silicone. All the secrets for pouring plaster and other methods are in large review with photos and videos!


Last stage 9. Filling the pot. We paint the plaster surface white to set off the red sisal. Carefully gluing, we form a nest of sisal around the trunk. A large apple and a bunch of stamens complete the composition at the base of the New Year's topiary.


We treat the finished New Year's themed topiary with artificial white snow from a spray can.


The Christmas tree is an integral attribute of the New Year; on this holiday, you want to please with a gift made by yourself. A great idea would be to make a topiary Christmas tree with your own hands.
Coffee Christmas tree
There can be an unlimited number of options for making topiary in the form of a herringbone, as far as human imagination can allow. The most versatile topiary is coffee, but what if you make it in the shape of a Christmas tree? This master class will present step-by-step photos of the manufacturing process.
First you need to make a cone out of cardboard or thick paper. You can use paper, newspaper, fabric or cotton wool as a base, the main thing is to push it all inside. How to make a cone: a sheet of paper needs to be rolled up in the form of a bag, or you can first use a compass to mark the diagram. The workpiece is glued together with an overlap using a hot-melt gun, regular glue, adhesive tape (you can use double-sided tape) or fastened with a stapler.
The cone can be placed on a paper coffee cup. The joints are glued with PVA or other suitable glue.

The cone is wrapped with twine, it is glued with double-sided tape or with Moment.

A bow made of golden ribbon is tied to the top of the tree. Instead of a bow, there can be any other decor.

The bottom edge of the cone is covered with coffee beans. Everyone decides how many rows to make, but you can lay out three or four rows and then leave the twine. The first layer dries in about half an hour and only after drying can the next layer be glued.

Now the second layer of grains is glued.
The more chaotic the better. This will make the topiary look more voluminous. If desired, you can paint the grains with acrylic.

Now you can start decorating the cone. Bows are made from, for example, silver ribbon and glued with hot glue; grains are glued into the center of the bows. The decor can be arranged arbitrarily.

The coffee tree is ready.

Another variation would be a Christmas tree with a trunk made from a tube or branch and planted in a pot. This is done like a standard topiary, it differs only in design.
Other decor options for coffee trees are presented below:
Product made from sisal
An interesting option would be to make a Christmas tree from sisal. What is sisal? This material is made from the leaves of a shrub - the Mexican agave. Its fibers are very tough, coarse and very durable. No special technology is required to produce the fiber. Its main purpose is to create decorative crafts, various brushes, sponges, all kinds of ropes and ropes.
If you want to create a New Year's topiary from sisal, then you need to stock up on fir needles and the corresponding decorative elements: tinsel, broken Christmas decorations, confetti, etc. A sisal Christmas tree is made similarly to any other tree of happiness. The only difference is the shape of the crown. A sisal Christmas tree will become a great gift loved ones or colleagues.

The crown of the tree is made of dense material rolled into a cone. Tinsel, rain, bows, and miniature toys are glued onto it or reinforced with decorative needles. Also, a sisal Christmas tree can be an excellent lamp if you attach a garland to the form.
If it’s difficult to choose your own design option, then photographs of the finished work can help:


If the top of the tree is slightly bent, it will resemble a tree from a magical forest and will certainly appeal to both children and adults. It can be given as a gift or used as interior decoration in your own apartment. A spectacular sisal Christmas tree will certainly create a festive atmosphere in your home. The decoration of the stand can be varied: pine cones, fir needles, tinsel, ribbons and beads.
New Year's tree topiaries look especially beautiful if they are decorated with various small decorative elements. An option could be this: beads or beads are strung on a thread or wire and wrapped around the product in a spiral. The same can be easily done using thin satin, brocade or other decorative tape, lace or braid.

You can glue artificial snow onto a Christmas tree or pot. It can be store-bought or made from cotton wool. You can also cut out small snowflakes and stick them on the tree. The gaps between the ribbons can be filled with small balls or bows. Not only Christmas trees decorated with small details will look beautiful, but also trees made from sisal balls. The only difference is that the surface of the topiary will be uneven. You can place larger balls at the base, and smaller ones at the crown. Simple and tasteful.
Video on the topic of the article
Sisal provides great opportunities for creativity. In the master classes presented below, you can see various designs and methods of creating a New Year's tree:
The New Year holidays are getting closer, and for those who like to spend their evenings with handicrafts, the most fertile time is coming - after all, now is the time to start making gifts for family and friends, as well as holiday decorations for your home.
You most likely already know what a topiary is - a small decorative tree that can be made in any style you like. And under New Year and Christmas, the most relevant tree is, of course, the Christmas tree. And creating topiary in this direction opens up truly unlimited scope for imagination. Everything is possible here - from a classic green Christmas tree to a ball decorated with ribbons and tinsel. The main thing is that it is bright, festive and tasteful!
Wherever our imagination takes us, the principle of creating these trees remains unchanged. Any topiary consists of the following elements:
- stand
- trunk
- warp
- crown
The main criterion in choosing a stand is that it must be stable. It can be anything - a mug, a flower pot, a shell, a cut of wood. For a New Year's topiary, it is best to decorate the stand with bright fabric and sparkles; it is fashionable to cover the base of the trunk with tinsel or small gift boxes. If some kind of container is used as a stand (which is the most convenient option, because it gives more opportunities to secure and beautifully hide the base of the trunk), then good material to fill it there will be polystyrene foam or a floral oasis.
The trunk must be flexible and wide enough so that it can be given the desired shape, but at the same time it looks harmonious. If you wrap it with a ribbon that sparkles mysteriously, it will be an appropriate touch for New Year's decor.
The base, as a rule, is a foam ball onto which the crown elements are fixed, most often with the help of toothpicks. First, the largest elements of the crown are distributed, and then the space between them is filled with smaller parts. For strength, everything is not only attached to the crown, but also glued together.
Little secret: In order not to make a mistake with the size and not make the crown too large, it is better to take a smaller base ball, and adjust the crown with the length of toothpicks.
A few New Year's ideas for inspiration
Soft Christmas tree
The easiest way to make a New Year's topiary similar to soft toy, this means cutting out two parts in the shape of the desired Christmas tree from felt or any other fabric suitable in style, sewing them together and stuffing them with cotton wool. Having secured it to the trunk, you can start decorating our Christmas tree. You can wrap it with beads, attach snowflakes, small balls, lace - in general, just like a real Christmas tree, only tiny!
Another option for creating a soft and fluffy-looking Christmas tree is to wind fluffy threads on a cone base.
And if you make legs as a stand, it will turn out very funny.
From the cones

Products from natural materials they always look cute and remind you of childhood, when you had to bring a craft to kindergarten or school. But if you have artistic taste, imagination and a can of spray paint, you can create quite stylish things from pine cones
From tangerines
What creates a New Year's atmosphere in your home? Of course, the smell of tangerines and Christmas trees! A bright orange ball will attract attention and surprise guests.
candy ball
New Year is a time when everyone expects gifts and sweets, regardless of age. And if we receive and give gifts on New Year’s Eve, then no one will stop us from surrounding ourselves with sweets during all the holidays!
Three nuts for Cinderella
Walnuts have long been used as holiday decoration, they were wrapped in foil, and candles were inserted into the shells. They also look very interesting in the topiary version.
A very popular material for creating this kind of souvenir is coffee beans. And if you experiment with attributes and shape, such a topiary can fit into any holiday.
Christmas balls
In pursuit of originality, let's not forget about the classics. The main decoration of a real Christmas tree is the balls, and if you take them as a basis, you will get a completely new decoration for your home.
You can come up with endless types of New Year's topiary. Use different materials and their combinations, artificial snow, tinsel, sparkles, light bulbs - it all depends on your inspiration!
And in order to better understand the intricacies of creating a New Year's topiary, we offer you these videos