
Ballerina cutting templates. Ballerina templates for paper cutting to print
To get a beautiful dancing ballerina, you can find and print any picture templates you like on the Internet.


You can also use your own creativity and try to draw the figures yourself. It wouldn’t hurt to call your children for help. This way you will not only develop your child’s creative imagination, but also perseverance. Below are some of the most popular templates that you can download and use in your creativity.

Paper snowflakes-ballerinas: how to make them yourself

Making a ballerina figurine is easy. For this we only need ready-made dancer templates, sheets of paper, scissors, white thread with a needle and a simple protractor.

The craft making process itself consists of the following steps:
- We cut out the figure from the template so as to cut off its contour outlines as well. Otherwise, the figure will look ugly and sloppy.
- We make paper snowflakes in the same quantity as the number of paper ballerina figurines that were made. It is best to make a six-pointed snowflake, as it is easier to cut out smaller and ornate patterns on it.

To do this, take a sheet of paper and fold it in half in the center. Next, using a protractor, draw lines at angles of 60 and 120 degrees. We bend the sheet according to the marks obtained and bend it in half again.

- These snowflakes are suitable as a tutu or a skirt. We just take the dancer figures and carefully, so as not to tear the paper in thin places, put snowflakes on them.
- Using threads and a needle, we tie knots on the ballerina and hang them on the chandelier as decoration.

If you wish, be sure to try to come up with something yourself, and the ballerinas will acquire their own uniqueness. Similar crafts You can later color it using watercolors or simple felt-tip pens. A variety of shades are perfect here. blue.
Making snowflake skirts for ballerinas

The most optimal shape for ballerinas is considered to be a 6-ray snowflake. If you try to make more rays, then you will need more skill so that during the work you do not accidentally tear or tear off any small part from the skirt itself. In addition to paper, for work we will also need scissors and a sharp stationery knife.

We need paper as a basis for the future skirt. We use scissors to cut out the base, removing unnecessary parts of the future workpiece. But we will need a stationery knife to cut out the internal elements of the skirt. At the same time, it must be sharpened, otherwise the edges will turn out torn.

Paper garland of snowflake ballerinas

In order to make a garland of gracefully dancing girls, you should take a certain number of paper sheets. For example, A4 format is perfect. Next, fold the sheet in half along the cent and draw a simple figure ballerinas Then, cutting along the contour, we get two identical figures.

We do the same with the remaining sheets of paper. Next we insert the ballerinas into any paper snowflakes, and they are ready to be hung one by one on garlands or a simple rain.
How to make a ballerina card

If you want to congratulate someone on the upcoming holidays, ideal option there will be a postcard with a ballerina. And the fact that it will be made by hand dear person, will only add joy to the recipient of this gift.

For this craft, take a sheet of colored cardboard and bend it in half so that the colored side is on top. Then we cut it out from any paper template a figurine of a ballerina, and using a stationery knife we create patterns on her skirt. Then we will need round napkin, which we bend in half twice and cut off its sharp tip so that the size of the cut is identical to the ballerina’s waist. Next, glue the ballerina to the inside of the card and attach the napkin skirt so that its lower edge is free. This way the craft will be voluminous.
Ballerina using the vytynanka technique

In order to get a patterned ballerina craft using the vytynanka technique, we only need a sheet of thick paper and a scalpel-type tool. A stationery knife will also work perfectly here.

To begin with, we take a template with an image of a dancer or draw it ourselves. Next, place the image on a hard surface and use a knife to separate unnecessary parts. When working with a skirt, you can use your imagination and creativity. And thick paper will allow you to cut through small parts without the risk of tears.

At the end, the resulting craft can be glued to a window glass or door using starch paste.
Ballerina made from napkins and wire

Do you want to create something unusual with your own hands? Then you can try making a dancing ballerina figurine from napkins. Only you will need them in one color: white, pink or blue. It all depends on your taste.

- We make a frame base from wire, which we first clean from the plastic coating. If the wire is too soft, then it must be twisted in 2-3 layers.
- We layer the napkins into several layers and make long strips.
- We wrap the resulting pieces tightly wire frame periodically applying glue or other adhesive.
- Any snowflake is cut out from a whole napkin and put on the figure frame.
- If you have napkins of different color shades, it is recommended to make several layers of the skirt so that they differ from each other. Moreover, this technique will make the ballerina look voluminous.

The advantage of this craft is that it can be given almost any shape and not only hung on the Christmas tree, but also simply placed on the bedside table by the window.
Ballerina (origami)

Origami is a rather complex art, but also very interesting. Try to make a sophisticated dancer out of a piece of paper who will delight you with her appearance and, perhaps, inspire others interesting crafts.

You will need one single sheet of A4 paper. You shouldn’t take less, as the figure will turn out sloppy. While working, you should strictly adhere to the fold lines. And the received volumetric craft You can not only attach it to the Christmas tree, but decorate it with it festive table.
Applications in the form of a dancer – Panel “Ballerina”

If you or your child loves arts and crafts, you will undoubtedly love the idea of making an applique in the shape of a graceful ballerina. Moreover, you can use absolutely any elements that can be found in almost any home, from lacy ribbons to glitter, rhinestones or even beads. It all depends only on your fantasy and imagination.

Here is one example of the craft making process:
- The first thing we do is draw a dancer on a piece of paper or take ready-made template from the Internet. You can also use a stencil, which is outlined from the inside with a pencil. At the end we cut out our figure.
- Next, we transfer the dancer to our main sheet of cardboard and carefully trace her.
- Paint the silhouette with black or other dark paint. If the application is conceived on colored cardboard, then use any matching color. Leave the base of the craft until it dries.
- We make skirts from openwork ribbons or fringes. It will look beautiful if the fabric is gathered and secured at the waist. Don’t be afraid to experiment – this will make your craft more memorable and unique.
- You can take sparkles with rhinestones and decorate the background with them. Apply drops of glue and, for example, sprinkle it with glitter. It will turn out very beautiful and magical. Beads and sequins can be applied using tweezers.
- The ballerina herself can be decorated in completely different ways. It all depends on you and your vision. You can add paint to your headdress or decorate your pointe shoes. It wouldn't hurt to add a stage or curtains.

In this way, you can make a colorful and memorable applique from absolutely any material, be it cotton pads or even cuttings from disposable tableware.
We decorate rooms with ballerina snowflakes

It is not at all necessary to limit yourself to any one way of making crafts in the form of ballerinas on upcoming holidays. You and your child can glue an applique and put it on the school table; the garlands will look great on New Year's tree or hung around the perimeter of the apartment.


You can place the doll figurines on the coffee table, and hide the most beautiful ones behind glass in the sideboard. And you can tie the cards with beautiful satin ribbons and place them in a prominent place for your loved ones so that they can notice them and appreciate your attention and care.
And in conclusion
As they say, “the work of the master is afraid” and there will be no exception here. If you wish, you can come up with ballet tutus for the ballerinas, made from disposable tableware, cotton pads or multi-colored felt, which can be purchased at any craft store. Moreover, try to interest your child in this, ask what he wants to do and how. Consult him. Also, such work done through joint efforts will teach him not only perseverance, but also respect for his own and other people’s work.
Happy New Year))
Looks very gentle and elegant snowflake ballerina. And most importantly, you can do it both at home and at work. To do this, I will give you a “ballerina with a snowflake” stencil.
It will take very little time to create this decoration. So:
We print ballerina stencils directly from my blog. First ballerina stencil:

Second snowflake ballerina:

Third sketch of the ballerina:

Using scissors or a stationery knife, cut out the ballerinas you like.
Cut out snowflakes-skirts. And we dress our beauties. If there is a hole in the skirt large size, then the ballerina will dress easily. Fold and slide her “native” dress into the skirt. If the hole in the skirt is very small, then use scissors to make slits on both sides and put on the skirt, and turn those places where there are slits to the front and back sides (so that the skirt does not fly off).

Hang your dancers on white strings using tape.
Admiring it!


The second ballerina takes longer to cut. Be very careful with her fingers, you're trying to cut them off. And also the place where the head meets the neck is very inconvenient for cutting.
The third model is easier to cut than the second, but a little more difficult than the first. The bent leg can be cut with scissors so as not to look for a stationery knife.

As for skirts. Skirts can be made not only of paper, but also of fabric. Skirts cut with curly scissors look beautiful. But if you don’t have any at hand, try to cut out the edge of the skirt in an original way.
I have made ballerina skirts of various lengths, but, in my opinion, the mini ones look the most beautiful. Long skirts seem cumbersome. A ballerina turns into a dancer. And the miniskirt looks like a real tutu.
You can take regular A4 paper for skirts, or you can take napkins - the skirt will be lighter and more airy. Skirts made of colored paper look original. Can be sewn on a quick fix bandage skirt.
The story of the love between a steadfast tin soldier and a fragile ballerina, once told by Hans Christian Andersen, still excites the hearts of both children and adults. Do you want to be transported to a fairy tale? New Year's Eve is exactly the time when you need to rush to work miracles! Using appropriate decor in the interior, create festive mood loved ones: decorate a children's room or living room with paper openwork ballerinas, reminiscent of weightless snowflakes floating in the air. Ballerina snowflakes, the stencil can be safely downloaded from this article, will be incredibly light, airy and beautiful.
Ballerina using the “vytynanka” technique
In many countries of the world there is a wonderful tradition -. All kinds of paintings and applications please the eye not only for household members, but also for random passers-by. Windows are often decorated with tracery. Not everyone knows that such products are called vytynanka. The very art of creation paper paintings and patterns by carving appeared 2 thousand years ago in China. The ballerina template will appeal not only to those who love ballet, but to all connoisseurs of magnificent paper crafts.
If you have already mastered the technique of making snowflakes (and you are quite tired of it), you can move on to the next stage - cutting out an openwork silhouette “ballerina” protrusion. To create it you will need a special drawing template. For example, one of these:
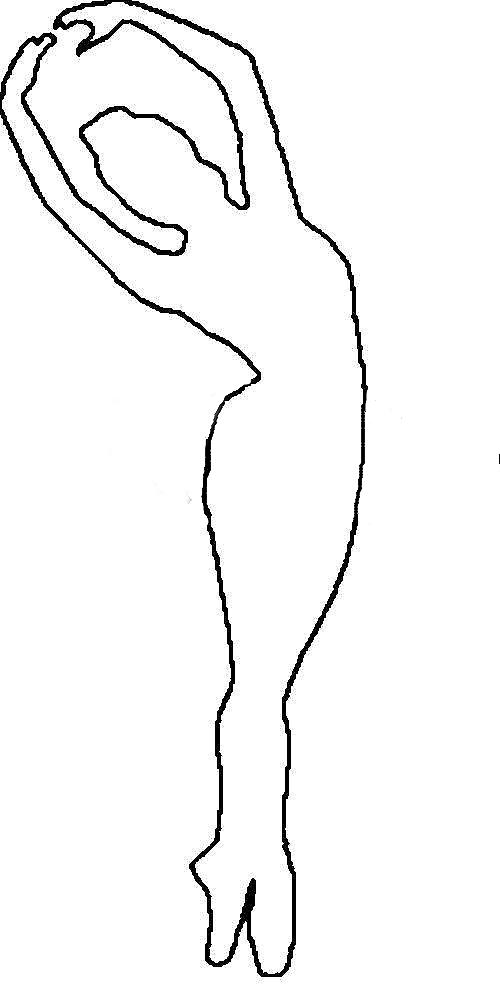
Paper ballerina: cutting templates


Print the drawing you like on paper. Using a stationery scalpel knife, remove all excess (filled with black). To make it more convenient to work, hold the sheet with your hand, placing plywood or a cutting mat under it. Take your time, try not to go beyond the contours. When the picture is ready, stick it to the window glass using soapy water or toothpaste. Do you want the vytynanka to become a permanent decoration of your home? Glue it onto colored cardboard and frame it.
Paper ballerina with organza tutu
You can decorate the window not only with images on the glass, but also with pendants with paper figures fixed on the curtain rod. In this case, the window opening can bizarrely turn into a stage on which a ballet performance takes place. To get the desired figure, you will again need a template. There are a lot of stencil drawings of ballerinas on the Internet, but for the option with fabric decor, silhouettes without a tutu are more suitable. As a last resort, you can print out any template you like, and then remove the skirt when cutting it out. To do this, you can use templates for cutting out a ballerina from paper.


To work, you will need the following tools and materials: white cardboard, scissors, organza, threads to match the fabric, needle and fishing line. First, place the previously prepared templates on a cardboard sheet. Outline each of them with a pencil. At the same time, hold the template with your fingers, and try to apply the line thinly, without pressure. Cut out the silhouettes and gently erase any pencil marks with an eraser.
Make stripes from organza. The width of each tape should be equal to two pack lengths. Determining this value is simple: measure the distance from the waist line to the ballerina’s knee with a ruler on the silhouette. If, for example, the length of the intended skirt is 5 cm, the width of the fabric strip should be 10 cm. The length of the ribbon is chosen arbitrarily depending on how full you want the tutu. To prevent the edges of the strip from fraying, carefully melt them over a candle flame.

Fold the ribbon in half lengthwise and iron it. After unfolding the fabric, walk along the fold line, and then pull the thread to gather the product. You can do it another way: do not unfold the folded strip, but stitch it almost at the very fold. This skirt will keep its shape better. Use a thread to secure the gathered organza around the ballerina’s waist. The final touch remains: pierce the silhouette at the top with a needle, pull the fishing line through the hole and tie it in a knot. Fasten the second edge of the nylon thread to the cornice.

Advice. It is not necessary to use organza to make a paper ballerina. Other airy fabrics are also suitable: tulle, chiffon or lace. The Christmas tree with ballerina snowflakes on it (templates can be printed for free from this material and our link) looks great and very original!
How to make a snowflake ballerina?
One more interesting handmade The idea is to use a snowflake as a pack. She, openwork and light, harmoniously complements the thin silhouette of the dancer. Both small and large snowflakes are suitable for paper figurine. In the first case, your “heroine” will look like a young, flirty person, in the second - a romantic, fantasy lady.

You can experiment not only with the length, but also with the material of the skirt. For beginners, it is easiest to work with regular office paper. If you are a master at using scissors, you can cut out a completely airy, translucent snowflake from a napkin. There is also tissue paper, widely used in decoration and handicrafts. It is very thin, but at the same time strong, holds its shape well, you can make snowflakes even from ordinary landscape paper, but if desired, the print can be transferred to cardboard, and from there the silhouette can be cut out with a stationery knife.
Before you start creating ballerinas, prepare templates according to a principle that is already familiar to you. Place the resulting figures on a sheet of white double-sided cardboard, trace them and cut them out. Now do:
Place a sheet of white or colored paper vertically on the table in front of you.
Fold the top right corner so that the top edge meets the left side.
Cut off the lower part of the sheet remaining outside the formed triangle.
Bend the resulting triangle again and place the larger side (hypotenuse) down.


Mentally divide this triangle into 3 equal parts. If you have any difficulties, use a protractor.
There will be fold lines where the intended parting lines should be. Now fold the triangle as shown in Figures 3 and 4 and trim off any excess.


Apply the pattern you like onto the resulting blank with a pencil. Please note that only a snowflake with a hole in the center can act as a pack. You can choose cutting templates and print them to make a snowflake. 


Cut out the pattern along the outline and unfold the sheet. Place the snowflake on the silhouette and secure with a few drops of glue.
If desired, the ballerina's waist can be decorated with a thin ribbon-belt made of satin or lace. The figurine itself can be used both as an independent decoration and as an element of some kind of composition. We also recommend watching how to make beautiful
Hi all! Watch my video master class for you on how to do it
SNOWFLAKES BALLERINS WITH YOUR OWN HANDS. Download ballerina snowflakes stencils for cutting right here.
Did you like the Snowflakes-Ballerinas from the video? Then let's get started. 😉
To make such beautiful snowflakes You will need:
- paper
- stencils (download to print right here)
- scissors
- thin thread
I use graceful ballerina silhouettes and, at the same time, simple ones to cut out.
See for yourself.


If you like the silhouettes of these ballerinas and would like to download and print them, CLICK DOWNLOAD.
Snowflakes Ballerinas
Stencils for cutting
For your convenience, downloadable files are presented in different formats: .doc and .jpg.
I also want to clarify, as in the video, that stencils with one ballerina on the entire A4 sheet are suitable for LARGE ballerinas. I don't usually use these.
I like to cut out ballerinas from stencils with two silhouettes on A4 sheet. You saw the result yourself in the video.
- Have you printed out the ballerinas?
Then let's continue.
2. Cut out the silhouette of a ballerina.
3. Take a sheet of paper and cut out a regular snowflake.
Or unusual - as you wish. 😉
Be sure to make a hole in the middle of the snowflake. Please note that this hole must be the same size as your ballerina's waist. Approximately (by eye).
4. Carefully put the snowflake on the ballerina, just like we put on a skirt.
5. Using a needle, pull through a thin thread.
I do this at the top of the silhouette's head (middle).
That's it. DIY Ballerina snowflakes are ready. Decorate the space around you with them. And if your children are not as small as mine, running around in the video frames, then they will be very happy to help you. Or make these ballerina snowflakes yourself. 😉

I hope the snowflake ballerina cutting stencils downloaded on this site will help you create such graceful beauty quickly and easily.
Leave Comments. See you in new articles and video. 😉
Happy New Year to you and your beloved children! 🎅🎄
Your Natalya May.
How to make a snowflake ballerina out of paper?
First you need to choose the silhouette of a ballerina you like and cut it out of thick paper (or half-cardboard).

Then choose a “tutu” for the ballerina, which will serve as a beautiful openwork snowflake. The snowflake patterns we presented are designed for 6 angles; you can make a blank for such a snowflake using this pattern:

If you fold the diagram in half, you can cut out a snowflake from 12 corners: this makes it easier to cut out the internal elements, but you will have to make an effort when cutting out so many layers of paper. Choose what is more convenient for you.
Redraw the outline of the selected snowflake and carefully cut out the design along the contour. To cut out internal elements, it is preferable to use a special silicone craft mat and a stationery knife. Do not cut out the middle (top) of the snowflake, even if the pattern requires it.


Use a ruler to measure the narrowest point on the ballerina's waist. Draw a line of the same length with a pencil in the center of the snowflake. Make a cut. Carefully insert the ballerina into the hole, folding it slightly in the wider areas (on the hips).


This is the beauty that comes out in the end. You can hang it on a chandelier or on a Christmas tree, or make a ballerina mobile for a crib. 
Ballerina snowflake templates
Ballerina stencils (click to enlarge image):


Templates for cutting snowflakes for ballerinas from paper (6-gonal snowflake, images enlarge by click):
