
Winter birch in quilling style. Quilling rowan - step-by-step description, master class and interesting ideas
Quilling- This is a simple type of needlework in our country, which does not require large expenses and the participation of craftsmen. Products from paper tapes may become beautiful decoration interior, as well as transform gift packaging or postcards. In this master class we will tell you how to make an original tree using the quilling technique. Now you can make your own declaration of love or give a beautiful gift to your loved ones.
Materials:
- sheets of paper for quilling;
- cardboard or postcard base;
- glue;
- quilling kit.
First of all, you must decide on the type of product: panel, postcard or gift wrapping. After this, you can draw a diagram on paper according to which you will stick the quilling paper. If you do not have such paper, you can prepare the blanks yourself. To do this you need to buy a double-sided colored paper and cut it into strips measuring 0.5 and 1.0 cm.
The peculiarity of the quilling technique is that a strip of paper is rolled into a roll using scissors or a special machine. In this case, each workpiece can be given a specific shape.

Master class on wood using quilling technique
There are several forms of blanks for quilling:
1. Eye. In order to make this blank, quilling paper is rolled into a roll and clamped at the edges.
2. Square. A strip of paper is rolled into a roll and clamped on the sides.
3. Diamond. The blank can be made from a square.
4. Triangle. The paper is rolled into a roll and turns into a drop. After this, the base is leveled and the workpiece turns into a triangle.
Using a regular roll as a base, you can make a blank of any shape and completely fill a panel or postcard.


After this, you need to fill the hearts with rolls using the quilling technique, and you can choose the filling form yourself.


Making a Tree out of paper using the quilling technique, video
Wood using the quilling technique looks quite original, and even a beginner can easily make it. Tired of the same gifts and cards? Bring individuality into your life - use a simple quilling technique.
But you can easily create a real masterpiece at home.
Satisfied interesting craft spring birch tree with budding leaves, made from a roll left over from paper towels or.
This roll needs to be given a cone shape by cutting its lower part and gluing the edges of the cut, bringing them slightly over each other. In addition to the roll, you will need white napkins (or paper towels), paint and a brush, glue, scissors and colored paper.
Let's get started.
Let's take a roll.

We tear off the disposable towel or unfold the napkin.

Wrap the roll with a napkin (or towel). Apply liquid glue to make it stick.

Using black paint we apply horizontal paired stripes, like on a birch trunk.

Cut out a rectangular piece from a brown paper sheet.

We cut one edge of this rectangle in a vertical direction, placing the cuts at a short distance from each other. We give the second edge a zigzag shape.

We wrap this detail cardboard roll, glue it with the fringe up. The trunk of our tree acquires a crown.


We glue small narrow strips of brown paper along the entire trunk - like separate branches.

We take the green corrugated one and cut off a rather narrow strip from it.

From this strip we cut out many leaves.

We randomly glue leaves onto the branches of our tree.


This birch tree will become a real decoration for any room.
Galina Alekseevna Mikheeva
Master class« Decorating an autumn birch tree using
quilling techniques»
Learning is only good then
when it goes ahead of development.
L. S. Vygotsky
Paper is one of the simplest, most accessible, and easily processed materials. We become familiar with paper products from early childhood. Paper as a material for children's creativity incomparable (ease of processing, minimum tools).
Any work with paper - folding, cutting, rolling - is not only exciting, but also educational. Paper gives the child the opportunity to express his individuality, realize his plan, and feel the joy of creativity.
One of the ways to develop artistic and creative abilities is to work in quilling technique(the art of twisting long and narrow strips of paper into spirals, modifying their shape and creating three-dimensional or planar compositions from the resulting parts).
Artistic modeling from strips of paper is based on the simplest ready-made elements: ring, drop, leaf.
In this I will show you in the master class as possible together with the children with the help quilling techniques to decorate an autumn birch tree.
What you will need:
prepare strips (better for an adult, they should be even, the aesthetic appearance of the craft depends on this;
strip width 3 mm, for marking a ruler is used;
for stripes I I use tinted paper, in our case we will need yellow and green;
stripes are drawn on the sheet parallel to its long side.

you can draw the tree yourself or - more easy option– print on a printer (under the basis I I used thick cardboard) .

Then tinting is done: bottom - green (grass, top - blue, blue (sky, the sky can be made gloomy - tree autumn.
Let's start twisting the strips - you should get free spirals.

When you wind the required amount, we make leaves from the spirals. You choose which leaves there will be more - green or yellow (early, golden autumn) .

Let's get started design of the tree itself.

You can add leaves to the ground - they have already fallen! Finish drawing the birds.

The children and I did work on design of spring trees. Here are some children's works.

Good luck in your work!
Publications on the topic:
Unconventional drawing is very attractive to children and gives them a lot of positive emotions, so this year we, the guys,...
“What a miracle, a bright fan walks importantly across the clearing! The beauty of that ruler, The peacock is proud of his tail!” (V. Sibirtsev) The peacock is considered the most.
Summary of the OOD “Tulips for Mom” in the senior group (using the non-traditional “quilling” appliqué technique) Integration tasks educational areas: Cognitive development: - Expand children’s knowledge about the International women's day, as it is celebrated.
Wheeling is simple paper rolling, the art of making flat or three-dimensional compositions from long and narrow strips twisted into spirals.
Planar modeling in senior group Planar, plot modeling based on Russian folk tale"Masha and the Bear". Goal: -consolidate knowledge.
Hello dear colleagues and guests of my page. I am glad to introduce you to the events that take place in our kindergarten. I want it today.
I offer a master class on making winter crafts - volumetric applique"Greetings from the North Pole!" Purpose: to introduce children to the eldest.
Birch in the quilling style is not much different in execution from simple tree in the same technique. According to the composition, the birch tree includes all the same elements - trunk, crown, branches, leaves. However, birch has distinctive features: black spots on an elongated trunk, earrings and pointed leaves. By these characteristics, birch can be distinguished from any other tree.
Birch is a symbol of life and death at the same time. In spring, the first buds swell on it, so for many peoples, birch is a symbol of spring, the beginning of life and purity.


Ideas for depicting a birch tree in quilling will come from imagination, skill and experience. For beginners, it is better to take a simpler diagram: a trunk and crown drawn or made from basic elements with leaves from the corresponding basic forms. For more experienced craftsmen It won’t be difficult to figure out how to make a composition more interesting. This could be a separate thread with large leaves and earrings or a stylized birch tree inscribed in a circle. This master class gives several tips on how to create and design a birch tree craft yourself using the quilling technique.
This MK is suitable for beginners and will explain the basic principle of work in quilling technique. You can make a spring gift for your loved ones with your own hands: a panel, painting or postcard with a blossoming birch tree. To do this you should prepare:
- strips of paper for quilling in the color of birch: white, black, green, yellow, brown;
- cardboard or paper as a base;
- PVA glue;
- scissors;
- tweezers, ruler, awl.
General job description:
- prepare the base: draw a landscape or glue colored paper, applique, etc.;
- make a sketch of the future birch tree: designate the trunk, branches, leaves, catkins;
- Based on the sketch, begin to twist all the necessary parts for the trunk and crown;
- glue all the elements to the intended places;
- complement the composition with decoration: make a frame, grass, clouds, etc.
The barrel can be made up of either twisted base elements or curved strips. You can combine stripes with shapes. Branches, as a rule, are made in the same style as the trunk.
Instructions for creating birch leaves and their variants are presented here in more detail.
First option: from basic figures. This is a simple method, which will also be useful for beginners to learn, since most paintings using the quilling technique are created from basic elements. Several basic shapes may be suitable for a birch leaf. For example, “drop”, “eye”, “arrow”, “triangle”. All figures are made from a twisted paper spiral, which needs to be unraveled a little and the tip glued.
- “drop”: gently squeeze the spiral on one side with your fingers;
- “eye”: press down the workpiece on both sides;

- “arrow”: using a pen or a special tool, push one side of the spiral inward and make the other side pointed;
- “triangle”: one side is compressed and stretched, the other is slightly pressed towards the middle to make a flat side.
Option two: simple openwork leaf. To create it, you need to prepare a comb, preferably with wide teeth (with a large distance) and strips of green paper.


Step-by-step creation of a sheet: secure the tip of the strip to the tooth of a comb with glue. Wind the strip evenly (for example, on each tooth or every two teeth) around the comb.


Make several turns (5-6) and secure the tip with glue.
Third option: leaf with veins. It’s quite easy to do, also using a comb. You just have to follow the execution rules step by step, based on the photo. You need to glue two green strips for quilling. Attach the tip to the comb and begin to wind the strip through about two teeth like an accordion:


Remove the workpiece from the comb. Grasp the resulting sheet in the middle with tweezers, fold and glue along the edges.


“Curly” birch can be created from spirals different shapes. It is enough to harmoniously connect the pieces together to form a crown. To understand how and where the branches should bend, it is better to first schematically draw patterns on a cardboard base:

Quilling earrings can also be made from small basic shapes, for example, from “crescents” arranged in a column, or from alternating a “semicircle” with a “crescent”. If the composition with a tree is small in size, then it is better to draw earrings:

It’s more interesting to make a whole grove with slender trees. As a sample, you can take any pictures with a birch landscape and make sketches based on them.
Birch twig with leaves
To make a branch with quilling leaves in more detail, it is recommended to use templates. For example, like this:


Golden time Autumn– this is certainly the most colorful and vibrant time. However, even such golden landscapes that you and I can watch outside the window cannot drive away autumn sadness and despondency from us. It’s rainy and cloudy outside, which means it’s time to dive headfirst into your favorite pastime, handicrafts.
There is an incredible number of all kinds of handicrafts that help you create amazingly beautiful things with your own hands: paintings, jewelry, figurines and much more.

In this article, the News Portal “site” has prepared for you magically beautiful works made using the quilling technique (paper rolling). The works are amazing, and you won’t believe that you can create such masterpieces! The quilling technique is so simple that anyone can master it. The main thing here is not to be lazy, to be careful and attentive.
And just like it’s golden autumn outside the window, then creative works in the quilling technique we selected on a current topic.
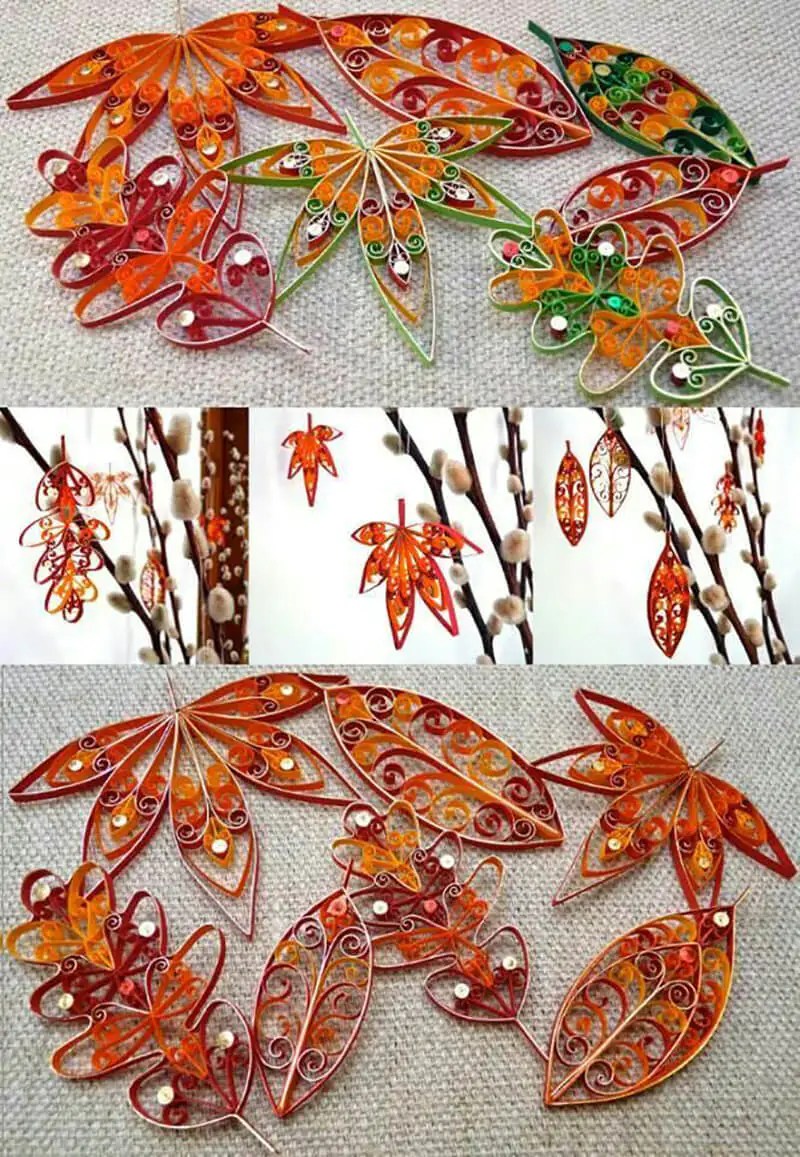
Quilling leaves

So what falls under the Autumn theme? Of course, such bright and magically beautiful autumn leaves. You can place finished leaves made using the quilling technique in frames and hang them on the wall, decorate homemade greeting cards with them, and even, you won’t believe it, leaves made using the quilling technique can become earrings and a pendant!

We bring to your attention several original and beautiful ideas manufacturing autumn leaves using quilling technique. In fact, the works are not complicated, but you must agree, they are amazingly beautiful.


To create such works, you can use special sets of paper for quilling, or you can cut any decorative paper into identical thin strips yourself.
Maple leaf quilling
Quilling Wood
Quilling Autumn Tree

Autumn means not only the leaves themselves, but also, of course, trees with lush golden crowns. Create voluminous works using the quilling technique and your walls can be decorated with luxurious autumn gardens like these.
Greeting cards decorated with autumn scenes made using the quilling technique will be a wonderful, sophisticated addition to any gift for any occasion in the fall!

Interior paintings and panels on the theme of Autumn will not only decorate your apartment or country house, but also a luxurious gift.

We wish you not boring autumn evenings in the company of paper strips and your limitless imagination!