
Impletituri rapide pentru par lung. Coafuri frumoase cu impletituri pentru par lung
Fiecare fată este unică și inimitabilă. Crea noua imagine fiecare zi este ușoară dacă știi simple secrete pe drumul spre perfectiune. Din timpuri imemoriale, împletiturile au fost considerate unul dintre standardele feminității și frumuseții.
Oportunitatea ideală de a învăța cum să împletești împletituri este să te uiți pas cu pas la o fotografie a creației lor și apoi să exersezi și să exersezi până instrucțiuni pas cu pas nu va deveni obișnuit pentru tine, iar țesutul coafuri tale preferate nu va deveni automat.
Vă prezentăm atenției cele mai fermecătoare opțiuni. Topul nostru 6:
- Cascadă.
- "Coada de peste"
- "Şarpe"
- Stilul coroanei
- Chic grecesc
- împletitură elfică.
Impletitură parțială cu șuvițe care cad („Cascada”)
Coafura și-a primit numele neobișnuit din cauza unei schimbări a țesăturii clasice. împletitură franceză. Cu această din urmă metodă, întregul păr este adunat într-o singură împletitură, iar cascada este o opțiune mai blândă, în care firele individuale curg în jos ca niște valuri vezi uitându-te la fotografia care demonstrează țeserea unei împletituri incomplete cu propriile mâini.

Stilul ușor și elegant, în simplitatea sa, nu este inferior cascadelor de salon, potrivite atât pentru un eveniment special, cât și pentru o excursie de zi cu zi la magazin. Eliberat bucle voluminoase poate fi efectuată în mai multe variante, de exemplu coborând pe lateral, dar indiferent pe care o alegeți - imagine romantică asigurate pentru tine.
Instrucțiuni pas cu pas:
- Părul trebuie să fie neted și bine separat unul de celălalt. Utilizați un pieptene cu dinți fini pentru aceasta. Pentru ca părul să arate grozav pe tot parcursul zilei, folosește un produs de coafat, cum ar fi spuma.
- Părul tău este gata. În continuare, prindem o parte a capului - luăm o șuviță de păr de aici și începem să țesem o împletitură standard: a) împletitura începe cu o șuviță care merge mai sus și merge în mijloc; b) apoi o luăm din ceafă și o ducem în centru;
- După prima țesătură, lăsați șuvița rezultată întinsă liber, acesta va fi unul dintre numeroasele fluxuri ale cascadei dvs. Pentru comoditate, îl puteți fixa lângă față, astfel încât să nu interfereze cu procesul ulterioar de a crea o coafură cu împletituri pe par lung.
- Luăm o grămadă nouă de păr liber pe partea laterală a capului și repetă procedura.
Puteți continua să țeseți cu astfel de repetări până la mijloc sau să aduceți valurile la templu. Frumos, blând - imaginea ta nu va lăsa pe nimeni indiferent. De asemenea, aceasta alegere grozavă coafuri pentru fete pentru 1 septembrie.
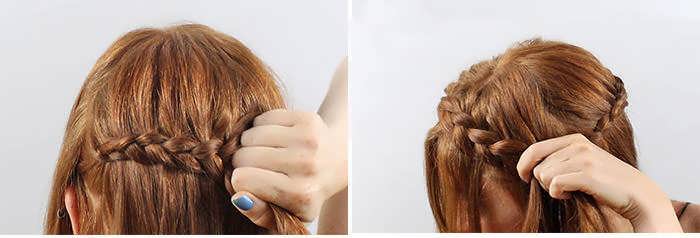
Impletitura coada de peste
Impletiturile frumoase pentru parul lung au devenit disponibile oricui in zilele noastre. fată modernă. Cu toată varietatea de agrafe de păr, barete, agrafe, benzi elastice, funde, este atât de ușor să creezi un aspect unic cu propriile mâini.

O astfel de împletitură simplă a câștigat deja inimile multor domnișoare. În fotografiile revistelor lucioase, vedetele și modelele strălucesc cu zâmbete strălucitoare, confirmând acest lucru. Și ce fată nu vrea să fie ca eroina filmului ei preferat, de exemplu? Această coafură este simplă și versatilă. Este nevoie de foarte puțin timp, iar când te pregătești de lucru dimineața, nu trebuie să-ți faci griji unde să-ți pui părul lung luxos. Toată lumea s-a plictisit deja de banala coadă de cal, dar coada de peste- este îndrăzneț și realizat într-un singur moment și este potrivit atât pentru fete, cât și pentru doamnele elegante, cu un păr bine îngrijit.
Fotografie pas cu pas cu coafura:

Șarpe peste capul meu
Format plin de farmec și strălucitor de țesere non-standard a unei împletituri franceze standard. Întregul secret este că îți muți împletitura, mai întâi o parte a capului „funcționează”, apoi cealaltă. Figura rezultată seamănă cu un șarpe, care pare să alunece prin păr. Foarte proaspăt și original, ca pentru un matineu de grădiniță fetitelor, deci pentru fata adulta pentru un interviu de angajare.
Unul dintre marile avantaje pe care le are acest tip de țesut este accesibilitatea sa pentru fiecare fată. Pentru a atinge obiectivul cu propriile mâini, veți avea nevoie doar de o oglindă, de o dispoziție bună și urmați exact instrucțiunile pentru implementarea acesteia (pentru comoditate, o fotografie este atașată la fiecare pas):
- Începem să împletim împletitura din partea din apropierea lobului temporal, împărțind bucla în trei șuvițe;

- începeți să faceți o împletitură franțuzească pe dos;

- În timp ce ne desfășurăm țesutul, selectăm păr nou exclusiv de la nivelul superior;

- continuăm lucrul până când aducem împletitura pe partea opusă ,
și începeți să captați bucle noi din partea feței;

- Incepem sa schimbam directia impletiturii cand ajungem in zona de sub ureche, luam si noi suvite doar de sus;


- ajungem la margine și schimbăm din nou traiectoria;

- înfășurați capetele rămase într-un inel;

- Dacă scoateți fragmente de împletitură de-a lungul întregului perimetru, veți obține un aspect magnific și voluminos. .

Coroană-împletitură
Această coafură de nivel mediu de dificultate vă va lua nu mai mult de 10 minute de timp liber, dacă doar petreceți timp analizând și exersând amănunțit. Și în ceea ce privește versatilitatea sa, nu este inferior niciuna dintre opțiunile anterioare. Potrivit atât pentru fetițe, cât și pentru tineri fete stilateși doamne adulte respectabile.
Pentru a crea această coafură cu propriile mâini, veți avea nevoie de:
- apă;
- benzi elastice;
- pieptene ascuțit;
- fixativ.

Fixați o secțiune rotundă de păr în vârful capului cu o bandă elastică subțire după ce o despărțiți. Începeți să țeseți dintr-o buclă mică lângă tâmplă împletitură franceză, luând părul din coada de cal pe o parte și din masa principală de bucle pe cealaltă parte. Continuați împletirea într-un model circular, ajungând la capăt, ascundeți împletitura liberă sub păr și asigurați-vă cu ace. Fixați rezultatul cu lac.
Vezi lecția foto de mai jos și vei învăța cu ușurință această tehnică.
Coafura in stil grecesc
Din cele mai vechi timpuri, Grecia a fost asociată cu harul, armonia și ambiția. Zeițele Olimpului sunt încă considerate standardul frumuseții, glorificate și imortalizate în artă și muzică. A fi perfect ca Afrodita în vremurile noastre nu este un lux sau un tribut adus modei, este disponibil pentru fetele de toate vârstele.
Coafura grecească cu împletituri vă va ajuta să creați un aspect uimitor. Vei fi încântător și ușor de recunoscut. Să vedem cum să țesem în fotografie , și începeți să aduceți la viață această țesătură simplă.

Impletituri din bucle mari sau mici impletituri africanețesute în șuvițe de păr nepăsătoare vă vor oferi lejeritate și poftă. Pentru a vă asigura că coafura rămâne pe loc toată ziua, împletiturile ar trebui să fie asigurate la spate cu ace de bobby sau ace de bobby. model frumos. Alternativ, toate buclele pot fi trase în lateral, fixate cu un ac de păr.
"Elf"
Vrei să te simți ca o prințesă elf fermecătoare? Să fii transportat în atmosfera unui basm și a unui miracol? Unică și extravagantă, această împletitură este cu siguranță pentru tine.

Țeserea acestuia este extrem de simplă, o luăm în considerare pas cu pas și urmărim fotografia:
- Împărțim părul în trei secțiuni - una în spatele capului și două în lateral. Începem lucrul cu prima parte, după ce a asamblat-o anterior într-o coadă.
- Trageți puțin elasticul în jos, astfel încât să puteți arunca coada în orificiul rezultat și trageți-l înapoi.
- Eliberăm zona temporală stângă și începem să țesem o împletitură obișnuită cu trei rânduri cu un gard stâng.
- Aducem împletitura la începutul cozii de cal și o fixăm temporar. Împărțim partea din spate a părului în două părți, eliberăm partea stângă și o împletim până la capăt.
- Procedăm în mod similar în ceea ce privește partea dreaptă.
Decorăm după cum doriți, cu orice vă permite imaginația. Coafura fermecătoare este gata!
A devenit atât de ușor să fii unic încât în zilele noastre este mai dificil să rezolvi problema 2+2 = 4. Și ține minte, nu există limită pentru perfecțiune!
Diversele țesături sunt un semn de bun gust și vă permit să oferiți șuvițelor lungi un aspect îngrijit și îngrijit. De aceea, împletiturile DIY pentru părul lung au un succes uriaș nu numai în rândul tinerilor adolescenți, ci și în rândul femeilor tinere. Vrei să înveți cum să împletești împletituri frumoase? Citiți cu atenție clasa noastră de master și efectuați țesutul pentru toate ocaziile!
Clasică coadă de pește
Pentru a crea această coafură, veți avea nevoie de o perie de masaj cu peri naturali, o clemă de păr sau o bandă elastică și apă sau un dispozitiv de netedă a părului.
- Pieptănați-vă părul și umeziți-l ușor cu apă sau cu un produs special.
- Împărțiți părul în două părți egale.
- Separați o șuviță subțire de păr de partea dreaptăși aruncă-l la stânga.
- Pe partea stângă luăm o șuviță de aceeași grosime și o aruncăm spre dreapta.
- Continuăm să țesem până la marginea împletiturii.
- Asigurați vârful cozii cu o bandă elastică sau un ac de păr.

O coadă de pește poate fi îngrijită și elegantă sau ciufulită și liberă. Dacă doriți, îl puteți decora cu flori, panglici sau agrafe de păr frumoase.
Șarpe peste capul meu
Aceasta se țese mai departe fire lungi reprezintă combinație elegantă impletituri subtiri si un coc lejer.
1. Împărțiți părul de lângă față într-o despărțire laterală clară.

2. Faceți o altă despărțire de la o ureche la alta.
3. Adună partea din spate a capului într-o coadă de cal strânsă.

4. Împărțim firele din dreapta despărțirii în trei părți identice și le țesem într-o împletitură obișnuită cu trei rânduri.
5. După câțiva centimetri, începem să adăugăm șuvițe subțiri la împletitură. Trebuie doar să le iei din stânga. Țesutura ar trebui să fie destul de strânsă și densă.


7. Continuăm țeserea, adăugând periodic șuvițe în stânga. Ajungem la finalul despărțirii.

8. Facem din nou o buclă și revenim la față.

9. Trebuie să creați trei răsuciri - veți obține o coafură în stil retro.

10. Fixați vârful împletiturii cu o bandă elastică și conectați-l la coadă.
11. Pe partea stângă a despărțirii, separăm trei șuvițe egale și țesem după același model. Fixăm și vârful cu o bandă elastică și îl conectăm la coadă.

12. Împărțim coada în sine în două părți și răsucim fiecare dintre ele într-o frânghie pufoasă.

13. Așezăm șuvițele finite într-un cerc în jurul bazei cozii și le fixăm cu ace sau agrafe de păr.

Impletitura coroana pentru suvite lungi
Vrei să te simți ca o adevărată regină? O coroană făcută din propriile fire vă va ajuta în acest sens, precum și următorul set de instrumente:
- Pieptene;
- Agrafă, ac de păr sau agrafă;
- Cauciuc;
- Acele de păr.
1. Pieptănați-vă părul, separați o parte de la tâmplă până la ureche și fixați-o cu o clemă.

2. Imediat în spatele urechii, separați trei șuvițe subțiri și începeți să le țeseți într-o împletitură franțuzească în sens invers, dar adăugați doar șuvițele de sus.

3. Ne deplasăm în spatele capului și ne asigurăm cu atenție că împletitura merge drept și nu se strecoară în jos sau în sus. Ne țesem coroana până la locul indicat de ac de păr și continuăm să țesem deasupra frunții.
4. Ajunși la locul indicat de semnul invizibil, continuăm țesut obișnuit din trei fire.

5. Legați capătul împletiturii cu o bandă elastică și conectați-l la baza acesteia.
6. Pentru fiabilitate, fixăm coroana cu agrafe de păr. Și decoram joncțiunea cu o floare.

Impletituri feminine pentru par lung
Impletiturile aerisite, feminine arata cel mai bine pe parul lung. Dacă aveți dorință și timp, încercați singur această opțiune.
Pasul 1. Pieptănați-vă părul cu o despărțire dreaptă sau ușor înclinată.
Pasul 2. Separați trei fire nu foarte groase lângă față (pe partea dreaptă).

3. Începem să țesem o împletitură clasică cu trei rânduri din ele, adăugând bucle subțiri în partea de sus și de jos. Țesutura nu trebuie să fie strânsă. Fă-l aerisit și ușor. Numai în acest caz coafura se va dovedi cu un breton.

4. Facem același lucru și în partea stângă. Vei ajunge cu două împletituri moi.

5. Adăugați cu atenție și mai mult volum împletiturii - separăm ambele împletituri cu degetele pe toată lungimea lor și scoatem bucle individuale.

6. Încrucișați împletiturile una peste alta și fixați-le cu agrafe de păr. Ascundem capetele în interior și, de asemenea, le fixăm cu un ac de păr.

Cozii de porc în jurul marginii părului lung
Cu această coafură simplă, dar originală, poți aranja rapid chiar și șuvițe foarte lungi.

- Separați o șuviță în spatele capului și împărțiți-o în trei secțiuni egale.
- Împăsăm firele între ele ca pentru o împletitură obișnuită cu trei rânduri.
- Acum începem să adăugăm bucle individuale în dreapta. Părul din stânga nu trebuie să se prindă în împletitură.
- Ajungem la capătul împletiturii și legăm capătul cu o bandă elastică.
- Pentru a da împletiturii puțină aerisire, întindeți-o ușor cu mâinile.
Coafura cu impletitura greceasca
Pentru a îndeplini acest romantic și foarte frumoasa impletitura părul lung va dura literalmente minute, dar rezultatul va depăși toate așteptările tale.
1. Aduna-ti parul intr-o coada de cal (stransa), lasand doar cateva bucle subtiri langa fata ta.

2. Coada în sine trebuie împărțită în patru secțiuni egale.

3. Luați-l pe primul și împărțiți-l în jumătate. Împletim o împletitură cu coadă de pește.

4. Facem același lucru cu cele trei secțiuni rămase.

5. Separăm fiecare împletitură cu degetele - acest lucru o va face dantelă și liberă.

6. Așezați prima împletitură de la stânga la dreapta în jurul capului. Veți primi o bandă de păr. O reparăm cu altele invizibile.

7. Așezați a doua împletitură sub prima de la dreapta la stânga și, de asemenea, asigurați-o cu ace de păr sau agrafe.

8. Acum luăm a treia împletitură. Îl punem într-un cerc de la stânga la dreapta.

9. Asezati a patra impletitura in partea centrala a capului in forma de floare. Reparăm totul cu ace și ace.

Impletitură pe patru rânduri stilul popular
Nu se poate face fără împletituri pentru păr lung țesut original din patru fire. Acest stil va face chiar și șuvițele foarte subțiri și rare să pară voluminoase.
Pasul 1. Adună-ți părul într-o coadă de cal (strâns). Locația sa este la discreția dvs.

Pasul 2. Împărțiți coada în 4 secțiuni.

Pasul 3. Așezați 1 secțiune peste 2 și treceți sub 3.

 Pasul 4. Suprapuneți 1 secțiune pe 4.

Pasul 5. Pune 4 sub 1 (ar trebui să fie în centru).
Pasul 7. Aruncă 2 peste 3.
Pasul 8. Sari peste 4 peste 2.

Pasul 9. Impletiti impletitura pana la capat. Asigurați vârful cu o bandă elastică. Pentru a face stilul frumos, nu-l strângeți.

Impletitura lata pentru par lung
Țesut neobișnuit în stil popular care va decora orice aspect.
1. Adună tot părul într-o coadă (strânsă).

2. Împărțiți-l în trei secțiuni.

3. Începem să țesem o împletitură cu trei rânduri, lăsând fire subțiri pe laterale.

4. Desfacem impletitura cu degetele, oferindu-i mai mult volum.

5. Țesiți o împletitură exterioară din șuvițele rămase și, de asemenea, întindeți-o cu degetele.

Impletitura de volum pentru par lung
- Mai întâi, pieptănați firele cu un pieptene și împărțiți-le în trei părți egale.
- Facem o împletitură franceză inversată - trecem șuvița stângă sub cea din mijloc.
- Facem același lucru cu firul potrivit.
- Separați de partea generală a părului din stânga buclă subțire, atașați-o de șuvița din stânga și puneți-o sub șuvița din mijloc.
- Facem același lucru pe partea dreaptă a țesăturii.
- Continuăm împletitura până la capăt.

Pasul 7. Întindeți ușor buclele cu degetele, acest lucru va adăuga volum împletiturii.
Pasul 8. Ondulează părul din spatele capului în formă de melc. Fixăm cocul cu agrafe de păr.

Impletitură romantică pentru doamnele cu păr lung
Acest stil se bazează pe același spikelet, dar împletitura laterală (unilaterală) îi conferă originalitate.
- Pieptănați-vă părul cu un pieptene și despărțiți-l lateral, astfel încât partea stângă să fie mult mai mare.
- Împletim secțiunea stângă a părului într-un spighelet.
- Din partea dreaptă împletim părul de-a lungul marginii, ridicând bucle doar dintr-o parte.
- Legam ambele impletituri la baza cu o banda elastica. Decorează-l cu un arc frumos sau un ac de păr.

Impletitura eleganta
Pasul 1. Pieptănați șuvițele cu un pieptene.
Pasul 2. Separați o șuviță subțire de păr în partea dreaptă și împletește-o într-o împletitură franțuzească unilaterală.

Pasul 3. Aduceți țesutul până la capăt și legați capătul cu o bandă elastică.

Pasul 4. Împletim partea inferioară într-un spighet și, de asemenea, o legăm cu o bandă elastică.

Pasul 5. Înfășurăm capetele împletiturii sub fund și fixăm cocul cu agrafe de păr.

Pasul 6. Decorează-ți părul cu o fundă sau o clemă de păr.
Impletitura cu coada de cal inversata
Pasul 1. Adunați șuvițele în coada de cal joasă, facem o depresiune la banda elastica in sine si intoarcem tot parul prin ea. Puteți atașa arcul imediat sau îl puteți lăsa până la urmă. Cu o fundă, este puțin mai dificil să-ți răsuciți părul, dar rezultatul va fi diferit.

Pasul 2. Formați o împletitură din părul liber și legați-i capătul cu o bandă elastică.

Cu împletiturile realizate folosind acest tutorial, vei arăta absolut uimitor! Pregătește-te să primești complimente!
Parul lung este standardul frumusețe feminină. Vremurile se schimbă, dar nu au nicio putere asupra preferințelor majorității bărbaților. Pentru loialitatea unei persoane dragi față de stereotipul stabilit, proprietarul părului lung trebuie să plătească. Pe lângă o atenție deosebită, care se exprimă în măști specializate, spray-uri, uleiuri și altele asemenea, un mop de păr, lăsat la dispoziție, se încurcă rapid. Chiar dacă ignorăm considerentele practice, dorința de a fi diferit și de a surprinde bărbatul pe care îl iubim împinge o femeie să experimenteze. Coafurile cu impletituri pentru par lung vin in ajutor, colectand elegant parul la unison cu imaginea de ansamblu. De ce realizări ale coaforilor poți ține cont?
Impletitura primordială națională până la talie a absorbit toți mulți ani de experiență a stiliștilor profesioniști și a apărut înaintea fashionistei moderne într-o varietate de variante. Este adesea dificil să recunoaștem vechiul nostru prieten într-o coafură făcută din multe șuvițe împletite. Dar, după cum știți, complexul este format dintr-un set de elemente simple. Așa că trebuie să începem cu elementele de bază - cu tipurile de împletituri.
Clasicul din trei șuvițe, împletit la capetele libere ale părului, după ce a migrat la suprafața capului, a căpătat numele împletitură franceză. Tot ce trebuie să facă este să schimbe dislocarea firelor încrucișate - din direcția „din cap” în „spre cap” - și deja "German".
Răsucind fiecare parte a părului în șuvițe și împletind împletitura în mod obișnuit, obțineți noua optiune – "Stil elvetian". Pierderea sub forma unei șuvițe transformă imediat împletitura în coada de peste. În plus, poate arăta grozav atât întins pe suprafața capului, cât și modelat pe capete libere. O împletitură din două părți de păr răsucite împreună are, de asemenea, un nume - o împletitură „Twist”.
Impletirea parului lung poate include optiuni mai complexe. De exemplu, pentru a face față cu 4, 5 sau mai multe fire, este necesară abilitate. Astfel de complexități par foarte neobișnuite. Dar chiar dacă nu este posibil să le implementezi pe propriul cap, coafurile cu împletituri pentru păr lung cu elemente mai simple nu arată mai rău! Ușurința implementării lor te va ajuta să fii fermecător și să surprinzi în fiecare zi.
Diferite impletituri pentru par lung - tutorial video
Coafuri cu impletituri pentru parul lung: cum se face pas cu pas
Țeserea frumoasă nu este întotdeauna complicată. Chiar și o împletitură obișnuită poate apărea într-un nou rol. Întregul secret este în șuvițe colorate legate la rădăcinile șuvițelor sectorului inferior al părului. Acest „zest” va adăuga culoare și volum și fotografie pas cu pas demonstrează clar simplitatea și creativitatea acestei abordări.
Frumoasă împletitură pentru părul lung: o fotografie valorează cât o mie de cuvinte!
Crearea de coafuri cu împletituri pe părul lung este o includere abil de elemente simple. Șuvițele îndepărtate de pe față, răsucite sub formă de șuvițe, imită originea unei împletituri, al cărei rol este apoi jucat de o serie de sectoare din cozi fixate în mod special cu benzi elastice. Fotografia arată cât de impresionant poate fi acest lucru.
Ceea ce este creat iluzoriu poate fi realizat cu ușurință cu o împletitură franțuzească obișnuită realizată în partea superioară a părului. Sau, prin analogie, împletește-ți o coadă de pește pe cap. Fotografia arată cât de fată arată această coafură cu împletituri. Cu segmentele ei de împletitură ușoară și pufoase, este și ea în tendințe!
Luând ca bază metoda franceză, efectuați țesut frumos Impletirea parului lung nu este dificila. Un exemplu în acest sens este a da direcție buclelor curgătoare și a da formă întregii coafuri.
Dacă este nevoie să îndepărtați tot părul, atunci o puteți face cu un breton, indiferent de contextul coafurii dorite. Țeserea cu o prindere pe o parte sau pe ambele cu trecerea la un coc obișnuit este o opțiune universală. Va rezista atât brizei mării, cât și privirilor pretențioase la un eveniment de seară. Fotografia vă va ajuta să evaluați acest lucru.
Impletitura frumoasa in interpretarea germana va ajuta la crearea si mai mult imagine spectaculoasă. Chiar dacă îl lovești în cap exact în mijloc, poți obține cu ușurință un rezultat uimitor. Principalul lucru este să nu uitați să folosiți toate fondurile pentru a crea un volum exagerat!
Apropo, pieptănând și pufând segmentele împletite, o coafură obișnuită cu două împletituri transformându-se într-una devine foarte impresionantă.
Mai multe elemente repetate consecutiv combinate cu o tranziție la un coc sau o coadă joacă bine în contrast, ceea ce este ușor de văzut în fotografiile următoare.
Urmărește videoclipul cu o coafură uimitor de frumoasă și neobișnuită cu împletituri, făcută pe păr lung.
Țesut frumos cu un accesoriu: panglica va spori impresia
Și dacă doriți un „zest” sub formă de accesorii suplimentare, atunci împletirea părului lung cu o panglică va adăuga culoare și îl va face foarte delicat. Rolul său poate fi jucat de orice fâșie colorată de material sau chiar de un fir cu mărgele. Vă puteți juca cu sunetul panglicii în contextul unei coafuri împletite în diferite moduri: lăsați-o să manevreze între șuvițe ca o jantă peste o împletitură gata făcută sau trimiteți capetele drept în grosimea buclelor încrucișate? Sau opțiunea „răsucire” cu o margine strălucitoare? Impletitura germană cu adăugarea de panglică în diferite încarnări arată proaspătă și drăguță bucle lungi. Și jucându-te cu interpretările, poți transforma cele două împletituri obișnuite de școală pe dos într-un corset elegant. O serie de fotografii de mai jos demonstrează versatilitatea fanteziei în contextul coafurilor împletite.


Puteți învăța cum să împletiți părul lung literalmente în câteva seri, dar aceasta este exact coafura care va decora orice fată, indiferent de vârstă și stil.
Apropo, coafurile împletite sunt foarte la modă acum, așa că merită să petreci puțin timp învățând. Și dacă știi deja să-ți împletești părul, atunci doar învață câteva moduri noi și încântă-te cu o coafură frumoasă și spectaculoasă și mai des!
Înainte de a începe orice manipulări cu părul, este mai bine să-l pregătiți puțin - astfel puteți fi sigur că vă va fi cu adevărat ușor să vă faceți părul și veți fi mulțumit de rezultat.
- Părul trebuie să fie curat și bine pieptănat. Dacă știi că părul tău nu este foarte ușor de gestionat și greu de coafat, atunci poți încerca să-ți împletești părul atunci când părul este încă ușor umed după spălare.
- De ce coaforii primesc impletituri perfecte? Pentru că profesioniștii folosesc produse de styling! Vei fi surprins să afli că multe femei nici măcar nu s-au gândit să folosească produse de styling pentru a-și asigura împletiturile.
Faptul este că cel mai adesea, pentru fiecare fată, împletiturile sunt o amintire a copilăriei, iar în copilăria noastră, desigur, nimeni nu folosea produse speciale de styling atunci când împletește părul unui copil pentru școală. Dar, pe de altă parte, acum este un alt moment, iar gama de produse de îngrijire a părului este complet diferită.
Nu ramane in epoca de piatra, investeste in lichid de stralucire, spray de descurcare si alte produse care te vor ajuta sa iti pastrezi parul frumos.
- Aveți la îndemână arsenalul necesar - mai întâi, piepteni. Pentru a realiza o împletitură cu adevărat frumoasă, coaforul poate folosi până la șase piepteni diferiți! Tot felul de piepteni și perii, perii și teasere - pentru ca împletitura să fie cu adevărat unică.
Ia acest truc și învață cum să-l folosești corect diferite tipuri piepteni
- Cum îți vei asigura coafura? Acestea pot fi benzi elastice obișnuite și altele speciale, diferiți crabi și agrafe de păr, elemente de fixare și panglici. Nu te opri aici benzi elastice simple- alege mai multe optiuni care iti vor pune in evidenta coafura.
Păr lung
Impletirea părului lung este o adevărată artă, deoarece lungimea părului vă permite nu numai să înfățișați două împletituri școlare, ci și să creați o coafură complexă cu mai multe fațete. Poate fi o spighetă familiară, împletită cu mare pricepere, sau poți alege ceva mai modern.
Uită-te la fotografia cu împletituri frumoase și pentru a înțelege cum vrei să arăți.
Este posibil să aveți nevoie de instrucțiuni pas cu pas prima dată.
Impletitura de coada de peste de volum
Această opțiune de coafură se va potrivi absolut tuturor fetelor, fără excepție, chiar dacă credeți că nu aveți suficientă grosime a părului pentru această opțiune, încercați-o oricum.
Impletirea unei astfel de impletituri este o chestiune de cateva minute, vei petrece inca cateva minute pentru a da impletiturii un aspect cu adevarat chic si vei putea admira rezultatul.

Pentru a crea o împletitură voluminoasă în coadă de pește pe părul lung, urmați instrucțiunile.
- Pieptănați-vă bine părul, pulverizați-l cu spray de descurcare dacă este necesar și pieptănați-vă despărțirea drept sau lateral. Nu ar trebui să faceți o despărțire ondulată complexă; împletitura în sine este un decor.
- Părul trebuie să se potrivească confortabil în jurul capului, acoperind urechile - nu trebuie să puneți șuvițe în spatele urechilor, acest lucru nu este întotdeauna potrivit sau frumos.
- Împărțiți întregul volum principal de păr în două părți și răsuciți ușor.
- Separați o șuviță mică din fiecare parte una câte una și transferați-o pe cealaltă parte.
- Nu este nevoie să încercați să faceți șuvițe de aceeași grosime - împletiturile care sunt țesute „la atingere” arată foarte bine.
- Impletiti impletitura aproape pana la capat si asigurati-o cu o banda elastica nu prea mare.
- Înarmați-vă cu un pieptene subțire („coadă”) și, începând de la baza împletiturii, trageți ușor buclele. Ține minte, nu trebuie să le scoți complet, vrei doar să adaugi puțin volum și să faci împletitura mai interesantă.
- Setați șuvițele cu orice produs de styling pe care îl utilizați de obicei - în cazul meu, este de obicei pudră de styling.
- Bucurați-vă de rezultat!
Coafura cu impletituri si impletituri
Impletiturile frumoase într-o coafură pentru păr lung arată fermecător, o fată nu înțelege întotdeauna cum să-și împletească propriul păr în acest fel. Cel mai adesea, pentru a crea o coafură geometrică - ca în fotografie - veți avea nevoie de prezența unei alte persoane, ale cărei acțiuni le veți dirija.

Dar există și câteva secrete. De exemplu, dacă te uiți cu atenție, devine clar că după câteva sesiuni de antrenament vei putea repeta acest lucru pe capul tău.
Aflați cum să țeseți tipurile de bază de împletituri - cu și fără împletituri. Aflați dacă puteți împleti frumos 4, 7 sau mai multe elemente la ceafă, fără a vă abate de la centru. De asemenea, încearcă să faci împletitura „Cascada” de mai multe ori - astfel vei înțelege cum să faci coafuri cu împletituri pentru păr mediu, cu împletitură și elemente libere.

De exemplu, în fotografie, țeserea împletiturii netede cu elemente încrucișate nu este atât de dificilă dacă imediat, pornind de la coroană, separă fire chiar folosind pseudo-împletitură, securiză fiecare șuviță cu o „răță” și apoi, fixează ușor întreaga lungime. a șuviței cu orice agent de styling, asamblați o „zăbrele” pe cap „”, împletind capetele libere pe ambele părți.
Lungimea medie a parului
Vin împletituri frumoase și interesante pentru părul mediu stiluri diferite, deci este mai bine să alegeți ceva specific pentru o anumită imagine pe care doriți să o creați.
De exemplu, modelele complexe de împletituri subțiri ne amintesc invariabil de frumuseti orientale, iar impletiturile ondulate sunt medii păr blond, așezat în jurul capului, va transforma orice frumusețe europeană într-un adept al celebrei personalități politice ucrainene.
Impletiturile frumoase arata foarte interesant intr-o coafura pentru par mediu, cand capetele parului sunt ondulate (sau ondulate natural) - asigurati-va ca subliniati acest lucru lasand numarul maxim de bucle libere.
Dacă nu știi cum să împletești o împletitură frumoasă, poate că trebuie să urmărești cum să împletești împletituri frumoase pas cu pas - cel mai adesea ghid pas cu pas conţine fotografii detaliate, pe care o poți folosi pentru a-ți da seama cum să împletești împletituri frumoase pe părul lung și mediu.
Învățând să împletești diferite împletituri
Uită-te la lecțiile foto de împletitură și diverse schemeîmpletire, astfel încât să puteți înțelege cum să împletești frumos părul unei femei adulte și al unei fetițe.
De asemenea, puteți urmări o clasă de master despre împletirea rapidă sau puteți învăța cum să țeseți o împletitură frumoasă cu o panglică.