
Din ce sunt făcute fustele tutu? Fusta din tul DIY pentru o fată: master class
Înainte de a cumpăra material și de a începe lucrul, va trebui să folosiți fusta unei fete bătrâne pentru a lua măsurătorile necesare - veți avea nevoie de lungimea produsului și circumferința taliei.
Folosind măsurătorile luate, decupați 4 bucăți de tul obișnuit, precum și încă o bucată de tul strălucitor. Pe mașina de cusut, setați cea mai mare lungime a cusăturii, ținând cont de o cusătură de 1 cm. Fiecare piesă trebuie cusută separat de-a lungul marginii superioare.
Trageți ușor firul de cusătură de pe margine pentru a aduna materialul. Continuați să trageți firele, îndreptând cu grijă pliurile rezultate. Trageți firele până când circumferința fustei este egală cu circumferința taliei. Strângeți nodurile de pe ambele părți ale cusăturii și tăiați firele în exces. Faceți manipulări similare cu toate croiurile din tul. Pliurile rezultate trebuie să fie asigurate - pentru a face acest lucru, instalați lungime medie coaseți pe o mașină de cusut și coaseți fiecare piesă de-a lungul liniei de cusături existente.

Îndoiți un metru și jumătate de panglică de satin (veți avea nevoie de ea pentru centură) în jumătate și călcați-o (așezați-o pe unitate temperatură scăzută). Așezați panglica pe fustă astfel încât să acopere toate cusăturile, apoi coaseți-o de-a lungul marginii inferioare. Acum este gata, se va lega cu ușurință în talie datorită capetelor libere ale curelei-panglică.
Folosiți sfaturile noastre pentru a coase o fustă tutu frumoasă, a cărei lățime va fi de 25-28 cm și lungimea de 28 cm.Luați o bandă de cauciuc lată în carouri (cel puțin 4 cm lățime) și înfășurați-o în jurul cărții pentru a o menține întinsă, acest lucru vă va ușura mult munca. Tăiați 10 benzi de tul de 56 cm lungime (dacă acest număr nu este suficient, puteți oricând să tăiați mai multe). Îndoiți banda de material în jumătate și treceți-o în al doilea rând de jos. Vă rugăm să rețineți că, dacă lucrați din rândul de jos, rezultatul va fi un produs slab. Strângeți bine nodul - ar trebui să se strângă uniform și strâns. Legați cele 9 panglici rămase în al doilea rând de jos, după care puteți afirma că ați făcut primul strat al pachetului. Ei bine, pentru ca produsul să dobândească mai mult fast și volum, puteți face oricând un al doilea strat. Pentru a ușura munca, pregătiți un mâner - ar trebui să îl mutați pe măsură ce faceți noduri în rând.
Deci, treceți la al treilea rând și faceți noduri în același mod ca și înainte. Nu uitați să îndreptați dungile și să le trageți în jos, astfel încât rezultatul eforturilor dumneavoastră să fie frumos și luxuriant. Așa puteți face ușor și rapid unul frumos.
Cum să coasi o fustă de tul cu elastic
Acum că ai citit despre cum să coasi o fustă tutu din tul, apoi ai grijă să coasi și tutu-ul. Instrucțiunile pentru realizarea unei fuste tutu vor fi, de asemenea, foarte simple - asigurați-vă că îi mulțumiți fiicei dvs. cu un lucru nou.În primul rând, măsurați talia fetei și tăiați măsura rezultată dintr-o bandă elastică largă cu o lățime de 1,5 cm. De asemenea, ar trebui să scădeți aproximativ 5 cm din valoarea rezultată, poate puțin mai puțin.

Așezați un capăt al elasticului peste celălalt cu o suprapunere (suprapunerea trebuie să fie de 0,7-0,8 cm). Coaseți capetele împreună.
Cum se măsoară lungimea țesăturii? Trebuie să lăsați deoparte lungimea dorită de la centură, să dublați numărul rezultat și apoi să adăugați 2,5 cm. Dacă ați achiziționat o bucată întreagă, ar trebui să o tăiați în bucăți de 7,5 cm lățime.
Panglica trebuie fixată pe spătarul scaunului, banda de tul trebuie pliată în jumătate și legată cu un nod cu o bandă elastică. Mai faceți 3-4 noduri unul lângă celălalt, apoi strângeți-le strâns și mutați-le unul spre celălalt. Trebuie menționat că este convenabil să lucrezi și să te miști exact cu această cantitate. În total, va trebui să legați aproximativ 90 de noduri.
Cum să coasi o fustă de tul pentru o fată
Ar fi o ținută grozavă fusta lunga cu căptușeală. Pentru a afla cantitatea de material aerisit și ușor pentru căptușeală, ar trebui să măsurați lungimea viitorului lucru nou de la talie până la podea. Înmulțiți numărul rezultat cu trei - acest lucru vă va permite să calculați cantitatea de tul. Tăiați cantitatea calculată în 3 părți și fiecare dintre ele ar trebui să se potrivească cu lățimea necesară. Tăiați materialul de căptușeală în același mod.
Așezați patru bucăți împreună (una în interiorul celeilalte) și îndreptați-le spre exterior partea dreaptă. Asigurați-vă că toate cusăturile se potrivesc. Puneți căptușeala în interiorul straturilor de țesătură.
Verificați dacă cusăturile și marginile inferioare se potrivesc. Dacă doriți, puteți tăia ușor partea din față superioară a materialului. Coaseți de-a lungul perimetrului marginii superioare a fustei (unde va fi amplasată centura). Folosiți ochiuri mari și ușoare pentru a coase cusătura. Împărțiți partea superioară a produsului în sferturi (ascundeți cusăturile în interior) și marcați cu ace.
Măsurați talia copilului dvs. Tăiați o bucată de elastic pentru centură - ar trebui să fie cu 4-5 cm mai mică decât circumferința taliei dvs. Conectați marginile elasticului și coaseți-le cu ochiuri în zig-zag.
Trageți de firul de jos pentru a îndrepta haina. Încercați să faceți pliurile cât mai uniforme și îngrijite posibil. Când așezați elasticul, introduceți toate cusăturile și neregulile în talie.
Începând cu o cusătură în zig-zag, va trebui să coaseți centura de fustă, întinzând-o puțin câte puțin. Ei bine, acum nu mai rămâne decât să inspectăm produsul și să eliminați toate cusăturile și firele inutile. După cum puteți vedea, chiar și o croitoreasă începătoare poate face o fustă atât de lungă și aerisită.
Cum să coasi o fustă de tul - master class
Ca urmare a coaserii, veți obține un lucru nou foarte drăguț, cu volane. În primul rând, coaseți baza. Tăiați un dreptunghi, pentru care luați un metru de material elastic bun, de exemplu, poate fi satin elastic. O parte a părții ar trebui să fie puțin mai mică decât lungimea viitoarei fuste, în timp ce lungimea celeilalte ar trebui să fie egală cu volumul șoldurilor, cu adăugarea de câțiva centimetri pentru alocații. Coaseți capetele dreptunghiului.
Pentru a coase volane, veți avea nevoie de 4 m de țesătură de tul, tăiați benzi lungi de 12-15 cm de-a lungul biajului, marginile lor trebuie să fie în zig-zag, iar materialul nu trebuie strâns împreună. Dacă acționați corect, vă puteți bucura de spectacolul atrăgător al valurilor frumoase de tul.
Acum trebuie să coaseți pliurile finite pe bază. Măsurați zece centimetri de sus și coaseți primul volan. Pentru a face viitorul produs mai magnific, este necesar să faceți pliuri atunci când coaseți volanele. Lăsați 5-7 cm între fund și ultimul pliu.
Țesătura care rămâne deasupra va trebui să fie pliată și cusă, după care jugul va fi gata. Faceți câteva găuri în mijloc și introduceți o sfoară în ele. Ei bine, pentru ca noul lucru să pară de neegalat, tot ce rămâne este să aburiți faldurile.
Cu siguranță fiicei tale îi va plăcea.
Cum să coasi o fustă plină de tul
Cu siguranță fiecare femeie, în timp ce se uita la seriale de televiziune, a acordat atenție fustei pline originale a lui Carrie Bradshaw. Puteți coase cu ușurință același lucru cu propriile mâini dacă urmați instrucțiunile din clasa noastră de master. Vă rugăm să rețineți că toate măsurătorile sunt pentru mărimile 44-46.
Primul pas este să faci un jupon din satin - va fi nevoie de un metru și jumătate de satin elastic pentru a face. Tăiați o bucată de satin, ghidat de parametrii dvs. și coaseți capetele piesei împreună.
Pentru a decupa volanele, tăiați materialul de tul în benzi de 15-20 cm lățime. Coaseți materialul de pe o margine, în timp ce acesta trebuie să fie ușor adunat. Cusătura trebuie să fie dreaptă și lungă.
Dați înapoi cu 2 cm de partea de sus a bazei și coaseți volanele în zig-zag. Distanța dintre rânduri trebuie să fie de aproximativ 10-12 cm Coaseți mai multe volanuri la rând, deoarece cu cât sunt mai multe, cu atât fusta va fi mai pufoasă.
După această etapă, o panglică de satin de doi metri trebuie cusută la centură - va acționa ca o centură, capetele panglicii ar trebui să rămână libere, legați-le cu o fundă. Dacă vreun moment îți rămâne neclar, poți oricând să te uiți Videoclipul „cum să coasi o fustă de tul”.– în ea veți găsi cu siguranță răspunsuri la toate întrebările. Ei bine, acum tot ce rămâne este să alegeți „acompaniamentul” potrivit pentru fusta lui Carrie Bradshaw sub forma unui top strâns și pantofi frumoși.
Cum să coasi o fustă de tul pas cu pas
O fusta shoppenka aerisita si romantica poate crea un cu adevarat imagine romantică, și coase destul de ușor.
Luați 5 metri de tul și tăiați-i, iar fiecare tăietură ulterioară (și ar trebui să fie 4-5 în total) ar trebui să fie mai lată decât cea anterioară. Trimurile trebuie să se potrivească cu volumul șoldurilor. Apoi fixați bucățile de material în locul unde va fi amplasată centura. Adunați 0,5 m de material de căptușeală pe un fir și coaseți-l manual pe tul.
Pentru a coase o curea, îndoiți un metru de material elastic în jumătate, măsurați 2 cm de-a lungul marginilor, coaseți cureaua, plasând o bandă elastică în interior.

Atașați cureaua la fusta shoppen-ului astfel încât să ascundeți locul unde este atașată căptușeala; Puteți folosi o fundă frumoasă ca decor pentru centură.
Cum să coasi o fustă de tul - fotografie:

Asta este - poți coase ușor și simplu un lucru nou pentru tine și pentru fiica ta, dacă folosești sfaturile de la cursurile noastre de master.
Când o fată se naște într-o familie, nimeni nu are nici cea mai mică îndoială că s-a născut o adevărată prințesă, așa cum lumea nu a mai văzut-o până acum! Desigur, hainele ei ar trebui să fie potrivite.
O varietate de funde, agrafe de păr, pantofi și rochii umplu garderoba copiilor. Cu toate acestea, puteți crea imaginea unei infante frumoase cu ajutorul unor lucruri mai simple, de exemplu, o fustă de tul cusută cu propriile mâini.
Fără îndoială, nu orice femeie de cărucior de acasă știe să o coasă. Dar în articolul nostru veți găsi cele mai multe idei originaleși design simplu.
Fatin. Ce este?
Tulle este o țesătură încântătoare care face adevărate prințese din fete drăguțe. Se obtine din fire sintetice prin impletirea lor intr-o plasa destul de rezistenta. Rigiditatea materialului va depinde de cât de mari sunt celulele în care sunt lipite fibrele de tul.

În total, trei soiuri de tul au fost lansate în producție:
- moale;
- medie;
- greu.
Cu toate acestea, știința nu stă pe loc. Astăzi sunt la vânzare tul colorat și țesătură cu imprimeuri, strălucitoare și mate, cu strasuri și paiete, cu broderii și aplicații.

Îmbrăcămintea din tul își păstrează perfect forma, nu se estompează și cu greu se murdărește. Cu toate acestea, există un dezavantaj. Acesta este faptul că țesătura practic nu absoarbe umezeala, așa că hainele pentru fiecare zi nu sunt cusute din ea. Cel mai adesea, fustele sunt realizate din tul: fuste de balet, jupon, costume de Anul Nou pentru fulgi de zăpadă și regine de zăpadă.
Reguli de bază pentru coaserea unei fuste de tul
Pentru început, luați măsurători măsurând circumferința taliei și adăugând 2 cm la valoare Apoi selectați lungimea (de la talie până la marginea fustei). Lungimea materialului de căptușeală trebuie să fie cu 2 cm mai mică decât lungimea fustei.
Consumul de material este de aproximativ 10 metri. Totul depinde de stilul și dimensiunea produsului.
Tul trebuie cusut cu ochiuri de aproximativ 2,5 mm. Fiecare linie trebuie să fie uniformă.

Tulle-ul din plasă este asamblat folosind o mașină. Lungimea cusăturii trebuie să fie maximă, iar tensiunea firului să fie relaxată. Dacă asamblarea se face manual, ochiurile trebuie să fie dese și mici, astfel încât volanele să fie foarte îngrijite.
După terminarea cusăturii, materialul necesită netezire cu un fier de călcat sau cu aburi. Tulle este un material delicat care este ușor de ars sau de rușit. Prin urmare, trebuie să lucrați cu el cu atenție.
Cum să coasi o fustă de tul pentru o fată cu propriile mâini? Opțiunea 1
De fapt, nu este nimic complicat în asta proces creativ Nu. Este suficient să aveți abilități de cusut din materiale obișnuite. Pentru a coase o fustă de tul cu propriile mâini, ar trebui să achiziționați următoarele:
- nu mai mult de un metru de tul;
- un metru și jumătate de panglică din satin sau sintetică;
- câteva bobine acrilice fire de cusut(incolor).

Pentru a oferi produsului finit splendoare și rafinament, trebuie să achiziționați un contor potrivit pentru schema de culori ghipură. Înainte de a începe să creați o capodopera de designer, va trebui să aflați circumferința taliei micuțului dvs. fermecător și să decideți lungimea fustei în sine. După ce ați primit datele, puteți începe procesul. Astăzi vom încerca să vă spunem în detaliu cum să faceți cea mai originală și în același timp mai ușor de realizat versiunea unei fuste pentru o fată.

- Așezați materialul achiziționat pe o suprafață plană, aliniați colțurile și tăiați-l în benzi care nu sunt foarte largi (aproximativ douăzeci până la douăzeci și cinci de centimetri). Vă rugăm să rețineți că lungimea dungilor ar trebui să fie de două ori mai mare decât lungimea fustei în sine.
- Aruncați benzile de tul pregătite peste o bandă elastică lată, cusută în prealabil. Fixați fiecare bandă astfel încât să obțineți o centură de-a lungul căreia benzile se pot mișca liber. Asigurați-vă că lungimea benzilor este aceeași. Fusta rezultată este decorată cu guipură (pur și simplu cusută la centură).
- Decorați produsul cu o panglică din satin. Pentru a face acest lucru, coaseți panglica în mijloc pe toată lungimea folosind o mașină cu cea mai lată cusătură. Scoateți cu atenție firul, astfel încât să obțineți adunări pe panglică, iar lungimea acestuia este suficientă pentru a înveli talia fetei. Cosem o panglică pe talia fustei, îndreptăm toate dungile, dând volum maxim.

Cum să coasi o fustă de tul pentru o fată cu propriile mâini? Opțiunea 2

- Țesătura achiziționată este tăiată în patru până la cinci pătrate echilaterale. După ce ați decorat plasa principală cu bucăți de tul strălucitor sau decorat, făcând un pas înapoi cu trei centimetri de marginea pătratului, coaseți ambele straturi de pătrate în pași largi.
- Scoateți cu grijă unul dintre fire pentru a crea adunări mari. În acest caz, este important să mențineți lungimea pătratelor adunate, astfel încât lungimea lor totală să fie suficientă pentru a se înfășura în jurul taliei.
- În continuare, se coase o curea în partea superioară (poate fi făcută dintr-o panglică care se potrivește cu culoarea sau una contrastantă). Această bandă va ține împreună cele mai multe ansambluri din ambele straturi de tul într-un mod de încredere. Chiar și fără decorațiuni cu guipură sau aplicație, un astfel de produs va arăta impresionant.

Cum să coasi o fustă de tul pentru o fată cu propriile mâini? Opțiunea 3
Această metodă nu este mai puțin simplă, dar trebuie să aveți abilități în tehnologia de tăiere, deși minimă.

- Va trebui să calculați care ar trebui să fie lățimea piesei de țesătură pentru a decupa forma unei fuste, numite erupții solare. Pentru a face acest lucru, trebuie să pliați materialul într-un pătrat și să tăiați unul dintre colțurile sale într-un semicerc.
- Apoi, trebuie să fileți cu atenție marginea superioară a piesei de prelucrat și, trăgând firul, să faceți pliuri pe ea.
- În plus, tehnologia de cusut repetă complet metoda anterioară. Dacă pliurile rezultate nu sunt suficiente pentru a face fusta suficient de pufoasă, atunci va trebui să faceți același experiment cu o altă bucată de tul.
- Cureaua cu panglică ar trebui să țină deja împreună două straturi de țesătură plasă sau un strat de tul și un strat de decorare - tul, ghipură, satin, mătase sau alt material care vă place.

Fiecare fată visează la o fustă pufoasă în care să se simtă ca o prințesă, zână sau balerină. Orice mamă poate face fantezia fiicei sale să devină realitate recurgând la abilitățile de bază de tăiere și cusut. O fustă de balet este ușor de cusut cu propriile mâini fără a utiliza un model sau vreo tehnică complexă. Cum se face acest lucru va fi descris în acest articol cu descriere detaliată toate etapele de lucru, precum și cu materiale foto și video.
După ce a făcut o astfel de tutu pentru o fată, o mamă poate încerca să coasă ceva similar pentru ea însăși, de exemplu, o fustă chopin. Există, de asemenea, multe materiale educaționale interesante și accesibile pe această temă pe Internet. Între timp, să studiem toate complexitățile confecționării unei fuste de balet pentru o fată.
Învață cum să faci o fustă de balet cu propriile mâini într-o clasă de masterCea mai ușoară versiune a unei fuste tutu pentru fete.
Veți avea nevoie de:
1) Tulle (numărul de culori și lungimea materialului depind de stilul dorit al produsului);
2) Bandă elastică largă;
3) Bandă centimetrică;
4) Panglică de mătase;
5) Bandă elastică subțire;
6) Foarfece;
7) Ace, fire.
Proces de fabricatie:1) În primul rând, măsurăm talia copilului, pentru a face acest lucru înfășurăm banda elastică în jurul ei și o strângem la lungimea dorită, fără a uita de alocațiile de cusătură. Fata ar trebui să se simtă confortabil în fustă, dar elasticul nu trebuie să cadă sub greutatea țesăturii. Aceste puncte trebuie luate în considerare la măsurare.
3) Tăiați materialul în benzi. Lungimea lor ar trebui să fie egală cu două lungimi ale fustei finale. Lățimea este de aproximativ 25 cm Pentru splendoare, este mai bine să tăiați aproximativ 50 din aceste benzi.
4) Trageți banda elastică pe orice obiect disponibil. Acesta ar putea fi un scaun, o cratiță, o lampă de masă etc.
5) Să trecem la partea principală a lucrării. Înfășuram fiecare bandă pe rând în jurul unei benzi elastice întinse (capetele trebuie să aibă aceeași lungime) și fixăm. Îl puteți repara folosind un nod obișnuit, dar această metodă nu este cea mai fiabilă, deoarece în timpul purtării, nodurile se pot slăbi și fusta își va pierde aspect. Cel mai bine este să fixați benzile de tul cu o bandă elastică subțire. Există o altă metodă în care banda este trecută printr-o buclă de aer creată cu un croșetat și strânsă. Puteți folosi oricare dintre opțiunile propuse, dar nu strângeți dispozitivul de fixare prea strâns.
6) Apoi repartizăm uniform benzile de material legate peste bază și le îndreptăm, dând volum produsului.
7) Trecem o panglică de satin prin buclele formate și formăm o fundă. Fusta este gata!

Produsul poate fi decorat cu flori decorative sau paiete, vopsele și șabloane pot fi folosite pentru decor. Dacă doriți, puteți face un tren pentru a face acest lucru, tăiați benzi de tul lungimi diferite, care sunt apoi stivuite una peste alta în straturi (cele mai scurte bucăți de material ar trebui să fie deasupra). Apoi ungeți straturile pe panglică și, la rândul său, la nodurile formate pe fustă. Rezultatul va fi un produs similar cu cel prezentat în fotografia de mai jos.

Când faceți această lucrare, va trebui să lucrați mai mult decât în metoda anterioară. Cu toate acestea, chiar și o meșteșugărească începătoare va putea să facă o fustă de balet. O clasă de master cu descriere pas cu pas proces. Vom folosi câteva straturi de material, doar 4, pentru început această cantitate va fi optimă. Nu este nevoie să tăiați cercurile pentru fustă, acestea sunt formate din benzi de material, ceea ce face sarcina mult mai ușoară.
Veți avea nevoie de:
1) Tulle de culoarea selectată (lungimea țesăturii este de cel puțin 6 metri);
2) Elastic de in;
3) Panglică din satin;
4) Foarfece;
5) Fire și ace.
Etape de fabricatie:
1) Decideți lungimea fustei și alegeți lățimea benzilor de material. Este mai bine dacă diametrul fiecărui strat următor al produsului este cu 2,5 cm mai mic decât cel anterior. Urmând această regulă, luăm următoarele dimensiuni pentru 4 straturi: 37,5 cm, 35 cm, 32,5 cm și 30 cm.
2) Întindeți ruloul de tul și tăiați 4 benzi de material, a căror lățime va fi de 37,5 cm Apoi le coasem într-o singură linie.
3) Folosind o cusătură de ungere, trecem de-a lungul unei părți a benzii de țesătură cusute, fixăm firul cu un nod (este mai bine să folosiți fir de cusut gros).
4) Apoi, trageți nodul, creând pliuri în țesătură. Lungimea marginii adunate trebuie să fie egală cu circumferința taliei. Când se atinge această condiție, capătul firului trebuie fixat cu un nod. În mod similar, formăm straturile rămase, ale căror dimensiuni au fost alese chiar la începutul lucrării.

6) Apoi atașăm piesele rezultate la centura-panglică. Mai jos ar trebui să existe un strat cu un diametru mai mic, deasupra - cu unul mai mare. Acest aranjament va conferi rigiditate produsului și va îmbunătăți aspectul acestuia, făcându-l cât mai aproape de o fustă de balet clasică.
7) Întindeți fusta pe o suprafață orizontală și apăsați pliurile împreună. Apoi coasem straturile pachetului cu ochiuri mari, asigurand forma.
Se dovedește a fi o fustă tutu atât de pufoasă și dură!

Videoclipuri pe tema articolului
Mai multe videoclipuri de antrenament care arată clar cum să coasi o fustă de balet pufoasă.
Pentru a transforma orice reprezentant al sexului frumos într-o prințesă drăguță, tot ce trebuie să faci este să coasi o fustă tutu. Indiferent de vârsta proprietarului său, accesoriul va adăuga feminitate și tandrețe imaginii. În plus, toate vârstele sunt supuse fustelor de balet. Astăzi, atât fashionistele adulte, cât și frumusețile nou-născute încearcă aspectul de zână. Și chiar și o meșteșugărească începătoare poate face față creării unei capodopere drăguțe.
Fusta tutu - o fusta din tul sau organza pe bandă elastică largă. Punctul culminant al unor astfel de haine este forma unică curbă, care plutește în aer datorită texturii aerisite a țesăturii.
Fusta de balet potrivită va adăuga magie oricărui look. Combinatia cu diferite stiluri vestimentare iti permite sa porti aceasta tinuta la orice eveniment.
Apropo, moda pentru un look magnific, fără să știe, a fost introdusă de școlile mici, pentru care astfel de fuste au fost cusute anterior. Fusta era considerată o uniformă festivă pentru matinee și își îndeplinea bine scopul.

Din ce în ce mai mult, ideea unei rochii magice este jucată în ședințele foto moderne pentru copii. Micile fashioniste sub vârsta de un an sunt îmbrăcate în fuste tutu strălucitoare, creând o vedere cu adevărat emoționantă.
Ținută pentru o prințesă nou-născută
A coase o fustă tutu din tul pentru o fetiță este o mare plăcere. Simplitatea și manevrabilitatea țesăturii, culori strălucitoare iar dimensiunea în miniatură a produsului vă va oferi o dispoziție minunată chiar și în stadiul creării unei capodopere.
Nu trebuie să fii croitoreasă pentru a coase o fustă. În plus, nici măcar nu aveți nevoie de o mașină de cusut! Înarmat cu unelte simple, poți coase un lucru nou minunat.
Pentru a coase o tutu pentru o fată cu propriile mâini, veți avea nevoie de:
- Tulle din trei culori consoane. Este potrivit roșu în cantitate de 1 m, precum și două bucăți de 50 cm de roz și alb.
- Foarfece;
- Ață pentru a se potrivi cu culoarea țesăturii;
- Ac;
- Banda elastica lata (de la 2,5 cm).
O fustă tutu DIY pentru o fată nu implică cusut, dar vor fi totuși necesare unele manipulări cu un ac. Instrucțiuni pas cu pas cum să construiești o capodopera drăguță:

Culorile dungilor le poți alterna la discreția ta. Efectul de „striping” sau amestecul haotic de culori arată interesant.

Imaginea unei zâne tinere
Pentru o fată de 5-10 ani, puteți coase o fustă folosind același principiu. Principalul lucru este să alegeți culorile potrivite și să decideți asupra lungimii produsului.
Pachetul se va completa perfect Costumul de Anul Nou fulgi de nea sau imagine regina zăpezii. Arata bine si o fusta mai stralucitoare pentru alte sarbatori. Il poti combina cu un corset sau alte tinute.
Apropo, costul scăzut al tulului și simplitatea clasei de master vă permit să faceți mai multe copii ale unui pachet în doar câteva ore.
Versiunea pentru adulți a rochiei
Dacă doriți să străluciți într-o vacanță, puteți face o fustă tutu cu propriile mâini pentru o domnișoară adultă. Principiul rămâne același. Tot ce aveți nevoie este un jupon care să se potrivească cu culoarea principală.
Fusta din panglici colorate
Instrucțiuni pas cu pas:
- Ar trebui să vă măsurați circumferința taliei și să decideți lungimea elasticului.
- Apoi coaseți elasticul într-un inel și fixați produsul rezultat la o înălțime convenabilă.
- Panglicile de tul pentru o fustă de adult ar trebui să aibă o lățime de 10 cm Lungimea lor este determinată în funcție de lungimea necesară a produsului. Pentru comoditate, benzile de material sunt realizate de două ori mai lungi și pliate în jumătate.
- Legați cu grijă panglicile de banda elastică. Dungile ar trebui să fie legate în rânduri pentru a urmări plinătatea fustei. Puteți încerca periodic produsul pentru a nu vă transforma dintr-o zână drăguță într-o balerină.
- Juponul trebuie cusut din aceeași nuanță de material.
- Dacă nu doriți să coaseți un jupon, puteți purta o tutu sub jambiere sau jambiere.
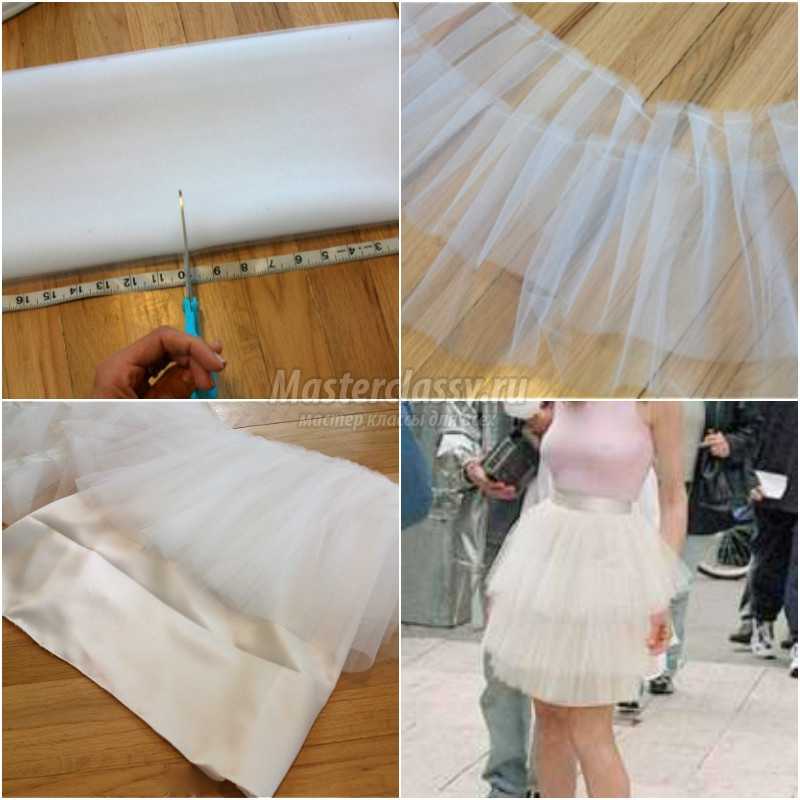
Tăitură solară dintr-o singură bucată
Dacă coaseți o ținută nu din panglici, ci după modelul „soarelui”, veți obține o fustă din tul. Clasa de master oferă abilități de bază de cusut.
Costul unei fuste circulare din tul este considerabil, așa că ar trebui să decideți imediat cât va dura produsul finit. Pentru o fusta de aproximativ 50 cm lungime vei avea nevoie de cinci metri de material.
Cel mai bine este să folosiți un jupon pentru ca tulul să nu se prindă de colanți. Dacă ținuta constă din cinci sau mai multe straturi și va fi purtată vara, atunci nu va fi nevoie de căptușeală, precum colanții.

Un model standard pentru o fustă circulară pe hârtie prevede cantitatea de țesătură fără a lua în considerare adunările. Dacă trebuie să faceți ca produsul să arate mai plin, este recomandat să vă dubleați dimensiunea taliei. Curele vor da fustei efectul aerisit dorit.
Fusta va arăta mai elegantă dacă straturile sale inferioare sunt cu câțiva centimetri mai lungi decât cele superioare.
Instrucțiuni pas cu pas:
- Îndoiți materialul în jumătate. Rezultatul este un „sandwich” cu două pliuri pe o parte și un pliu și două margini pe cealaltă. Această metodă va economisi material. Cu toate acestea, această tăiere produce două părți întregi și două părți jumătate. Jumătățile trebuie cusute și așezate sub toate.
- Jumătățile vor fi pe partea de jos și nu trebuie asamblate.
- După ce îndoiți părțile inferioare, ar trebui să le fixați pe masă și să le măturați de-a lungul liniei taliei.
- Apoi, șlefuiți manual alocațiile pentru fermoar și coaseți-l.
- Straturile superioare și inferioare de material sunt conectate. Pe cele de sus, marcați poziția fulgerului și tăiați o intrare pentru acesta. Marginile acestei intrări sunt măturate și cusute cu o cusătură ascunsă.
Pentru a coase căptușeala, alegeți culoare potrivitățesături și tăiate pe jumătate de somn. Raza juponului se determină prin măsurarea circumferinței taliei și împărțirea acesteia la trei. Există loc de-a lungul cusăturii pentru un fermoar.
Pentru a coase căptușeala, îndoiți-o și fusta pe dos și coaseți. Pentru a evita coaserea cu fermoar, puteți folosi o bandă elastică care este atașată de produs din interior.
Pachet tutu DIY
Fusta tutu este cusută la fel de simplu ca o fustă de balet obișnuită. Pentru a-l crea, ar trebui să alegeți cel mai dur tul. Acesta va ajuta produsul să-și păstreze forma și să ofere fustei plinătate. Cu ceva efort și imaginație, poți obține un produs care va fi greu de distins de unul de salon.
Clasa de master pas cu pas:

O tutu este un element distractiv al unei imagini care își face loc încet, dar sigur, în viața fashionistelor moderne. Poți purta un lucru atât de drăguț cu orice ținută. Fusta de balet se va decora favorabil silueta zveltă proprietarul ei, transformând-o într-o păpuşă elegantă.
Fusta tutu - o varietate fusta plina cu bandă elastică sau cu bandă elastică în talie. Pentru realizarea acestui model se folosesc țesături ușoare care își păstrează bine forma și volumul - organza, tul. Cu ajutorul unei astfel de fuste poți crea un aspect cu adevărat unic atât pentru o fetiță, cât și pentru o adultă.
Fustele tutu de balet din plasă sau tul erau cusute pentru fetițele pentru a juca la matineele din grădină sau din școala primară - rezultatul au fost imagini foarte delicate și aerisite. În a doua jumătate a secolului al XX-lea, frumusețile mature au adoptat fusta tutu pentru a-și face propria lor. aspect la modă chiar mai ușoare, mai aerisite și mai feminine. Cu o astfel de fusta, tinuta a capatat un romantism si tandrete aparte.
Tăierea și coaserea unei astfel de fuste nu este de fapt foarte dificilă, chiar și pentru cei care nu s-au simțit niciodată confortabil cu o mașină de cusut înainte.
Pentru a-ți coase propria fustă tutu de balet din tul, în primul rând trebuie să alegi cel mai mult stilul potrivitși metoda pe care o vei folosi pentru a-l realiza.
Cei mai importanți indicatori atunci când faceți o fustă balerină sunt mărimea taliei viitorului proprietar și lungimea așteptată a produsului. Pentru o fată în vârstă de aproximativ 3 ani, veți avea nevoie de 2 până la 6 metri de material textil. O doamnă adultă cu talia de 60–70 cm va avea nevoie de 12 până la 15 metri de textile. Cu cât este planificată fusta mai pufoasă, cu atât este posibil să aveți nevoie de mai multă țesătură.
 Astăzi, fiecare mamă se străduiește să-și îmbrace copilul nou-născut cât mai elegant și strălucitor. Sedintele foto cu tinere mame fericite cu bebelusi in brate devin din ce in ce mai populare. Pentru o astfel de ședință foto va fi utilă o fustă pufoasă atât de fermecătoare din tul sau organza pentru un copil de un an.
Înainte de a începe să coaseți, trebuie să vă aprovizionați cu toate componentele necesare. Va trebui să cumpărați material textil, benzi elastice, fire, panglici colorate. Puteți folosi tul, organza sau nailon. Cea mai reușită combinație va veni din nailon cu tul - o astfel de fustă se va dovedi a fi cea mai pufoasă și elegantă.
- În primul rând, trebuie să pregătiți un model pentru produs. Pentru aceasta, două arce sunt decupate. Lățimea fiecărui arc este egală cu lungimea produsului + alocația de cusătură. Circumferința arcului interior este egală cu jumătatea circumferinței taliei copilului.
- Următorul model de hârtie transferat pe material. Pentru a face produsul cât mai luxuriant, puteți face câteva dintre aceste detalii.
- Piesele vor trebui cusute împreună. Dacă este necesar, tăiați marginile țesăturii.
- Capetele elasticului din talie sunt cusute între ele folosind o cusătură în zig-zag.
- Toate fustele rezultate sunt cusute pe banda elastică rezultată.
Produsul finit poate fi decorat cu panglici, margele și strasuri. Pentru set, puteți face o panglică-bandaj ușor din aceeași țesătură pentru capul bebelușului.
Galerie: fusta tutu (25 fotografii)


 Este foarte posibil să coaseți o fustă tutu pentru o fată acasă cu propriile mâini. Orice mamă care știe să opereze o mașină de cusut și să facă modele simple poate face acest lucru.
Pentru a face o fustă de balet pentru o fată, veți avea nevoie de:
- Fatin – 5 m.
- Căptușeală – 1 m.
- Tricotaje groase – 25 cm.
- Banda elastică lată - 1 m.
Pentru o fata mai mare, fusta balerina poate fi facuta mai lunga. Dacă este necesar să coaseți un model mai scurt, materialul poate fi scurtat la lungimea necesară.
Cum să coasi o fustă tutu pentru o fată? Procedura de operare Următorul:
- Tulul este tăiat în 10 bucăți identice de 50 cm fiecare.
- ÎN maşină de cusut introduceți piciorul cu volan. Dacă nu aveți unul la îndemână, puteți pur și simplu să setați lungimea cusăturii mai mult decât de obicei. Este necesar să slăbiți ușor tensiunea firului.
- Tulul este pliat în jumătate și cusut de-a lungul marginii de sus. Treptat, bucățile de material sunt conectate între ele.
- La sfârșitul lucrării, cusătura nu este asigurată. Firul trebuie tras cu atenție la capete, astfel încât fusta să se adune. Este necesar să se calculeze lățimea produsului astfel încât să fie egală cu dimensiunea taliei copilului plus 15 cm.
- După ce materialul este tras la lățimea dorită, marginile sale sunt cusute de mai multe ori pentru a asigura cercul.
- În continuare, se decupează o bucată de material de căptușeală astfel încât să fie cu câțiva cm mai scurtă decât lungimea fustei, ținând cont de alocația de cusătură.
- Căptușeala este cusută de-a lungul liniei laterale și adunată deasupra în modul descris mai sus.
- În continuare, tot ce rămâne este să coaseți căptușeala pe partea de tul a fustei.
- Pentru ca produsul să fie confortabil și să arate plăcut din punct de vedere estetic, este necesar să faceți o curea. Este decupat lat pentru a se îndoi ulterior și a regla lățimea. Pentru a face acest lucru, tăiați 2 benzi de material textil gros. Lățimea fiecărei benzi este egală cu jumătate din circumferința taliei + 10 cm.
- Laturile scurte ale benzilor sunt cusute la o distanta de 5 mm de margine. Pe o parte a benzii rezultate este lăsată un orificiu pentru înfilarea unei benzi elastice.
- Cercul rezultat este pliat în jumătate și călcat. Trebuie să o pliezi pe dos.
- Cureaua este atașată de partea superioară a fustei și cusută. Orificiul pentru elastic trebuie să fie înalt de la marginea tulului.
- Apoi, cureaua este pliată de-a lungul liniei călcate rezultată, iar a doua margine este cusută cu o cusătură în zig-zag.
Tot ce rămâne este să introduceți banda de cauciuc in functie de marimea taliei copil. Dacă se dorește, fustele pentru copii sunt decorate cu o fundă sau alte accesorii.
O altă opțiune pentru o fustă tutu
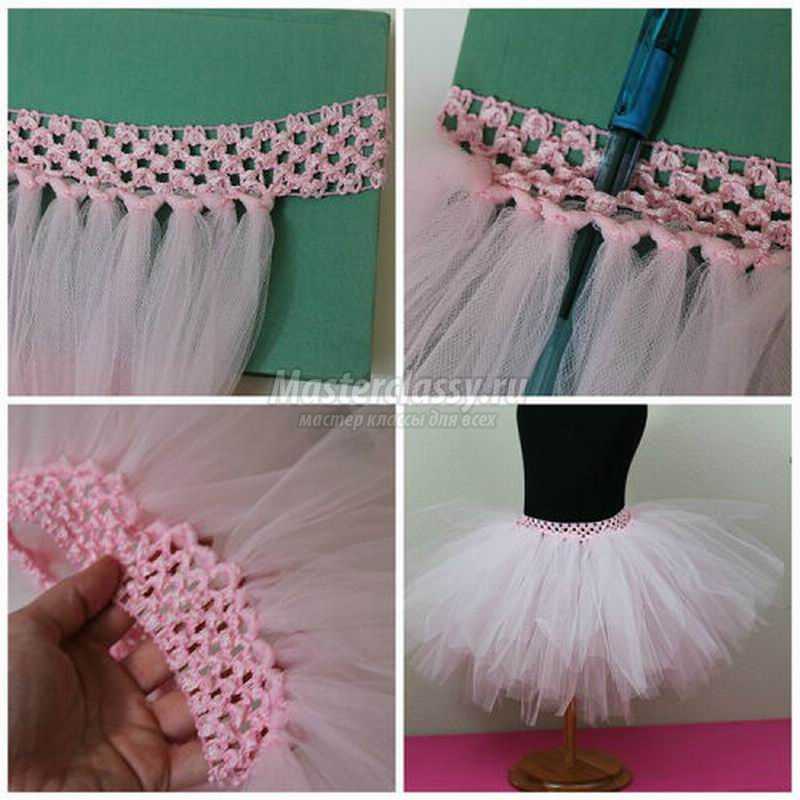
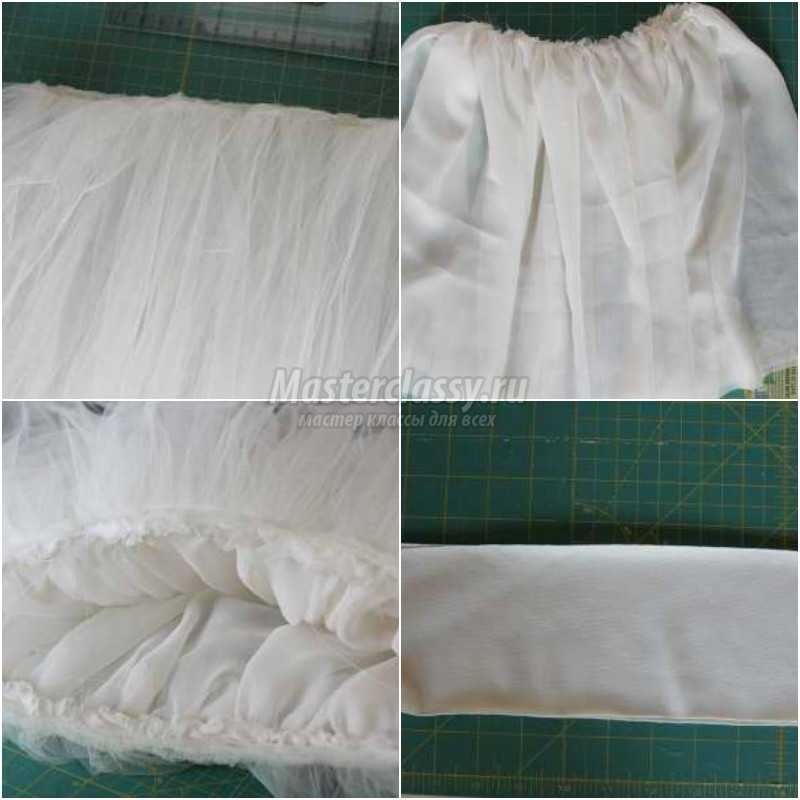
 Mai oferim unul master class, spunând cum să coaseți o fustă de balet pentru o fată cu propriile mâini. Acest model este cel mai simplu și mai accesibil chiar și pentru meșterițele începătoare. Dimensiunea produsului finit va fi 28
cm in lungime si la fel ca latime.
Mai oferim unul master class, spunând cum să coaseți o fustă de balet pentru o fată cu propriile mâini. Acest model este cel mai simplu și mai accesibil chiar și pentru meșterițele începătoare. Dimensiunea produsului finit va fi 28
cm in lungime si la fel ca latime.
Pentru a coase o astfel de fustă veți avea nevoie de:
- Foarfece de croitor.
- Ac mare.
- Bandă elastică lată de șah de aproximativ 4 cm lățime.
- Tulle - 2 bobine.
Procedura de confectionare a unei fuste de balet pentru o fata cu propriile tale mâini Următorul:
- Banda elastică poate fi cusută împreună la capete și întinsă peste o carte cartonată - acest lucru va fi semnificativ ușurează-ți munca.
- Tul sau tul se taie în fâșii de 56 cm lungime fiecare. Pentru ușurință în utilizare, se recomandă să tăiați 10 benzi. După ce sunt folosite, tăiați o nouă porție.
- Fiecare bandă de material este pliată în jumătate și înfilată în al doilea rând de elastic de jos. Nu este recomandat să îl fileți în rândul de jos al benzii elastice - produsul se poate rupe cu ușurință. Fiecare bandă de material este asigurată cu un nod puternic. După ce întregul rând de jos este umplut, se va dovedi primul strat al pachetului.
- Pentru a oferi fustei mai multă pufătate și volum, aceasta este realizată din două straturi. Pentru a facilita lucrul cu al doilea strat, veți avea nevoie de un obișnuit pix. Poate fi mutat pe măsură ce lucrați pentru a nu rata orificiul dorit din elastic. Fâșii de tul sunt fixate în al treilea rând în același mod ca și anterior.
Pentru a face o fustă de balerină frumosŞi luxuriantă, benzile trebuie îndreptate și trase în jos după fixare.
Clasa de master pentru fusta tutu DIY
 O fată sau o femeie adultă poate purta o astfel de fustă ca pe ocazii speciale, și în viata de zi cu zi. Această fustă se potrivește de minune cu un tricou sau o jachetă decupată. Puteți coase singur un astfel de produs
Pentru coasere este necesar ține cont de mărimea taliei și șoldurilor, precum și lungimea așteptată a produsului. Trebuie luată în considerare circumferința șoldurilor pentru ca pe viitor să puteți pune și scoate fusta prin picioare, iar banda elastică vă permite să faceți acest lucru liber.
Puteți coase o fustă conform instrucțiunilor de mai sus. Dacă doriți, puteți decora produsul cu paiete, strasuri, broderie etc.
Fusta Shopenka
 Vă invităm să vă familiarizați cu fabricarea unei alte versiuni a unei fuste pufoase - care se numește shopinka. Acest articol de garderobă are diferențe semnificative de la până balet clasic de balet. Chopinka poate fi purtată întâlnire romantică sau pentru o sedinta foto cu bebelusul tau.
Pentru a face o shopenka veți avea nevoie de aceleași țesături translucide voluminoase care își păstrează perfect forma. Poate fi organza, tul, tul, plasă. Bucățile de material sunt pliate de mai multe ori. Produsul nu necesită fabricarea unui model complex sau abilități profesionale ridicate de cusut.
Mai jos este master class pas cu pas pe croitorie fuste shoppen.
- O bucată de țesătură care măsoară aproximativ 6 metri este tăiată în trei părți - 1,5 metri, 2 metri și 2,5 metri.
- Cea mai scurtă bucată de material este pliată în jumătate și tăiată la lungime dacă este necesar.
- Țesătura este adunată de-a lungul liniei de îndoire cu un ac folosind ochiuri drepte obișnuite. Lungimea firului trebuie să fie egală cu circumferința taliei + 5–7 cm.
- După ce bucata de țesătură este asamblată, este necesar să îndreptați uniform pliurile de pe fir.
- Acțiuni similare sunt efectuate cu alte bucăți de țesătură.
- Conectați piesele astfel încât să existe o bucată de un metru și jumătate în partea de jos, o bucată de doi metri în mijloc și o bucată de 2,5 metri deasupra.
- Măturați cu grijă foile împreună.
- Toate cusăturile pot fi ascunse cu grijă sub o panglică largă de satin. Banda este atașată de mașină.
Puteți alege dispozitivul de fixare pentru fusta care vă este cel mai convenabil - un nasture, un nasture, un cârlig sau Velcro.