
Cum să faci cel mai frumos brad de Crăciun. Din ce îți poți face propriul brad de Crăciun? Pom de Crăciun din hârtie DIY
Frumosul brad original de Crăciun va decora interiorul festiv. Desigur, nu poți dansa în jurul ei, dar un astfel de miracol vă va ridica cu siguranță moralul. Acest meșteșug interesant de masă poate fi făcut din cele mai simple lucruri care se găsesc în fiecare casă.
Materiale necesare:
- Foaie A4, carton;
- fire dense (de preferință amestec de lână);
- 2 „gălbenușuri” de la kinders;
- batoane de sushi din lemn;
- plastilină;
- spumă;
- cuțit de papetărie;
- corector de cursă;
- lac de unghii roșu;
- adeziv PVA;
- resturi de tesatura;
- lucruri mici pentru decor.
Faceți rama viitorului brad de Crăciun din foaie A4 - rulați-o într-o minge. Introduceți spumă în interior.

Aplicați lipici pe suprafața conului în benzi subțiri și înfășurați un fir în jurul acestuia.

Asigurați capătul firului cu lipici.

Bețișoarele de sushi vor servi drept picioare pentru frumusețea noastră. Pentru a face acest lucru, acestea trebuie vopsite cu un corector.

În timp ce se usucă, faceți cizme din „gălbenușuri”, așa cum se arată în fotografie.

Umpleți-le până la jumătate cu plastilină și înfășurați-le în cârpă.

Introduceți picioarele bastonului în cizme, împodobiți bradul de Crăciun cu diverse fundițe și panglici. Pictați dungi de picioare cu lac roșu. gata!

Puteți face o pălărie din carton, o acoperiți cu material și să coaseți un pompon.
Brad de Crăciun în stil shabby chic DIY
Să facem asta uimitor de frumos și meșteșug original V stil la modă shabby chic.

Materiale necesare.

Pentru bază, luați un pahar mare de hârtie sau oricare vase de plastic. Separat, diluați alabastru sau gips cu apă până la grosimea smântânii lichide și turnați-l în viitoarea oală. Fixăm trunchiul copacului nostru, plantăm ramura în centru și o fixăm în această poziție până se întărește.

Facem un con din carton folosind un capsator.

Facem vârful molidului din sârmă și cauciuc spumă.

Conectăm vârful la trunchi și atașăm conul.

Învelim baza copacului cu blană albă.


Tăiem excesul de jos.

Apoi îndoim capetele pânzei de jută spre interior și o atașăm cu lipici fierbinte.

Să trecem la partea distractivă - decorarea bradului nostru în stil shabby chic.


Pentru a crea compoziția finită vom avea nevoie de un suport.

Facem o bancă dintr-un șervețel de bambus.


Din blană albă - un om de zăpadă.


Atașăm un clopot la vârful molidului.

Decorăm bradul de Anul Nou cu mărgele, perle, flori, dantelă etc.


Aplicați adeziv transparent chiar în vârful copacului.

Și stropiți cu zăpadă artificială.

Facem același lucru cu banca.


Compoziția noastră" Povestea Iernii"Gata!


Brad decorativ de Crăciun realizat din șervețele
O vom face din carton și șervețele cu un singur strat. Veți avea nevoie și de margele pentru decor.

În primul rând, să construim un cadru pentru bradul nostru de Crăciun. Rulam un con din carton, îl fixăm (eu l-am cusut cu ață) și tăiem fundul conului exact, astfel încât să stea în picioare.

Baza este gata, pune-o deoparte pentru moment. Acum să trecem la șervețele. Vom face trandafiri din ei. Șervețelele de hârtie simplă cu un singur strat sunt potrivite pentru noi.

Luați un șervețel și tăiați-l de-a lungul pliurilor. Apoi îl împăturim în trei și tăiem din nou de-a lungul pliurilor.

Îndoim benzile rezultate în trei și le tăiem din nou. Avem un pătrat egal cu 1/9 dintr-un șervețel.

Fixăm acest pătrat în centru cu o capsatoare.

Apoi tăiați un cerc din el. Mega-precizia și acuratețea nu sunt necesare aici deloc; trandafirul finit poate fi ușor ajustat cu foarfecele.


Astfel se formează un trandafir. Dacă trandafirul finit vi se pare neuniform, îl puteți tăia cu foarfecele.

Numărul de astfel de flori depinde de dimensiunea conului de carton. Pomul meu de Crăciun avea 21 cm înălțime și aveam nevoie de 59 de trandafiri pentru el.

Când toate florile sunt gata, ne întoarcem la con. Începând din vârful capului, lipiți florile pe con, astfel încât baza să nu fie vizibilă. L-am lipit cu lipici fierbinte (este mai convenabil pentru mine), dar PVA obișnuit va face.

Am făcut un brad din șervețele de două culori. Dacă decideți să vă creați propria ambarcațiune din trandafiri multicolori, atunci puteți experimenta în siguranță cu alternarea lor pe un con. Dacă rezultatul nu vă convine, puteți oricând să rupeți floarea și să o lipiți din nou în alt loc. În acest caz, doar stratul inferior al florii va fi deteriorat. Pur și simplu îl rupem (stratul de jos). Rozeta nu își va pierde aspectul.
Deci, am lipit florile de con. Pomul de Crăciun în sine este gata și vă puteți opri în această etapă.

L-am decorat și cu margele - l-am lipit cu același lipici fierbinte, PVA nu va ajuta aici.

Pom de Crăciun decorativ DIY realizat din șervețele
După cum puteți vedea, chiar și un începător poate face o asemenea frumusețe, astfel încât să puteți implica în siguranță copiii în acest proces.

O altă opțiune pentru un brad de Crăciun făcut din șervețele

Meșteșuguri realizate din conuri, bile, panglici și margele
Cum să faci o astfel de meșteșug - urmăriți tutorialul video de la sfârșitul articolului.
Brad de Crăciun din plastilină cu bomboane
Cu ce ne asociem cu toții vacanta minunata Anul Nou? Cu miros de ace de pin, lumini strălucitoare, ghirlande, dulciuri. Și copiii creează, de asemenea, meșteșuguri neobișnuite cu propriile mâini, aducând astfel mai aproape momentul plăcut al debutului unei nopți fabuloase. Mai ales le plac lecțiile de creativitate pe această temă. În meșteșuguri poți realiza orice fantezie.
Vă sugerăm să faceți un brad elegant, care să poată fi decorat cu ușurință cu bomboane. Faceți un meșteșug din plastilină - cel mai ieftin și mai popular material. Cu siguranță vei face un suvenir frumos dacă ne urmezi sfaturile - nu sunt complicate.

Pentru a sculpta un brad de Crăciun cu propriile mâini, pregătiți:
- plastilină verde pentru coroană;
- ciot sub formă de capac sau o bobină goală de fir;
- scobitoare, plastilină roșie și albă pentru bomboane.
Selectați un bloc verde de plastilină din set. Corpul bradului de Crăciun în sine va fi făcut din el, iar în viitor vom face mici bomboane ca jucării. Desigur, un mic suvenir nu trebuie să fie verde o altă culoare pe care o alegeți. Dacă reușiți să găsiți un set la vânzare care conține un lingot de aur, atunci această opțiune va părea bogată.

Frământați bine întregul bloc pregătit în mâini și pregătiți-vă pentru lucrul suplimentar. Este necesar să se formeze o coroană în formă de con și nu chiar cea obișnuită plată, ci una curbată, asemănătoare cu capacul unui gnom de basm. Din moment ce despre care vorbim despre o vacanță magică, nu este interzis să fantezi și să creezi ceva incredibil.

Trageți toată plastilina moale într-un con lung. Faceți partea superioară cât mai ascuțită posibil, apăsați partea inferioară în jurul circumferinței cu degetele, arătând fusta. Apoi luați și îndoiți întreaga structură în lateral. Uneori, brazii de Crăciun nu se întind perfect drept, ci se aplecă în lateral astfel.

Pentru a modela decorațiuni pentru brad - bomboane mici - folosiți plastilină albă și roșie. Formați tablete rotunde roșii (partea interioară a bomboanelor), precum și triunghiuri albe (partea răsucită a ambalajelor de bomboane).

Lipiți împreună bomboane delicioase. Lipiți un punct alb pe fiecare bucată rotundă roșie și apăsați-l în centru cu o scobitoare. Lipiți bucățile triunghiulare pe părțile laterale.

Faceți suficiente detalii decorative pentru a umple întreaga suprafață a bradului de Crăciun, distribuind uniform bomboanele în jurul circumferinței la o anumită distanță.

Lipiți toate semifabricatele rezultate pe coroană. Frumos Meșteșuguri de Anul Nou este aproape gata. Apăsați un capac mic - un ciot - de jos (sau modelați-l din plastilină).

Și vârful încă lipsește. Ea imploră doar să fie adăugată la pomul de Crăciun de basm rezultat. Veniți cu o opțiune, de exemplu aceleași ramuri de molid în combinație cu fructe de pădure roșii. Toate acestea par festive și strălucitoare.

Acesta este un brad atât de fantastic. Aceasta este o versiune elegantă a meșteșugurilor pentru Anul Nou, care va deveni un cadou grozav pentru vacanța ta preferată.

Anul Nou este chiar după colț - trebuie să vă grăbiți pentru a finaliza totul.


Cum să faci un card ca acesta.

Pom de Crăciun din fetru DIY
Să facem brazi de Crăciun din pâslă - acesta este un decor excelent de Anul Nou și perfect pentru școală sau grădiniţă.
Pregătește-te pentru ei:
- Set pâslă colorată;
- vată de vată;
- lipici "Moment" transparent;
- orice margele;
- fire pentru tricotat și cusut;
- un ac;
- foarfece;
- stilou cu pâslă.

Alegeți culorile de pâslă adecvate. Acestea pot fi diferite nuanțe de verde. Sau poți să-ți arăți imaginația și să faci un molid roșu sau albastru neobișnuit. Îndoiți câteva foi de pâslă împreună și desenați forma unui brad pe cea de sus.

Tăiați o bucată de pâslă cu un model pe toată lungimea sa și pliați-o în jumătate, așa cum se arată în fotografie. Facem asta doar dacă pâsla nu este foarte groasă, altfel va fi dificil să tăiați 4 straturi deodată.

Tăiați 4 semifabricate în formă.

Pentru a le da o umflătură, puneți puțină vată, așa cum se arată în fotografie.

Ungeți marginile piesei de prelucrat cu lipici.

Tăiați o bucată de ata de tricotat și atașați-o pe partea superioară a piesei de prelucrat, direct pe lipici. Poate fi atârnat de el. Atașați a doua bucată și apăsați de-a lungul marginii, astfel încât ambele părți să se lipească.

Pe un brad de Crăciun ușor, faceți cusături cu fire de culoare verde mai închis. Acest lucru va adăuga originalitate meșteșugului.

Decorați-l pe al doilea cu un chenar de mărgele perle. Pentru a face acest lucru, faceți un strat de lipici de-a lungul marginii și puneți margele pe el.

Acum lasă-l pe micuțul tău să le decoreze așa cum dorește. După uscare, ambarcațiunea este gata de utilizare.

Acest meșteșug simplu va fi un decor grozav pentru bradul tău de Crăciun. Poate fi dat bunicilor. Copiii mai mari vor putea să o facă complet singuri. Folosind acest principiu, puteți realiza orice decorațiuni din pâslă. Orice sugerează imaginația ta.
Din materiale naturale Tutorial video DIY cu flori de foamiran
Pliculeț pentru brad de Crăciun - pentru a crea o aromă festivă
Un plic este o pungă mică plină cu parfumuri uscate care este folosită pentru a crea un fundal parfumat într-un dulap de haine sau o comodă. Dacă așezi astfel de pungi parfumate pe rafturi cu lucruri, un miros plăcut și subtil se va instala în dulapul tău.

A face un astfel de plic cu propriile mâini nu va fi dificil, iar dacă îl creați sub forma unui copac de Anul Nou, atunci, pe lângă aromă, compoziția festivă va crea și starea de spirit adecvată.
Materiale pentru clasa de master:
- Coaja de citrice;
- ulei esențial de portocale;
- fire, ac;
- margele, margele, paiete;
- panglică de satin;
- țesătură de bumbac verde;
- foarfece și creion.

Desenați un șablon de molid pe o bucată de hârtie și decupați-l.

Tăiați mărunt coaja de citrice, iar pentru a adăuga o aromă mai mare, puteți adăuga și câteva picături de ulei esențial.

Din țesătură subțire de bumbac verde, decupați două semifabricate conform șablonului, pliați-le cu părțile drepte spre interior și ungeți.

Dacă este posibil, coaseți și finisați marginea maşină de cusut, dacă acest lucru nu este posibil, procesați marginile manual.

A se dovedi.

Faceți o buclă dintr-un fir de argint cu un nod voluminos la capăt, folosind un ac sau un cârlig, treceți bucla în vârful molidului.


Legați o panglică de satin într-o fundă și fixați-o în partea de sus cu câteva ochiuri.


Umplem meșteșugul cu coji aromate de citrice și coasem marginea.


Dacă doriți, puteți decora copacul de pliculețe cu propriile mâini cu diverse margele și paiete.

Plicul nostru accesibil și ușor de făcut este gata, acum aroma sa va încânta și frumoasă aspect vă va oferi o energie extraordinară și festivă.

Fotografie cu pliculeț de pom de Crăciun cu parfum de portocale
Jucărie pentru brad de Crăciun făcută din paste

Comerțul dinamic se va deschide pe străzile orașului în decembrie pomi de Crăciun. S-ar părea că ar trebui să ne bucurăm de o asemenea abundență de piețe de Anul Nou, dar de multe ori ne pare sincer rău pentru frumusețile verzi tăiate într-un moment în care abia începeau să crească. Din fericire, mulți oameni cumpără acum copaci artificiali din plastic sau chiar îi fac acasă din cele mai neobișnuite mijloace la îndemână - sticle de limonadă, baloane, beteală, conuri de pin și chiar cărți! Astăzi vom împărtăși cu voi informații noi, din ce și cum să faci un brad de Crăciun cu propriile mâini pentru Anul Nou 2018, cum să-l împodobești, ce meșteșuguri poți aduce la școală și grădiniță pentru concurs. De la cursurile noastre de master cu instrucțiuni pas cu pasși fotografii, veți învăța cum să faceți un miracol verde din hârtie și carton cu propriile mâini, tampoane de bumbac, fire și panglici.
Cum să faci un brad de Crăciun din panglici cu propriile mâini pentru școală pas cu pas: o clasă de master acasă pentru Anul Nou 2018
Probabil că nu au mai rămas materiale din care meșterii populari să nu fi încercat să le facă. pomi de Crăciun. Se folosește totul - de la conuri și foi de hârtie până la jucării moi si margele. Dar poate că nu ați auzit încă cum să faceți un brad de Crăciun cu panglică pentru școală acasă. Atunci acest videoclip și master class este pentru tine!
Clasă de master video despre realizarea unui brad de Crăciun din panglici

După ce vizionați videoclipul de mai jos, vă va deveni clar cum să faceți un brad mic de Crăciun cu propriile mâini în condiții normale de acasă pentru școală de la panglici de satin. Acest mini brad elegant va trebui să fie decorat cu mărgele de perle artificiale sau mărgele mari. Cu toate acestea, această clasă de master video va fi utilă doar celor care știu să se ocupe de mici detalii și sunt obișnuiți să facă mici meșteșuguri.
Cum să-ți faci propriul brad de Crăciun din hârtie sau carton acasă pentru grădinița de Anul Nou 2018
Înainte de Anul Nou, profesorii le dau adesea preșcolarilor sarcini simple - îi invită pe copii să facă ceva pentru sărbătorile viitoare: o cutie cadou, un om de zăpadă din vată, Jucării de Anul Nou. Poate că, după ce au citit recomandările noastre și au vizionat fotografii și videoclipuri ale cursurilor de master, părinții le vor putea explica fiicelor și fiilor lor cum să facă un brad de Crăciun pentru grădiniță cu propriile mâini din hârtie sau carton acasă.

Clasă de master despre realizarea unui brad de Crăciun din hârtie cu fotografii pas cu pas

Probabil ați văzut cât de sârguincios copiii fac diferit meșteșuguri din hârtie pentru sărbători. Cât de entuziasm strălucesc ochii copiilor când își dau seama că totul merge bine pentru ei! Această clasă de master simplă cu fotografii pas cu pas vă va explica cum puteți face un brad de Crăciun acasă grădiniţă— meșteșugurile sunt realizate cu propriile mâini din hârtie sau carton. În plus, veți avea nevoie de:
- Creion;
- Foarfece;
- Beteală;
- Sârmă pufoasă;
- Lipici;
- Paiete;
- Cauciuc;
- Un suport cu umplutură sau o lumânare decorativă mare.

Cum să faci un brad de Crăciun cu propriile mâini acasă pentru școală pentru concursul de meșteșuguri de Anul Nou 2018
Înainte de Anul Nou, școlile cer adesea copiilor să aducă jucării de casă pe Tema de Anul Nou. În același timp, cel mai popular produs este întotdeauna bradul de Crăciun. Dacă vrei să știi cum să faci cel mai bun brad de Crăciun cu propriile mâini acasă și câștigați un concurs de meșteșuguri la școală, citiți instrucțiunile noastre, amintiți-vă recomandările cursurilor de master, urmăriți videoclipul cu explicații.

Meșteșuguri pom de Anul Nou pentru un concurs școlar - Master class cu fotografii pas cu pas

Cei mai talentați copii participă întotdeauna la concursurile școlare. Luptând pentru un premiu, se gândesc în avans la cele mai neașteptate și originale produse și caută materiale potrivite pentru ei. După ce ați citit cum să faceți un brad de Crăciun cu propriile mâini acasă pentru un concurs de artizanat școlar, copiii vor putea să facă pomi neobișnuiți de Anul Nou. Pot decora atât sala de clasă, cât și raftul cu suveniruri. Citiți cu atenție toate instrucțiunile din clasa de master și treceți la treabă.

Bradul de Crăciun poate fi realizat în alt mod. Doar lipiți panglici de hârtie strălucitoare pe con până când obțineți un asemenea miracol.

Cum să faci un brad de Crăciun din tampoane de bumbac acasă cu propriile mâini: master class cu fotografii
Mai credeai că tampoanele de vată vândute în supermarketuri și farmacii sunt vândute doar de doamnele care le folosesc pentru demachiere? Nu, sunt achiziționate și de meșteri populari și amatori meșteșuguri neobișnuite. Dacă doriți să faceți o frumusețe pufoasă de Anul Nou acoperită cu zăpadă, citiți cum să faceți un brad de Crăciun din tampoane de bumbac acasă cu propriile mâini: o clasă de master cu fotografii vă va explica toți pașii. Mărimea produsului va depinde de dimensiunea hârtiei Whatman pentru ambarcațiune.
Brad de Crăciun realizat din tampoane de bumbac pas cu pas - Master class cu fotografii cu meșteșuguri pentru copii

După ce ați învățat cum să faceți un frumos brad de Crăciun din tampoane obișnuite de bumbac acasă cu propriile mâini, apelând la clasa noastră de master cu fotografii și explicații, vă puteți surprinde toți prietenii și familia. Este rar să vezi un molid artificial de o asemenea frumusețe! Încercați să o faceți singur.
Înainte de a începe lucrul, pregătiți:
- foaie Whatman;
- baton de lipici;
- Capsator;
- O mulțime de tampoane de bumbac;
- Foarfece;
- Plasture;
- Decoratiuni pentru meserii finite.


Cum să faci un brad de Crăciun cu propriile mâini din fire acasă pentru Anul Nou 2018: master class video cu explicații
Dintre toți brazii de Crăciun făcuți din cei mai mulți materiale neobișnuite Probabil cel mai ușor copac din punct de vedere al greutății este considerat a fi un copac cu fir. Ei bine, ce zici ak acasă pentru a face un simplu dar durabil și frumos brad de Crăciun cu propriile mâini din fire, o clasă de master video cu explicații de la autorul unei astfel de meșteșuguri neobișnuite va explica.

Brad de Crăciun DIY din fire: master class pe video acasă

Pentru a-ți surprinde prietenii care vin să te viziteze de Anul Nou, urmărește cum să faci un brad de Crăciun cu propriile mâini din fire acasă: o clasă de master video cu explicații îți va oferi toate sfaturile necesare. Această ambarcațiune este destul de ieftină și arată întotdeauna uimitor de aerisită!
Cum să faci un brad de Crăciun cu propriile mâini din beteală pentru a sărbători Anul Nou 2018: instrucțiuni pas cu pas cu fotografii pentru grădiniță și școală
De multe ori ne pare rău că tăiem brazii de Crăciun, așa că mulți caută o alternativă la lucrul real. Pomul de Anul Nou. Ar putea fi un molid artificial de casă realizat dintr-un decor strălucitor. După ce ați învățat cum să faceți un brad de Crăciun cu propriile mâini din beteală pentru 2018, veți renunța la ideea de a merge la piața bradului de Crăciun.

Brad de Craciun 2018 din beteala - Master class cu fotografii si instructiuni

După ce ați pregătit materiale și instrumente ieftine, accesibile și amintindu-vă cum să faceți un brad de Crăciun șic cu propriile mâini din beteală strălucitoare pentru Anul Nou 2018, vă puteți pune la treabă. Pentru orice eventualitate, lăsați pagina cu clasa de master și instrucțiuni pentru a face meșteșug să se deschidă pe ea.

Cum să faci un brad de Crăciun cu propriile mâini pas cu pas din materialele și cărțile disponibile: o clasă de master pentru copii pentru Anul Nou 2018
Cum vă puteți imagina modern brad de Crăciun schematic? În esență, este o structură triunghiulară, colorată, decorată cu decorațiuni sclipitoare, margele și ghirlande. Unii meșteri reușesc să facă molizi chiar și din reviste lucioase! Vă vom spune cum să faceți un brad de Crăciun cu propriile mâini din materialele și cărțile disponibile.

Brad de Crăciun din cărți - Master class cu fotografii pas cu pas

După ce te-ai familiarizat cu o clasă de master care explică cum să faci cel mai neobișnuit brad de Crăciun cu propriile mâini din diverse mijloace improvizate și cărți disponibile în biblioteca ta de acasă, vei înțelege că o astfel de activitate îți va aduce o adevărată plăcere. Ei bine, când tu ultima dată Ai ținut în mâini volume groase de romane? Acum o vei face cu plăcere!

Din ce să faci un brad de Crăciun cu propriile mâini: curs de master despre meșteșuguri din conuri de pin
Cei mai „vii” brazi de Crăciun sunt cei din materiale naturale. Dacă vrei cu adevărat să știi ce poți folosi pentru a face un brad de Crăciun realist cu propriile mâini, o clasă de master cu explicații despre cum să creezi meșteșuguri din conuri de pin te va ajuta să te pregătești pentru Anul Nou 2018.

Brad de Craciun pentru Anul Nou 2018 din conuri de pin - Master class cu instructiuni


Dacă sunteți în căutarea ceva pentru a face un brad de Crăciun cu propriile mâini, cursul de master de artizanat cu conuri de pin, sau mai degrabă, fiecare dintre instrucțiunile sale, vă va răspunde la toate întrebările. Pe lângă mugurii denși, dar complet deschisi, veți avea nevoie de următoarele:
- Pistol termic;
- Lipici fierbinte;
- Foarfece;
- Carton;
- Ghiveci de flori;
- beteală și jucării;
- O cutie de vopsea albă sau argintie (aurie).
Lăsați-ne să facem imediat o rezervare că puteți alege orice dimensiune de molid. Desigur, va fi nevoie de mai mult de o duzină de conuri de pin pentru a face un copac mare.

Ce poți folosi pentru a face un brad de Crăciun pentru meșteșuguri pentru Anul Nou 2018 și cum să-l decorezi
După ce ați hotărât că în niciun caz nu veți cumpăra un brad tăiat la piața de pom de Crăciun, gândindu-vă la ce puteți folosi pentru a face un brad de Crăciun pentru meșteșuguri pentru Anul Nou 2018 și cum să-l împodobiți, consultați cursurile de master prezentate pe aceasta. pagină. Unul dintre ei spune cum să faci un brad de Crăciun din bumbac. Când urmăresc instrucțiuni pas cu pas meșterii de acasă ajung întotdeauna cu o frumusețe albă pufoasă!

Brad alb pufos din vata - Master class cu fotografii

Dacă, după ce te-ai gândit mult la ce poți folosi pentru a face un brad de Crăciun original pentru meșteșuguri pentru Anul Nou 2018 și cum să-l decorezi într-un mod neobișnuit și luminos, ai decis că cea mai ieftină opțiune este pentru tine, citește clasa noastră de master și uită-te cu atenție la fotografia lui. Creează un brad frumos de Crăciun folosind vată obișnuită!

Cum să faci un brad de Crăciun cu propriile mâini din sticle de plastic și cum să-l decorezi
Uneori, noi, aruncând lucruri aparent complet inutile, nu ne dăm seama că trimiteți material de construcție valoros pentru cele mai neobișnuite meșteșuguri la grămada de gunoi. După ce ați învățat cum să faceți un brad de Crăciun cu propriile mâini din sticle de plastic și cum să-l împodobiți, cel mai probabil vă veți reconsidera atitudinea față de un „gunoi”.

Brad verde din sticle de plastic: master class cu explicații

Probabil, după ce ai băut limonadă sau Sprite, arunci fără regret sticla folosită la gunoi? Degeaba. Dacă sunteți în căutarea ce să oferi unui prieten de Anul Nou, clasa noastră de master cu explicații despre cum să faceți un brad de Crăciun verde original cu propriile mâini din sticle de plastic și cum să îl decorați frumos vă va ajuta să alegeți un cadou pentru vacanta.
Pentru muncă, pregătiți:
- Sticla de plastic verde;
- Foarfece;
- dopul de plută;
- O lumânare;
- Lipici;
- cauciuc spumă;
- O ceașcă mică de plastic pentru iaurt sau mousse.


Acum, după ce v-ați familiarizat cu câteva cursuri de master minunate, care explică cum să faceți un brad de Crăciun cu propriile mâini din diverse materiale disponibile, inclusiv sticle de plastic, panglici, conuri, beteală, cărți, fire, tampoane de bumbac și hârtie, tu și copilul tău poți face meșteșuguri excelente pentru Anul Nou 2018 la grădiniță sau școală. Poate că produsul tău va ocupa primul loc în competiție și toți concurenții vor începe să se înțeleagă din ce ai făcut o asemenea frumusețe.
Pentru a deveni proprietarul unui pom de Crăciun, nu trebuie să-l cumperi- trebuie doar să te uiți sfaturi utileși află cum poți să o faci frumos brad de Crăciun cu propriile mâini.
Astăzi poți găsi multi brazi de Craciunîn magazine și pe stradă.
Îl poți pune în casă un brad natural de Crăciun sau ramuri dintr-un pom de Crăciun pentru parfum, dar pentru a decora casa, sau un cadou unei persoane dragi se poate face dacă știți câteva trucuri interesante.
Aflați cum să faceți un brad de Crăciun din hârtie, alimente, țesături și chiar paste.
Faceți un meșteșug ca acesta deloc greu, iar casa ta va fi împodobită cu decor unic, iar prietenii și cunoscuții vor fi bucuroși să primească un brad de Crăciun realizat de tine ca un cadou.
Pom de Crăciun din hârtie DIY. Brad de Crăciun făcut din resturi de pagini de reviste.
Veți avea nevoie de:
Revista sau carte inutilă cu desene strălucitoare
Carton sau foaie groasă de hârtie
Pistol de lipici sau lipici PVA
Perforator în formă, opțional
Creion sau pix
1. Faceți un con dintr-o foaie groasă de hârtie și fixați-l cu lipici.


2. Pregătiți pagini dintr-o revistă cu imagini strălucitoare și decupați multe cercuri de același diametru din ele. Dacă aveți un perforator în formă (în formă de floare sau de cerc mare) va fi mai ușor.
3. Înfășurați cercurile tăiate în jurul unui creion, astfel încât să se onduleze puțin.
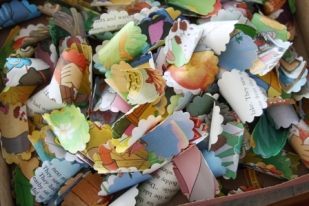

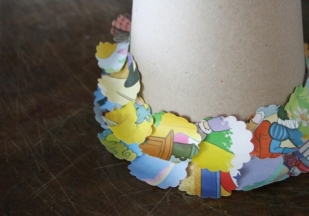
4. Pornind de la partea de jos a conului, începeți să lipiți cercurile pliate.
Faceți rânduri îngrijite. Cercurile trebuie lipite strâns unele de altele, astfel încât cartonul să nu fie vizibil.
5. Faceți un con mic dintr-un cerc și lipiți-l de partea superioară a conului de carton.
Pomul de Crăciun este gata!
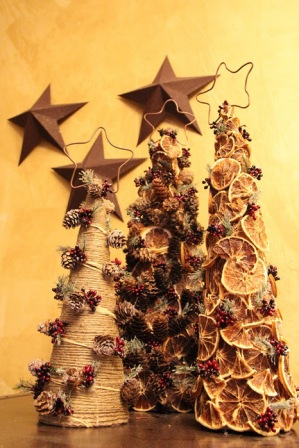
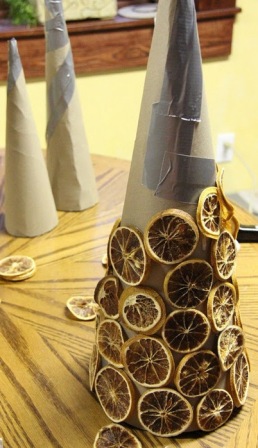
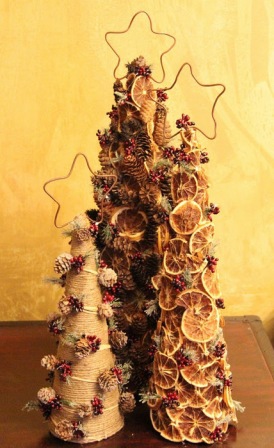
Brad de Crăciun DIY făcut din conuri de pin și fructe citrice uscate


Brad de Crăciun DIY (clasa de master). Pomi de Crăciun din hârtie de împachetat.


Veți avea nevoie de:
Foaie mare de hârtie groasă
Hârtie de împachetat
Banda dubla
Foarfece
Decoratiuni
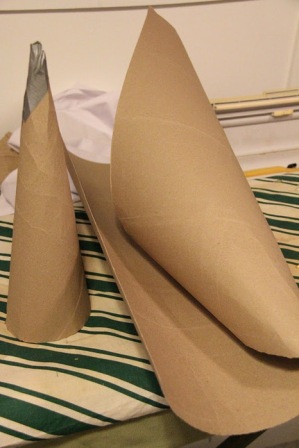
1. Faceți un con dintr-o foaie de hârtie groasă.
* Dacă hârtia de împachetat este destul de groasă, puteți ocoli pasul 1 și puteți face un con din hârtie de împachetat.

1.1 Îndoiți hârtia în diagonală, ținând un capăt pentru a o menține ascuțită.

1.2 Fixați hârtia rulată într-un con cu bandă adezivă. Nu trebuie să faceți totul prea atent, deoarece veți acoperi conul cu hârtie de împachetat.

1.3 Tăiați excesul din partea de jos a conului pentru a crea o bază netedă.

2. Pregătiți un colorat hârtie de împachetatși acoperiți conul cu el. Pentru a face acest lucru, așezați hârtia pe o suprafață plană, cu modelul în jos.

2.1 Folosind bandă adezivă, atașați capătul hârtiei de construcție în partea de sus a conului.
2.2 Începeți să răsuciți încet conul în timp ce îl împachetați în hârtie de împachetat. Trebuie să înfășurați conul strâns.

2.3 Măsurați hârtia și tăiați-o înainte de a o înfășura complet în jurul conului. Lipiți bandă dublă pe margini și conectați la celălalt capăt. Trebuie să tăiați excesul de la bază, astfel încât hârtia să fie uniformă.


3. Rămâne doar să împodobiți bradul după dorință. O poți face stele de hârtie, folosiți sclipici, autocolante, margele de lipici și/sau nasturi, înfășurați cu panglică etc.

Pomi de Crăciun similari:


Pom de Crăciun din material DIY. Cum să faci un brad de Crăciun din pâslă.


Veți avea nevoie de:
Lipici sau bandă dublă
Foarfece
* Încercați să utilizați două culori de pâslă pentru a face bradul de Crăciun și mai frumos. În acest exemplu, a fost folosit pâslă galbenă și portocalie.
1. Faceți un con din carton. Asigurați capetele cu lipici sau bandă dublă.
2. Pregătiți din pâslă și tăiați cercuri de diferite diametre, de la mic la mare (vezi poza). Puteți folosi șabloane de cerc pregătite în prealabil din carton.


3. Lipiți beteala de Crăciun pe fundul conului.
4. Acum trebuie să faceți o tăietură în cruce în centrul fiecărui cerc tăiat din pâslă. Nu tăiați prea mult pentru a preveni căderea hainei din pâslă. Faceți tăietura suficient pentru a se potrivi bine cercul pe con.
5. Începeți să puneți treptat cercuri pe con. Dacă utilizați două culori, apoi puneți cercurile secvenţial, mai întâi o culoare, apoi cealaltă. De asemenea, merită remarcat. Ce să puneți pe următorul cerc nu este doar pe con, ci și deasupra vârfurilor tăierilor cercului anterior.

6. Decorăm vârful bradului de Crăciun. Pentru a face acest lucru, adăugați pur și simplu beteală, pe care va trebui să adăugați un mic con de pâslă pregătit în prealabil. Fixați beteala și coroana cu lipici.
* Dacă doriți, puteți ascunde un cadou dulce în interiorul conului.


Brazi de Crăciun originali DIY. Pom de Crăciun strălucitor.
Veți avea nevoie de:
Plasă florală (de preferință mai multe nuanțe de verde)
Foarfece
Carton pentru con
adeziv PVA
Celofan
Ace
Ghirlandă
Sârmă florală
Decoratiuni la cerere

1. Faceți un con din carton.
2. Înfășurați conul în celofan.
3. Luați orice recipient și faceți o soluție de adeziv PVA și o cantitate mică de apă în el
3. Pregătiți o plasă florală. Tăiați-o în bucăți mici și puneți fiecare într-un recipient cu soluția.
4. Începeți să lipiți piesele pe conul acoperit cu celofan. Lipici diferite nuanțe secțiuni de plasă în direcții diferite. Rosturile trebuie acoperite cu un alt strat de adeziv pentru o fixare mai durabilă.
5. Asigurați întreaga structură cu știfturi și așteptați ca lipiciul să se usuce.
6. Acum ați creat primul strat al bradului de Crăciun. Acum trebuie să faceți un al doilea strat în același stil. După lipirea celui de-al doilea strat, lăsați structura să se usuce.
7. Acum scoateți bradul de Crăciun din con - lipiciul ar trebui să se desprindă rapid din celofan.
8. Puneți o ghirlandă în interiorul copacului, care trebuie asigurată cu sârmă florală.
9. Mai rămâne doar să împodobiți bradul după bunul plac.
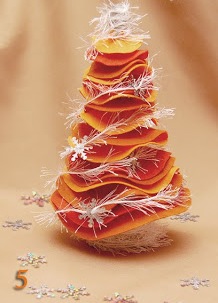
Pomi de Crăciun DIY (foto). Arborele de paste DIY.

Veți avea nevoie de:
Un con din plastic sau spumă (sau îl puteți face singur din carton)
adeziv PVA
Paste de diferite forme și dimensiuni
Vopsea spray, vopsea acrilică sau guașă
Perie.
1. Pregătiți un con și vopsiți-l în culoarea dorită. Așteptați ca vopseaua să se usuce.
*Dacă utilizați vopsea spray, puteți sări peste acest pas.
2. Pregătiți pastele. Începeți să aplicați lipici pe fiecare bucată și să lipiți piesele de con. Proiectați-vă bradul de Crăciun așa cum vă dictează imaginația.
După aplicarea lipiciului, apăsați puțin piesa și țineți-o astfel încât să se lipească bine de con. Este în regulă dacă lipiciul este vizibil de sub paste.
Continuați până când ați acoperit conul cu paste. Așteptați ca lipiciul să se usuce.

3. Începeți să adăugați culoare pastele. În acest exemplu, a fost folosită vopsea acrilică. Încercați să vopsiți toate piesele cu atenție, astfel încât să nu existe pete goale.
* Este indicat sa vopsiti in doua straturi.
* Daca il vopsesti cu vopsea alba, bradul va arata ca un produs din portelan.
Sfat util: Dacă doriți să îndepărtați ambarcațiunea, atunci puneți-o mai întâi într-o pungă de plastic, astfel încât să puteți găsi imediat partea care s-ar fi putut desprinde de pe con.
Facem un brad de Crăciun cu propriile noastre mâini. Pom de Crăciun din hârtie strălucitoare.

Veți avea nevoie de:
Carton colorat sau hârtie de designer
Carton gros
Moment de lipire sau pistol de lipici (cu lipici fierbinte)
1. Tăiați o bază pătrată pentru copac din carton gros.
2. Introduceți frigăruia în carton și fixați-o cu lipici.
3. Acum trebuie să tăiați cercuri de diferite diametre din hârtie de designer sau carton colorat. Trebuie să faceți 3 cercuri de aceeași dimensiune.
De exemplu, vrei să faci 10 cercuri dimensiuni diferite, atunci va trebui să tăiați 30 de cercuri (3 pentru fiecare dimensiune).


*Dacă nu ai chef să tai multe cercuri, doar scurtează frigăruia și vei ajunge cu un mini brad drăguț.
4. Faceți o gaură mică în centrul fiecărui cerc.
5. Înainte de a începe să puneți cercurile pe frigărui, ungeți gaura din mijloc cu lipici.
6. Începeți să așezați cercurile pe frigărui, lăsând puțin spațiu între ele.
7. Tăiați stelele din hârtie și atașați-le cu lipici în vârful copacului. Puteți folosi o altă piesă pentru coroană și nu neapărat hârtie.
Meşteşuguri. Brazi de Crăciun DIY din ață.


Veți avea nevoie de:
Fire groase
Fire cu grămadă
Con (carton sau spumă)
Ace
Decoratiuni, dupa gust.
1. Faceți un con de hârtie sau cumpărați un con de spumă din magazinele specializate.
2. Luați ambele fire și fixați-le capetele la baza conului.


3. Începeți să înfășurați firele în jurul bazei conului, fixându-le cu știfturi aproximativ la fiecare 5 cm.
4. Acum începeți să vă deplasați spre partea de sus a conului, înfășurând cu atenție ambele fire în jurul viitorului copac. În această etapă nu este nevoie să atașați firul la con.
5. Când ați ajuns la coroană, fixați firele din nou înfășurând firele în jurul coroanei de mai multe ori.
6. Ambele fire trebuie acum trase în jos, înfășurând și conul într-un al doilea strat.


7. La baza conului, tăiați firele și fixați-le.
Poți lăsa bradul așa sau îl poți și împodobi.

În acest exemplu, boabele artificiale au fost folosite pentru decor, dar puteți folosi margele colorate, snaps, nasturi etc.


Încearcă să faci și un decor pentru vârful bradului tău. Vârful capului poate fi decorat așa cum doriți.
Poți lăsa bradul așa, sau îl poți și împodobi.
Puteți face doar o pălărie de hârtie sau o stea, sau puteți face ceva mai complicat. Dacă ați ales ultima opțiune, mai jos sunt instrucțiuni pentru dvs.
Veți avea nevoie de:
Sârmă de flori
Cleste (pentru sarma)
Paiete
adeziv PVA
Sârmă fină (sârmă calibrată)


1. Îndoiți firul în formă de stea (vezi poze) și tăiați excesul.
2. Acoperiți steaua cu lipici și presărați sclipici pe ea.
3. Atașați un fir subțire la stea, așa cum se arată în imagine:
4. Atașați o stea bradului dvs. de Crăciun.
Pom de Crăciun creativ DIY

Dacă vrei ceva original, sau pur și simplu nu ai suficient spațiu pentru... brad mare de Crăciun Acasă, puteți încerca să realizați un design atât de simplu.
Este de remarcat faptul că un astfel de brad de Crăciun este potrivit pentru orice cameră. Se poate face atât acasă cu copiii, cât și la serviciu.
Acest copac se poate ridica la 1,5-2 metri și aproape că nu ocupă spațiu în casă. În plus, este un fundal bun pentru fotografia de Anul Nou.
Veți avea nevoie de:
Baza din spuma sau carton mat
Foarfece
Hârtie ondulată
Banda de mascare
Bandă adezivă
adeziv PVA
Cuțit de papetărie
Marker, opțional

1. Așezați spumă sau carton pe o suprafață plană pentru a crea un dreptunghi mare (vezi imaginea).
2. Utilizați bandă adezivă pentru a conecta toate piesele.
*Acest exemplu a folosit bandă adezivă neagră pentru o vizibilitate mai bună, dar banda albă este mai bună.
3. Marcați dimensiunea viitorului brad de Crăciun folosind bandă de mascare.
4. Folosind un cuțit utilitar, tăiați cu atenție forma viitorului copac.
5. Pregăti hârtie ondulată, îndoiți-l în jumătate și tăiați franjuri. Ar trebui să aveți multe coli de hârtie cu franjuri pentru a acoperi întregul copac.
6. Începeți să lipiți cu atenție hârtia ondulată de spumă, începând de la baza copacului. Franjuri trebuie să atârne puțin sub bază pentru a acoperi spuma (sau cartonul) și, de asemenea, să acopere puțin vârful trunchiului copacului pe care îl vom face mai târziu.

7. Mergeți până sus, acoperind întregul copac cu un strat verde strălucitor de hârtie creponată.
8. Adăugați un cârlig în spatele copacului, astfel încât bradul să poată fi atârnat. În loc de cârlig, puteți folosi bandă dublă pentru a acoperi perimetrul copacului.
9. Pentru a face trunchiul, trebuie să tăiați un mic dreptunghi din spumă sau carton.
9.1 Acoperiți dreptunghiul cu hârtie maro, la fel ca bradul de Crăciun, adică. tăind franjuri pe benzi de hârtie și lipindu-le.
Ce Anul Nou poate fi imaginat fără simbolul principal - bradul de Crăciun. Frumusețile verzi se vând la fiecare colț în ajunul sărbătorii. Cu toate acestea, pentru o astfel de sărbătoare nu este necesar să cumpărați un molid viu. Încearcă să o faci singur. Prin urmare, în acest articol vom vorbi despre ce poți folosi pentru a face un brad de Crăciun Vacanta de Anul Nou. Merită spus că puteți crea simbolul principal al Anului Nou din materiale complet diferite. Și astăzi vă vom spune mai multe despre asta.
Mini brazi de Crăciun din conuri de pin.
Dacă copiilor tăi le place să facă meșteșuguri la fel ca tine, atunci pot participa și la crearea unor astfel de meșteșuguri. Următorul meșteșug - un copac de Anul Nou este format din conuri și plastilină. Tot ce are nevoie copilul tău este să învețe cum să rostogolească bile mici din plastilină. În același timp, puteți folosi plastilină din cele mai strălucitoare nuanțe în acest scop. Puteți folosi bobine obișnuite de ață ca bază pentru bradul de Crăciun. Dar trebuie să le înfășurați în folie. Conurile sunt atașate de bobină folosind super-clei.

Dacă ți-a plăcut următorul brad, atunci ia-l vopsele acriliceși pictează cu el. Amintiți-vă că este cel mai înțelept să folosiți vopsea verde aici. În acest caz, vârfurile copacului sunt vopsite alb vopsea. Fă-l din plastilină maro baza pentru pomul de Crăciun. Utilizați o stea pentru decor.

Următoarea ambarcațiune este puțin mai dificil de realizat. Aici merită să folosiți margele. Prin urmare, dacă copilul tău este mic, atunci monitorizează singur acest proces. Lipiți margelele de conul de pin folosind un pistol de lipici.

Toate meșteșugurile de mai sus făcute din conuri de pin nu vă pot decora doar casa. Va fi o plăcere să prezinți astfel de brazi de Crăciun drept cadou persoanei dragi.
Următoarea ambarcațiune pare mai voluminoasă. Și pentru a-l crea veți avea nevoie de mai multe conuri. Ar trebui să folosiți un con de carton gros ca bază aici. După care, conul este acoperit cu conuri pe toate părțile. În această lucrare se obișnuiește să se folosească un pistol rece. Odată ce lipiciul s-a uscat, acoperiți copacul cu margele mari.

Copaci de beteală simpli.
Dacă citești acest articol, poți învăța cum să faci brad artificial de Crăciun acasă. Mai sus v-am oferit idei pentru brazi de Crăciun care au fost făcuți din conuri de pin. Acum vă sugerăm să folosiți beteală pentru această lucrare. Desigur, pentru o astfel de ambarcațiune trebuie să achiziționați beteala în sine. Pentru brazi de Crăciun, faceți conuri din carton. Apoi, lipiți beteală de ele. În acest caz, beteala trebuie lipită de con în spirală. În timp ce lucrați, înarmați-vă cu un pistol de lipici.

Brad de Crăciun din bomboane.
Următorul copac nu poate fi doar frumos decor, dar și un cadou foarte frumos. Pentru a face acest meșteșug, faceți un con. Fixați bomboanele pe el cu bandă adezivă și apoi înfășurați bradul de Crăciun cu beteală.


Simplu și brad volumetric din hârtie.
Următorul meșteșug este, de asemenea, foarte ușor de făcut. Poate fi un decor excelent pentru camera unui copil. Sărbători de Anul Nou. Pentru a o prepara, pregătiți:
- carton gros verde,
- markere, sclipici, vopsele,
- foarfece și lipici,
- scotch.
Progresul lucrării:
- Îndoim o foaie de carton în jumătate și folosim foarfecele pentru a o tăia de-a lungul pliului.
- Punem cele două părți pe care le-ați adunat și le îndoim din nou în jumătate.
- Vizavi de pliu, folosind un marker, desenați jumătate din bradul de Crăciun.
- Acum tăiați de-a lungul liniei trasate. Drept urmare, veți obține 2 brazi de Crăciun care nu vor diferi în niciun fel unul de celălalt.
- Folosind mișcări blânde, îndoiți fiecare copac în jumătate. Marcați centrul.
- Apoi, faceți o tăietură pe unul dintre copaci. Tăierea ar trebui să fie lungă de la vârf până la linia mediană. Pentru un alt copac, tăierea ar trebui să fie de jos la mijloc.
- Acum conectăm copacii inserându-i în tăieturile rezultate.
- Pentru a face copacul mai stabil, utilizați bandă adezivă.
- Asta e tot, acum începe să-ți împodobești bradul de Crăciun. Folosește-ți imaginația și materialele disponibile aici.

Și iată o altă variantă a bradului de Crăciun, pe care o poți face în același mod dintr-o veche cutie de carton.

Pom de Crăciun elegant din hârtie.

Daca vrei sa stii sa faci un brad frumos, atunci urmatoarea idee a fost creata special pentru tine. Pentru un astfel de brad, pregătiți:
- hârtie colorată,
- scotch,
- lipici și foarfece.

 Cel mai dificil este să tăiați fâșii de hârtie colorată, care trebuie să aibă aceeași lungime și aceeași lățime. În acest caz, fiecare bandă trebuie lipită împreună cu bandă pentru a forma o buclă. După care toate buclele sunt lipite de o bandă de bandă.
Ar trebui să înfășurați un con de carton gros cu ghirlande similare.
Cum să faci un pom de Crăciun strălucitor.
Dacă te hotărăști să afli cum să faci brad de Crăciun cu propriile mâini, atunci ești pe drumul cel bun. Mai sus am descris câteva meșteșuguri simple. Acum este timpul să vă angajați în creativitate serioasă pentru a face ceva original.
 Pentru brad de Crăciun creativ pregăti:
- Sfera floristică a florii. În acest caz, vă recomandăm să cumpărați mai mult de o nuanță de verde.
- Foarfece, lipici PVA.
- Carton gros pentru con.
- Celofan, ace, ghirlandă, sârmă florală.
- Decoratiuni diverse.
Progresul lucrării:
- În primul rând, facem un con din carton.
- Înfășurați conul în celofan.
- Diluăm lipiciul cu apă într-un recipient.
- Taiem plasa florala in bucati si asezam fiecare bucata intr-un recipient cu lipici si apa.
- Acum lipiți piesele pe con. În acest caz, îmbinările sunt lipite din nou pentru fiabilitate.
- Folosiți ace pentru a preveni desfacerea ambarcațiunii dvs. la cusături.
- Ca rezultat, aveți primul strat al copacului. Faceți al doilea strat în același mod. Amintiți-vă că după lipirea celui de-al doilea strat, structura trebuie să se usuce bine.
- Dacă adezivul este uscat, scoateți copacul din con.
- O ghirlandă este plasată în interiorul copacului.
- Acum pur și simplu împodobiți bradul după cum doriți.
Brad de Crăciun din fire.
Dacă vrei să ai ceva neobișnuit de Anul Nou în casa ta, atunci pe lângă decorațiunile standard, decorează-ți casa diverse meșteșuguri tematică de Anul Nou.
Crearea următorului tău brad de Crăciun este, de asemenea, destul de ușor de manevrat. Luați o foaie de hârtie Whatman și faceți un con din ea. Acoperiți conul cu lipici și începeți să-l înfășurați cu fir verde.
Când adezivul este uscat, separați conul de hârtie.
Decorează bradul finit cu diverse accesorii. De asemenea, lipiți decorațiunile de copac folosind lipici.

În concluzie
Sărbătorește-ți Anul Nou cu strălucire! Faceți mulți brazi diferiți care pot face atmosfera din casa dvs. cu adevărat magică.
Este un arbore artificial un sacrilegiu? Deloc. Dimpotrivă, din punctul de vedere al conservării mediului, cumpărarea unui brad artificial pentru Anul Nou este un act nobil. Și apropo, nu trebuie să cumpărați un brad de Crăciun, puteți face un brad neobișnuit cu propriile mâini.
Cum să faci un brad neobișnuit cu propriile mâini
În aproape toate opțiunile pentru a face un pom de Crăciun neobișnuit, se folosește o bază de carton, ca și în cursurile de master anterioare, toată neobișnuirea bradului de Crăciun de astăzi constă în materialele decorative.
Pentru început, o selecție de patru pomi de Crăciun neobișnuiți.
Vezi mai jos cum să faci acești pomi frumoși de Crăciun.
Primul copac este făcut din linguri.

Pentru a realiza acest brad veți avea nevoie de: un pachet de linguri de plastic, lipici și vopsea. Procesul de lucru este destul de simplu: tăiem mânerele de la linguri, le punem pe ziar sau hârtie inutilăși acoperiți spray-ul cu vopsea (baza de carton, de altfel, poate fi pulverizată și cu vopsea). De îndată ce vopseaua s-a uscat, începem să lipim lingurile, așa cum se arată în fotografiile 6,7,8.
Următorul brad de Crăciun de la Decoratiuni de Craciun.

Pentru a realiza un brad din jucarii veti avea nevoie de: ambalajul propriu-zis al decoratiunilor pentru brad, adeziv, baza si beteala de brad. Scoatem niturile de pe jucării și le lipim bile de Crăciun pe bază, apoi lipiți beteală în spațiul dintre bile pentru a ascunde golurile. Admirăm rezultatul!
Și restul de doi brazi de Crăciun: unul este din beteală și dulciuri, iar celălalt este făcut doar din beteală.

Sau puteți face un brad de Crăciun din frunze de copac. Pictează-le cu puțină vopsea spray și lipește totul pe aceeași bază. Se dovedește a fi un copac destul de neobișnuit, frumos.

La categoria altora moduri originale Pentru a face un brad de Crăciun cu propriile mâini, puteți include bile de spumă, pene și sclipici.


Cu brazi de Crăciun din pene sau bile de spumă, totul este clar - doar lipiți-i de bază. Dar despre cum să faci un brad de Crăciun „strălucitor”, ar trebui spus câteva cuvinte: înainte de a aplica sclipici, aplică un amestec de gel de ras și lipici (1: 1) pe bază, lasă-l să se usuce puțin și stropește cu sclipici. De acord, astfel de copaci arată foarte original.

O altă variantă care merită atenție este un brad de Crăciun format din conuri sau crenguțe. Puteți face un brad de Crăciun din conuri întregi.

Sau puteți, ca să spunem așa, să „dezasamblați” conul și să-i lipiți solzii, așa cum se arată în fotografie.

Arborele neobișnuit din conuri de pin este gata.

Un brad la fel de frumos si original poate fi facut din seminte de floarea soarelui sau de dovleac.

Probabil că nu este un secret că în zilele noastre puteți cumpăra fructe artificiale și din ele, așa cum puteți vedea în fotografia de mai jos, puteți face un brad neobișnuit. Prevopsiți baza culoare potrivită, lăsați vopseaua timp să se usuce. Toarnă fructe peste baza uscată, decorează fundul cu ramuri frumoase, o fundă deasupra și îi poți surprinde pe cei dragi cu un brad original.

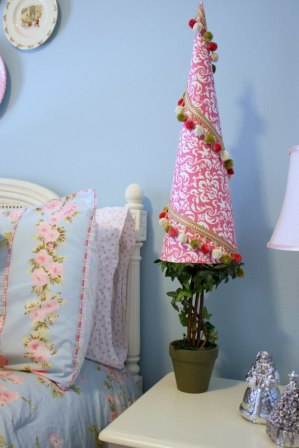
Apropo, pentru a face o topiară de Anul Nou în formă de pom de Crăciun cu propriile mâini, va funcționa și un con de carton. În general, să urmărim o mini clasă de master despre crearea unui topiar de Anul Nou. Un con din hârtie groasă sau carton trebuie lipit de un băț (apropo, dacă ai mâncat rulouri cu o zi înainte, poți folosi un băț din ele) înfășurat cu sfoară sau un fir frumos. Lipiți structura rezultată pe un pahar, umpleți-o cu orez și decorați-o cu beteală deasupra. Ei bine, acum vom face bradul de Crăciun în sine: acoperiți conul cu dantelă, pictați-l și puteți lipi diverse decorațiuni (chiar și cele mai obișnuite butoane vor face, principalul lucru este să le vopsiți mai întâi).

Poți lăsa bradul de Crăciun topiar finit în decorul tău sau îl poți oferi unuia dintre prietenii tăi pentru noroc.

Un con de carton poate fi util nu doar ca bază directă pentru un brad de Crăciun. Îl poți lipi peste folie alimentarăși înfășurați-l cu fire preimpregnate cu lipici. Lipiți diferite decorațiuni și lăsați-le să se usuce. Când lipiciul se usucă, bradul din fire poate fi îndepărtat cu ușurință din conul de carton și totul datorită filmului.


Sau pur și simplu înfășurați conul cu sârmă, sârma cu o ghirlandă și puneți jucăriile. Se dovedește a fi un brad de Crăciun foarte drăguț.


Pe lângă ghirlandă, puteți folosi un fel de țesătură sau dantelă. Veți primi și un brad de Crăciun foarte frumos.

Sau puteți lipi nasturi în baza de spumă. Lipiți strasuri sau margele.


Sau înfășurați strâns baza cu ață și decorați-o frumos cu nasturi.

Butoanele pot fi folosite nu numai pentru a decora bradul de Crăciun finit, ci și pentru a face un brad de Crăciun din ei, așa cum se arată în fotografie.

Și, în sfârșit, vorbind de pomi de Crăciun neobișnuiți, nu putem să nu ne amintim de brazi de Crăciun din lemn. În prezent, au fost dezvoltate diverse modele de designer care sunt vândute în magazinele online și obișnuite.

Tu și cu mine suntem mai răi decât designerii? - Puteți face un brad de Crăciun din lemn cu propriile mâini. Pentru a face acest lucru, veți avea nevoie de o foaie de placă de fibre și unelte pentru a tăia părțile necesare din tabla de fibre și, de preferință, un soț care va face totul.

Sau această opțiune, principiul este același. Acest brad frumos, ca și precedentul, este asamblat din două părți.

Dacă soțul tău se simte confortabil cu acest tip de muncă, îl poți convinge să asume un proiect care necesită mai multă muncă: crearea acestui brad neobișnuit. Sper că totul este foarte clar în instrucțiunile foto.

Bradul de Crăciun finit este atașat de perete și îl puteți decora după bunul plac. Puteți chiar să-l vopsiți într-o culoare, cred că asta o va face doar mai bună.
Apropo, dacă doriți ca un astfel de copac să reziste mult timp, tratați-l cu agenți de protecție.

În plus, puteți folosi matrițe din lemn, scânduri, crengi etc. Tăiați-le în diferite dimensiuni și lipiți-le împreună sau bateți-le pe bază. Rezultatul sunt brazi de Crăciun originali de masă.


Sau puteți „înșira” matrițele pe o bază subțire, veți obține un frumos brad de Crăciun tridimensional. Apropo, „ramurile” sale pot fi rotite în jurul axei lor.


Sau iată o opțiune simplă pentru a face un brad de Crăciun original cu propriile mâini: doar îmbracă tava în consecință.

Sau folosește o ușă veche din lemn sau obloane ferestre.

Și iată un alt brad de Crăciun, care poate fi creat folosind bețișoarele rămase după mâncarea rulourilor.

În plus, puteți face o copie mărită a unui astfel de brad de Crăciun.

Prea supărător, dar ți-a plăcut copacul? - Îmbrăcați scara, rapid și ușor.

Și pentru cei care au timp pentru o trăsură și un cărucior, aș dori să prezint următoarele „capodopere”.
Poți să te confuzi și să faci un brad de Crăciun fără greutate. Cu siguranță aveți o zăbrele rotundă, iar firul de pescuit cu cârlige nu este o marfă rară în zilele noastre. Principalul lucru este că bradul de Crăciun se dovedește a fi extraordinar.

Un pom de Crăciun la fel de magic poate fi făcut dintr-o plasă de metal, doar faceți un con, împodobiți-l și bucurați-vă de „magia” de Anul Nou;

Sau puteți face un brad neobișnuit din sârmă și o oglindă mare. Trebuie să faceți semicercuri de diferite dimensiuni, să le atașați la o bază triunghiulară și să le pictați cu vopsea. Odată ce vopseaua se usucă, decorează podeaua bradului cu o ghirlandă și atașează-o de oglindă.

Aprindeți ghirlanda, stingeți luminile și admirați bradul rezultat.

Pe lângă oglindă, puteți folosi un tablou inutil și puteți crea un panou neobișnuit de pom de Crăciun.

În general, poți face un brad din orice: cărți, bile, dopuri, becuri etc. Du-te! Și pentru inspirație, mai jos sunt câteva fotografii cu pomi neobișnuiți de Crăciun.


Apropo, puteți face unul neobișnuit dintr-un brad obișnuit, de exemplu, transformați-l într-un om de zăpadă!

Aici sunt brazi neobișnuiți de CrăciunÎl poți face singur pentru Anul Nou. La mulți ani ție!