
Cum să faci ghirlande frumoase. Cum se face o ghirlandă de hârtie
Pe Anul Nou O ghirlandă de hârtie este folosită pentru a decora un brad de sărbători și ca decor independent. Este ușor să-l faci din materiale vechi cu propriile mâini. Există mai multe opțiuni pentru a crea un astfel de decor.
Ghirlandă de felinare de hârtie
Ghirlanda de felinare de Anul Nou poate fi folosită ca lumină de noapte
Decorul finit poate fi plasat deasupra felinarelor electrice. Numai înainte de aceasta este inspectat cu atenție, verificând integritatea firelor.
Pentru a crea felinare veți avea nevoie de următoarele materiale:
- foarfece;
- hârtie colorată;
- creion simplu;
- riglă;
- ac;
- lipici;
- fir.
Realizarea unei ghirlande are loc în mai multe etape:
- Tăiați o fâșie de 7–8 cm lățime dintr-o foaie de hârtie colorată.
- Marcați o bucată de hârtie folosind un creion de-a lungul unei rigle. Ar trebui să obțineți benzi verticale de dimensiuni egale.
- Repetați procedura, dar folosiți un ac în loc de un creion. Apoi este mai ușor să îndoiți piesele în locurile în care liniile conturate cu creionul sunt apăsate cu un ac.
- În mijlocul piesei de prelucrat - perpendicular pe liniile de pe ea - marcați un zig-zag cu un creion și împingeți-l cu un ac.
- Asamblați piesa de prelucrat rezultată într-un acordeon. Este important să acordați atenție zonelor oblice din mijlocul piesei de prelucrat.
- Folosind adeziv sau ață și un ac, asamblați acordeonul într-un felinar.
- Înșiră mai multe felinare pe un fir.
Diagrama arată secvența acțiunilor la realizarea unei lanterne
O ghirlandă de felinare de hârtie este perfectă nu numai pentru Anul Nou, ci și la ore regulate pentru decorațiuni interioare, vitrine etc.
Decor realizat din stele tridimensionale pentru Anul Nou
Dacă faci stele din material alb, apoi le poți colora cu vopsele sau pixuri
Pentru a crea decorațiuni folosiți obișnuit hârtie albă, culoare sau ambalaj. Puteți lua hârtie destinată scrapbooking-ului.
Materiale pentru realizarea stelelor:
- hârtie;
- foarfece;
- radieră;
- raportor;
- busolă sau farfurie;
- riglă;
- creion simplu.
Lucrarea este efectuată într-o anumită ordine:
- Întoarceți hârtia pe verso. Folosind o busolă, desenați un cerc pe ea - diametrul stelei. În loc de busolă, puteți folosi o farfurie - atașați-o pe hârtie și trasați-o cu un creion. Desenați o linie dreaptă de la margine la centru.
- Folosind un raportor, măsurați un unghi de 72°. Desenați o linie dreaptă. Repetați procedura de-a lungul întregului diametru. Rezultatul ar trebui să fie 5 linii cu aceeași distanță între ele.
- În mijlocul dintre liniile drepte, desenați altele suplimentare - puteți utiliza o linie punctată. Conectați liniile rezultate într-o formă de stea. Ștergeți cercul și alte linii suplimentare cu o radieră. CU partea dreaptă Marcați o bandă de legătură de la fiecare margine a stelei.
Este bine să folosiți elemente pentru a face o ghirlandă culori diferite si dimensiuni
- Tăiați piesa rezultată și îndoiți de-a lungul liniilor de ghidare. Dacă hârtia este groasă, pliurile se încrețesc cu o foarfecă sau o riglă pentru a le oferi expresivitate maximă. Apoi piesa de prelucrat ar trebui să fie îndoită.
- Folosind același principiu, faceți a doua jumătate a stelei. Acoperiți benzile de legătură cu lipici și lipiți cele două părți împreună.
Rezultatul este o stea tridimensională
Decor bile de hârtie
Ghirlanda poate fi agățată în orice poziție - atât orizontală, cât și verticală
Pentru a face o ghirlandă veți avea nevoie de:
- hârtie colorată;
- busolă;
- foarfece;
- lipici;
- ata cu un ac.
Comanda de lucru:
Dacă lipiți câte un dreptunghi pe fiecare figură de jos, veți obține coșuri cu baloane. Apoi, în intervalul dintre ele, puteți înșira nori tăiați din hârtie pe o ghirlandă.
Fulgi de zăpadă din hârtie volumetrică
Este indicat sa alegeti carton cu o densitate de 65 g/m2. cm. Cu cât pătratul este mai mare, cu atât ar trebui să fie mai mare densitatea hârtiei.
Pentru a face bijuterii, aveți nevoie de materiale și instrumente:
- carton - 6 pătrate;
- foarfece;
- capsator;
- lipici;
- fire;
- creion.

Ghirlande de hârtie - o opțiune simplă și ieftină decor de sărbători. Copiii sunt întotdeauna interesați să facă decorațiuni de Anul Nou, să experimenteze plăcerea procesului în sine și să se bucure de rezultatul acestuia.
Do - acesta este cel mai rapid și mod frumos decorează-ți casa în ajunul Anului Nou. În plus, nu va necesita costuri mari de materiale. Astfel de decorațiuni sunt realizate din hârtie colorată, țesătură, fire, bile, conuri și alte mijloace. Revista noastră electronică despre design, interior și decor Dekorin. iti voi spune eucum să faci o ghirlandă de Crăciun cu propriile mâinisimplu și rapid de utilizat diverse materiale astfel încât să devină un adevărat decor al casei.
Ghirlande de hârtie de Revelion DIY:bile, oameni de zăpadă și pomi de Crăciun
Puteți realiza destul de multe modele diferite din hârtie albă și colorată. bijuterii frumoase. Pentru a face, trebuie sa ai un anumit set de rechizite de birou si anume: hartie alba, colorata (de preferinta fata-verso), foarfece, lipici PVA, rigla, creion, busola. Pentru decorare suplimentară, puteți folosi paiete, vopsele, margele etc.
De la luxuriantul original bile de hârtie, puteți forma diferit. Pentru a face o minge, veți avea nevoie de o busolă. Din hârtie multicoloră sau doar albă, trebuie să tăiați trei cercuri identice, să le pliați în jumătate și să le lipiți cu margini. La lipire, este necesar să așezați un fir în interior, astfel încât mingea să poată fi suspendată. Pentru a face o ghirlandă lungă și solidă, luați o bobină și, derulând treptat firul, lipiți-o cu bile.
De făcut Ghirlande de hârtie de Anul Nou- Oameni de zăpadă DIY , bilele se fac dupa acelasi principiu, dar dimensiuni diferite. Ele sunt atașate de un fir strâns între ele în dimensiune: mare, medie și mică, așa cum se arată în fotografie.
Ghirlandele pentru pomul de Crăciun sunt foarte ușor de făcut. Tăiați conuri mici din hârtie, lipiți și înșirați trei bucăți pe un fir. Pentru a preveni alunecarea elementelor de-a lungul firului, le puteți fixa cu margele sau picături de lipici de la un pistol de topire la cald. Pentru a face așa cevaGhirlande de hârtie de Crăciun DIYNu este necesar să folosiți hârtie verde, puteți folosi diferite culori, alternându-le. Poți completa brazii de Crăciun cu sclipici sau decorațiuni ușoare din vată lipite de marginile conurilor sub formă de zăpadă.


Realizarea unei ghirlande de Anul Nou cu propriile mâini: șarpe
Aceasta este cea mai simplă ghirlandă pe care o poate face chiar și un copil. Apropo, faceîmpreună cu copiii este foarte util și interesant. Deci, trebuie să tăiați benzi subțiri (nu mai mult de 1 cm lățime) din hârtie colorată, a căror lungime depinde de cum doriți să arate link-urile. Este important ca dungile să fie aceleași - atunci lanțul va fi neted și frumos. Lipiți capetele primei benzi împreună pentru a crea o legătură. Următorul este să-l fileți și, de asemenea, să lipiți capetele. Astfel, formăm un lanț de lungimea necesară, care poate fi folosit ulterior pentru a împodobi bradul, pereții, deschiderea ferestrei, sau agățat-o în valuri coborâtoare de pe tavan folosind bandă.


Ghirlande de Crăciun din fetru DIY: modele și sfaturi de fabricație
Pâsla este destul de des folosită la fabricare diverse meșteșuguri, deoarece structura sa este complet diferită de alte țesături. Este destul de dens și produsele fabricate din el își păstrează perfect forma pentru o lungă perioadă de timp. F Eter are multe culori strălucitoare, De aceea Ghirlande de Crăciun din fetru DIYva deveni frumosdecor pentru camera ta. Modele am dat câteva exemple în nostru al-lea articol. De exemplu, puteți coase o mulțime de brazi de Crăciun verzi mici, așa cum se arată în fotografie, să-i împodobiți cu fundite aurii sau roșii, mărgele, paiete etc. Apoi trebuie să luați un fir cu un ac și să înșirați brazii de Crăciun la partea de sus. Pentru a le împiedica să „alunece” de-a lungul firului, puteți folosi un pistol de lipici.Ghirlande de Crăciun DIY din pantofi, foto care sunt prezentate în articolul nostru, vă vor încânta oaspeții dacă puneți înăuntru diverse dulciuri și suveniruri. Diferite stele, clopote, oameni de zăpadă, inimi și alte forme pot fi folosite ca elemente de ghirlande. Deoarece nuanțele aurii sunt în tendințe în anul Câinelui Galben,fă-ți propria ghirlandă de Anul Nou, ținând cont de acest lucru. Fundițele din panglică aurie, stele galbene și alte decorațiuni ar fi destul de potrivite. Dekorin. eu am ales pentru tine diverse opțiuni produse frumoase din fetru care pot fi decorate sub forma unei ghirlande.


Facem ghirlande de Revelion cu mâinile noastre pentru 2018, ținând cont de simbolism
Simbol Deoarece anul care vine este Câinele Galben, interiorul trebuie să aibă simbolismul corespunzător. Dacă știi să coasi chiar și puțin, creeazăJucării și ghirlande de Revelion DIYdin simțit va fi destul de ușor. De exemplu, puteți coase câini mici simbolizând anul care vine, așa cum se arată în fotografia din articolul nostru. De asemenea, puteți face un decor interior separat. Întindeți un fir puternic pe perete de-a lungul suprafeței tavanului, înfășurați-l cu beteală și, alternând unul cu celălalt, agățați câini și oase, de asemenea, tăiate din pâslă și acoperite, de el. Astfel deGhirlande de Revelion DIY pentru 2018 an va însufleți semnificativ interiorul, va atrage atenția oaspeților și, cu siguranță, va liniști proprietarul anului, ceea ce va contribui la bunăstarea familiei.


Idei pentru ghirlande DIY de Revelion din materiale vechi
Bijuterii foarte frumoase pot fi realizate folosind materiale familiare tuturor, care pot fi vata, fire,
Ninsoarea adevărată este destul de ușor de decorat dacă este făcută separatPandantive și ghirlande de Revelion DIYdin vată și așezați-le dens pe o secțiune a peretelui sau a tavanului. Pentru a face o astfel de ghirlandă, trebuie să luați bucăți mici de vată și să le înfășurați în jurul unui fir, să înfășurați strâns capetele, ca un ambalaj de bomboane. Pentru fiabilitate, puteți umezi capetele cu adeziv PVA. Ghirlanda va deveni pufoasă și ușoară.
Decoratiuni de Craciun DIY-ghirlandese poate face din nasturi. Cu siguranță, fiecare gospodină acasă are un „depozit” de tot felul de nasturi din lucruri vechi, așa cum se spune, pentru orice eventualitate. Deci, putem presupune că acesta este chiar cazul care vă va ajuta să scăpați de lucrurile inutile și, în același timp, să decorați interiorul într-un mod original. Înșiră nasturi colorați pe panglici subțiri sau fire dense, atașați-le ca pandantive la o ghirlandă cu LED-uri și veți obține un decor frumos, demn, pentru Anul Nou.


Ghirlandă de șemineu DIY de Anul Nou
Dacă camera are șemineu, acesta este un plus uriaș în designul interior pentru vacanța viitoare. O poți face singur din cutii de carton, lipindu-le impreuna cu litera „P” si decorandu-le cu caramida alba sau rosie. Oricare ar fi - real sau artificial,Ghirlandă pentru șemineu de Crăciun DIYva fi un decor minunat.Idei de ghirlande de Crăciun DIYpentru șemineu sunt inepuizabile: utilizați panglici mari de beteală verde, completați-o cu funde roșii și aurii, bile de sticlă strălucitoare, conuri de pin vopsite în alb vopsea acrilică. Deoarece culoarea principală a anului viitor a Câinelui de Pământ este galbenul cu toate nuanțele sale, decorațiunile vor fi portocale, mandarine și alte fructe, care, apropo, pot fi consumate după sărbătoare.
Vor arăta foarte plăcut de CrăciunPandantive de Anul Nou-pantofi si ghirlande, decorate cu propriile maini care va ocupa spatiu deasupra semineului. Puteți adăuga la compoziție cu diapozitive de lumânări, o coroană de Crăciun și, de asemenea, puneți o mică figurină de porțelan sau cusută de sine a unui câine - un simbol al anului care vine.


Citește și pe site-ul nostru Dekorin. eu: Cum să decorezi o cameră pentru Anul Nou 2018, citește articolul nostru și vezi 55 de fotografii frumoase de Anul Nou.
CU Ghirlande de Crăciun cu LED DIY
Cea mai simplă opțiune este de a crea o imagine specifică dintr-o ghirlandă, de exemplu, o silueta unui câine, Moș Crăciun, un om de zăpadă sau doar o formă abstractă. DarLumini LED DIY de Crăciunpot fi transformate in decoratiuni deosebite care vor fi apreciate de oaspeti. De exemplu, folosind fire, baloane și adeziv PVA, puteți face o varietate de abajururi transparente, ușoare, care vor decora fiecare bec din ghirlandă. Totul se face foarte simplu: umflam balonul (doar putin) si il fixam, scufundam firul in lipici si il infasuram lejer in jurul mingii. După uscarea completă, bila sparge și este scoasă din abajurul de răchită, care în cele din urmă trebuie fixat pe bec. Astfel deGhirlande de Crăciun DIY(fotografie vezi articolul) in ora serii va crea cele mai incredibile modele în interiorul camerei.


Ghirlande de Crăciun DIY pentru grădiniță
În ajunul Anului Nou se țin matinee în toate instituțiile pentru copii, iar personalul și părinții trebuie să creeze atmosfera de sărbătoare necesară copiilor. De exemplu, poți face frumosGhirlande de Revelion DIY grădiniţă din hârtie colorată. Tăiați stelele, pomii de Crăciun, fulgii de zăpadă de diferite dimensiuni și înșirați-i pe un fir folosind un ac. Astfel de ghirlande trebuie așezate cât mai aproape de suprafața tavanului, astfel încât copiii să nu le rupă accidental. De asemenea, puteți faceGhirlande de Revelion DIY din bile. Am strâns fotografii cu diferite decorațiuni în cadrul nostru al-lea articol. Una dintre ele arată cum sala de adunări a grădiniței este decorată cu ghirlande de beteală albă și pandantive cu fulgi de nea.


Decorul de Anul Nou nu se poate lipsi de ghirlande festive. Fă frumosGhirlande decoratiuni de Craciun DIYnu este deloc dificil, după cum confirmă articolul nostru. Trebuie doar să aplici puțină imaginație și creativitate, iar casa ta va străluci cu culori noi în ajunul mult așteptatului An Nou.


Ghirlande de Crăciun DIY - 45 de fotografii cu decorațiuni frumoase actualizat: 23 noiembrie 2017 de: dekomin
În ajunul sărbătorii, cu toții începem să ne decoram casa cu diverse subiecte tematice. Ghirlande, câmpuri de zăpadă, Decoratiuni de Craciun- totul va fi în această chestiune. Dar uneori vrei ceva interesant. Cel mai bun decor va fi meșteșugurile făcute cu dragoste în cercul familiei. Vă prezint cursuri de master - cum să faceți ghirlande cu propriile mâini pentru a decora interiorul și brad de Crăciun cu fotografii unice pas cu pas. Vedeți și mai multe cursuri de master despre cum să faceți acest lucru aici.
Pentru a crea o astfel de ghirlandă vom avea nevoie de:
- hârtie colorată A4;
- foarfece;
- bandă cu două fețe;
- fir, fir.

O coală A4 va face o umbrelă. Îndoiți foile în jumătate.


Și din nou. Rezultatul ar trebui să fie 8 straturi.

Apoi selectăm cercul după mărime, pentru mine este capacul ceainicului. Trasăm cu un creion.


Cu ajutorul foarfecelor de unghii, tăiați cercuri.


Aceste cercuri pot fi de o varietate de culori și în orice cantitate.

Îndoiți cercurile în jumătate.

Și din nou.

Apoi luăm bandă cu două fețe și tăiem o astfel de bandă.

Lipiți banda așa cum se arată în fotografie.

Lipiți-l împreună.

Pe exterior lipim benzi de bandă pentru a fixa cercurile împreună.

Dacă, ca și mine, îți place să folosești un pistol de lipici, atunci, înlocuind banda cu lipici, poți accelera mult acest proces.


Conectați toate cercurile împreună.


Ca rezultat, vom obține un cerc ca acesta.


Luați firele albe.

Și atașează o umbrelă de hârtie.

Aplicați o picătură de lipici fierbinte pe baza ambarcațiunii.


Umbrelele noastre DIY pentru ghirlandă sunt gata.

Luăm un fir subțire și începem să atașăm umbrelele.


Pentru a face umbrelele să se învârtească și să strălucească, le puteți atașa cu ață.


Ghirlandă DIY din coajă de mandarină
Ceea ce de obicei se întâmplă des Masa de Anul Nou? Olivier și mandarine. De ce să nu folosiți coji de mandarină uzate? Toate acestea se fac rapid și veți obține o ghirlandă pentru Anul Nou cu propriile mâini. Și uite cât de neobișnuit arată.


Dacă vă place ideea, atunci să începem cursul de master.
Tot ce ai nevoie pentru asta:
- coaja de mandarina;
- carton,;
- pix;
- foarfece;
- lipici;
- sfoară.

Mai întâi trebuie să desenați un șablon pe carton. Aceștia pot fi fulgi de zăpadă, pomi de Crăciun, inimioare. În general, orice îți dorește inima. Decupați șablonul.

Trasează-l pe coaja de mandarine. Este mai bine să folosiți un stilou obișnuit. Scrie bine la suprafață și apoi se șterge la fel de ușor.

Tăiați toate spațiile goale.

Asta sa întâmplat. Pentru varietate, puteți tăia în cercuri.


Pregătiți sfoară sau orice altă frânghie. Așezați piesele de prelucrat pe el. Ar trebui să fie amplasate pe ambele părți, astfel încât să arate frumos din toate părțile. Poate fi lipit. Folosește lipici fierbinte, funcționează excelent în acest scop.

Acum ghirlanda este gata.


Această ghirlandă poate fi folosită în diverse scopuri. Poate fi o decorare a părului.

Deveniți o brățară originală.

Și, desigur, decorați camera.

Mirosul mandarinei în sine rămâne și el și va mirosi grozav.
În timp, coaja se va usca puțin și va arăta diferit, dar acest lucru nu o va strica deloc. aspect ghirlande. Așa, fără prea mult efort, poți crea o ghirlandă extraordinară. Puteți lipi nasturi sau strasuri pe coajă și să le faceți și mai interesante. Cu puțină imaginație, vei obține un lucru uimitor de frumos.
Ghirlandă de Anul Nou MK DIY
Ghirlandă Mickey Mouse pentru ziua de naștere a copiilor
Acum sunt multe diferite idei tematice organizarea de evenimente festive. Este deosebit de frumos să organizezi zile de naștere. Aceste evenimente din viața fiecărei persoane provoacă multe emoții pozitive.
Pentru a-ți decora casa colorat și strălucitor, poți face o mulțime de desene frumoase, tridimensionale, cu Mickey Mouse, atârnă panglici roșii și albastre, deoarece aceste culori sunt una dintre culorile importante în ținuta lui Mickey și a iubitei sale Minnie. A face ghirlande din carton cu chipul lui Mickey Mouse nu este deloc dificil. Trebuie doar să-l dorești și totul se va rezolva cu siguranță.
Materiale pentru fabricare ghirlandă festivă Mickey Mouse:
- Carton de diferite culori;
- fir gros (din fire);
- foarfece;
- lipici.
Decupați o față de Mickey Mouse din carton. Acest lucru se poate face folosind două căni de dimensiuni diferite. Trasează un cerc mare pe carton și face urechi pe el cu un cerc mai mic. Tăiați fața eroului cu foarfecele. Folosind șablonul finit, decupați fețele din alte culori.

Separat, decupați o fundă din carton roșu.

Lipiți fundițe pe fețe, dar nu pe toate, ci pe toate celelalte.


Luați foarfece, faceți găuri pe toate fețele așa cum se arată în fotografie și treceți firul selectat prin ele.

Ghirlanda finită poate fi atârnată. Este demn de remarcat faptul că lungimea unei astfel de frumuseți depinde de preferințele individuale, deoarece fiecare decide singur unde să atârne acest miracol.


Sărbători plăcute și fericite!
Ghirlandă de prăjituri pentru Anul Nou
De Anul Nou, se obișnuiește să coaceți prăjituri delicioase, să le decorați și să le atârnați pe bradul de Crăciun. Dar de foarte multe ori prăjiturile sunt consumate chiar înainte de a începe vacanța. Pentru a preveni acest lucru și pentru a face bradul de Crăciun să vă încânte cu decorul său, trebuie să pregătiți o ghirlandă de fursecuri sărate și să le decorați cu vopsea cu sclipici.
Pentru a pregăti ghirlanda veți avea nevoie aluat de sare, un ac cu un ochi mare, țesătură groasă, adeziv PVA, vopsea cu sclipici și paiete multicolore.
Metoda de gatire:
Pentru a crea figuri de fursecuri, trebuie mai întâi să frământați aluatul și să-l coaceți. Compoziția fursecurilor include apă, multă sare și făină. Și cu cât pui mai multă sare în ea, cu atât aluat mai bun se va preta modelării.
Dar, amintiți-vă, astfel de fursecuri din ghirlandă nu mai pot fi mâncate, vă vor servi doar pentru a vă decora bradul sau interiorul.
Când frământați aluatul, acesta trebuie să aibă consistența argilei. Trebuie să luați o jumătate de pahar de sare și apă, dar un pahar de făină. După ce ați frământat aluatul cu mâna, îl puteți întinde folosind un sucitor de lemn sau o rolă similară într-un strat subțire.
Folosind forme pentru prăjituri, tăiați fursecurile din aluat - stele, romburi, pătrate, luni sau cercuri. În locul în care vei înfila firul și acul, folosește un cuțit pentru a face găuri mici. Coaceți fursecurile până sunt gata în cuptor la 180 de grade și lăsați-le să se răcească pentru a începe să vă creați propria ghirlandă.

Acum că prăjiturile s-au răcit, le puteți decora cu lipici și sclipici. Puneți puțin lipici pe fursecuri și lipiți imediat sclipiciul. Lasă-ți opera de artă să se usuce.
Folosind un fir și un ac puternic, începeți să înșirați fursecurile pe lângă gaura pe care ați făcut-o în pregătirea pentru coacere. Asigurați-vă că faceți un nod puternic și fixați-l de primul fursec. De asemenea, puteți decora fursecuri nu numai cu sclipici, ci și cu glazură de zahăr sau vopsea multicoloră.

Când ai pregătită o ghirlandă de prăjituri, poți împodobi bradul sau casa ta cu ea. Nu ezita, această decorație arată cu adevărat festivă și solemnă! Citiți cum să o faceți aici.
Cum să faci o ghirlandă cu propriile mâini tutoriale video
O ghirlandă simplă de lanț de hârtie DIY
Salut tuturor, salut!! Astăzi aș vrea să încep articolul cu cuvintele unui cântec celebru: „Vine o sărbătoare la noi, vine o sărbătoare la noi...” Desigur, înțelegeți deja despre ce fel de sărbătoare vorbim despre care vorbim?! Acesta este Anul Nou preferat și anticipat al tuturor și pentru ca atmosfera minunatului să ne înconjoare cât mai curând posibil, să ne transformăm acum casa!!
Desigur, este prea devreme pentru a pune un brad de Crăciun, dar a face o ghirlandă este corect. Mai mult decât atât, există o varietate atât de mare, încât eu însumi am vrut să înțeleg acest subiect. Mai mult, toată atmosfera sărbătorii nu este o sticlă de șampanie, ci decorațiuni de iarnă, ești de acord cu mine?! Apoi, mergeți mai departe și începeți să mânuiți și să vă imaginați!
Probabil cele mai simple și mai accesibile tuturor sunt ghirlandele din hârtie. Desigur, le puteți face complet diferite: sub formă de inele conectate între ele, oameni de zăpadă, îngeri, brazi de Crăciun etc. În acest caz, alegeți orice culoare pentru meșteșug, alb, albastru, roșu, în funcție de interior a camerei.

Pentru a face asta design frumos, luați hârtie de culoarea aleasă și îndoiți-o în mai multe straturi ca un acordeon, apoi desenați pe ea silueta dorită și decupați-o cu grijă. Nu atingeți părțile îndoite ale foii. Desfaceți figurina și ghirlanda este gata. Nu uitați că trebuie să faceți mai multe dintre aceste spații și apoi pur și simplu să le conectați împreună.

Acum vă voi arăta varietățile acestor decorațiuni realizate manual, apoi vă voi oferi diagrame gata făcute, tot ce trebuie să faceți este să alegeți designul dorit și să-l imprimați, iar apoi este o chestiune de tehnică.
- Pomi de Crăciun și stele înșirate pe fire puternice sau sârmă

- Pomi de Crăciun din șervețele de hârtie

- cerbul de Anul Nou

- Îngeri și oameni de zăpadă

- Ajurat

- Căni obișnuite, multicolore

Ei bine, așa cum ți-am promis șabloane de produse din hârtie pentru tine:
- Părintele Frost

- Elemente de Anul Nou

- Oameni de zăpadă

- Cerb amuzant

- Îngerii

Realizarea unui banner „Flags” din material textil
Produsele din material textil vor fi foarte luminoase și impresionante. Să aruncăm o privire mai atentă la această tehnică și nu va trebui să coaseți nimic!!

Vom avea nevoie de: țesături multicolore, foarfece, pix, frânghie, fier de îndreptat părul, bandă de măsurare sau bandă de măsurare, bandă cu două fețe.

Procesul de fabricatie:
1. Mai întâi faceți șabloane de steaguri din carton. Apoi transferați-le pe material.

2. Tăiați cu grijă numărul necesar de piese.

3. Luați un fir de lungimea necesară și întindeți-l uniform pe suprafața de lucru. Așezăm steagul exact în mijloc, împărțindu-l cu un fir în două triunghiuri. Pentru a menține formele de țesătură pe loc, fixați-le cu o bucată de bandă adezivă.

4. După ce ați asamblat toate elementele (faceți totul așa cum se arată în fotografia de mai jos), călcați-le cu un fier de călcat.


După cum puteți vedea, totul este foarte, foarte simplu!! Iată câteva opțiuni suplimentare pentru ghirlande de țesături:


Cum să faci o ghirlandă din ramuri de brad cu propriile mâini
Va fi grozav dacă faci un produs de conifere, pentru că va aduce nu doar căldură și confort în casa ta, ci și un adevărat miros de sărbătoare!!
Aceste meșteșuguri sunt ușor de făcut, doar legați ramuri mici de o bază, frânghie sau sârmă, apoi adăugați panglici culoare strălucitoare sau jucării mici, dar nu exagera. Decorul principal sunt acele, nu elemente suplimentare.

O astfel de ghirlandă vie poate fi atârnată eficient în jurul unei uși sau deasupra unui șemineu, precum și pe balustrada unei scări.


Ghirlandă „întindere de Anul Nou”
Un alt tip popular de decor este întinderea. De asemenea, este destul de simplu de făcut, dar arată foarte luminos și pozitiv!!
Pentru a-l realiza, vei avea nevoie de cea mai obișnuită trusă de creativitate: hârtie colorată, sau mai bine zis hârtie strălucitoare, ață, foarfece, lipici.

Apoi faceți niște dreptunghiuri sau triunghiuri din hârtie cu sclipici pe sfoară și adăugați cuvintele „La mulți ani!”
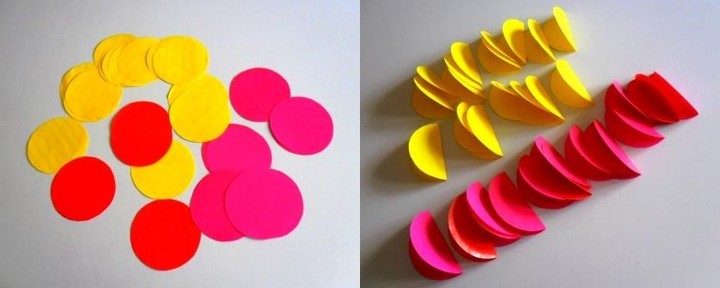
Sau puteți face aceste flori fermecătoare.

Mai întâi trebuie să faceți cercuri albe și să lipiți o floare roz sau roșie cu o gaură în interior pe ele. Decorăm blatul cu picături de lipici cu paiete sau margele. Acum leagă-le pe o panglică și decorează-ți camera!! Totul este gata!!

Sau faceți iepurași așa:

Sau puteți face accesorii de Anul Nou din carton:

Sau felinare obișnuite multicolore:

Și, de asemenea, vizionați un videoclip despre cum puteți crea o ghirlandă voluminoasă:
Meșteșuguri din fulgi de zăpadă pentru Anul Nou 2019
Bineînțeles, nu puteam rata acest subtopic, pentru că cât de elegante sunt bannerele de sărbători sub formă de fulgi de nea frumoși!
Dar nu voi intra în detalii, deoarece totul este simplu aici: alegeți orice opțiune pentru produsele decupate (am discutat deja despre cum să facem fulgi de zăpadă) și înșirați-i pe panglici, fire și decorați în toată casa.
Pentru dumneavoastră opțiuni gata făcute meşteşuguri:
- Fulgi de zăpadă volumetrici pe pomul de Crăciun

- Modul de tavan

- Targi de perete, candelabre


- Fulgi de nea tricotati

- Echipă Ghirlandă de Anul Nou

Ghirlande pentru școală și grădiniță pentru concurs din materiale vechi
Acum să vorbim despre creativitatea comună a părinților și copiilor, deoarece cred că toate instituțiile pentru copii au dat deja sarcini pe tema decorarii camerelor. Nu rămâneți pe margine, ci creați împreună cu fiicele și fiii voștri, iar rubrica mea vă va ajuta).
Vom face acest stretching original cu tine:

Vom avea nevoie de: carton, nasturi si panglici multicolori, fire colorate, lipici, foarfece, agrafe de rufe.

Procesul de fabricatie:
1. Tăiați numărul necesar de brazi de Crăciun din carton și împodobiți-i după bunul plac cu nasturi și panglici.

2. Facem pompoane din fire verzi și roșii.

3. Înșirăm pomii de Crăciun pe un fir folosind agrafe de rufe și legăm pom-poms pe un fir. Asta este!!

Iată încă ceva ce putem face cu copiii noștri:
- Oameni de zăpadă

- Mănuși

- Frosties

- Conuri de brad multicolore

Videoclip despre cum să faci decorațiuni de Anul Nou din sticle de plastic
Daca ai sticle de care nimeni nu are nevoie, atunci ai noroc, se dovedeste ca poti face lucruri utile din ele, mai degraba, uita-te si admira!
Iată câteva alte ghirlande din care puteți face: sticle de plastic. Totusi, ies lucruri frumoase!!


Clasă de master despre realizarea unei ghirlande cu propriile mâini pentru o fereastră
Îmi place foarte mult să decorez ferestrele, iar anul acesta mă ajută și fiica mea)) Practic, decoram această parte a apartamentului folosind șabloane și autocolante și totul pare super festiv și, cel mai important, starea de spirit este ridicată nu numai în rândul rezidenților. a apartamentului, dar și în rândul trecătorilor .
Iată câteva fotografii cu idei pentru acest tip de design:


Și tu și cu mine vom încerca să fim creativi și să facem o super ghirlandă pentru fereastră, ești gata? Atunci hai să mergem!
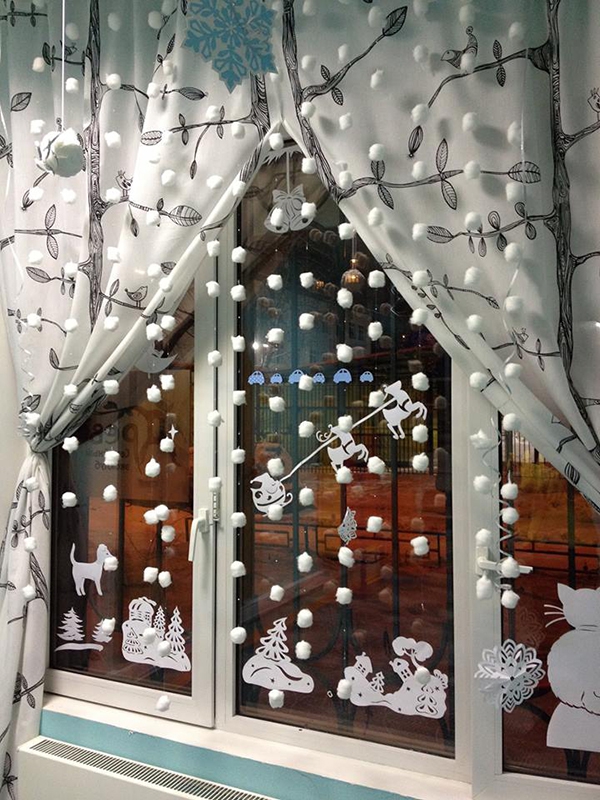
- Zăpadă din bumbac

Vom avea nevoie de: vată, fir puternic sau fir de pescuit, ac, lipici PVA.
Procesul de fabricatie:
- Ciupiți bucăți mici din vată și rulați-le în bile strânse și nu le faceți de aceeași dimensiune.
- Ungeți fiecare minge cu lipici și lăsați să se usuce.
- Acum măsurați firul de pescuit la lungimea necesară și faceți un nod de la marginea superioară a ferestrei până la mijloc sau chiar dedesubt, treceți al doilea capăt al firului de pescuit în urechiul acului. Înșirăm o minge pe un fir de pescuit și le distribuim la o oarecare distanță unul de celălalt.
- Trebuie să faci o mulțime de astfel de fire. Nu uitați să fixați fiecare dintre ele de cornișa ferestrei sau de bara de sus a cadrului.
Iată încă câteva produse finite:
- Bile, căprioare și fulgi de nea;

- Ei bine, nu uitați de ghirlandele luminoase achiziționate, la urma urmei, sunt pur și simplu superbe!


Deși au mai rămas doar câteva zile până la sărbătoarea principală a întregii țări, reușiți să creați atmosfera potrivită acasă! Sper că a fost de folos.
Ne vedem curând și La mulți ani!
Există multe tipuri de ghirlande speciale vândute în magazine, dar pentru a face această zi cu adevărat unică, vă sugerăm să faceți singur decorațiunile.
Aici am adunat idei interesanteși cursuri de master care te vor ajuta să faci Ghirlandă La mulți ani din hârtie, material sau pâslă!
La fel și șabloane gata făcute și machete pentru imprimare!
Realizarea unei ghirlande cu literele „La mulți ani” poate dura 15 minute sau o jumătate de oră, dacă nu te grăbești.

Descărcați și imprimați șablonul
Desigur, dacă doriți, puteți sta și veni cu șabloane și apoi le desenați singur. Dar pentru a vă ușura puțin această sarcină și pentru a accelera procesul, am adunat ghirlande interesante și originale de șabloane „La mulți ani”, le puteți descărca și imprima pur și simplu, apoi folosiți-l pentru a crea ghirlande de sărbători.
Șablonul #1
Complet șablon gata făcut ghirlande. Trebuie doar să descărcați (apasă pe butonul roșu). Imprimare. Și asamblați conform instrucțiunilor de mai jos.


Șablonul nr. 2
Litere în două culori: verde moale și roz. Litere din întregul alfabet - imprimați și colectați cuvintele potrivite. Cum să-l atașați la un fir sau un arc - descris mai jos


Șablonul nr. 3
Steaguri și dreptunghiuri strălucitoare. Alegeți-l pe cel care vă place. Imprimați pe o imprimantă color și Literele pot fi scrise cu un marker de orice culoare!


Cum să asamblați o ghirlandă
Imaginează-ți câte litere minunate poți face folosind aceste șabloane! Sunt potrivite pentru o zi de naștere sau orice altă vacanță, sau chiar doar pentru a face o surpriză neașteptată unei persoane dragi.


- Ideea este că există șabloane ale tuturor literelor alfabetului care poate fi imprimat și pliat în inscripția dorită.
- Și nu este necesar să tipăriți întregul alfabet, selectați numai literele individuale de care aveți nevoie.
- Dacă doriți, puteți utiliza șabloane cu litere adăugați câteva elemente de decor.
- Pentru a economisi cerneală, literele sunt proiectate într-un stil texturat și, de asemenea, puteți utiliza setările imprimantei pentru a controla consumul de cerneală.


SFAT: ceea ce te va scuti de la risipa de hârtie: tipăriți o literă, întoarceți hârtia și imprimați alta pe cealaltă parte.

Cum și cu ce să prindeți literele ghirlandei
Pentru a face o ghirlandă pentru o zi de naștere, nu este suficient să imprimați șabloane, trebuie, de asemenea, să le fixați cumva și să le atârnați. Să ne uităm la opțiunile despre cum se poate face acest lucru.
Atașăm literele la un fir lung

Pentru aceasta vei avea nevoie de:
- șabloane de scrisori gata făcute,
- fir gros sau panglică,
- perforator, foarfece.

Progresul lucrării:
- Folosind un perforator, faceți o gaură în fiecare litera are 2 găuri deasuprași apoi trebuie să înșirați literele pe o frânghie sau o panglică.
- Dacă firul este subțire, îndoiți-l de mai multe ori, uneori pare chiar mai interesant.
- Este important să înșiri literele în ordinea corectă pentru a nu le reface mai târziu, așa că este mai bine să aranjați mai întâi literele așa cum aveți nevoie și să le luați pe rând.
ATENŢIE! Trebuie să faceți un nod pe fiecare literă, astfel încât acestea să nu se miște din loc și să se adună împreună.


SFAT: nu trageți prea mult de frânghie și se va lăsa spre mijloc, dar dacă frânghia este întinsă, este o pierdere de timp.
Legăm literele cu o fundă
Această metodă de fixare este potrivită dacă nu ați tăiat literele de-a lungul contururilor lor, dar lăsând un spațiu suplimentar în rezervă, în caz contrar arcurile se pot suprapune parțial literelor (trebuie să vă uitați la situație, dacă literele sunt foarte mari, atunci totul va fi bine).

Veți avea nevoie de:
- șabloane de scrisori gata făcute,
- fir gros sau panglică,
- perforator și foarfece.

După cum puteți vedea, toate aceleași materiale ca în metoda anterioară. Numai aici vom conecta literele adiacente cu fire separate.
Progresul lucrării:


- Do perforați 2 găuri în fiecare șablonși aranjează-le în ordinea în care le vei lua.
- Luați-l pe primul și a doua litera si leaga-le cu o fundita. Pentru a face procesul mai ordonat, puteți tăia imediat numărul necesar de panglici de aceeași lungime.
- Când primele două litere sunt conectate, procedați la fel cu a doua și a treia și așa mai departe până la sfârșit. Ghirlanda ta este gata.

Prindem ghirlanda cu agrafe de rufe
Acest tip de prindere poate fi des întâlnit în ultima vreme la diverse foto-uscături, adică expoziții de fotografie. Metoda este convenabilă și rapidă și, de asemenea, nu necesită un perforator, ceea ce este un avantaj important pentru cei care nu au unul.


Progresul lucrării: Atașați literele una câte una la o frânghie lungă cu agrafe de rufe. Toate!
Cum se atașează:în toate aceste metode, ultimul pas este atașarea ghirlandei finite pe perete. Desigur, nimeni nu va lovi prin cuie de dragul unei ghirlande, astfel încât capetele frânghiei pot fi întinse și legate de orice obiecte proeminente (cornișă, mâner dulap, țeavă etc.).
Fixare cu bandă de perete
O altă opțiune este să-l atașați cu bandă (dacă acest lucru nu dăunează suprafeței), iar în acest caz este mai bine nu numai la margini, ci în alte câteva locuri, astfel încât ghirlanda să nu cadă. Puteți lipi cu grijă ace în tapet și agățați frânghia de ele.

Ghirlande din fetru „La mulți ani”
Aici va trebui să muncești mai mult, dar rezultatul va arăta cât de multă grijă a fost pusă în crearea unei astfel de ghirlande. Am pregătit două cursuri de master care nu vă vor lăsa indiferent.

Veți avea nevoie de:
- Pâslă colorată sau țesătură din pâslă (cantitatea depinde de inscripție)
- Hârtie autoadezivă (sau hârtie pentru congelator, dacă o găsiți în magazinele noastre)
- Șablon de litere
- Foarfece sau cuțit utilitar
- Funie, panglica sau fir gros (pe care vei atasa literele)
- Ață albă (pentru coaserea straturilor de material)
- Mașină de cusut (dacă nu aveți una, puteți face totul manual)
- Agrafe de rufe
Progresul lucrării:
Pasul 1: 
- Pe hârtie autoadezivă tipăriți șabloane ale literelor necesare pentru inscripție. Mărimea literelor o alegi singur, în funcție de cum vrei să arate inscripția și de cât spațiu ai pentru ea pe perete.
- Decupați dreptunghiuri cu litere, iar apoi fiecăruia dintre ei un dreptunghi gol de hârtie și țesătură de aceeași dimensiune.
- Îndoiți dreptunghiurile descrise în paragraful anterior, astfel încât materialul să fie între hârtie, liniile literei ar trebui să fie în sus.
- Când lucrezi cu hârtie autoadezivă trebuie doar să o lipești pe ambele părți ale țesăturii, dacă găsiți hârtie pentru congelator, treceți deasupra pe ambele părți cu un fier de călcat, acesta va ține straturile împreună.


Tăiați literele de-a lungul conturului. Scoateți cu grijă hârtia pe ambele părți. Am primit aceste scrisori frumoase:


PASUL 2:

- Acum vom face literele mai groase, astfel încât să aibă cea mai buna vedereși nu atât de răsucite pe frânghie. Pentru a face acest lucru, așezăm literele de țesătură pe un alt strat de pâslă sau pâslă și le călcăm.
- Cosem o mașină sau o cusătură manuală de-a lungul contururilor literelor la o distanţă de aproximativ 1-2 mm de margine. Vă recomandăm firul alb, deoarece arată bine pe toate culorile de țesătură, altfel va trebui să selectați un fir separat pentru fiecare literă, iar aceasta este doar o pierdere suplimentară inutilă de timp și bani.
- Tăiați fiecare literă de-a lungul conturului. Sunt deja gata, rămâne doar să le atașăm.
- Atârnând o frânghie lungă, fixându-și capetele de perete. Folosind agrafe de haine, atașăm fiecare literă la ea în ordinea necesară pentru a crea inscripția selectată.

Acum ghirlanda este gata să încânte ziua de naștere și să surprindă invitații!
Afiș „La mulți ani” pe țesătură
Probabil că fiecare dintre voi cel puțin o dată în viață, măcar o dată la școală, ați desenat un poster de felicitare. Metoda de fabricație propusă în această clasă de master duce această artă la un nivel cu totul nou. Piloturi patchworkÎi mulțumesc de multă vreme pe mulți cu căldura și confortul lor și nu vă vor mai surprinde, dar posterul patchwork, sunt sigur, va fi o surpriză completă și o noutate originală.

Veți avea nevoie de:
- resturi de pâslă sau țesătură de pâslă (în acest caz 9 bucăți)
- Foarfece sau cuțit utilitar
- Șablon de litere
- Căptușeală adezivă (de exemplu, dublerin sau material nețesut)
- Fier de călcat (sau orice țesătură de bumbac)
- Băț de lemn
- Fir gros pentru prindere
Progresul lucrării:
- Așezați bucăți de pâslă sau țesătură de pâslă pentru a forma un dreptunghi. Luați în considerare combinația de culori, astfel încât totul împreună să pară armonios și holistic.
- Reglați resturile astfel încât să se suprapună cu aproximativ 1,5 cm.
- Așezați bandă adezivă de-a lungul marginilor clapetelor inferioare; lățimea acesteia este egală cu lățimea suprapunerii țesăturii, adică 1,5 cm.
- Călcați țesătura cu grijă. Vă recomandăm să folosiți un fier de călcat pentru a nu strica suprafața materialului în sine.
- Puteți tăia forma posterului, oferindu-i dimensiunile dorite.
- Marginea de sus a posterului trebuie procesată. Pentru a face acest lucru, întoarceți-l pe dos spre exterior cu aproximativ 1,5-2 cm, acest lucru depinde de grosimea bastonului, pe care îl veți introduce apoi în orificiul rezultat. Asigurați reverul cu cusături de mână sau la mașină.
- Așezați litere tipărite și decupate deasupra posterului din material pentru a crea mesajul de salut dorit.
- Trasează ușor literele cu cretă sau cu o bucată subțire de săpun, acestea pot fi apoi șterse cu ușurință. Puteți folosi și un creion, dar apoi trebuie să tăiați și aceste linii.
- Decupați literele.
Ultimul lucru de făcut este să introduceți un băț de lemn în orificiul din partea de sus a posterului și să legați un fir gros sau o panglică de-a lungul părților laterale. Închide posterul și bucură-te de spiritul sărbătorilor!

Ghirlande: marker pentru țesături
Această clasă de master va avea și șabloane, dar nu mai trebuie să decupați literele. O astfel de ghirlandă arată foarte îngrijită și frumoasă și cu siguranță va mulțumi băiatul de naștere.
Iar cel mai important avantaj al ghirlandelor din țesături este că pot fi depozitate pentru o perioadă lungă de timp!

Veți avea nevoie de:
- țesătură, vopsea sau marker,
- modele de scrisori,
- foarfece, riglă,
- fir gros, lipici.
Progresul lucrării:
- Găsiți sau cumpărați în casa dvs. țesături similare ca tip cu cea prezentată în fotografie. O țesătură precum pânza de pânză funcționează bine. Ar trebui să fie deschis la culoare, cu un model discret care să completeze literele și să nu atragă atenția asupra lor.

- Tăiați materialul în dreptunghiuri egale. In acest caz este 17x12 cm.
- Alegeți un șablon de litere în stilul care vă place și imprimați. Apoi puneți fiecare literă pe o bucată separată de material și urmăriți.
- Pictează scrisoarea si las-o sa se usuce. Va funcționa și un marker.
- Culoarea ar trebui să fie contrastantă și să iasă bine în evidență pe fundalul țesăturii, nu să fuzioneze, astfel încât inscripția să poată fi citită chiar și de la distanță.
SFAT: Ca alternativă, puteți decupa șabloane din plastic subțire sau folie, le puteți atașa pe material și puteți schița imediat

- Acum trebuie să atașați literele la fir, formând o ghirlandă. Stabiliți la ce distanță ar trebui să fie unul de celălalt și lipiți-le pe un fir gros. De asemenea, puteți atașa fiecare literă cu două agrafe de rufe.

Idei de ghirlande „La mulți ani”.
Uită-te și la alte opțiuni pentru ghirlande aniversare: cu sclipici, cu baloane! Fii inspirat și lasă această zi să fie cu adevărat specială și unică pentru tine!


