
Picturi frumoase în stil quilling. Flori de hârtie folosind tehnica quilling
Pasionații de artizanat vor fi interesați de o astfel de tehnică de realizare a picturilor și panourilor ca quilling. Constă în răsucirea benzilor subțiri de hârtie multicoloră într-o spirală în rulouri, apoi oferindu-le forme diferite. Apoi, flori ajurate incredibil de frumoase, copaci, animale, păsări și multe altele sunt lipite împreună din elementele rezultate. O clasă de master cu fotografii pas cu pas ale creației lor vă va ajuta să învățați cum să creați panouri frumoase și picturi quilling.
Pentru femeile de aci începătoare, va trebui să pregătiți tot ce aveți nevoie pentru a face picturi. Este nevoie de două fețe hârtie colorată, de preferință nu foarte subțire. Hârtia este tăiată în fâșii de 3 mm cu un cuțit de papetărie. De asemenea, magazinele de artizanat vând benzi de hârtie gata făcute, paleta lor de culori este foarte diversă. Pentru a rula rulourile, puteți folosi o scobitoare obișnuită, pe vârful căreia puteți face o crestătură pentru a fixa marginea benzii de hârtie. Sau cumpărați o „răsucire” specială pentru quilling, care seamănă cu o punte, doar tija este mai scurtă și capătul său este bifurcat.
Veți avea nevoie și de lipici care să nu lase pete. Se obișnuiește să se folosească adeziv PVA, dar alt adeziv pentru papetărie va face. Pentru a ține mai ușor elementele mici, veți avea nevoie de pensete. Foarfece scurte și ascuțite. Trebuie acordată atenție bazei pe care va fi amplasată imaginea. O ramă foto, carton colorat sau bucăți de tapet simplu în relief funcționează bine. După ce ați pregătit aceste materiale și instrumente, puteți începe să faceți un tablou sau un panou.
Flori simple
Tehnica quilling produce flori foarte realiste. Elementele ajurate din care constau adaugă grație și tandrețe.
Este mai bine să începeți să faceți picturi cu flori pas cu pas cu tipuri simple. Cele mai ușor de făcut sunt margaretele.
Facem o rolă liberă din benzi albe de hârtie, lipim marginea benzii și îi dăm o formă de lacrimă. Așa se dovedește o petală. Lipiți mai multe petale împreună într-un cerc.

Tăiați o fâșie din hârtie de culoare galbenă care este de patru ori mai lată decât benzile pentru petale. Faceți tăieturi de-a lungul marginii pentru a crea o franjuri.

Rulați într-o rolă strânsă, lipiți marginea benzii și îndreptați franjuri, direcționând marginile tăiate din centru spre lateral. Așezați centrul galben între petale și lipiți-le împreună.

Pentru a da florii o formă naturală, așezați-o în palmă și apăsați în mijloc. Mușețelul va deveni concav.

Tija este făcută din sârmă. Trebuie să fie împachetat în hârtie ondulată verde. Lipiți marginea benzii verzi de capătul tulpinii și înfășurați banda în jurul ei. Faceți o pâlnie mică și lipiți o floare înăuntru.

Floarea soarelui este o altă floare ușor de făcut. Aceste flori însorite strălucitoare fac foarte frumoase tablouriși panouri care, cu culorile lor bogate, îți ridică moralul și te umplu de energie.


Panourile interesante și delicate sunt realizate din ramuri de sakura. Sakura are flori simple. Sunt făcute din rulouri dense, apăsând centrul fiecărei petale. Cinci petale sunt lipite într-un cerc. Fie stamine, care se vând în magazinele de artizanat, sunt plasate în mijloc, fie margele sunt înșirate pe o fir de pescuit. Puteți face mijlocul pufos și lipiți o rolă cu franjuri în centru. Crenguța este făcută din sârmă învelită în hârtie ondulată maro. Sau, o spirală este răsucită din fâșii de hârtie maro și scoasă, apoi lipită de bază, dând forma dorită.


Îmbunătățiți-vă abilitățile
După ce stăpânești florile simple, poți încerca să faci crini mai complexe. În natură există multe specii ale acestei flori și culorile lor sunt diferite.
Pentru a crea un crin, pe lângă trusa standard de quilling, veți avea nevoie și de un stilou cu gel pentru a aplica puncte, ca o floare vie.

Trebuie să faceți trei petale mari. Fotografia arată diagrama sa, iar numerele indică diametrul rolelor libere, care trebuie îndoite ca în diagramă.

Lipiți elementele împreună.

Înfășurați o chenar comună în jurul elementelor de mai multe ori.

Trebuie să faci trei astfel de petale.


Sunt realizate după același principiu ca petalele anterioare. De asemenea, trebuie să faci trei dintre ele.


Faceți o rolă strânsă și modelați-o într-o pâlnie. Lipiți petalele mai mici de centru la aceeași distanță una de cealaltă.

Lipiți petale mai mari într-un model de șah mai sus în nivel. Mijlocul trebuie să fie gol, astfel încât staminele să poată fi lipite de centru.
Pentru stamine, trebuie să formați elemente mici în formă de lună din rulouri visiniu. Apoi tăiați o fâșie de hârtie pe lungime în trei benzi, măsurați lungimea staminelor, lipiți unele margini împreună și îndoiți celelalte margini. Lipiți luni visiniu de aceste margini îndoite. Staminele sunt gata.

Lipiți staminele în centrul florii.

Acum trebuie să faci un pistil. Pe bandă sunt lipite trei role mici, dense, verde deschis.

Lipiți în pistil. Lily a terminat.

Deci, complicând treptat sarcina, puteți învăța cum să faceți flori incredibile.
Orhideele de pe o ramură arată grozav. Aceste flori foarte neobișnuite se disting prin forma și culoarea lor unică. Petalele lor sunt făcute fie ca ale unui crin, fie din rulouri dese concave. Orhideele sunt potrivite atât pentru tablouri, cât și pentru panouri. Un aranjament de masă într-un ghiveci de flori va arăta grozav.


anotimpuri
Picturi luminoase minunate sunt realizate pe o temă de toamnă. Toamna este caracterizată de culori luminoase, calde. Peisaje, buchete de frunze galbene, portocalii și fructe de pădure roșii de viburnum și rowan - toate acestea arată incredibil de colorate, așa cum se poate vedea în fotografia de mai jos.


Pentru a crea astfel de pânze încântătoare, trebuie să înveți cum să faci frunze frumoase de arțar sculptate.
Iarna în picturile de quilling nu pare mai puțin atractivă. Modele înghețate, fulgii de zăpadă, natura acoperită de zăpadă arată pur și simplu fabulos. Panglicile de hârtie par a fi create pentru a face dantelă de iarnă și pentru a decora rame cu monograme.


Un loc special în tema de iarna ia Anul Nou. O poză festivă va fi un cadou minunat care va completa Decor de Anul Nou sediul. Felicitari frumoase cu brazi frumosi ajurati, Mos Craciun, bile de Crăciun Vă vor încânta cu frumusețe și vă vor crea o stare de sărbătoare.
Nu va fi dificil să finalizați aceste picturi, deoarece majoritatea elementelor pentru crearea lor sunt aceleași cu cele pentru realizarea florilor. De făcut modele frumoase, puteți mai întâi să le desenați cu un creion sau să imprimați modelul finit. Apoi lipiți cu atenție partea laterală a benzilor de hârtie pe conturul modelului desenat.


Video pe tema articolului
Această selecție de videoclipuri arată cum să creați picturi frumoase pe diverse subiecte folosind tehnica quilling.


Tablouri realizate din benzi de hârtie - picturi folosind tehnica quilling.
Picturi și cărți poștale folosind tehnica quilling- este foarte frumos! Aceasta nu este doar făcută manual, ci o operă de artă! Priviți fotografiile de mai jos și vedeți singuri.
Tehnică quilling foarte simplu. Baza este fâșii răsucite de hârtie colorată.
Cum să faci un tablou sau o carte poștală sau alte meșteșuguri folosind tehnica quilling? Veți avea nevoie de hârtie colorată față-verso de bună calitate, foarfece, lipici și o scobitoare de lemn sau chibrit. Hârtia special tăiată este disponibilă spre vânzare. quilling, dar puteți tăia singur benzile la lățimea dorită.
Luați o foaie de hârtie colorată A4 și tăiați o fâșie uniformă de pe marginea lungă. Lățimea benzii este de obicei de 3-6 mm. Apoi răsuciți această bandă pe o scobitoare, apăsați cu degetele astfel încât hârtia să se îndoaie într-o spirală. Veți obține o spirală ondulată. Folosește-ți degetele pentru a-i da forma dorită: inel, petală, oval etc.
Ai terminat o bucată din meșteșug. Toate celelalte părți sunt realizate în același mod. Apoi sunt puse împreună în ceva întreg - o carte poștală, un tablou. Utilizați adeziv PVA.
Flori în tehnologie quilling- cel mai comun complot.

Quilling: lacramioare.

Quilling: ghiocei.

Quillin: Păun.


Quilling - un buchet de flori.


Quilling: narcise.


Pictura folosind tehnica quilling.

Mai ales în lumea modernă Ceea ce a devenit valoros este ceea ce a fost făcut cu suflet, cu imaginație, a cărui producție a fost abordată nu formal, ci selectiv și creativ. Lucrări individuale, dintr-o singură piesă, în care intenția autorului și starea sa de spirit sunt lizibile - doar aceasta iese în evidență din flux, mulțumește ochiul și dă emoții pozitive.
Astăzi, împreună cu maestrul Oksana Maslova, vom încerca să ne transmitem starea de spirit prin arta rulării hârtiei, plastic hârtie - quilling. Clasa noastră de master „Scrisoarea de nume” este dedicat stăpânirii tehnicilor de bază de quilling și este conceput pentru cei care abia încep să exploreze lumea elegantă a „filigranului de hârtie”.
Ce este quilling?
Quilling este arta rulării hârtiei. Cuvântul quilling este derivat din Cuvânt englezesc„penă” este o pană de pasăre. În antichitate (secolele XIV-XV), călugărițele răsuceau fâșii de hârtie aurita în spirale, așezându-le pe vârful ascuțit al unei pene de pasăre. În acest fel s-au creat compoziții de dantelă, un fel de mozaic pentru decorarea icoanelor. De-a lungul timpului, arta quilling-ului a depășit zidurile mănăstirilor și a căpătat un caracter laic. Doamnele din înalta societate au decorat cutii, steme de familie, oglinzi înrămate și multe alte obiecte cu bucle aerisite de hârtie, imitând filigran, forjare și produse din plăci metalice. Acum, quilling-ul a devenit un hobby foarte popular și accesibil tuturor, datorită simplității tehnicii, costurilor reduse și frumuseții sale. Această lume strălucitoare a plasticului și hârtiei va interesa nu numai adulții, ci și copiii, oferindu-le o oportunitate minunată de creativitate și exprimare de sine.Clasa de master „Litera de nume”
Așadar, astăzi munca noastră folosind tehnica quilling se numește „Literă de nume”. Vom așeza scrisoarea folosind tehnica quilling contur, combinând-o cu elemente de bază - rulouri. Astfel, scopul nostru este să ne familiarizăm cu elementele de bază ale quilling-ului, să stăpânim abilitățile datorită cărora vom putea întruchipa ideile noastre creative în mod luminos și elegant.Principalele instrumente pe care le vom folosi în timpul lecției noastre:
- Furculiță pentru quilling (un instrument pentru ondularea benzilor de hârtie). Acest instrument este principalul în tehnica quilling. Cu ajutorul lui, benzile de hârtie sunt ușor răsucite în diverse elemente, care sunt ulterior folosite pentru a decora lucrările noastre.
- Riglă-șablon din plastic pentru quilling pe bază de plută. Indispensabil pentru crearea de elemente identice, uniforme, pentru colectarea rolelor cu un centru decalat, precum și pentru decorticare (quilling în buclă). Aceasta este o ramură separată în quilling. Pe bază se pun știfturi și se înfășoară benzi de hârtie în jurul lor, formând bucle. Elementul se dovedește a fi mai filigran, lipsit de greutate și delicat. Loop quilling este de obicei folosit pentru a face forme aerisite, de exemplu, aripile fluturilor, păsărilor și îngerilor.
- Covoraș de plută. Convenabil pentru asamblarea pieselor individuale într-un element final.
- Pensetă cu nas drept sau înclinat. Va fi convenabil pentru a colecta mici detalii într-o compoziție generală.
- Foarfece.
- Știfturi cu cap (de siguranță) pentru asigurarea elementelor și crearea formelor bucle. De asemenea, ajută la crearea unui design excentric (excentric).
- Hârtie de quilling - benzi multicolore, adesea ambalate în seturi care sunt vândute în magazine de artizanat specializate, făcut singur, scrapbooking sau quilling. Ca alternativă la benzile cumpărate din magazin, utilizați hârtie colorată față-verso, tăiată în benzi de 3, 5 sau 7 mm lățime.
- Lipici de hârtie (de preferință PVA sau un stilou cu lipici). Cel mai important lucru despre lipici este că trebuie să fie gros. Pe măsură ce lucrați, trebuie să-l amestecați astfel încât să rămână omogen și aplicat uniform. În munca noastră la o scrisoare personală, este foarte convenabil să folosiți un stilou cu lipici, datorită vârfului ascuțit al cărui lipici se află într-o linie îngrijită și subțire.
- Carton colorat sau obișnuit pentru bază, care este foarte important în quillingul contur. Vă puteți juca oricând cu culoarea și textura sa, care vor adăuga propria sa aromă muncii noastre. Puteți alege o bază deja colorată sau puteți nuanța zonele dorite în funcție de designul compoziției. Este mai bine să luați carton cu o suprafață ușor aspră, nu prea netedă, care va asigura o aderență rapidă și puternică și o aderență între suprafețe.
- Hârtie carbon (pentru transferul scrisorii pe bază).
După ce ne-am hotărât asupra literei (dimensiune, font), a culorii bazei și a conturului, ne apucăm de treabă.
Contour quilling - instrucțiuni pas cu pas
- Desenăm conturul literei pe baza de carton cât mai precis posibil prin hârtie de carbon. Acest lucru trebuie făcut fără pete, astfel încât lucrarea să fie îngrijită și frumoasă.
- Folosind o scobitoare sau un ac, aplicați lipici la capătul (marginea) benzii și conectați marginea acoperită cu conturul literei desenate pe bază. Aici trebuie să fixați banda pentru o perioadă scurtă de timp pentru a oferi lipiciului șansa să se întărească și să se usuce puțin. În acest fel, așezăm treptat conturul scrisorii noastre. Puteți face acest proces minuțios mai ușor folosind un stilou cu lipici. Stiloul cu lipici vă permite să aplicați lipici într-o linie subțire direct la bază, și abia apoi fixați o fâșie de hârtie pe ea.
- Când întindem scrisoarea, acordăm atenție faptului că toate conexiunile și îmbinările dintre dungi trec de-a lungul părții inferioare.
- Pentru a așeza și a lipi cu atenție toate colțurile și coturile literei, vom folosi un covoraș de plută și ace cu cap. Așezăm un covoraș sub bază, fixăm literele la colțuri, întindem o bandă peste ele și o lipim.
- După ce conturul scrisorii noastre este lipit și uscat, scoatem toate știfturile, scoatem baza de pe suportul din plută și umplem conturul literei cu elemente frumoase, armonios selectate după culoare.
Pentru ca compoziția noastră să fie îngrijită și frumoasă, vom ține cont de câteva nuanțe:
- Rupem fâșia de hârtie în loc să o tăiem. Acest lucru îi face marginea mai subțire, iar mijlocul ruloului devine invizibil.
- Vă rugăm să vă asigurați că nu rămâne adeziv din fabrică la capătul benzii, care este folosit pentru a conecta toate benzile din set între ele.
- Ne amintim că uneltele diferă în funcție de dimensiunea și textura mânerului, lățimea și lungimea fantei. Selectăm o furculiță pentru quilling care să se potrivească mâinii tale, astfel încât să se potrivească confortabil în mâna ta. Acest lucru vă va ajuta cu munca dvs.
- Tăierea în instrument trebuie să corespundă lățimii benzii și grosimii hârtiei. De regulă, aceste date sunt indicate pe setul de hârtie de quilling. Deci, dacă hârtia are o densitate de 160 g/m2, atunci luăm o mufă cu un conector mai larg. Pentru hârtie cu o densitate de 80 g/m2 veți avea nevoie de o furculiță cu fantă îngustă. Înălțimea conectorului trebuie să corespundă și lățimii bandă de hârtie. Pentru o bandă de 3-5 mm lățime, luați o furcă de 5 mm înălțime, pentru o bandă de 5-10 mm lățime, este potrivită o unealtă cu o înălțime de fante de 1 cm.
Pentru a înțelege mai bine elementele de bază ale quilling-ului, să ne uităm la fabricarea unora dintre ele mai detaliat.
Realizarea elementelor de bază de quilling
Cum să faci o rolă strânsă

Introducem marginea benzii în fanta instrumentului și răsucim strâns rola, ținând și controlând uniformitatea acesteia. De asemenea, scoatem rulada cu grijă pentru a nu se întinde într-un con. Puteți folosi două sau mai multe culori de hârtie. Când se termină o bandă, lipiți alta, astfel încât îmbinarea să nu depășească 2-4 mm și continuați răsucirea. O rolă strânsă, spre deosebire de una liberă, nu este relaxată, ci se lipește imediat folosind o perie, o scobitoare sau un ac pentru a aplica lipici. De asemenea, puteți folosi un instrument special pentru a face rulouri strânse. Se numește „uneltă de rulare strânsă”.
Folosind baza celui strâns, facem o „rula liberă”

Pentru a crea o rolă cu un anumit diametru, este convenabil să folosiți o riglă șablon. Introducem ruloul strâns răsucit în șablon, unde se desfășoară la dimensiunea necesară, după care fixăm vârful cu lipici. De asemenea, puteți lipi rulada până când i se dă o anumită formă. Stăpânul o alege singur.
Elementul „ochi”.

Răsucim strâns rulada, o desfacem la dimensiunea dorită și o apăsăm în jos, o strângem cu degetele arătător și degetele de la ambele mâini de-a lungul marginilor, pe ambele părți și o lipim.
"Romb"

Strângem ruloul liber, ca atunci când facem un „ochi”, închidem strâns indexul și degetul mare o mână cu degetul arătător și degetul mare al celeilalte pentru a forma un diamant.
Foarte element frumos quilling - „picătură”

Următoarele elemente de quilling sunt realizate folosind același principiu:
"Săgeată"

Relaxăm rulada, facem o picătură, o lipim și apăsăm cu degetele partea de jos a picăturii spre interior, ascuțind ușor marginile. Acest element poate fi realizat și folosind un creion sau un stilou.
"Triunghi"

Apăsați rola ușor relaxată cu două degete ale mâinii drepte și apăsați pe a treia parte cu degetul stâng. Astfel obținem un triunghi.
"Pătrat"

Comprimați ușor părțile laterale ale ruloului liber, ca atunci când faceți un diamant, dar nu prea mult, dându-i o formă pătrată.
"Lalea"

Mai multe dintre aceste elemente pot alcătui deja o compoziție finită. Apăsăm o parte a rolului răsucit și ușor slăbit spre interior cu partea din spate (mânerul) a instrumentului de quilling. Ascutim putin marginile cu degetele si obtinem o lalea. Lipim marginea, iar elementul este gata.
"Semicerc"

Se face ca o lalea. Numai că formăm rulada răsucită nu cu mânerul instrumentului, ci cu degetele și, în același timp, nu apăsăm o parte spre interior, ci o lăsăm plată. Se dovedește a fi un semicerc.
"Semilună"

Este făcut ca un semicerc, dar mai curbat.
Acestea sunt rulourile de bază. Urmând logica fabricării lor, poți fantezi și nu există limite. Puteți forma un con, spirală, picior, stea, picătură curbată și multe alte elemente, datorită cărora puteți decora carduri, cutii lucrate manual, ambalaj cadou. Ouăle de Paște făcute folosind tehnica quilling arată foarte frumos.
"S-scroll"

Fasia de hârtie este răsucită într-o rolă strânsă la jumătate și pe cealaltă parte tot la jumătate, doar în sens invers. Așa obținem un element care arată ca litera „S”. Acest scroll nu este lipit. Înflorește puțin și păstrează forma dorită.
"V-scroll"

Îndoiți banda exact în jumătate și răsuciți strâns fiecare parte spre exterior până se pliază. Rezultatul este un pergament care arată ca litera „V” sau cu antenele unui fluture.
Derulează „inima”

Se face la fel ca scroll V, doar că răsucim strâns fâșiile de hârtie nu spre exterior, ci spre interior, spre interiorul colțului. Se dovedește a fi o inimă. Poate fi plasat într-o matriță șablon și lăsat să înflorească la dimensiunea dorită.
Derulați „buclă”

Derulează „cremură”

Îndoim banda într-un raport de 1:2. Răsucim capetele într-o direcție.
Pe lângă elementele de bază, puteți răsuci multe altele arbitrare. De exemplu, un val cu „aripi” egale sau crescătoare. Se răsucește din orice fragment al benzii în orice direcție. Îl poți lăsa bine ondulat sau îl poți slăbi puțin. Nu există limite sau reguli stricte în quilling. Există elemente de bază datorită cărora poți construi ceva nou și nu mai puțin interesant. Puteți așeza diverse mozaicuri bazate pe rulouri și suluri. Și pentru o varietate mai mare, astfel încât lucrarea să pară voluminoasă și colorată, puteți utiliza diferite culori de hârtie în fabricarea unui element, lipindu-le cu atenție benzile una după alta și răsucindu-le. Acest lucru creează efectul unei tranziții prin semitonuri sau un contrast luminos și bogat. Totul este ca în natură. Natural si voluminos.
De asemenea, poti realiza unele complexe din elemente de baza simple: flori, frunze, modele... Daca impaturim o floare si dorim ca petalele ei sa aiba aceeasi dimensiune, folosim un sablon. Puneți o rolă strânsă mărimea potrivită, lasă-l să se desfășoare, formează picături-petale și lipește-l acolo în șablon. Dacă trebuie să faceți multe elemente diferite, atunci va fi mai convenabil să rulați mai întâi numărul necesar de role, să le lipiți și să setați forma. Apoi fixați-le pe covorașul de plută, întindeți compoziția, lipiți-le și lăsați-le să se usuce. Știfturile vor împiedica mișcarea elementelor (pieselor) asamblate. Este convenabil.
Cum să faci o frunză voluminoasă fără a folosi bucla quilling

Puteți face o frunză aerisită, voluminoasă, fără a folosi bucla quilling. Fâșia de hârtie este tăiată în fragmente, de aproximativ 10-15 cm fiecare Cu cât sunt mai multe, cu atât frunza noastră va fi mai voluminoasă. Stivuim aceste fragmente unul peste altul, lipind totul într-un punct la o margine. Asigurați-vă că aliniați benzile între ele, astfel încât să se așeze într-o stivă îngrijită și uniformă, apoi mutați-le pe lungime, fixându-le cu lipici pe cealaltă margine. Rezultatul este o frunză aerisită, voluminoasă, cu nervuri.
Trandafiri folosind tehnica quilling

Introduceți marginea benzii în fanta sculei. Facem mai multe ture, formând o rolă strânsă (ține rulada cu degetul arătător pentru a nu se desfășura). Întoarcem banda spre exterior printr-o îndoire și o răsucim din nou în jurul furculiței. Continuăm să facem o „întoarcere” până când se formează bobocul nostru sau trandafirul deschis. Scoateți floarea finită din furculiță și picurați o picătură de lipici în mijloc din partea de jos, astfel încât lipiciul să nu fie vizibil. Puteți acoperi ușor petalele inferioare cu lipici pentru a le fixa. Trandafirul nostru este gata.
Urmărește următorul videoclip pentru întregul proces de realizare a trandafirilor folosind tehnica quilling:
Hârtia de quilling este foarte flexibilă. Arboră bine, își păstrează forma și este ușor de manipulat. În timp, cu ceva pricepere, toate elementele tale se vor forma rapid și ușor. Rămâne doar să urmezi principiul de bază al quilling-ului: răsucire-compunere-lipire și distrează-te imaginând! De fapt, quilling-ul este atât de simplu și distractiv încât odată ce începi să așezi modele specifice sau abstracte, nu te vei opri. Aceasta este o stare de spirit pe care doriți să o împărtășiți cu ceilalți. O mare de lumină și culori!
Quilling este arta „rulării hârtiei” din benzi de hârtie. Spiralele de hârtie au forme diferite– se numesc module. Ele sunt principalul material pentru crearea meșteșugurilor, picturi, albume, cărți poștale, figurine... Quilling tradus din engleză înseamnă „penă de pasăre” - aceasta vine din istorie.
În Evul Mediu, hârtia era tratată cu mare atenție și rămășițele nu erau aruncate, ele erau înfășurate în jurul vârfului stiloului - așa s-a format un nume atât de neobișnuit. În Rusia, quilling-ul a devenit popular la sfârșitul secolului al XX-lea. În secolul al XIX-lea, quilling-ul era considerat principalul meșteșug al doamnelor nobile. Prințesa engleză Elisabeta a devenit interesată de această artă, iar multe dintre lucrările ei se află la Londra, la Victoria and Albert Museum.
Veți avea nevoie de: pensetă, foarfece, hârtie colorată, scobitori, lipici, carton, o unealtă pentru răsucirea hârtiei (un băț de lemn cu capătul despicat sau un ac țigănesc cu ochiul spart), șablon, riglă.

Astăzi sunt disponibile spre vânzare truse de quilling întregi, cu fâșii de hârtie deja tăiate la un preț accesibil, în magazinele de papetărie sau online.
Baza fiecărei meșteșuguri de quilling este un modul. Un modul este o spirală de hârtie. Are forme precum franjuri, spirală strânsă, spirală liberă, picătură, picătură curbată, săgeată, semilună, ochi, stea, picior de pasăre, petală...
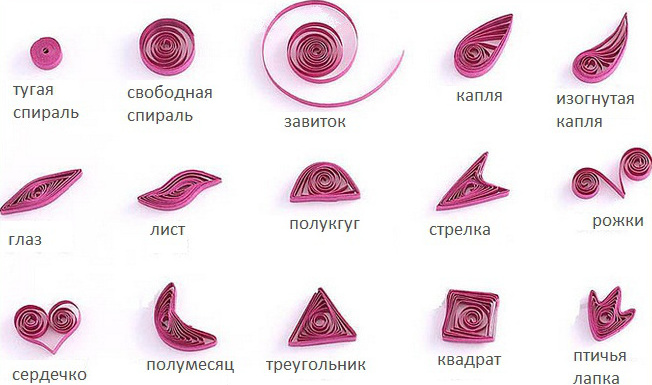
Franjuri– folosit pentru a da volum florilor. Fasia de hârtie este tăiată pe ambele părți și apoi rulată.
spirală strânsă– se înfășoară o fâșie de hârtie pe un ac, se lipește imediat și se scoate din ac.
Spirala liberă- o fâșie de hârtie se înfășoară pe un ac, se scoate din acesta, apoi se introduce în șablon, se desface ușor și se lipește la capete.
Picătură– se realizeaza o spirala libera si piesa este usor presata la un capat.
Picătură curbată- se face ca una obisnuita, doar capatul este indoit.
Săgeată- se face o spirală liberă, apoi se îndoaie pe ambele părți pentru a forma o bandă și îndoim săgeata de pe o margine.
Semilună- se face o spirală liberă, îndoită la o margine și i se dă formă de semilună.
Ochi- se realizeaza o spirala libera, indoita pe ambele parti si i se da forma unui ochi.
Stea- se realizeaza o spirala libera, colturile sunt prinse pe diferite laturi, formand o forma de stea.
picior de pasăre– un triunghi se face prin înfășurarea unei benzi pe un ac și dând forma piciorului de pasăre.
Petală– se realizează un modul de ochi și colțurile de pe ambele părți sunt îndoite în direcții diferite.
Idei de artizanat cu quilling
Începeți prin a crea aplicații mici, imagini, cărți poștale. Popularitatea meșteșugurilor care folosesc tehnica quilling este renumită pentru faptul că chiar și începătorii se pot descurca foarte bine. meșteșuguri frumoase.

Principalul lucru este să stăpânești crearea unui modul, să ai răbdare și să te pricepi la el, iar apoi totul va merge ca un ceas. Sushi folosind tehnica quilling este foarte idee creativă si sunt usor de facut!

Când stăpâniți elementele de bază ale quilling-ului și puteți crea meșteșuguri frumoase, apoi creați tablouri tridimensionale cu efect 3D și creează adevărate capodopere!

Folosind tehnica quilling puteți realiza flori, animale, plante, fulgi de nea, puteți crea o mare varietate de figuri, portrete, mâncare și multe altele... Dacă vă plac meșteșugurile folosind tehnica quilling, mergeți mai departe și cu siguranță veți reuși!
Dacă ești interesat de quilling, atunci acest videoclip este pentru tine!
Acest articol oferă o privire de ansamblu asupra unui hobby popular, creativitatea folosind hârtie - quilling pentru începători, modelele și sfaturile oferite în acest articol vă vor ajuta să vă încercați să creați singur articole de bijuterii, uimitor. felicitări frumoaseși picturi în relief.
În mod tradițional, însoțim povestea cu ilustrații colorate. De asemenea, am pregătit instrucțiuni pentru profesioniști și entuziaști cu privire la modul de a crea detalii și compoziții complete din hârtie de o complexitate mai mare, dar și o frumusețe mai mare.


Ca și în alte domenii, pentru a-ți realiza ideile creative trebuie să obții o bază, cunoștințe de bază în acest subiect. În quilling, înainte de a crea compoziții frumoase, trebuie să vă amintiți (și este util să exersați) cum să răsuciți forme de bază pentru quilling. Trebuie remarcat faptul că, în diferite manuale, formele de quilling sunt numite prin termeni diferiți, dar semnificația abilităților de aplicare și curling sunt aceleași. Dacă înveți cum să răsuciți diferite forme, atunci veți putea efectua orice scheme.
Bazele Quilling pentru începători
Un model de quilling constă întotdeauna din conturul unui model specific și din elementele care îl umplu. Pentru a completa diagrama lucrării viitoare, se folosesc fie forme de bază, fie elemente suplimentare, care sunt detalii derivate din formularele de bază.
În primele etape ale lucrului cu quilling, cea mai dificilă parte a formării compozițiilor este plasarea formelor strict în limitele designului și de-a lungul contururilor acestuia. Prin urmare, mai întâi recomandăm scheme de compoziție de quilling mai simple pentru a practica. Diferența dintre astfel de diagrame este detalierea: pe lângă desenul general, ele arată în detaliu locația formelor de bază în compoziție.
În plus, astfel de diagrame conțin adesea o listă de forme de bază, dimensiunile necesare și cantitatea acestora. Acest lucru vă permite să pregătiți toate elementele în avans și apoi să asamblați compoziția ca un set de construcție. Această abordare este ușor de utilizat pentru începători și permite chiar și copiilor să practice quilling.

Când elementele de bază elementare au fost stăpânite, diagramele simplificate în care desenele sau ornamentele sunt reprezentate doar printr-un contur sunt deja potrivite pentru persoanele cu imaginație spațială dezvoltată și bun gust. În plus, puteți desena compoziții manual, în funcție de imaginația dvs., în mod independent, apoi planificați unde vor fi plasate rulourile și formele de bază în desen.

Această metodă de construire a modelelor oferă persoanelor implicate în quilling spațiu maxim pentru creativitate și elimină toate limitările tiparelor standard (cu excepția timpului personal și a imaginației maestrului) atunci când sunt cufundați în ceea ce iubesc. Trebuie să recunosc, nu toată lumea reușește în asta. Dar schemele gata făcute pentru începători, combinate cu răbdarea și perseverența, vor permite tuturor să intre în lumea creativității hârtiei, chiar și cu puțină experiență.

Pentru a vă spune cât mai multe despre această artă, vom enumera pentru dvs. toate formele de quilling. Această listă, în viitor, vă va putea servi ca referință sau ca indiciu pentru munca creativă independentă.
De fapt, dacă analizați formele de bază, acestea sunt grupate în două soiuri principale (fiecare dintre acestea fiind reprezentată de mai multe opțiuni):

Rulourile libere în toate soiurile lor sunt obținute prin răsucirea mai întâi cu un instrument special și eliberarea tensiunii benzii la sfârșitul răsucirii. Acest lucru vă permite să dați figurii forma necesară și să o fixați cu lipici.

Rolele strânse se obțin prin înfășurarea foarte strânsă a benzii de hârtie pe unealtă și prin fixarea formei cu lipici.

De regulă, în quilling, rulourile strânse sunt în centru și formează baza compoziției. Uneori, secțiunile individuale ale lucrării sunt evidențiate folosind rulouri strânse, care, datorită dungilor bine înfășurate, au o culoare mai pronunțată.
Pentru a face munca să pară mai interesantă și pentru a vă încuraja să studiați toate detaliile în detaliu, ar trebui să combinați armonios rulourile goale, compacte și pline.

Tranziții de culoare foarte interesante și un farmec deosebit al compoziției pot fi obținute prin utilizarea mai multor culori într-o singură rolă. Acest lucru se face prin răsucirea a două dungi multicolore, așezându-le una peste alta - iese o rolă cu dungi sau fac o rolă în două culori cu o tranziție clară de culoare: capetele celor două culori diferite Fâșiile sunt lipite într-una și răsucite așa.
Astfel de tranziții de culoare sunt utile în special pentru compunerea imaginilor cu flori în lucrări de quilling.
Pentru a gestiona rulourile în timpul lucrului de quilling, oferindu-le exact dimensiunea și forma dorite, multe diverse instrumente. Aceste instrumente vor face ca meseria de rulare a formelor de quilling să fie distractiv și ușor, iar tu vei putea proces creativ va fi mult mai usor.

Tot ce aveți nevoie și vă va ajuta să creați cu plăcere dacă vă decideți să vă ocupați de quilling este prezentat în următoarea listă:
- Instrumentul principal de quilling este o punte furculită (sau un ac de tricotat, o scobitoare, un bețișor de portocale sau de bambus cu fantă);
- Foarfece;
- Pensetă;
- Un șablon special pentru quilling (poate fi înlocuit cu o riglă cu diverse forme geometrice);
- adeziv PVA;
- Hârtie groasă pentru bază, acționând ca fundal al compoziției;
- Hârtie de quilling, specială sau de casă (hârtie colorată tăiată singur în fâșii);
- Cuțit pentru panouri;
- Un covoraș pe care sunt tăiate benzi;
- foarfece ondulate;
- Ace de siguranță;
Un pieptene cu dinți, cu ajutorul căruia se creează elemente decorative speciale (prin împletirea benzilor într-o ordine dată între dinții pieptenului).

Forme de bază de quilling
Dacă formele de bază de quilling nu mai rezistă răsucirii și totul este clar cu ele, poți începe să creezi compoziții frumoase folosind această tehnică Când quilling-ul pentru începători este stăpânit, modelele te vor ajuta să te decizi și să alegi ce vrei să faci acum. Puteți alege singur diagrama detaliata sau pur și simplu un anumit motiv pentru care vei crea. Pentru a te inspira, poți să te uiți la exemple de compoziții gata făcute sau să alegi ceva care îți place din diagrame.

Mulți oameni, „s-au îmbolnăvit” de quilling, după ce au încercat puțin, încep să o exerseze serios, petrec mult timp și, după ce au obținut măiestrie, chiar participă la expoziții sau fac cărți poștale, suveniruri și bijuterii folosind această tehnică pentru vânzare. Mulți entuziaști, care au atins niveluri înalte de perfecțiune, nu numai că își arată munca, ci și își împărtășesc experiența, descriu procesul și vorbesc despre nuanțele creării lucrărilor lor.

O varietate de flori și compoziții cu participarea lor sunt deosebit de frumoase în quilling. Când faceți flori folosind această tehnică, nu uitați de proporții, dar amintiți-vă că în viață florile sunt variate și deosebit de frumoase. Aceasta înseamnă că în quilling puteți folosi o mare varietate de culori și tehnici de hârtie pentru combinarea diferitelor culori într-o compoziție.

Văzând pentru prima dată munca specialiștilor în quilling, mulți nu pot crede că lucruri atât de frumoase au fost create de om cu propriile mâini, toată această frumusețe nepământească a elementelor ajurate. Dar este foarte interesant că, după cum s-a dovedit în practică, copiii nu sunt mai răi la quilling decât adulții și chiar sunt capabili să creeze capodopere și lucrări unice, mai ales atunci când se lasă purtați de procesul creativ.

Pentru creativitatea copiilor Quilling-ul este in general ideal, este usor accesibil din punct de vedere al materialelor si tehnicilor, exista un numar infinit de optiuni, iar datorita acestei tehnici de lucru cu hartia, micul creator dezvolta calitati foarte utile: gust artistic si perseverenta. Da si abilități motorii fine Degetele se dezvoltă foarte bine. Copiilor le place mai ales quillingul volumetric: jucăriile, magneții, buchetele volumetrice și alte lucrări atractive, prezentate din belșug pe site-ul nostru.
Un material popular pentru quilling sunt benzile de carton ondulat, folosit atât ca cadru pentru compoziții plate, cât și pur și simplu pentru a crea volum. Datorită combinației materiale diferite, lucrările de quilling sunt mai interesante. De exemplu, dacă formați conturul unei flori din carton ondulat după un model și îl umpleți în interior cu forme pliate din hârtie colorată, o astfel de compoziție va fi foarte expresivă. Un astfel de carton este convenabil și pentru realizarea de cutii sau vaze, deoarece cadrul din benzi de carton ondulat menține perfect forma unei compoziții tridimensionale.

Maeștrii de quilling cu experiență cunosc bine instrumentele pentru ondularea hârtiei simple, vândute în magazine specializate. Tot ce trebuie să faceți este să încercați o dată în acest tip de meșteșug de hârtie pentru a vă asigura că oricine poate crea lucrări ajurate din benzi de hârtie și poate exersa singur quillingul.