
Jucării populare tricotate. Jucării tricotate, șoareci, șobolani
Vrei să-ți mulțumești bebelușul cu un cadou unic? Ce se întâmplă dacă croșetezi jucării, petrecând foarte puțin timp și materiale pe ele. Haideți să creăm împreună lucruri exclusive care să vă aducă ție și celor dragi o cantitate incredibilă de emoții calde și tandre. Vă vom arăta modele de tricotat jucării DIY simple și accesibile, vom vorbi despre tehnica unică a umigurumi și vom dezvălui secretele artei minunate numite handmade.
Probabil știi că jucăriile făcute manual sunt mult mai bune decât bunurile de larg cumpărate din magazin. Când creezi un lucru, îl umpli cu dragoste și energie pozitivă, ceea ce este foarte important atunci când creezi jucării pentru copii. Copiilor le place să atingă, să mirosească și să guste toate obiectele din jur, așa că este mai bine să le oferiți jucării moi, naturale și, cel mai important, complet sigure pentru sănătatea bebelușului. Așa că mamele și bunicile grijulii se pun fericite la treabă, creând jucării tricotate croșetate.
Am pregătit această minunată clasă de master, în cadrul căreia vă vom povesti în detaliu cum să tricotezi un pui amuzant folosind tehnica amigurumi japoneză. Acest tricotat este cel mai ușor pentru începători, deoarece puiul este foarte mic. Dar el este atât de fermecător - să începem să tricotăm repede.
Prima etapă: tricotarea capului 

- Primul rând: tricotați 6 croșete simple într-un inel amigurumi.
- Al doilea rând: adăugați încă 6 linguri. fără croșetat.
- Al treilea rând: adăugați încă 6 linguri. fără croșetat.
- Al patrulea rând: adăugați 2 linguri. croșetat simplu într-o buclă de 6 ori.
- Al cincilea rând: + 3 linguri. croșetat simplu într-o buclă de 6 ori.
- Al șaselea rând: + 4 linguri. croșetat simplu în 1 buclă de 6 ori.
- Al șaptelea rând: + 5 linguri. croșetat simplu în 1 buclă de 6 ori.
- De la al optulea până la al cincisprezecelea rând tricotăm 42 de croșete simple.
- De la al șaisprezecelea la al nouăsprezecelea rând al rândului micșorăm buclele în aceeași ordine în care le-am adăugat.
- Înfilăm capetele firelor și umplem produsul cu poliester de căptușeală.
A doua etapă: tricotarea corpului

- Pentru primul rând facem un inel amigurumi din 6 croșete simple.
- De la al treilea la al cincilea rând facem o creștere, ca atunci când tricotăm un cap.
- De la al șaselea până la al unsprezecelea rând tricotăm 30 de croșete simple.
- Tricotăm al doisprezecelea și al treisprezecelea rând în ordine descrescătoare.
Terminăm de tricotat cu o cusătură de legătură, lăsând o margine lungă a firului, cu care vom lega capul și corpul. Umplem capul cu poliester de căptușeală și legăm părțile împreună.
A treia etapă: tricotarea aripilor

- Tricotăm un inel amigurumi din 6 croșete simple.
- Adăugați 6 croșete simple.
- Să mai facem o adăugare.
La sfârșit există un stâlp de legătură. Lăsați un fir lung și îndoiți cercul în jumătate.
Etapa a patra: tricotarea ciocului

- Primul rând este un inel standard de 6 coloane.
- Al doilea rând este o adăugare de 3 coloane.
- Al treilea rând - tricotați 9 croșete simple.
A cincea etapă: tricotarea labelor
- Inel.
- Adăugarea a 6 coloane.
Tricotăm 2 părți. Coaseți picioarele și ciocul pe corp. Să facem ochi.
Etapa a șasea: tricotarea unei flori

- Primul rând: tricotăm un lanț de 39 de ochiuri de lanț și închidem inelul cu un stâlp de legătură.
- Al doilea rând: tricotați 39 de croșete simple.
- Al treilea rând: croșetare simplă, săriți peste 1 croșetă simplă de pe rândul anterior și tricotați 5 croșete duble dintr-o buclă și săriți din nou o croșetă simplă de pe rândul anterior. Facem 10 astfel de repetări.
A șaptea etapă: tricotarea unei oale

- De la primul până la al șaselea rând tricotăm în același mod în care am făcut trunchiul și capul.
- Al șaptelea rând - faceți 36 de croșete simple în spatele peretelui din spate al buclei.
- Al optulea rând: adăugați 11 croșete simple într-o buclă de 3 ori.
- De la al nouălea până la al doisprezecelea rând tricotăm 39 de croșete simple.
- Al treisprezecelea rând: tricotăm 39 de croșete simple în spatele peretelui frontal al buclei.
- Tricotăm 39 de croșete simple.
Terminăm tricotajul cu o cusătură de legătură. Fundul vasului poate fi întărit prin lipirea unui cerc de carton.
Etapa a opta: tricotat iarba 
Vom lega firele verzi de oală, în spatele pereților din spate ai rândului al treisprezecelea.
- Facem 5 bucle de aer.
- În a doua buclă de la cârlig facem un stâlp de legătură.
- Facem un singur croșetat, apoi o jumătate dublu croșetat.
- Tricotăm o croșetă dublă.
- Pentru a finaliza triunghiul, facem un stâlp de legătură în 3 jumătăți de bucle.
- Tricotăm următoarele 5 ochiuri de lanț și repetăm întregul proces.
- Tricotăm 13 triunghiuri în jurul întregului vas.


Toate elementele jucăriei noastre uimitoare sunt gata.
Pentru a exersa mai bine și a realiza singur jucării croșetate, vă sugerăm să urmăriți mai multe instrucțiuni video cu o descriere detaliată pas cu pas.
Jucării croșetate cu modele și descrieri
Produsele realizate manual arată întotdeauna rafinate și exclusive. De aceea, atât copiii, cât și părinții îi iubesc atât de mult. Am vorbit deja puțin despre preferințele copiilor, rămâne de adăugat că nici adulții nu sunt contrarii să primească cadou o jucărie unică făcută de ei înșiși. Un produs mic poate fi purtat ca breloc sau talisman, dar este mai bine să așezi o pisică moale sau un iepure de câmp de mărime medie în fața unui monitor de computer sau pe un raft lângă cărți. Lasă-l pe placul inimii, ochilor și sufletului tău. Și pentru a vă face mâinile fericite, am adunat pentru dvs. jucării croșetate cu modele și descrieri, cu fotografii detaliate și instrucțiuni video. Vei primi toate aceste cunoștințe complet gratuit pe pagina noastră și foarte repede le vei putea transforma în realitate. Învață să faci lucruri unice și bucură-ți pe cei dragi cu cadouri unice!

De exemplu, acești dovleci mici pot deveni un decor unic sau pot servi drept cadouri simbolice pentru Halloween. Vă rugăm să citiți instrucțiunile și să începeți să creați chiar acum.


Dacă îți lipsesc culorile strălucitoare în viața ta, un pui de elefant curcubeu va veni în ajutor. Încercați să tricotați un cadou unic cu propriile mâini.


Și cu ajutorul acestei clase de master detaliate, veți învăța cum să tricotați un raton drăguț.


Și pentru toți iubitorii de pisici - un tutorial exclusiv despre tricotarea pisicuțelor moi și jucăușe.
Jucării de croșetat pentru începători: cele mai simple modele
Și vrem să vă prezentăm cele mai simple jucării croșetate: veți găsi și diagrame și descrieri ale acestora în această secțiune. Bucurați-vă de proces și de rezultat.


Dacă tot nu puteți face produse mari și complexe cu multe elemente, încercați să creați aceste emoticoane drăguțe. Cu siguranță îți vor ridica moralul.


Acest pinguin drăguț cu ochi mari este foarte ușor de tricotat și arată grozav.
 Personajele de desene animate vin adesea să te viziteze? Încearcă să tricotezi un personaj vesel pe nume Krosh, iar copilul tău va avea un nou prieten minunat.


Jucării de croșetat: idei pentru femeile cu ac
Croșetarea jucăriilor este o activitate atât de fascinantă care poate „atrage” întreaga familie în rețeaua sa. La urma urmei, privind aceste imagini minunate, vrei doar să faci totul deodată. Suntem siguri că bebelușul tău va fi foarte fericit când va începe să se nască în mâinile pricepute ale mamei sale. păpuși fermecătoare, troli amuzanți și zâne bune, pisicile și pisicile pufoase vor toarce și vor apărea păpuși exclusive pe care nu le vei găsi în niciun magazin. Vă prezentăm o colecție exclusivă de jucării croșetate cu modele și descrieri. Explorează, creează, joacă-te cu copiii tăi! 
Jucăriile tricotate au fost întotdeauna populare atât pentru copii, cât și pentru adulți. Puteți crea produse minunate cu propriile mâini: perne mici, decorațiuni pentru brad sau jucării simple și haioase pentru copii.
Îl poți tricota din fire (rămășițe) ca cadou sau îl poți coase folosind orice material.
Adesea, aceștia combină aceste două tehnici: tricotează un produs și apoi îl decorează cu inserții de pâslă, de exemplu. Vă vom învăța cum să tricotați jucării cu modele și descrieri folosind ace de croșetat și de tricotat, vă vom oferi cele mai simple modele pentru începători și cursuri de master eficiente și utile cu descrieri detaliate. Și copilul tău poate ajuta în această chestiune - procesul va merge mai rapid și mai distractiv!
Jucării croșetate și tricotate DIY
Do drăguț cadou este foarte simplu pentru cei dragi. Jucării croșetate și tricotate foarte frecvente pe Internet, foarte des postează cursuri de master detaliate cu descrieri. Este suficient să tricotați un animal cu propriile mâini: un șoarece, un urs, un pisoi, folosind „modele” speciale - modele de tricotat. Dacă urmați sfaturile despre cum să faceți acest lucru corect, atunci procesul va merge foarte repede. Astăzi ne vom uita la două metode: croșetat Şi ace de tricotat . Nu există o metodă mai ușoară sau mai grea - alege-o pe cea care ți se potrivește cel mai bine. Și, dacă ești începător, te așteaptă tutoriale clare și detaliate cu imagini și videoclipuri.
Jucării croșetate cu modele și descrieri pentru începători
În primul rând, trebuie să decideți ce veți tricota. Pentru asta te poti uita diferite scheme de pe Internet sau alege una dintre acestea , pe care o vom furniza mai jos. Dacă există o mulțime de opțiuni diferite dintre care trebuie să o alegeți pe cea care vă place. Găsirea lor pe Internet este destul de ușoară, așa că dacă doriți să găsiți o astfel de secțiune, este pe aproape toate site-urile despre tricotat.
Cel mai adesea, începătorilor li se oferă să tricoteze o jucărie - casa
, deoarece este cel mai ușor de tricotat și trebuie să vă umpleți mâna înainte de a face lucrări complexe! Trebuie legați 6 fețe laterale ale casei
(6 pătrate de aceeași dimensiune cât de înaltă doriți), face un acoperiș
Şi coase toate aceste părți în 1
. Umpleți cu căptușeală din poliester sau umplutură, apoi decorați pereții: faceți o ușă unde câinii de pază să poată sta, flori la ferestre, perdele și așa mai departe. Casa tricotata este gata!
Aceasta este o clasă de master! 


Croșetăm jucării: master class pas cu pas cu fotografii
Când tricotăm jucării croșetat, este foarte convenabil să lucrezi cu diagrame și descrieri simple. Vă vom spune cum să creați un frumos maimuta tricotata , care poate fi folosit ulterior ca broşă sau cum breloc , sau coase-l undeva. Pentru asta vei avea nevoie de: fire maro si bej, carlig, ac, fir negru si margele pentru ochi. Dacă vrei să faci o broșă din ea, atunci ia un mecanism de broșă. Această clasă de master de croșetat poate fi interpretată în diferite moduri.
Articole populare:

Acum să trecem pas cu pas la pregătirea părții din spate
. Se execută exact la fel ca cel din față, doar firul nu trebuie schimbat!  A lega botul
– se ia un fir mai subtire si se foloseste un carlig subtire ca sa nu fie voluminos.
A lega botul
– se ia un fir mai subtire si se foloseste un carlig subtire ca sa nu fie voluminos.
- 4 V.P., 2 S.B.N. în a 2-a buclă, 1 S.B.N., în ultima buclă 3 S.B.N.
Următorul pas este tricotarea de pe reversul lanțului: 1 S.B.N. + încă 1 în primul ochi. 

Nu tăiem firul, pentru că... trebuie să înceapă design frontal
, la care coasem botul propriu-zis. Nu uitați să umpleți jucăria. Coaseți ochii, nasul, gura și decorați cu o floare.
Croșetăm jucării pentru copii
Copiilor le place jucării moi strălucitoare , care poate fi atins, tras de coadă (dacă există). O alegere bună ar fi maimuţă, miel sau iepuraș. De asemenea, potrivit Ursuleț, girafă, urs, șoarece, vulpe și mama - vulpe, fluture cu aripi colorate, Pinocchio, Minion (descrierea de mai jos în articol), pinguin, elefant, pisoi– oricine nu tricotează meșteșugarii moderni! Puteți veni cu animale mici pe bețe pentru un teatru de păpuși: meșteșugurile ușoare nu vor lăsa pe nimeni indiferent . Apropo, acesta ar putea fi Smeshariki sau popularul Luntik.
Cu ajutorul unor astfel de jucării, îți poți învăța copilul despre diverse animale, arăta cum diferă, mai ales că senzațiile tactile pentru copii sunt foarte bune. Copilul va putea învăța să distingă animalele mult mai devreme. De asemenea, puteți face ceva de genul unor jocuri educaționale cu copilul dvs. folosind astfel de jucării.
Iar pentru nou-născuții, puteți tricota jucării mici pentru copii mobil . Lăsați iepurii, cățelușii și păsările amuzante să vă ajute copilul să adoarmă mai bine!
Master class despre crearea acestui mai drăguț pisoi . Nu poate fi doar cusut mobil , dar și reușiți breloc , coaseți pe un rucsac, creați broșe neobișnuite, atașați la o șapcă sau o jachetă.
Este posibil, în plus, să tricotați o astfel de pisică, fă o pălărie hello kitty la fel (sau alte modele cool) pentru fete:
Jucării croșetate cu modele și descrieri: video
Jucării tricotate de bricolaj cu descrieri și diagrame
Să conectăm minunatul Moidodyra
ace de tricotat pentru copilul tau! Veți avea nevoie de fir acrilic în următoarele culori: alb, albastru, galben, cârlig, ace de tricotat, pâslă pentru ochi sau cele gata făcute, cutie și sârmă în formă de cub.
Este necesară o bandă punct jerseu , adică unde rândurile din față sunt buclele din față, unde rândurile din față sunt buclele din față. A doua dungă va fi formată din jumătate cusatura dos Şi a doua jumătate – facial. Aceste benzi rezultate trebuie să fie învelite în jurul perimetrului cutiei, puteți introduce sârmă.
Colectați astfel: lipiți ochii, gura, nasul de sârmă, gura și coaja. Pentru a tricota un prosop ca cel din poza de mai jos: tricotați 10 ochiuri în ochi rasă la lungimea de care aveți nevoie. Dacă vrei, poți să o faci dungi Şi franjuri la capete.
Pentru pelvis, formați 6 V.P. croșetați într-un inel. Următorul: 8 S.B.N. Tricotat, dublare S.B.N. Se tricotează următoarele trei rânduri uniform, apoi se dublează din nou, apoi se tricotează uniform. Gura se face conform diagramei de mai jos.

Jucării de tricotat: clasă de master cu o singură pânză
Această tehnică de tricotat este considerată una dintre cele mai simple. . În principiu, nici măcar o diagramă și o descriere nu sunt necesare pentru aceasta. Aceasta este cea mai comună opțiune pentru femeile cu ac începătoare. Videoclipul de mai jos vă va arăta cum să tricotați un astfel de produs. Dacă doriți, îl puteți descărca, la fel ca diagrama de pe Internet. Nu este deloc greu de realizat, este nevoie doar de puțin efort. Copiilor mici le va plăcea în special!
Cum să tricotezi o jucărie pentru începători: cel mai ușor lucru din videoclip
Jucării tricotate: fotografii și idei de tricotat
Jucării tricotate pentru începători și profesioniști
– cel mai interesant lucru la noi! Anul acesta sunt deosebit de populare panda, porci, iepurași de Paște, arici, albine și multe alte animale.


Jucării amigurumi în miniatură croșetate
Jucării tricotate amigurumi Cusăturile de croșetat sunt foarte populare pe internet, puteți găsi cu ușurință diagrame și descrieri pentru ele și mai mult de o clasă de master. Arta amigurumi este animale frumoase și drăguțe (de exemplu, un porc, pisici și pisici, o vulpe, câini în miniatură, un iepuraș, un șarpe, un pui, o maimuță, o broască și altele), înzestrat cu proprietăţi umane . Ar putea fi, de asemenea, de exemplu, înghețată sau niște dulciuri sub formă de cupcakes. Trebuie să aibă o față/boț cu ochi strălucitori și o privire prietenoasă! Avem mai multe fotografii cu ele în articol, așa că nu vei trece pe lângă ei.
Jucării frumoase tricotate pentru cadou
Ca cadou poti tricota absolut orice animal
, dar acum sunt foarte populare tricotate sigilii
. Pentru aceasta veți avea nevoie de fire albe și gri, umplutură, pâslă gri și fire negre, puteți lua ata dentara. H Pentru a lipi pâsla de pisică, utilizați lipici sau un pistol de lipici. Poate fi croșetat sau tricotat, dar cu modele și descrieri diferite. Alb
formați 6 V.P. Începeți cu bucla a 2-a de la cârlig, 4 S.B.N. în spatele pereților din spate ai buclelor. 3 S.B.N. la următorul S.B.N. Pentru a lucra mai departe, desfaceți produsul și 5 S.B.N. în pereții frontali ai buclelor. Mai jos este o fotografie cu cum ar trebui să arate pânza după primul cerc.
Alb
formați 6 V.P. Începeți cu bucla a 2-a de la cârlig, 4 S.B.N. în spatele pereților din spate ai buclelor. 3 S.B.N. la următorul S.B.N. Pentru a lucra mai departe, desfaceți produsul și 5 S.B.N. în pereții frontali ai buclelor. Mai jos este o fotografie cu cum ar trebui să arate pânza după primul cerc. 

Făcând labele pentru o jucărie gri
: inel amigrumi din 5 V.P., P.R. + 1 S.B.N. + P.R. + 1 S.B.N. + P.R. La 3, 4 si 5 R. = 8 S.B.N.  Ia fire albe
și începeți să tricotați din piciorul din spate: 4 S.B.N. din fata + 5 V.P. Următorul 4 4 S.B.N. de asemenea pe partea din față a picioarelor. Obține un rând circular de 34 de bucle:
Ia fire albe
și începeți să tricotați din piciorul din spate: 4 S.B.N. din fata + 5 V.P. Următorul 4 4 S.B.N. de asemenea pe partea din față a picioarelor. Obține un rând circular de 34 de bucle:

Două urechi gri
: 3 S.B.N. în inel amigurumi, 2 S.B.N. în fiecare S.B.N.
Coada este de asemenea gri: 5 V.P. în ring, de la 2 la 10 rândul 5 S.B.N.
Croșetați un minion: diagramă și video
Acum nu mai trebuie să cumpărați Minion din desene animate
- Can lega-l singur
! Pentru a face acest lucru, luați următoarele materiale: fir(galben, albastru, negru, alb), carlig, umplutura pentru jucarii, margele pentru ochi si orice alte decoratiuni si accesorii(decorul depinde de preferinte). Deci, să începem să creăm un cadou de designer! 
Mai întâi, să conectăm baza, adică corpul și capul minionului.
- 6 V.P. legați într-un singur inel
- Se mărește de 6 ori (mărește, în continuare P.R. - tricotăm două ochiuri într-o buclă). Ar trebui să existe 12 bucle
- 1 croșetă simplă (denumită în continuare S.B.N.) + P.R = de 6 ori
- 2 S.B.N., P.R. = de 6 ori
- Trei S.B.N., P.R. = de 6 ori
- 4 S.B.N., P.R. = de 6 ori
- 5 S.B.N., P.R., = de 6 ori. Ar trebui să aveți 42 de ochiuri pe acest rând!
- 6 S.B.N., P.R. = de 6 ori
- 7 S.B.N., P.R. = de 6 ori
- 8 S.B.N., P.R. tot de şase ori.
- De la rândul 11 până la rândul 31 inclusiv, tricotați 60 de ochiuri.
- Rândul 32 (în continuare – R.) 8 S.B.N., descreștere (scădere – tricotăm două ochiuri împreună, în continuare – U.B.) de 6 ori. (în continuare de la pașii 32 la 40, toate ochiurile cu scăderi sunt tricotate de 6 ori.)
- 33 R. - 7 S.B.N., U.B.
- 34 R. – 6 S.B.N., U.B.
- 35 R. – 5 S.B.N., U.B.
- Nu uitați să vă umpleți jucăria cu umplutură în timp ce tricotați!
- 36 R. – 4 S.B.N., U.B.
- 37 R. – 3 S.B.N., U.B.
- 38 R. – 2 S.B.N., U.B.
- 39 R. – 1 S.B.N., U.B.
- 40 R. – W.B. de șase ori . În această etapă ar trebui să existe 6 bucle.
Începeți să tricotați un minion
- acesta este capul lui și Sfârşit
- va fi amplasat sub salopeta, pe care o vom face acum! Luați fire albastre. 

- 14 S.B.N.
- 1 V.P., 14 S.B.N.
- 1 V.P., U.B., 10 S.B.N., U.B.
- 1 V.P., 12 S.B.N.
- 1 V.P., U.B., 8 S.B.N., U.B.
- 1 V.P., 10 S.B.N. Vor mai rămâne 10 bucle la sfârșit.
Ar trebui să legați pantalonii scurți rezultați pentru jucărie
. Pe partea din spate - coborâm 5 S.B.N., 16 S.B.N., ridicăm din lateral la 5 S.B.N. + 23 V.P. În continuare trebuie să ne întoarcem la locul din care am venit: 22 S.B.N., urcăm pe butoiul 10 S.B.N. și 23 V.P.
Din nou ne întoarcem cu ajutorul lui 22 S.B.N., coborâm 5 S.B.N., 16 S.B.N. si ridica - 5 S.B.N. Cu asta s-a terminat treaba, poți tăia firul.
Se poate adauga deasupra buzunar
, nu trebuie să faci asta. Vom explica acest pas în detaliu, dar îl puteți sări peste el! Un inel de 5 V.P care nu trebuie inchis. În continuare, tricotarea se va face folosind bucle rotative. P.R. de 5 ori, 10 S.B.N., 7 posturi de legătură (denumite în continuare S.S.). 
Vom face fire negre pantofi
: 6 V.P. în ring. P.R. de 6 ori, 12 S.B.N. (întregul rânduri 3 și 4), 4 S.B.N. + W.B. de 2 ori. De la rândurile al șaselea până la al nouălea, 10 S.B.N. În continuare, coasem piciorul direct la cizmă în albastru. Scriem pe el 12 S.B.N., 3 S.B.N., P.R. de 3 ori, iar 15 S.B.N. în ultimul rând al cincilea. 
Manșetă și mână
. Mână
constă din fir negru și galben. Să începem cu primul. 6 V.P. în ring, P.R. De 6 ori, (rândurile de la 3 la 5) 12 S.B.N., 5 U.B. După aceasta legăm un fir galben: 7 S.B.N. pe peretele din spate, (de la 8 la 16 R.) 7 S.B.N., în ultimul rând 2 U.B. 
Pentru a lega manşetă
tricotam doua randuri: 2 S.B.N., P.R., S.B.N., P.R. și 9 S.B.N.
Pentru ochi tricotăm două cercuri cu fir alb și negru. Lipiți sau coaseți o mărgele în mijloc. Pentru a le conecta împreună, formați 45 V.P. și 44 S.B.N. la două R. 
Aceasta va fi o curea pentru ei! Totul este gata! Nu uitați să coaseți sau să lipiți toate piesele împreună! Îi poți face coafura din fire negre.
Puteți vedea cum se descurcă aci talentată pe canalul tău YouTube. Ea are absolut abordare diferită , dar rezultatul este și grozav!
Fotografii cu lucrări celebre: idei de inspirație
Există multe celebru aci , și nu numai în rândul femeilor care pot arată-ți proiectele uimitoare de tricotat . Vă invităm să evaluați lucrarea Alana Darta, Mary Jane, Susan Hickson, Elena Belova. Lucrările frumoase vă vor inspira și vă vor oferi puterea de a crea mai mult. Atenție: aceste joburi sunt departe de a fi pentru începători, sunt foarte complexe și necesită mult efort și timp.
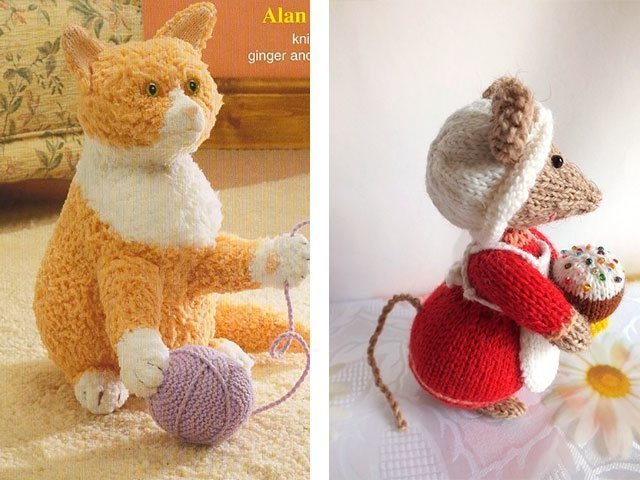
Jucării tricotate de la Alan Dart


Jucării de tricotat de Susan Hickson


Tuturor le plac jucăriile tricotate - atât adulți, cât și copii. Dacă ai ținut vreodată un cârlig în mâini, atunci ești capabil să creezi singur o jucărie. Firele rămase fac perne drăguțe și amuzante, figurine de animale, personaje de desene animate și chiar decorațiuni pentru pomul de Crăciun. Vă vom spune cum să faceți jucării croșetate cu diagrame și o descriere a procedurii. Încearcă, cu siguranță vei reuși.
Selectarea schemei
Există o mulțime de modele pentru tricotat jucării. În timpul căutării vreau să iau imediat o jucărie complexă, frumoasă, cu multe detalii. Tentația este de înțeles, dar încearcă să o învingi. Începeți cu un produs mai simplu. Puteți începe să tricotați articole complexe când ați stăpânit elementele de bază ale tricotării, puteți tricota suficient de strâns și înțelegeți trucurile de a reduce și adăuga ochiuri. Încercați să începeți cu lucrări mici. În acest fel, nu vă veți plictisi de activitate și nu vă veți pierde interesul pentru ea. Citiți descrierea. Complexitatea va fi clară din ordinea tricotării și asamblarii. Aici vom oferi cele mai simple diagrame despre cum să croșetezi o jucărie.
Selecția de fire și cârlig
Pentru jucării de tricotat, alegeți fire neelastice. Opțiune ideală - bumbac simplu sau mercerizat. Are un preț accesibil și o mare varietate de culori. Puteți alege alte fire. Doar verificați dacă firul nu se întinde. Firul elastic se va întinde în produs. Buclele din jucăria finită se vor întinde, rezultând găuri inestetice.
 Firele vin în diferite grosimi. De obicei, eticheta indică câți metri de fir sunt în 50 sau 100 de grame de fire. Cu cât lungimea este mai mare, cu atât firul este mai subțire. Jucării tricotate din fir subțire, se dovedesc mai elegante, dar o astfel de tricotat va dura mai mult timp. De asemenea, este mai bine să nu folosiți un fir prea gros. Fiecare buclă va ieși în evidență. Pentru început, cumpărați fire cu parametrii 150 m/50 g.
Pentru primele tale lecții de tricotat, este mai bine să iei fire netede. Puteți experimenta mai târziu cu diferite texturi.
Cârligul trebuie să se potrivească cu firele. De obicei, ambalajul conține informații despre dimensiunea acelor de tricotat și cârligului căruia îi corespunde. Acest cârlig va oferi un tricot de densitate medie. Deoarece jucăria va trebui tricotată foarte strâns, luați un cârlig cu 1-2 mărimi mai mic decât este menționat pe etichetă. De exemplu, pentru grosimea indicată mai sus, utilizați un cârlig de la 1,5 la 2 mm.
Pregătiți accesoriile
Pregătiți în prealabil tot felul de ochi, urechi, decorațiuni etc. Multe dintre ele sunt atașate în timpul împerecherii. De exemplu, ochii de siguranță și un nas sunt introduși înainte de a umple capul cu umplutură. Atunci pur și simplu nu le veți putea introduce bine. Și este mai bine să înșiri ochiurile de mărgele pe firul de lucru chiar de la început.
Cum să tricotezi un inel amigurumi
Inelul amigurumi este începutul fiecărei jucării tricotate. Acesta este numele vechii arte japoneze de a face jucării tricotate. Este tricotat în locul tradiționalului lanț de bucle de aer închise într-un inel. Produsul finit este mai îngrijit deoarece este strâns și nu există nicio gaură în centrul jucăriei.
Descrierea inelului:

Reguli pentru tricotarea jucăriilor amigurumi

Tricotând un zâmbet
Cea mai simplă jucărie amigurumi de croșetat este o față zâmbitoare sau un coc. Are un minim de detalii și poate fi tricotat în câteva ore.
Este ușor de tricotat:

Tricotarea unui smiley kolobok se bazează pe o minge. Se poate face mai mare sau mai mic prin creșterea sau scăderea numărului de rânduri cu adăugiri. De exemplu, în descrierea de mai sus, puteți continua să adăugați: la fiecare al șaptelea VP, la fiecare al optulea VP și așa mai departe. Deci mingea va avea un diametru mare.
Începeți să tricotați o minge:

În viitor, atunci când tricotați jucării, dacă este necesar un model de bile, ne vom referi la această descriere.
Decoratiuni de Anul Nou
Decorațiunile pentru brad pot fi și croșetate. Dacă decideți să faceți bile, atunci utilizați descrierea din paragraful anterior. Nu uitați să atașați cârlig sau panglică pentru agățat. Experimentați cu diferite culori. Bilele croșetate pot fi fie simple, fie cu modele. Cel mai simplu model sunt dungi. Pentru a face acest lucru, trebuie să schimbați periodic culoarea firului. Ridicați nuanța dorită cu un croșetat și trageți cu grijă pe cele nefolosite pe partea greșită.
Jucăriile de Anul Nou tricotate pot fi de alte forme. Cel mai simplu mod este să tricotați două figuri plate identice, să le coaseți împreună și să umpleți spațiul dintre ele cu poliester. De exemplu, Patinele se tricotează ușor și simplu după acest model:

Decorațiunile croșetate îți vor decora perfect casa și vor aduce căldură și confort.
Ursuleț de pluș croșetat
Tricotarea unui ursuleț este puțin mai dificil. Dar pe baza acestei scheme puteți face aproape orice jucărie: iepuraș, tigru, chiar purcel. Trebuie doar să schimbați modelele urechilor și cozii.
 Deci, un urs tricotat este format din:
- urechi;
- capete;
- trunchi;
- labele din față;
- picioarele din spate.
Tricotează capul ursului conform descrierii mingii:

- aruncați șase bucle în inelul amigurumi;
- Tricotați două ochiuri în fiecare buclă;
- coloană, de trei ori două coloane într-o buclă, terminați rândul cu croșete simple.
Corpul ursului:

Picior din față:

Picior din spate:

Apelează lanț de cinci bucleși leagă-o trei rânduri de croșete simple a face un oval. Diagrama este prezentată în figură:
Rezultatul este talpa ursului. Poate fi tricotat într-o culoare diferită, apoi animalul tricotat se va dovedi a fi încălțat.
Apoi tricotați așa cum este descris:

Acum colectează toate detaliile, brodează gura și nasul. Ursul croșetat este gata.
Jucării de croșetat pentru începători


2808
Amigurumi este o tehnică de croșetat animale mici. A fost inventat în Japonia. În ultima vreme această activitate a fost foarte populară. Schemele care descriu cum să croșetați jucăriile sunt necesare pentru alegerea firelor și crearea unui produs de calitate.
Derulați:
Derulați:

Începeți să tricotați
Trebuie să începeți să croșetați jucării studiind descrierea și diagrama.
Pentru a face acest lucru, trebuie să cunoașteți convențiile de bază:
- VP – bucla de aer;
- ss – coloană de legătură;
- sc – croșetat simplu;
- ps – semicoloană;
- dc - croșetat dublu;
- ss2n – ochi dublu croșetat;
- cresc – tricotați 2 sc într-o buclă, triplu – 3 sc;
- dec - faceți un sc în bucla următoare - sunt 2 fire pe cârlig, din nou un sc în bucla lângă el - sunt 3 fire pe cârlig. Tragem firul principal prin 3 bucle. În acest fel cele două bucle sunt combinate.
- *2sc, inc*. Repetați *de 2 ori (8) – două croșete simple, în coloana următoare, etc. Repetați de două ori. Acest lucru face doar 8 bucle.
Câteva detalii
Tehnica amigurumi presupune tricotarea ambilor pereți. Creșterile și scăderile sunt folosite pentru a da forma jucăriei. Nu puteți sări peste o cusătură pentru a reduce, deoarece aceasta va crea o gaură. Pentru a face jucăria mai grea, mărgele mici sunt folosite și cusute în țesătură.
Când începeți să croșetați jucării, trebuie să vă familiarizați în avans cu descrierile și diagramele. Toate denumirile abreviate ale buclelor ar trebui să fie clare.
Inel: diagramă și descrierea tricotării amigurumi
De obicei, majoritatea modelelor încep cu un cerc cu o gaură în interior. Tehnica inelului amigurumi va ajuta la rezolvarea acestei probleme.
Diagrama detaliata:
- Faceți o buclă la o distanță de 2,5 cm, firul este între degetele arătător și mijlociu;
- Introduceți cârligul în buclă și trageți;
- Prindeți firul de lucru, trageți-l prin buclă și strângeți;
- Trageți cârligul sub ambele fire (urzeală și coadă) în același timp;
- Prindeți firul principal cu un cârlig (2 bucle pe cârlig) și trageți prin bucle. Rezultatul este primul sc al inelului;
- Tricotați 6-10 sc și strângeți firul inelului rămas. Rezultatul este un semicerc de sc;
- Introdu cârligul în prima buclă și tricotează un sc.
Ursuleț - o diagramă simplă cu o descriere pentru începători
Înălțimea jucăriei va fi de 8,5 cm, tricotată cu iris maro și alb, cârlig 1,15 (pentru un începător 1,0). 
Detaliile sunt tricotate separat:
- Cap
- Nas - fire albe
Sistem:
- Al 2-lea rând - *pr* se repetă de 6 ori (12);
- Al 3-lea rând - *2 sc, cresc*, repetă de 4 ori (16);
- Rândul 4 – *3 sc, cresc*, repetă 4 (20);
- 5 – 7 rânduri ca al 4-lea (20), sc pentru offset;
- Rândul 8 – 20 ss, nu tricotați ochiurile prea strâns.
- Luați fir maro. Al 9-lea rând - 2 sbn, inc, 1 sbn, inc, 1 sbn, 3 creșteri, 2 sbn, 3 creșteri, 1 sbn, inc, 1 sbn, inc, 2 sbn (30);
- 10 – 12 rânduri - * 4 sc, măriți *, repetați * de 6 ori (36);
- 13 - 15 rânduri - * 5 sc, cresc *, repetați * de 6 ori (42);
- 16 – 17 rând – *5 sc, scădere*, repetă * de 6 ori (36);
- Rândul 18 - *4 sc, scăderi*, repetă * de 6 ori (30), sc pentru tricotarea schimbătoare;
- Rândul 19 - *3 sc, scăderi*, repetă * de 6 ori (24), sc pentru tricotarea schimbătoare;
- Rândul 20 - *2 sc, scăderi*, repetă * de 6 ori (18), sc pentru tricotarea schimbătoare;
Umpleți această parte cu poliester de căptușeală și dați capului o formă îngrijită.
Designul feței: Folosind fir negru (ață dentară sau fir simplu pliat pe mai multe rânduri), brodăm nasul într-un triunghi, cu două dungi în formă de cârlig care trec de la el în lateral. Coase margele pentru ochi si brodeaza sprancenele.
- 21 rând - *sc, scade*, repetați * de 6 ori (12);
- Rândul 22 - *scădere*, repetați de 6 ori (6). Închideți gaura, ascundeți firul și fixați.
Urechi: Tricotează un inel amigurumi din 7 bucle. Trageți de fir pentru a închide orificiul. De 6 ori cresc, 1 ss (13). Lăsați firul să se atașeze de cap. Legați 2 urechi. Alegeți singur culoarea firului (maro sau alb).
trunchi:
- Rândul 1 – inel amigurumi din 6 bucle;
- Al 2-lea rând - *pr*, repetă de 6 ori (12);
- Al 3-lea rând - *sc, inc*, repetă de 6 ori (18);
- Al 4-lea rând - * 2 sc, cresc *, repetă de 6 ori (24);
- Rândul 5 - * 3 sc, măriți *, repetați de 6 ori (30);
- 6 – 10 rânduri - * 4 sc, măriți *, repetați de 6 ori (36);
- Rândul 11, 12 - * 4 sc, scade *, se repetă de 6 ori (30);
- 13,14 rând - * 3 sc, scădere *, repetă de 6 ori (24);
- 15,16,17 rând - * 2 sc, scădere *, repetă de 6 ori (18);
- Rândul 18 - *sc, scade*, repetă de 6 ori (12); Umpleți cu căptușeală din poliester.
- Rândul 19 - *sc, scade*, repetați de 6 ori (12), 1 ss
Lăsați firul pentru cusut.
Labele inferioare:
- Rândul 1 - 6 ch, 4 sc, începe din a doua buclă, 3 sc în ultima buclă, 4 sc, chiar în aceeași buclă (13).
- Al 2-lea rând - crește, 3 sc, 3 creșteri, 4 sc, 2 creșteri (19).
- Rândul 3 și jumătate - crește, 5 sc, * crește, 1 sc *. Repetați * de 3 ori, 5 sbn, * inc, 1 sbn *. repetați * de 3 ori, 7 sc (26). Schimbați culoarea firului.
- Rândul 4 – 26 sc în spatele peretelui din spate pentru stabilitatea labei.
- 5,6 rând - 9 sbn, 2 creșteri, 4 sbn, 2 creșteri, 9 sbn (30);
- Al 7-lea rând - 9 sc, 6 mic, 9 sc (24);
- Al 8-lea rând - 8 sc, 4 sc, 8 sc (20), sc pentru offset;
- 9 – 16 rânduri – * 3 sbn, descreștere*. repetați * de 4 ori (16);
- Sc pentru offset;
- Rândul 17 - * 2 sc, scade *. Repetați * de 4 ori (12).
- Umpleți cu căptușeală din poliester.
- Rândul 18 - * 1 sc, descreștere *. Repetați * de 4 ori (9).
- Rândul 19 - * 1 sc, descreștere *. Repetați * de 3 ori (6). Lăsați firul pentru coaserea picioarelor pe corp. Nu umpleți prea mult partea superioară a labelor, altfel labele vor ieși în afară.
Labele superioare:
- Rândul 1 - turnați 2 ch, 6 sc în a doua buclă de la cârlig (6);
- 3 – 6 rânduri – * 3 sbn, inc*. repetați * de 3 ori (15);
- 1 sc pentru tricotat offset;
- 7 – 15 rânduri – 3 scăderi, 9 sc (12);
- 2 sc pentru tricotat offset.
- Rândul 16 - * 2 sc, scade *. repetați * de 4 ori (9);
- Rândul 17 - * 1 sc, descreștere *. repeta * de 3 ori. 1cc (6);
Lăsați firul pentru coaserea picioarelor pe corp. Nu umpleți prea mult partea superioară a picioarelor.
Coadă de cal:
- (6);
- Al 2-lea rând - *pr*. repetați * de 6 ori (12);
- Al 3-lea rând - *sc, desc*. repeta * de 4 ori. 1cc (8).
- Lasă firul.
Asamblarea ursului: Alături de descrieri și diagrame, jucăriile croșetate trebuie asamblate cu grijă. Aceasta este o etapă dificilă și priceperea vine odată cu experiența. Fixați picioarele inferioare cu știfturi. Coaseți labele la rândul 6-7 al corpului. Coaseți labele superioare între ultimul și penultimul rând. Coaseți coada, astfel încât să nu interfereze cu șederea.
Pui - o diagramă simplă cu o descriere pentru începători
Utilizați cârligul nr. 2, fire de culori galben, portocaliu, albastru, liliac.
 Pentru a croșeta jucăriile, trebuie să urmați descrierea și diagramele.
 Cap (fire galbene):
- Rândul 1 – inel amigurumi din 6 bucle;
- Al 2-lea rând - 6 centimetri (12);
- Al 3-lea rând - (1 sc, cresc)*6 (18);
- Rândul 4 - (2 sc, cresc)*6 (24);
- Rândul 5 - (3 sc, cresc)*6 (30);
- Rândul 6 - (4 sc, cresc)*6 (36);
- Rândul 7 - (5 sc, cresc)*6 (42);
- 8-13 rând - 42 sc;
- Rândul 14 - 7 sbn, (1 sbn, inc)*3, 15 sbn, (1 sbn, inc)*3, 8 sbn (48);
- Rândul 15 - 7 sbn, (2 sbn, inc)*3, 15 sbn, (2 sbn, inc)*3, 8 sbn (54);
- 16-18 rând - 54 sc;
- Apoi va fi o scădere, așa că între rândurile 14 și 15 coaseți ochii nasturii;
- Rândul 19 - (7 sc, scădere)*6 (48);
- 20 rânduri - (6 sc, scădere) * 6 (42);
- 21 rând - (5 sc, scădere) * 6 (36);
- 22 rând - (4 sc, scădere) * 6 (30);
- 23 rând - (3 sc, scădere) * 6 (24);
- 24 rânduri - (2 sc, scădere) * 6 (18);
- 25 rânduri - (2 sc, scădere) * 6 (12);
- Rândul 26 - 6 descreștere (6).
Umpleți corpul cu holofiber și strângeți firul.
Cioc - fir portocaliu:
- Rândul 1 - 5 sc în inel amigurumi;
- Rândul 2 - (1 sc, cresc)*2, 1 sc (7);
- al 3-lea rând - 7 sc;
- Rândul 4 - (2 sc, cresc)*2, 1 sc (9).
Coaseți ciocul între 16 și 20 de rânduri, umplut pe măsură ce coaseți. Brodeaza sprancenele si genele cu fir negru. În continuare, în funcție de imaginația ta, fă-ți un șurub și nuanță-ți obrajii.
Corp – fir galben:
- Umpleți cu holofiber în timp ce tricotați.
- Al 2-lea rând - 6 centimetri (12);
- Al 3-lea rând - (1 sc, cresc)*6 (18);
- Rândul 4 - (2 sc, cresc)*6 (24);
- Rândul 5 - (3 sc, cresc)*6 (30);
- Rândul 6 - (4 sc, cresc)*6 (36);
- Rândul 7 - (5 sc, cresc)*6 (42);
- Rândul 8 - (6 sc, cresc)*6 (48);
- Rândul 9 - (7 sc, cresc)*6 (54);
- Rândul 10 - (8 sc, cresc)*6 (60);
- 11-18 rânduri - 60 sc:
- Rândul 19 - (8 sc, scădere)*6 (54)
- 20-21 rând - 54 sc;
- Rândul 22 - (7 sc, scădere)*6 (48)
- 23-24 rând - 48 sc;
- 25 rânduri - (6 sc, scădere) * 6 (42);
- 26 rând - (5 sc, scădere) * 6 (36);
- 27 rând - (4 sc, scădere) * 6 (30);
- 28 rând - (3 sc, scădere) * 6 (24);
- 29 rând - (2 sc, scădere) * 6 (18);
- Rândul 30 - 18 sc.
Lăsați firul și coaseți capul pe corp.
Coadă de cal:
- Fire galbene, nu se umple
- Rândul 1 - 4 sc în inel amigurumi;
- Al 2-lea rând - 4 incremente (8);
- al 3-lea rând - 8 sc;
- 4 rânduri - (1 sbn, inc) * 4 (12);
- 5 rânduri - 12 sc;
- Al 6-lea rând - (2 sc, cresc) * 4 (16);
Îndoiți și conectați sc. Coaseți pe corp la nivelul celui de-al 8-lea rând.
Aripi – fir galben, nu umple:
- Rândul 1 - 6 sc în inel amigurumi;
- Al 2-lea rând - 6 centimetri (12);
- al 3-lea rând - 12 sc;
- Rândul 4 - (1 sc, cresc)*6 (18);
- 5-16 rânduri - 18 sc.
- Îndoiți și conectați sc. Tricotează două părți. Coaseți la nivelul celui de-al 24-lea rând.
Picioare – fir portocaliu:
- Picioarele. Umpleți pe măsură ce tricotați.
- primul rând - 6 sc în k.a.;
- 2-4 rânduri - 6 sc.
- Tăiați firul. Tricotează trei părți. S-a dovedit a fi degete.
- Pentru a lega, tricotați 2 ochiuri pe primul deget, tricotați al 3-lea ochi de la primul deget și primul ochi al celui de-al doilea deget împreună cu o singură croșetare (adică facem o scădere), 1 ochi, al 3-lea ochi de la al doilea deget și Primul ochi tricotați al treilea deget împreună, 4 ochiuri, tricotați al 6-lea ochi de la al treilea deget și al 4-lea ochi de la al doilea deget împreună, 1 ochi, tricotați al 6-lea ochi de la al doilea deget și al 4-lea ochi de la al treilea deget împreună, 2 sc. Veți primi 14 coloane.
- Rândul 6 - (5 sc, scădere)*2 (12);
- Rândul 7 - (2 sc, scădere)*3 (9);
- Rândul 8 - (1 sc, scădere)*3 (6).
- Închideți gaura și ascundeți firul. Tricotează două părți.
- primul rând - 6 sc în k.a.;
- Rândul 2 - (1 sc, cresc)*3 (9);
- 3-14 rânduri - 9 sc.
Îndoiți și conectați marginile sc. Tricotăm două părți. Coaseți piciorul la picior. Utilizați marginea care a fost conectată la sc pentru a coase picioarele pe corp.
Ou de Paște - fire albastre:
- primul rând - 6 sc în k.a.;
- Al 2-lea rând - 6 centimetri (12);
- Al 3-lea rând - (1 sc, cresc)*6 (18);
- Rândul 4 - (2 sc, cresc)*6 (24);
- Rândul 5 - (3 sc, cresc)*6 (30);
- Rândul 6 - (4 sc, cresc)*6 (36);
- Rândul 7 - (5 sc, cresc)*6 (42);
- 8-16 rând - 42 sc;
- Rândul 17 - (5 sc, scădere)*6 (36);
- 18 rânduri - 36 sc;
- 19 rânduri - (4 sc, scădere) * 6 (30);
- 20 rânduri - 30 sc;
- 21 rând - (3 sc, scădere) * 6 (24);
- 22 rânduri - 24 sc;
- 23 rând - (2 sc, scădere) * 6 (18);
- 24 rânduri - (2 sc, scădere) * 6 (12);
- Rândul 25 - 6 descreștere (6).
Închideți gaura și ascundeți firul. Tăiați banda și lipiți-o de testicul. Leagă o floare. Coaseți o mărgele de floare și lipiți-o de ou.
Câine - o diagramă simplă cu o descriere pentru începători
Cârlig nr. 1, fire acrilice portocalie și alb. 
Cap:
- Rândul 1: în 1 v.p. - 8 sc.
- Al 2-lea rând: 2 sc din 1 buclă.
- Al 3-lea rând: sc
- al 7-lea rând: sc
- Al 8-lea rând: 2 sc din 1 buclă, 4 sc
- Rândul 9: sc
- Al 10-lea rând: 2 sc din 1 buclă, 5 sc
- al 11-lea rând: sc
- Al 12-lea rând: 2 sc din 1 buclă, 6 sc
- Rândurile 13,14,15,16,17: sc
- Al 18-lea rând: din 2 bucle - 1 sc (scădere), 6 sc
- 19,20,21,22,23 rânduri: sc
- Al 24-lea rând: scădere, 5 sc
- Rândurile 25,26,27,28,29: sc
- Rândul 30: scădere, 4 sc
- 31,32,33,34 rânduri: sc
- Rândul 35: scădere, 3 sc
- Rândul 36: scădere, 2 sc, introduceți ochi între rândurile 22 și 23, umpleți cu umplutură de jucărie.
- Rândul 37: scădere, 1 sc, scădere, închideți tricotajul, înfilați firul în interior.
Capul este gata.
Nas. Doua detalii:
- Rândul 1: în 1 v.p. - 8 sc
- Al 2-lea rând: 2 sc din 1 buclă.
- Al 3-lea rând: sc
- Al 4-lea rând: 2 sc din 1 buclă, 1 sc
- Al 5-lea rând: 2 sc din 1 buclă, 2 sc
- Rândurile 6,7,8,9,10,11,12: sc, fir tăiat.
- Îndoiți 2 bucăți margine la margine, tricotați 12 bucle, conectând 2 rânduri.
Partea superioară a nasului:
- Rândurile 1 și 2: sc, legând marginea exterioară.
- Al 3-lea rând: scădere, 2 sc
- 4,5 rânduri: sc
- Al 6-lea rând: Dec, 1 sc Introduceți nasul peste ochi, chestii
- Rândul 7: descreștere, tricotând 1 sc din 2 bucle până la capăt. Coaseți nasul la cap.
Pata alba pe frunte:
- Rândul 1: 15 v.p., 1 v.p. salt, 3 sc într-o buclă, tricotați până la ultima buclă, în care tricotați 4 sc
- Al 2-lea rând: trebuie să faceți 4 creșteri la ambele capete.
- Al 3-lea rând: unde s-a făcut creșterea, 2 sc în 1 buclă, între ele - 1 sc
- Al 4-lea rând: întreg rândul ps. tricotat aproape.
Orbitele ochilor:
- Rândul 1: în 1 v.p. - 8 sc
- Al 2-lea rând: 2 sc din 1 buclă.
- Al 3-lea rând: sc
- Al 4-lea rând: 2 sc din 1 buclă, 1 sc
- Al 5-lea rând: 2 sc din 1 buclă, 2 sc
- Rândul 6: ps întreg rândul
- Rândul 1: 8 ch.
- Al 2-lea rând: 1 v.p. săriți, tricotați sc, tricotați 4 sc în buclele exterioare (încărcați).
- Tricotați rândurile următoare, adăugând locul în care rândul este vizibil în rândurile anterioare. Un total de 4 trepte pe fiecare margine. în ultimul rând ar trebui să obțineți 9 sc
- Ultimul rând: sc fără creșteri.
Coaseți urechile la cap, astfel încât o ureche să fie ridicată.
Labele:
- Începeți să tricotați în alb.
- Rândul 1: în 1 v.p. - 8 sc
- Al 2-lea rând: 2 sc din 1 buclă.
- Al 3-lea rând: sc
- Al 4-lea rând: 2 sc din 1 buclă, 1 sc
- Al 5-lea rând: 2 sc din 1 buclă, 2 sc
- Al 6-lea rând: 2 sc din 1 buclă, 3 sc
- Picioare din față - tricotați 4 rânduri sc
- Picioare posterioare - tricotați 6 rânduri sc
- primul rând: scădere, 3 sc
- Al 2-lea rând: scădere, 2 sc
- Al 3-lea rând: sc
- Al 4-lea rând: psbn
Rezultatul au fost tampoane: mai mari pentru labele din spate, mai mici pentru labele din față.
Treceți la un fir roșu. Pentru labele din față: 2 rânduri de sc, pe al 3-lea rând - scădere, 2 sc În continuare tricotăm 4 rânduri de sc. tricotat aproape. Pentru picioarele din spate: 7 rânduri sc. Îndesă-ți labele. Conectați cele 2 picioare din spate cu o buclă de conectare și faceți un ham. 12 rânduri sc. Ar trebui să obțineți aproximativ 49 de ochiuri.
- Rândul 13: scădere, 5 sc
- Rândurile 14,15,16,17,18: sc
- Rândul 19: scădere, 4 sc
- 20,21,22,23,24 rânduri: sc
- Rândul 25: tricotează picioarele din față din partea de jos, unde sunt axilele.
- Rândul 26: tricotează labele din partea de sus, unde sunt umerii.
- Rândul 27: sc. tricotat aproape. Umpleți și coaseți corpul la cap.
Coadă de cal
- Rândul 1: în 1 v.p. - 8 sc
- Al 2-lea rând: 2 sc din 1 buclă.
- 3,4 rânduri: sc. Aproape. Umpleți și coaseți.
Brodeaza mustati, sprancene, gene. Câinele este gata!
Pisicuță - o diagramă simplă cu o descriere pentru începători
Firele sunt albe și gri. 
Cap:
- Rândul 1 - inel amigurumi din 6 bucle;
- Al 2-lea rând – crește, (12)
- Al 3-lea rând – sc, cresc (18)
- Al 4-lea rând – 2 sbn, cresc (24)
- Rândul 5 – 3 sc, măriți (30)
- Al 6-lea rând – 4 sc, cresc (36)
- Rândul 7 – 5 sc, măriți (42)
- 8 rânduri – 6 sc, cresc (48)
- 9 – 14 rânduri sc (48)
- Rândul 15 – 6 sc, descreștere (42)
- Rândul 16 – 5 sc, descreștere (36)
- Rândul 17 – 4 sc, descreștere (30)
- Rândul 18 – 3 sc, descreștere (24)
- Rândul 19 – 2 sc, descreștere (18)
- Rândul 20 – sc, descreștere (12)
- 21 rânduri – 4 scădere (6)
- Fixați firul.
trunchi:
- Rândul 1 - inel amigurumi din 6 bucle
- Al 2-lea rând – dreapta (12)
- Al 3-lea rând – sc, cresc (18)
- Al 4-lea rând – 2 sc, cresc (24)
- 5 – 8 rânduri sc (24)
- Rândul 9 – scădere, 2 sc (18)
- Rândul 10 – scădere, sc (12)
- Fixați firul și lăsați-l pentru coasere.
Laba din spate (2 buc.):
- Rândul 1 - inel amigurumi din 6 bucle
- Al 2-lea rând – dreapta (12)
- Al 3-lea rând – sc, cresc (18)
- 4 – 5 rânduri – sc (18)
- Rândul 6 – sc, descreștere (12)
- Rândul 7 – 2 sc, scăderea (9)
- 8-9 rânduri - sc (9)
Îndoiți în jumătate, umpleți și coaseți. Lăsați firul pentru cusut.
Laba din față (2 buc.):
- Rândul 1 - inel amigurumi din 6 bucle
- Al 2-lea rând – dreapta (12)
- 3-4 rânduri – sc (12)
- Al 5-lea rând – 6 scăderi (6)
- 6 – 9 rânduri – 6 sc
Umpleți și lăsați ata pentru cusut.
Urechi:
- 1 rând – 5 bucle inel amigurumi
- Al 2-lea rând – 5 sc
- Al treilea rând – dreapta (10)
- Al 4-lea rând – 10 sc, cresc (15)
- Închideți și lăsați firul pentru cusut.
Coadă de cal:
- Rândul 1: în 1 v.p. - 6 sc
- Al 2-lea rând: 2 sc din 1 buclă.
- 3,4 rânduri: sc. Aproape
Următoarea etapă: coaseți toate piesele, coaseți mărgele-ochi, brodați sprâncenele, mustața, ghearele cu fire negre.
Croșetarea jucăriilor nu este dificilă dacă verifici descrierea și diagrama. Instrucțiunile detaliate vă ajută să faceți treaba rapid și eficient.
Jucărie cu pui - model de tricotat și descriere
Detalii de tricotat:

Tricotarea începe cu realizarea capului și a corpului. Părțile sunt realizate separat: ciocul, 2 picioare și 2 aripi. După asamblarea lor, se formează creasta și coada. Etapa finală este decorarea. Pe capul puiului se pune o floare, gatul este decorat cu un pandantiv, iar obrajii vor deveni mai stralucitori cu ajutorul fardului de obraz.
Jucărie iepuraș - model de tricotat și descriere
Detalii de tricotat:

Timp de tricotat: aproximativ 2-3 ore. Lucrul la jucărie trebuie să înceapă cu realizarea capului. Jucăriile croșetate cu descrieri și diagrame sunt ușor de asamblat. Pentru a obține un iepuraș finit, urechile sunt cusute pe cap, care se fac separat. Tricotarea se finalizează prin coaserea ochilor, obrajilor, nasului și gurii.
Jucărie elefant – model de tricotat și descriere
Detalii de tricotat:

A face un elefant începe cu crearea capului și a corpului. Tricotarea urechilor, trunchiului și picioarelor este necesară separat. Toate părțile sunt cusute alternativ pe corp și pe cap. Etapa finală a lucrului la jucărie este coaserea în ochi, gura și funde.
Jucărie Kolobok - model de tricotat și descriere
Detalii de tricotat:

Ar trebui să începeți să tricotați Kolobkov din corp. Când baza jucăriei este gata, ochii, gura și părul sunt cusute pe ea. Decorul pentru o fată va fi funde, iar pentru un băiat - fard de obraz pe obraji.
Jucărie cu șoarece - model de tricotat și descriere
Detalii de tricotat:

Crearea unui mouse începe cu crearea capului și a trunchiului. Labele, coada și limba sunt tricotate separat și cusute la sfârșitul lucrării. Nasul si ochii din nasturi sunt cusute la cap.
Jucărie piggy - model de tricotat și descriere
Detalii de tricotat:

Trebuie să începeți să tricotați porci din cap și corp. Labele, urechile și călcâiele sunt tricotate separat. Sunt cusute pe baza finisată a jucăriei. Etapa finală a lucrării este decorarea. Porcii ar trebui să aibă păr, ochi, haine amuzante și papuci.
Pisica de jucărie cu iepuraș - model de tricotat și descriere
Detalii de tricotat:

Ar trebui să începeți să faceți jucării tricotând capul și corpul. Cu descrieri și diagrame nu este dificil să asamblați jucării croșetate. Urechile, cozile, labele, eșarfele și mănușile sunt create separat și apoi cusute pe corp și pe cap.
Toy Cat - model de tricotat și descriere
Detalii de tricotat:

Crearea unei jucării începe cu tricotarea elementelor individuale: cap, corp, labe, urechi și coadă. Etapa finală a tricotării este asamblarea elementelor finite. Pentru decor, o fundă și mustăți de sârmă sunt cusute pe pisică.
Jucărie melc - model de tricotat și descriere
Detalii de tricotat:
- Dimensiunile melcului sunt de 10 cm înălțime și 5 cm în lățime (7 cm în volumul corpului).
- Corpul și capul sunt fire de culoarea piersicii.
- Shell - fire portocalii.
- Flori - fire de culoare smarald.
- Pentru ochi ai nevoie de margele de 5 mm, iar pentru a decora cochilia - 15 margele de culoare perla.
- Timp de tricotat: nu depășește 3 ore.


A face un melc începe cu crearea corpului și a capului. Când baza jucăriei este gata, se coase pe ea o coajă tricotată separat. Apoi se adaugă detalii: coarne, flori, mărgele și ochi.
Toy Elk - model de tricotat și descriere
Detalii de tricotat:

Tricotarea ar trebui să înceapă prin crearea bazei jucăriei - capul și corpul.
Tricotarea este finalizată prin asamblarea elanului finit. Mânerele și picioarele, coarnele și urechile, tricotate separat, sunt cusute la bază.
Jucărie Panther - model de tricotat și descriere
Detalii de tricotat:

În primul rând, se creează capul și trunchiul, care vor servi drept bază pentru viitoarea jucărie. Este necesar să coaseți alternativ picioarele din spate și din față și coada la baza finită. Botul și urechile sunt așezate pe cap. Toate piesele pentru asamblare sunt tricotate separat. Pantera este decorată cu paiete brodate în formă de inimă.
Jucărie de oaie - model de tricotat și descriere
Detalii de tricotat:
- Dimensiunile oilor sunt de 15 cm înălțime și 5 cm în lățime (volumul corpului este de 8 cm).
- Cap și corp - fire albe.
- Picioare, copite și haină - fire roz.
- Pantofi – fire violet și margele roz.
- Pentru ochi veți avea nevoie de 2 mărgele negre mici.
- Poliester roz este necesar pentru fusta.
- Timp de tricotat: nu mai mult de 4 ore.


Tricotarea începe cu formarea capului și a corpului. Când capul și trunchiul sunt conectate, membrele sunt cusute la ele. Capul este decorat cu ochi, nas și gura. Pantofii sunt decorati cu margele. O haină de blană este pusă pe jucăria finită.
Toy Teddy Bear - model de tricotat și descriere
Detalii de tricotat:

Baza jucăriei va fi capul și trunchiul, care sunt tricotate la început. Mânerele și picioarele, realizate separat, sunt cusute pe corp. Capul este decorat cu urechi, bot și ochi.
Jucărie Little Dragon - model de tricotat și descriere
Detalii de tricotat:

Tricotarea începe cu formarea capului. În urma acesteia, corpul este format. Cu descrierea și diagramele, nu va fi dificil să asamblați o jucărie croșetată finită din mai multe părți. Mânerele și picioarele, un pieptene și aripile sunt atașate de corp folosind o metodă de frânghie. Capul este format din nări, ochi și urechi.
Jucărie ponei - model de tricotat și descriere
Detalii de tricotat:
- Mărimea poneiului este de 33 cm înălțime și 11 cm în lățime (volumul corpului este de 14 cm).
- Baza capului și a corpului, urechile și picioarele sunt realizate din fire violet.
- Copite, creasta, coada - fire liliac.
- Botul este din fire roz.
- Pentru ochi veți avea nevoie de fire negre, albe și albastre.
- Timp de tricotat: nu mai mult de 4 – 5 ore.


Ar trebui să începeți să tricotați creând capul și gâtul. Apoi se formează trunchiul, precum și picioarele unul câte unul. Ansamblul completează tricotarea. Capul este format din urechi, ochi, nări și gură. Este atașat de corp folosind un gât umplut cu umplutură. Picioarele si elementele decorative sunt cusute pe: coama si coada.
Păpușă de jucărie - model de tricotat și descriere
Detalii de tricotat:

Tricotarea începe cu crearea bazei viitoarei jucării: cap, trunchi și picioare. Mânerele sunt tricotate separat și atașate cu prindere cu fir. Etapa finală este decorarea păpușii cu păr, rochie și pantofi.
Jucărie Amigurumi Kitten - model de tricotat și descriere
Detalii de tricotat:

Trebuie să începeți să tricotați din cap și gât. Apoi este creat corpul jucăriei. Lucrarea este finalizată prin asamblarea unor piese mici: picioare, coadă și urechi. Pisicuta terminata poate fi decorata cu o fundita.
Jucărie rățușcă - model de tricotat și descriere
Detalii de tricotat:

Tricotarea începe cu crearea unui cap și a corpului cu o coadă. Aripile, labele, curelele și ciocul sunt cusute pe baza finită a jucăriei. Decorarea bretelelor cu nasturi completează treaba. Când croșetați jucării, este important să vă bazați pe modele. Cu ajutorul lor, jucăria se va potrivi exact cu descrierea.
Fiecare aci, care vad amigurumi (jucarii mici tricotate) pentru prima data, se indragosteste de ele imediat si pentru totdeauna. Și vrea imediat să se apuce de treabă să croșeteze o mulțime de iepurași, pisici, urși și păpuși. Dar nu este nevoie să vă grăbiți în această chestiune. Chiar dacă știi să tricotezi puțin, amigurumi necesită puțin mai multă practică, perseverență și grijă. De exemplu, pentru șervețele de croșetat, aerisirea și lejeritatea sunt importante, pentru jucăriile tricotate - dimpotrivă: densitatea, textura perfect uniformă a țesăturii, respectarea regulilor speciale, care pot fi găsite în articolul „Cele 7 cele mai frecvente greșeli în rândul începătorilor. ” pe site-ul nostru.
Este mai bine să începeți să tricotați jucării cu descrieri (modele) simple, ușor de înțeles și dovedite. În special pentru amigurumerii începători, am făcut cea mai bună selecție pentru începători. Cu aceste jucării este cel mai bine să înveți să tricotezi. Sunt simple, detaliate, fără erori (foarte importante pentru începători) și ușor de asamblat. Să vă spunem un secret: asamblarea și designul este cel mai dificil, dar în același timp captivant proces în crearea amigurumi. Deși lucrurile pot fi diferite pentru tine.

7. Este grozav să exersezi pe gărgărițe și melci. Cel mai mult vacă simplă și naturalistă nu vă va ocupa mult timp. Puteți tricota multe dintre aceste vaci, în culori diferite, și le puteți oferi tuturor prietenilor sau colegilor. Dintre cele mai complexe (dacă te simți suficient de puternică), aceasta este foarte populară în rândul femeilor cu ac Dusya, vaca. Lucrul bun despre melci este că pot fi făcuți din fire de orice culoare. Nu sunt greu de asamblat, iar designul se termină cu banala coasere a ochilor. Foarte bun si suficient melci simpli live pe forumul nostru și sunt, de asemenea, grozave melci de la Olesya Solozhenko.

8. Deși Anul Calului a trecut deja, există descrieri foarte reușite ale acestor animale frumoase care nu au lăsat pe nimeni indiferent. De exemplu, acesta simplu cal de la Natalia Kalmykova. Să înveți să tricotezi pe astfel de cai este o idee foarte bună.

9. Te-ai săturat încă de pisici? Există o foarte simplă și pisică amuzantă de la Diana Egoyan. Puteți lua fire de orice culoare, asamblare minimă și un design foarte distractiv - de ce au nevoie începătorii în jucăriile de tricotat pentru a nu-și pierde interesul pentru amigurumi.

10. Oaia. Desigur, este mai bine să tricotați oile cu fire texturate. După cum știți, acest lucru este destul de dificil, mai ales pentru începători. Cu toate acestea, există o fire texturată care este destul de ușor de croșetat. De exemplu, „Iarba întinsă Lotus” de la Kamtex sau Adelia „VALERI” (puteți afla mai multe în subiect „În lumea firelor” pe forumul nostru). Cea mai populară oaie de pe Runet -