Topiare din panglici de satin 5 cm Facem topiari frumoase cu propriile noastre mâini
Topiary DIY pentru o mică fashionistă de ziua ei.
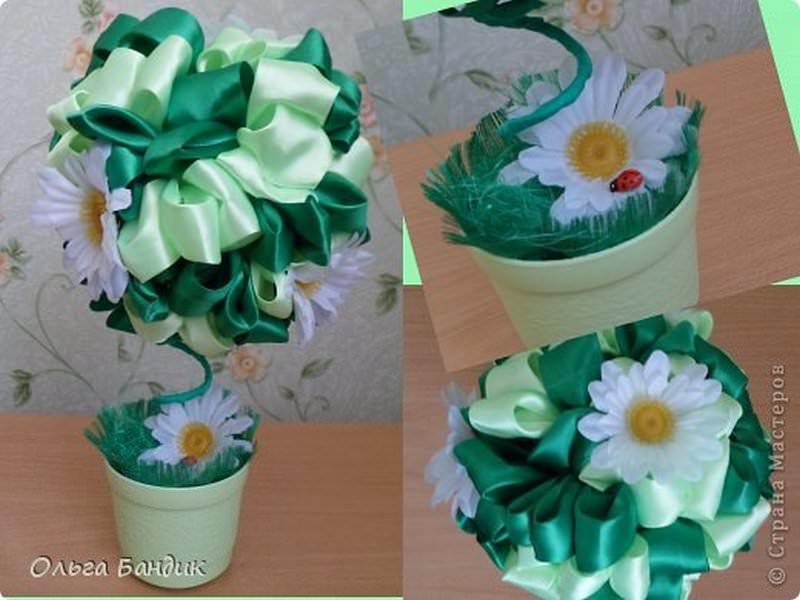
Clasa de master cu fotografii pas cu pas. Arborele fericirii „Trandafiri roz” ca un cadou cu propriile mâini.
profesoară de educație suplimentară Novichkova Tamara Aleksandrovna MBU DO Casa Lesnovsky a creativității copiilor.
Descriere: Clasa de master este destinată copiilor de vârstă de liceu, profesorilor de educație suplimentară, profesorilor de tehnologie, părinților și tuturor celor cărora le place să facă meșteșuguri și să facă cadouri cu propriile mâini.
Scop: un topiar sau un copac al fericirii va servi ca un decor minunat pentru interior și, în același timp, va deveni una dintre cele mai bune opțiuni pentru un cadou făcut manual. Chiar și femeile de aci începătoare pot face acest mic copac decorativ de trandafir. Această abilitate nu este greu de învățat. Principalul lucru ar fi o dorință sinceră de a vă mulțumi celor dragi și prietenilor tăi.
Ţintă: făcând un copac al fericirii din panglici de satin.
Sarcini:
- invata sa faci trandafiri din panglici de satin;
- invata sa faci topiaria, decorand-o cu trandafiri satinati;
- consolidarea abilităților de lucru cu materialele disponibile;
- dezvolta abilitati creative, gust estetic;
- cultivați diligența și acuratețea atunci când lucrați.
Materiale si instrumente:
Panglici roz de diferite nuanțe și lățimi diferite;
- ac, foarfece;
- fire roz;
- margele roz si sidefate;
- oglinda.

- pistol termic;
- suport pentru topiară (ghiveci);
- bete pentru butoi;
- sisal;
- plasture;

- o bucata de spuma de polistiren;
- alabastru, apă;
- un borcan pentru diluarea alabastrului, o lingura;

Execuția pas cu pas a ambarcațiunii.
Etapa principală: realizarea trandafirilor din panglici de satin.Pentru topiaria mea, am luat panglici roz. Din moment ce acest copac al fericirii va aparține unei fetițe. Puteți lua orice lățime a panglicilor: de la 2 cm la 5 cm. Acest lucru va depinde de cât de mari vrei să fie trandafirii tăi. Dacă abia începeți să lucrați cu panglici de satin, este mai bine să luați o panglică largă. Vă va fi mai convenabil să îl țineți în mâini și să formați petale de trandafir. Trandafirii cu panglică nu se fac atât de repede pe cât credem. Este necesar să stăpânești tehnica de a le face și să faci mai multe încercări. Și după ce ați învățat să „gestionați” panglica, puteți face cu ușurință muguri și trandafiri frumoși. Un trandafir este făcut dintr-o bucată întreagă de panglică și, după ce a obținut dimensiunea dorită a florii, tăiați panglica. Puteți tăia imediat panglica în fâșii, știind că în medie este nevoie de 35 - 40 cm pentru un trandafir.
Să trecem la treabă. Luați o panglică și un ac și ață pentru a se potrivi cu panglica. Ținem banda cu mâna stângă, iar cu mâna dreaptă îndoim colțul de sus al benzii în jos la un unghi de 90 de grade.

Răsucim panglica, făcând mijlocul trandafirului, și coasem fundul cu câteva ochiuri.

Îndoiți panglica departe de dvs. și înfășurați panglica îndoită în jurul mijlocului. Tivul cu grijă cu ochiuri. Așa a ieșit bobocul.


Îndoiți panglica înapoi și în jos din nou, răsuciți bobocul, făcând o petală de trandafir. Tivim partea de jos.

Repetăm acțiunea, făcând din ce în ce mai multe petale. Nu uitați să fixați banda de jos, astfel încât petalele să își păstreze bine forma.


Tăiați panglica și coaseți capătul tăiat al panglicii. Așa arată floarea din spate.


Trandafirul este gata! Unu, doi, trei... Florile ies frumoase, delicate, aerisite. L-am admirat și continuăm să lucrăm cu răbdare, dând dovadă de acuratețe și sârguință. A fost prima dată când am făcut topiară din trandafiri din satin, așa că nu știam câte flori să fac. M-am lăsat dus de treabă și acesta este rezultatul! 20 de trandafiri frumoși de diferite nuanțe zac pe masă.


A doua etapă: pregătirea coroanei și a trunchiului.
Pentru trunchi avem nevoie de 2 bețe. Le pregătesc pentru utilizare viitoare vara. Găsesc ramuri de o formă bizară, răsucitoare. Scoar scoarța, decojesc și usuc la soare. Legăm două bețe împreună cu bandă adezivă. Acest lucru trebuie făcut astfel încât să arate frumos și să se completeze reciproc. Copacul nostru va avea un trunchi atât de neobișnuit.

Pentru coroană am luat o minge de spumă. Dacă nu îl puteți cumpăra, faceți o minge din ziare vechi, înfășurați-o cu ață și acoperiți stratul superior cu șervețele de hârtie albă. Faceți o gaură în minge, adăugați lipici și introduceți un bețișor. Mingea este acum ferm pe loc.

Fixăm capătul panglicii roz cu lipici și îl înfășurăm în jurul butoiului. Panglica ar trebui să se suprapună. Adăugați lipici aici și acolo pentru a preveni alunecarea panglica în jos.

Înfășurați panglica în jurul celui de-al doilea bețișor. Va deveni un suport pentru oglindă.


Pentru contrast și pentru a adăuga luminozitate portbagajului, îl înfășuram cu o panglică îngustă, roz strălucitoare. Trunchiul și coroana sunt gata.

A treia etapă: instalarea arborelui.
Luăm o oală frumoasă, introducem o bucată de spumă de polistiren în ea, facem o gaură în ea și instalăm semifabricatul topiar. Spuma de polistiren va ajuta la salvarea vasului de la crăpare atunci când este umplut cu alabastru.


Diluăm alabastrul până la smântână groasă și îl punem cu grijă în oală cu o lingură, nivelând suprafața. Așteptăm până se întărește complet.


Etapa a patra: decorarea coroanei cu flori.
Folosind un pistol termic, începem să lipim trandafirii de jos.


Încercăm să lipim trandafirii, alternându-i după culoare. Trandafir în trandafir și mingea noastră se transformă treptat într-o floare mare roz.


Este imposibil de numărat numărul de trandafiri necesari pentru muncă. Așa că a trebuit să mai fac trei și abia apoi să-mi continui munca. Le lipesc de vârful mingii și coroana este gata!


Pentru a adăuga eleganță topiarei, lipiți margele mari de perle pe petalele de trandafir și mărgele mici roz pe trunchi.


Decorați suprafața vasului cu sisal și margele.

Lipim un trandafir decorat cu margele de alt trunchi de copac.

Ei bine, acum haideți să pregătim o surpriză pentru fashionista noastră. Aceasta este o oglindă cu o imagine a unei fete frumoase. Și ce este interesant este că, dacă întorci puțin oglinda, fata deschide și închide ochii, de parcă clipește la tine. Legăm o panglică de oglindă.


Atârnăm o oglindă și admirăm creația noastră.

Topiară cu panglică delicată: 30 de idei foto pentru un cadou romantic
Topiaria cu panglică este un decor interior elegant sau un cadou delicat făcut manual Topiarele cu panglică sunt unul dintre cele mai populare cadouri realizate manual. Mai mult de o clasă de master este dedicată modului de a crea un copac frumos cu o coroană atât de elegantă și drăguță cu propriile mâini. Florile sunt de obicei făcute din panglici, adesea trandafiri, care devin principalul detaliu al topiarei.
Flori din panglici pentru topiară: clasa de master nr. 1
Pentru ca coroana să fie o împrăștiere de trandafiri delicati, trebuie să faci cel puțin zece astfel de flori.
Lățimea panglicii pentru floare trebuie să fie de cel puțin 2,5 cm, lungime – 20 cm Puteți alege orice culoare
Faceți trandafiri din panglici pas cu pas:
- Luați panglica astfel încât reversul să fie îndreptat către tine;
- Începeți să răsuciți marginea stângă în direcția de la stânga la dreapta, obținând o coloană;
- Răsuciți aproape până la capăt, astfel încât să rămână un triunghi mic cu latura de 2 cm;
- Acum trebuie să răsuciți trandafirul în sine, să țineți baza florii cu mâna stângă și să întoarceți panglica departe de dvs. cu mâna dreaptă, în timp ce o îndoiți;
- Cu mâna stângă, cu degetul mare și arătător, țineți trandafirul de bază, răsuciți-l în sens invers acelor de ceasornic și cu mâna dreaptă îndoiți marginea superioară a panglicilor departe de tine;
- Când trandafirul este format, îndoiți capătul panglicii și conectați-l la bază;
Țineți ambele capete ale panglicii cu mâna stângă, degetul mare și arătătorul, înfășurați strâns baza cu fir și cravată
În acest caz, principalul lucru este îndemânarea; primul cuplu de trandafiri cu propriile mâini poate să nu iasă imediat, dar apoi lucrul va semăna cu o bandă transportoare.
Cum să faci trandafiri pentru topiară (videoclip MK)
Topiar DIY din panglici: flori, master class nr. 2
De asemenea, puteți face flori cu petale îndreptate spre exterior, ca un mușețel. Dacă faceți topiare din panglici pentru un eveniment vesel, poate pentru ziua de naștere a unui copil sau a unei adolescente, această clasă de master va fi exact la timp.
O idee grozavă - o topiară cu astfel de flori pentru profesor, în care toți băieții din clasă au făcut o floare
Instrucțiuni cu sfaturi pas cu pas:
- Luați panglici de satin de diferite culori, puteți avea chiar și un model;
- Tăiați banda în lungimi egale;
- Puteți face baza unei flori din două cercuri de pâslă;
- Îndoiți o bucată de panglică în jumătate și introduceți cele două capete deschise în mijloc între cercurile de pâslă;
- Faceți acest lucru cu fiecare petală și o puteți fixa în miezul de pâslă folosind un pistol termic sau pur și simplu o cusați;
- Petalele pot fi multicolore sau simple, totul depinde de ce fel de topiară doriți să obțineți în cele din urmă.
Experimentați cu lățimea panglicii și a miezului, poate fi mare sau poate foarte miniatură. Miezul poate fi o mărgele, un buton, o mărgele de sticlă etc.
Un MK alternativ vă va arăta cum altfel puteți face flori pentru topiară.
Flori din panglici pentru topiară (clasa de master foto pas cu pas)
Pentru floare vom avea nevoie de panglici de doua culori de 25 si 50 mm latime, strasuri, fetru, lipici, ata, ac, foarfece, bricheta
Tăiem panglicile dreptunghiuri egale și tăiem marginile cu o brichetă. Pentru a forma o petală, îndoiți marginea benzii, așa cum se arată în figură, apoi îndoiți vârful marginii îndoite înapoi. Facem același lucru și de cealaltă parte
Conectăm și fixăm marginile cu fir. Vom avea nevoie de o mulțime de astfel de elemente
Formăm un trandafir din petale și îl lipim pe o bază de pâslă.
Îndoiți o bucată de panglică de altă culoare în jumătate, tăiați-o în diagonală și conectați marginile cu o brichetă.
Conectăm structura cu lipici; o petală pliată poate fi fixată într-unul dintre elemente
Decorăm floarea la discreția noastră. Decorul pentru topiaria este gata
O astfel de floare poate deveni un punct culminant în topiarea dvs., elementele rămase pot fi simplificate.
Topiară cu panglică: cum să faci o floarea soarelui
Acest MK implică, de asemenea, multe variații. Cel mai adesea este o combinație de materiale, cum ar fi panglici și boabe de cafea. Această opțiune DIY este probabil cea mai populară.
Nu este atât de greu de făcut. Veți avea nevoie de o panglică galbenă din satin suficient de lată. Din el trebuie să tăiați cel puțin 20 de petale identice. Pentru a preveni căderea materialului, va trebui să fie topită peste o flacără, dar numai împreună cu elementele de fixare.
Pentru a decora centrul floarea soarelui, puteți folosi semințe decojite, boabe de cafea sau aceleași panglici
Faptul este că nu tăiați doar petale ovale, totul este puțin mai complicat.
Pentru a face o petală de floarea soarelui aveți nevoie:
- Luați o bucată de 15 cm lungime și îndoiți-o în jumătate;
- Îndoiți-l astfel încât atunci când conectați capetele să obțineți o buclă;
- Când se topesc, capetele nu numai că nu se vor sfărâma, ci vor fi și ținute împreună.
Pentru ca o floarea soarelui să fie luxuriantă și frumoasă, trebuie să existe două rânduri de petale - superior și inferior
Miezul îl faci singur din boabe de cafea. Le puteți lipi pe un fel de bază durabilă, cum ar fi pâslă sau carton obișnuit.
Floarea soarelui DIY făcută din panglici (video MK)
Topiary cu panglică: clasă de master de la început până la sfârșit
Așadar, este timpul să folosiți semințe de flori și, în sfârșit, să faceți acest copac înflorit suvenir.
După ce ați adunat toate materialele împreună, puteți începe prin a face baza pentru coroană. Să presupunem că decizi să nu faci această minge de bază cu propriile mâini, ci să folosești un semifabricat de spumă. Grozav, economisește timp. Dar dacă nu găsiți un astfel de gol, luați cele mai obișnuite ziare, fire și lipici. Faceți o minge de ziar, cântăriți-o cu lipici și înfășurați-o cu ata până arată ca o minge. Baza este gata!
De asemenea, o bază excelentă pentru topiaria de o dimensiune adecvată poate fi făcută din macroflex
- Bila de ziar trebuie vopsită pentru a se potrivi cu culoarea trandafirilor, a margaretelor, etc.;
- Într-unul dintre locurile mingii, faceți o gaură pentru butoi;
- Puteți introduce imediat trunchiul în minge, fixați ramura sau lipiți cu lipici fierbinte;
- Țineți butoiul în minge pentru un timp, nu lăsați până nu „prinde” bine;
- Acum, întreaga structură poate fi decorată - înfășurați portbagajul cu o panglică de satin sau o împletitură decorativă, fără a vă abate de la schema generală de culori;
- Fixați capetele benzii sau împletiturii cu lipici;
- A sosit momentul să atașați florile, lipiciul fierbinte și un pistol cu lipici fierbinte vă vor ajuta să faceți acest lucru cu atenție, atașați astfel încât golurile să fie cât mai invizibile;
- Rezultatul este un trunchi cu coroana care trebuie plantat undeva;
- Puteți cumpăra un ghiveci frumos de la o florărie și nu va trebui să faceți nimic singur;
- Puteți decora orice recipient - înfășurați o ceașcă sau un pahar cu panglici de dantelă sau hârtie creponată, pictați-l cu vopsele acrilice, înfășurați-l cu fire de tricotat pentru a se potrivi cu coroana etc.;
- Acum turnați soluția de gips în oală și coborâți copacul acolo, țineți până când stă ferm și uniform în tencuială;
- Tot ce rămâne este decorul de finisare - decorați stratul superior de ipsos cu pietre artificiale transparente, care strălucesc atât de frumos la soare.
Un ghiveci cu topiară poate fi decorat cu orice decor pe care îl aveți la îndemână. Poate fi textile, sfoară, ondulat și multe altele.
Puteți planta o figurină de gărgăriță sau fluture pe una dintre flori. Totul este gata, ați făcut o topiară delicată cu propriile mâini din panglici de satin, demnă de un cadou și cel mai bun decor pentru camera unei fete.
Topiary cu panglică: faceți-o pas cu pas (video)
Amintiți-vă că topiaria este considerată un copac al fericirii, ceea ce înseamnă că prin creșterea unui copac în acest mod artizanal, creați. Și orice muncă creativă este legată de gânduri, dorințe și forțe spirituale. Pune-ți o dorință, iar copacul tău poate ajuta la realizarea acesteia.
Arborele fericirii DIY. Clasa de master cu fotografii pas cu pas
Markina Natalya Ivanovna profesor de învățământ suplimentar, Centrul MBU DO pentru activități extracurriculare, districtul Volgodonsk, regiunea Rostov.
Descriere: Clasa de master se adresează copiilor de vârstă de liceu, profesorilor de educație suplimentară, părinților și tuturor celor cărora le place să facă meșteșuguri.
Scop: cadou, decor interior.
Ţintă: făcând un copac al fericirii.
Sarcini:
- dezvolta imaginatia creativa;
- cultivarea perseverenței;
- dezvolta gustul estetic;
- cultivați acuratețea la efectuarea lucrărilor.
Un topiar sau un copac al fericirii va servi ca un decor minunat pentru interiorul tău și, în același timp, va fi una dintre cele mai bune opțiuni pentru un cadou făcut manual. Chiar și meșteșugarii începători și amatorii pot crea acest copac decorativ. Învățarea acestei abilități nu este dificilă, iar materialele și instrumentele sunt ieftine. Cel mai important lucru este timpul și dorința ta sinceră.
Materiale și instrumente necesare pentru lucru:

- panglica din satin roz de 2,5 cm latime;
- fire roz;
- ac;
- foarfece;
- lumanare sau bricheta;
- bila decorativa;
-ramură uscată de copac;
-vase;
-pietricele de mare;
- adeziv universal;
- margele mari.
1. Luați o panglică cu o lățime în funcție de cât de mare este nevoie de trandafir. Am o panglică de 2,5 cm, care face un trandafir relativ mic. Tăiem panglica în bucăți de 25 cm și tăiem marginile cu o lumânare sau o brichetă. Îndoiți un capăt la un unghi de 45 de grade.

Răsucim banda de 5 mm de 2-3 ori. Rezultatul este un boboc de trandafir. De-a lungul marginii inferioare a panglicii cu un tub răsucit, faceți mai multe ochiuri de fixare cu un ac pentru a fixa partea centrală a trandafirului.

Ținem mugurul vertical în mâna stângă, iar cu mâna dreaptă îndoim capătul lung spre exterior la un unghi de 30 de grade.

Înfășurați panglica în jurul bobocului.

Îndoiți din nou capătul lung și înfășurați-l. Facem asta până la capătul panglicii până obținem dimensiunea necesară a trandafirului. Formăm un trandafir frumos îl fixăm cu un ac și ață, făcând mai multe ochiuri.

Trandafirul nostru din panglică de satin este gata. In felul acesta facem inca 26 de trandafiri.

2. Facem baza copacului nostru, conectăm o minge decorativă și o ramură de copac (vopsită anterior în verde), o fixăm cu lipici universal.

3. Se pune intr-o oala si se acopera cu pietricele de mare.

4. Să începem să ne decoram bradul, lipim trandafiri și mărgele între ele.

5. Pomul fericirii este gata! Dacă doriți, puteți decora cu mușchi și o gărgăriță.

O formă de artă populară, topiaria, era cunoscută încă din Roma Antică. Este încă destul de comună în multe țări europene, inclusiv în țara noastră. Se crede că „pomul fericirii”, așa cum este numit cu afecțiune în Europa, aduce prosperitate, succes și prosperitate acasă. Acest articol vă va ajuta să faceți o topiară șic cu propriile mâini din panglici de satin și organza. Clasa de master detaliată și fotografii sunt atașate.
O varietate de materiale sunt potrivite pentru realizarea acestui copac frumos și neobișnuit - hârtie decorativă, organza, panglici de satin, flori artificiale sau proaspete, boabe de cafea. Unii meșteri fac chiar topiari din bomboane și diverse dulciuri. Și din ce va fi făcut „pomul fericirii” tău, alege-ți singur.
- Topiară din panglici de satin Arată deosebit de elegant și frumos. În cele mai multe cazuri, panglicile sunt selectate în una sau două culori care contrastează bine între ele, de exemplu, alb și albastru, roșu și roz, galben și verde. Topiarele realizate din panglici de culori pastelate arată impresionant. Panglicile pot fi răsucite în formă de flori, bile, picături, funde, lipite peste coroana unui copac sau înfășurate în jurul unui trunchi.

Topiarele cu panglică sunt unul dintre cele mai populare cadouri realizate manual. Mai mult de o clasă de master este dedicată modului de a crea un copac frumos cu o coroană atât de elegantă și drăguță cu propriile mâini. Florile sunt de obicei făcute din panglici, adesea trandafiri, care devin principalul detaliu al topiarei.
Pentru ca coroana să fie o împrăștiere de trandafiri delicati, trebuie să faci cel puțin zece astfel de flori.

Faceți trandafiri din panglici pas cu pas:
- Luați panglica astfel încât reversul să fie îndreptat către tine;
- Începeți să răsuciți marginea stângă în direcția de la stânga la dreapta, obținând o coloană;
- Răsuciți aproape până la capăt, astfel încât să rămână un triunghi mic cu latura de 2 cm;
- Acum trebuie să răsuciți trandafirul în sine, să țineți baza florii cu mâna stângă și să întoarceți panglica departe de dvs. cu mâna dreaptă, în timp ce o îndoiți;
- Cu mâna stângă, cu degetul mare și arătător, țineți trandafirul de bază, răsuciți-l în sens invers acelor de ceasornic și cu mâna dreaptă îndoiți marginea superioară a panglicilor departe de tine;
- Când trandafirul este format, îndoiți capătul panglicii și conectați-l la bază;

În acest caz, principalul lucru este îndemânarea; primul cuplu de trandafiri cu propriile mâini poate să nu iasă imediat, dar apoi lucrul va semăna cu o bandă transportoare.
Cum să faci trandafiri pentru topiară (videoclip MK)
Topiar DIY din panglici: flori, master class nr. 2
De asemenea, puteți face flori cu petale îndreptate spre exterior, ca un mușețel. Dacă faceți topiare din panglici pentru un eveniment vesel, poate pentru ziua de naștere a unui copil sau a unei adolescente, această clasă de master va fi exact la timp.

Instrucțiuni cu sfaturi pas cu pas:
- Luați panglici de satin de diferite culori, puteți avea chiar și un model;
- Tăiați banda în lungimi egale;
- Puteți face baza unei flori din două cercuri de pâslă;
- Îndoiți o bucată de panglică în jumătate și introduceți cele două capete deschise în mijloc între cercurile de pâslă;
- Faceți acest lucru cu fiecare petală și o puteți fixa în miezul de pâslă folosind un pistol termic sau pur și simplu o cusați;
- Petalele pot fi multicolore sau simple, totul depinde de ce fel de topiară doriți să obțineți în cele din urmă.

Un MK alternativ vă va arăta cum altfel puteți face flori pentru topiară.
Flori din panglici pentru topiară (clasa de master foto pas cu pas)


O astfel de floare poate deveni un punct culminant în topiarea dvs., elementele rămase pot fi simplificate.
Topiară cu panglică: cum să faci o floarea soarelui
Acest MK implică, de asemenea, multe variații. Cel mai adesea este o combinație de materiale, cum ar fi panglici și boabe de cafea. Această opțiune DIY este probabil cea mai populară.
Nu este atât de greu de făcut. Veți avea nevoie de o panglică galbenă din satin suficient de lată. Din el trebuie să tăiați cel puțin 20 de petale identice. Pentru a preveni căderea materialului, va trebui să fie topită peste o flacără, dar numai împreună cu elementele de fixare.

Faptul este că nu tăiați doar petale ovale, totul este puțin mai complicat.
Pentru a face o petală de floarea soarelui aveți nevoie:
- Luați o bucată de 15 cm lungime și îndoiți-o în jumătate;
- Îndoiți-l astfel încât atunci când conectați capetele să obțineți o buclă;
- Când se topesc, capetele nu numai că nu se vor sfărâma, ci vor fi și ținute împreună.

Miezul îl faci singur din boabe de cafea. Le puteți lipi pe un fel de bază durabilă, cum ar fi pâslă sau carton obișnuit.
Floarea soarelui DIY făcută din panglici (video MK)
Topiary cu panglică: clasă de master de la început până la sfârșit
Așadar, este timpul să folosiți semințe de flori și, în sfârșit, să faceți acest copac înflorit suvenir.
După ce ați adunat toate materialele împreună, puteți începe prin a face baza pentru coroană. Să presupunem că decizi să nu faci această minge de bază cu propriile mâini, ci să folosești un semifabricat de spumă. Grozav, economisește timp. Dar dacă nu găsiți un astfel de gol, luați cele mai obișnuite ziare, fire și lipici. Faceți o minge de ziar, cântăriți-o cu lipici și înfășurați-o cu ata până arată ca o minge. Baza este gata!

- Bila de ziar trebuie vopsită pentru a se potrivi cu culoarea trandafirilor, a margaretelor, etc.;
- Într-unul dintre locurile mingii, faceți o gaură pentru butoi;
- Puteți introduce imediat trunchiul în minge, fixați ramura sau lipiți cu lipici fierbinte;
- Țineți butoiul în minge pentru un timp, nu lăsați până nu „prinde” bine;
- Acum, întreaga structură poate fi decorată - înfășurați portbagajul cu o panglică de satin sau o împletitură decorativă, fără a vă abate de la schema generală de culori;
- Fixați capetele benzii sau împletiturii cu lipici;
- A sosit momentul să atașați florile, lipiciul fierbinte și un pistol cu lipici fierbinte vă vor ajuta să faceți acest lucru cu atenție, atașați astfel încât golurile să fie cât mai invizibile;
- Rezultatul este un trunchi cu coroana care trebuie plantat undeva;
- Puteți cumpăra un ghiveci frumos de la o florărie și nu va trebui să faceți nimic singur;
- Puteți decora orice recipient - înfășurați o ceașcă sau un pahar cu panglici de dantelă sau hârtie creponată, pictați-l cu vopsele acrilice, înfășurați-l cu fire de tricotat pentru a se potrivi cu coroana etc.;
- Acum turnați soluția de gips în oală și coborâți copacul acolo, țineți până când stă ferm și uniform în tencuială;
- Tot ce rămâne este decorul de finisare - decorați stratul superior de ipsos cu pietre artificiale transparente, care strălucesc atât de frumos la soare.

Puteți planta o figurină de gărgăriță sau fluture pe una dintre flori. Totul este gata, ați făcut o topiară delicată cu propriile mâini din panglici de satin, demnă de un cadou și cel mai bun decor pentru camera unei fete.
Topiary cu panglică: faceți-o pas cu pas (video)
Amintiți-vă că topiaria este considerată un copac al fericirii, ceea ce înseamnă că prin creșterea unui copac în acest mod artizanal, creați. Și orice muncă creativă este legată de gânduri, dorințe și forțe spirituale. Pune-ți o dorință, iar copacul tău poate ajuta la realizarea acesteia.
Topiară cu panglică (foto)